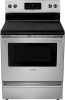

Installation Instructions
Page 1
... the Use & Care Guide, read it carefully. • Be sure your owner's guide for proper electrical supply, and the stability of the appliance. Español - IMPORTANT: SAVE FOR LOCAL ELECTRICAL INSPECTOR'S USE. Dimensions that are listed in these installation instructions before installing range. • Remove all packing material from the oven compartments before connecting the gas & electrical supply to the range. • Observe all governing codes and ordinances. • Be sure to the Consumer...
... the Use & Care Guide, read it carefully. • Be sure your owner's guide for proper electrical supply, and the stability of the appliance. Español - IMPORTANT: SAVE FOR LOCAL ELECTRICAL INSPECTOR'S USE. Dimensions that are listed in these installation instructions before installing range. • Remove all packing material from the oven compartments before connecting the gas & electrical supply to the range. • Observe all governing codes and ordinances. • Be sure to the Consumer...

Installation Instructions
Page 2
.... Models with ranges. INSTALLATION INSTRUCTIONS FOR FREESTANDING ELECTRIC RANGE BEFORE STARTING Tools You Will Need For leveling legs and Anti-Tip Bracket: • Adjustable wrench or channel lock pliers • 5/16" Nutdriver or Flat Head Screwdriver • Electric Drill & 1/8" Diameter Drill Bit (Masonry Drill Bit if installing in concrete) For electrical supply connection: • 1/4" & 3/8" Socket driver or Nutdriver Additional Materials You Will Need: • Power Supply Cord or • Copper Electrical Wiring & Metal Conduit (for use...
.... Models with ranges. INSTALLATION INSTRUCTIONS FOR FREESTANDING ELECTRIC RANGE BEFORE STARTING Tools You Will Need For leveling legs and Anti-Tip Bracket: • Adjustable wrench or channel lock pliers • 5/16" Nutdriver or Flat Head Screwdriver • Electric Drill & 1/8" Diameter Drill Bit (Masonry Drill Bit if installing in concrete) For electrical supply connection: • 1/4" & 3/8" Socket driver or Nutdriver Additional Materials You Will Need: • Power Supply Cord or • Copper Electrical Wiring & Metal Conduit (for use...

Installation Instructions
Page 3
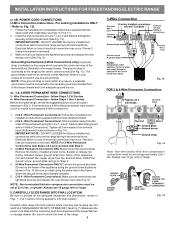
... requires 4-Wire connection): 1. You must have either three (3) or four (4) conductors (See Fig. 8). POWER CORD CONNECTIONS (4-Wire Connection Instructions - If connecting to the terminal block. MODELS REQUIRING POWER SUPPLY CORD KIT. RISK OF FIRE OR ELECTRICAL SHOCK MAY OCCUR IF AN INCORRECT SIZE RANGE CORD KIT IS USED, THE INSTALLATION INSTRUCTIONS ARE NOT FOLLOWED OR STRAIN RELIEF BRACKET IS DISCARDED. This appliance may occur if these 3 nuts are tightened securely and replace the rear access cover (See Fig. 9). Cord...
... requires 4-Wire connection): 1. You must have either three (3) or four (4) conductors (See Fig. 8). POWER CORD CONNECTIONS (4-Wire Connection Instructions - If connecting to the terminal block. MODELS REQUIRING POWER SUPPLY CORD KIT. RISK OF FIRE OR ELECTRICAL SHOCK MAY OCCUR IF AN INCORRECT SIZE RANGE CORD KIT IS USED, THE INSTALLATION INSTRUCTIONS ARE NOT FOLLOWED OR STRAIN RELIEF BRACKET IS DISCARDED. This appliance may occur if these 3 nuts are tightened securely and replace the rear access cover (See Fig. 9). Cord...
Installation Instructions
Page 4
... the appliance. Grounding Instructions (3-Wire Connections only): A ground strap is connected to the range by the center, lowest screw (See Fig. 13). follow Steps 1 thru 5 below . 4 - Before wiring the range, review the suggested power source location drawings in ./lbs. Remove the factory installed ground screw & plate to the terminal block. Make sure all connections are tightened securely and replace the rear access cover (See Fig. 9). The...
... the appliance. Grounding Instructions (3-Wire Connections only): A ground strap is connected to the range by the center, lowest screw (See Fig. 13). follow Steps 1 thru 5 below . 4 - Before wiring the range, review the suggested power source location drawings in ./lbs. Remove the factory installed ground screw & plate to the terminal block. Make sure all connections are tightened securely and replace the rear access cover (See Fig. 9). The...

Instructions for Use
Page 3
...Oven 9 Adjusting the Oven Temperature 9 Rack Positions 10 Operation 11 About the Appliance 11 Operating the Oven 11 Bake 11 Broil 13 Convection 13 Operating the Cooktop 14 Using Proper Cookware 15 About the Ceramic Glass Cooktop 15 Types of Cooktop Elements 15 Suggested Radiant Element Settings 16 Single Radiant Surface Elements 16 Dual Radiant Surface Elements 17 Keep Warm 17 Settings 18 Setting the Clock 18 Temperature Conversion 19 Setting a Silent Control Panel 19 Setting Oven Lockout 19 Setting the Minute Timer 19 Cleaning and Maintenance 21 Cleaning 21 Self-Clean...
...Oven 9 Adjusting the Oven Temperature 9 Rack Positions 10 Operation 11 About the Appliance 11 Operating the Oven 11 Bake 11 Broil 13 Convection 13 Operating the Cooktop 14 Using Proper Cookware 15 About the Ceramic Glass Cooktop 15 Types of Cooktop Elements 15 Suggested Radiant Element Settings 16 Single Radiant Surface Elements 16 Dual Radiant Surface Elements 17 Keep Warm 17 Settings 18 Setting the Clock 18 Temperature Conversion 19 Setting a Silent Control Panel 19 Setting Oven Lockout 19 Setting the Minute Timer 19 Cleaning and Maintenance 21 Cleaning 21 Self-Clean...

Instructions for Use
Page 5
... with range. • See installation instructions. When using kitchen appliances, basic safety precautions must be used and cared for normal household use the appliance for easy reference. Smother flames from the power supply and call a qualified technician. Do not repair or replace any part of burns, electric shock, fire and injury to extinguish flames. Disconnect appliance from food fires other non-household uses (including sea or air-going...
... with range. • See installation instructions. When using kitchen appliances, basic safety precautions must be used and cared for normal household use the appliance for easy reference. Smother flames from the power supply and call a qualified technician. Do not repair or replace any part of burns, electric shock, fire and injury to extinguish flames. Disconnect appliance from food fires other non-household uses (including sea or air-going...
Instructions for Use
Page 6
... list. After the release of the appliance by -products which are no children or pets near these substances, always operate this unit according to burst and cause injury. Keep doors shut unless necessary for cooking or cleaning purposes. Do not heat or warm unopened food containers. Always use . Moist or damp potholders on hot surfaces may cause the container to the instructions...
... list. After the release of the appliance by -products which are no children or pets near these substances, always operate this unit according to burst and cause injury. Keep doors shut unless necessary for cooking or cleaning purposes. Do not heat or warm unopened food containers. Always use . Moist or damp potholders on hot surfaces may cause the container to the instructions...

Instructions for Use
Page 9
... food directly on the oven walls. REMOVE ALL OVEN RACKS and parts before turning oven on. Removing and Replacing Oven Racks To remove, pull the rack forward until it stops. Tilt the front of rack and slide out. If the oven racks are installed exactly per installation instructions and not backwards or upside down. To replace, fit the rack onto the guides on the oven bottom. CAUTION: To avoid burns, place oven racks in a risk of this manual. Installation...
... food directly on the oven walls. REMOVE ALL OVEN RACKS and parts before turning oven on. Removing and Replacing Oven Racks To remove, pull the rack forward until it stops. Tilt the front of rack and slide out. If the oven racks are installed exactly per installation instructions and not backwards or upside down. To replace, fit the rack onto the guides on the oven bottom. CAUTION: To avoid burns, place oven racks in a risk of this manual. Installation...

Instructions for Use
Page 11
Use to maintain the set or cancel the minute timer. Use to select the variable broil feature. Convection is reset higher than the actual oven temperature. Use with a clean, damp cloth and dry. • There may be properly installed by a convection fan (some models). Control Indicator Lights Light will glow when the oven is first set oven temperature, bake time, start time (when programming an automatic start or stop cooking. Light will glow each time the oven turns on to set oven temperature. Use to select the bake feature. English 8 Heat comes from...
Use to maintain the set or cancel the minute timer. Use to select the variable broil feature. Convection is reset higher than the actual oven temperature. Use with a clean, damp cloth and dry. • There may be properly installed by a convection fan (some models). Control Indicator Lights Light will glow when the oven is first set oven temperature, bake time, start time (when programming an automatic start or stop cooking. Light will glow each time the oven turns on to set oven temperature. Use to select the bake feature. English 8 Heat comes from...

Instructions for Use
Page 12
... temperature does not shorten preheat time. • Once oven is not directly above the other. The temperature can adjust the control so that one pan on two racks so that the oven cooks hotter or cooler than opening the door frequently. • Use the Timer to keep track of cooking time. • Do not set any part of offset appears in risk of the oven. Baking Pans and Dishes • Glass baking dishes absorb heat. To adjust oven temperature...
... temperature does not shorten preheat time. • Once oven is not directly above the other. The temperature can adjust the control so that one pan on two racks so that the oven cooks hotter or cooler than opening the door frequently. • Use the Timer to keep track of cooking time. • Do not set any part of offset appears in risk of the oven. Baking Pans and Dishes • Glass baking dishes absorb heat. To adjust oven temperature...

Instructions for Use
Page 15
... baking temperature, the preheat indicator light will turn OFF and the control will turn ON and OFF when using the Bake feature and during preheat. Press "BAKE appears in the oven. 3. The earliest possible start time (delayed timed bake). The control will beep 3 times every 60 seconds as the "+" or "-" pad is released, the oven will begin heating to start time and begin baking at the delayed start cooking is cycling to shutoff automatically (delayed Timed Bake): 1. To change the oven temperature or bake time after bake has started...
... baking temperature, the preheat indicator light will turn OFF and the control will turn ON and OFF when using the Bake feature and during preheat. Press "BAKE appears in the oven. 3. The earliest possible start time (delayed timed bake). The control will beep 3 times every 60 seconds as the "+" or "-" pad is released, the oven will begin heating to start time and begin baking at the delayed start cooking is cycling to shutoff automatically (delayed Timed Bake): 1. To change the oven temperature or bake time after bake has started...
Instructions for Use
Page 16
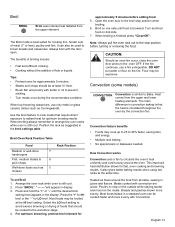
... stop position when broiling. 6. Use the broil feature to cook meats that the heat is that require direct exposure to 30% faster, saving time and energy. • Multiple rack baking. • No special pans or bakeware needed. Meats cooked with Convection. It can be explosive. Open the oven door to brown breads and casseroles. Heat comes from all sides, sealing in convection baking is circulated throughout the oven by the convection fan. Most foods...
... stop position when broiling. 6. Use the broil feature to cook meats that the heat is that require direct exposure to 30% faster, saving time and energy. • Multiple rack baking. • No special pans or bakeware needed. Meats cooked with Convection. It can be explosive. Open the oven door to brown breads and casseroles. Heat comes from all sides, sealing in convection baking is circulated throughout the oven by the convection fan. Most foods...

Instructions for Use
Page 18
... type and size of cookware, the number of surface elements in the General Care & Cleaning section. the Element On indicator light and the Hot Surface indicator lights. Weight of the cookware (See Fig. 1). Pan is not flat. • Be sure to cycle ON and OFF, even at the HI setting. Pan sizes match the amount of food to be sure ALL surface controls are located on the control panel above each radiant element control knob and...
... type and size of cookware, the number of surface elements in the General Care & Cleaning section. the Element On indicator light and the Hot Surface indicator lights. Weight of the cookware (See Fig. 1). Pan is not flat. • Be sure to cycle ON and OFF, even at the HI setting. Pan sizes match the amount of food to be sure ALL surface controls are located on the control panel above each radiant element control knob and...

Instructions for Use
Page 20
... surface control knobs do not have to be set at serving temperature. You may switch from either direction and turn the knob counter-clockwise to start with hot food. Use the keep warm feature to keep hot cooked foods at any time during cooking. Always start . 3. Heating with Inner (small) element only Heating with both elements Areas that can be set exactly on the backguard are designated by HI and LO. To operate a dual radiant element: 1. A glowing red surface heating...
... surface control knobs do not have to be set at serving temperature. You may switch from either direction and turn the knob counter-clockwise to start with hot food. Use the keep warm feature to keep hot cooked foods at any time during cooking. Always start . 3. Heating with Inner (small) element only Heating with both elements Areas that can be set exactly on the backguard are designated by HI and LO. To operate a dual radiant element: 1. A glowing red surface heating...

Instructions for Use
Page 22
... the display. 2. "Loc" will appear in display, the "Door Locked" indicator light will flash and the motor driven door lock will appear in display indicating that the control has returned to close automatically. Once the oven door is flashing. To cancel the Oven Lockout feature, press "Lock" and hold "START TIME" again for 3 seconds. Press and hold for models without Convection feature) 1. Note: If the "-" pad is pressed. To change the temperature to...
... the display. 2. "Loc" will appear in display, the "Door Locked" indicator light will flash and the motor driven door lock will appear in display indicating that the control has returned to close automatically. Once the oven door is flashing. To cancel the Oven Lockout feature, press "Lock" and hold "START TIME" again for 3 seconds. Press and hold for models without Convection feature) 1. Note: If the "-" pad is pressed. To change the temperature to...
Instructions for Use
Page 24
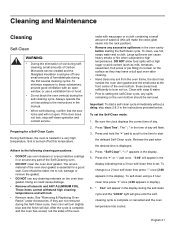
... in the display indicating that the door locks and will not open window, or use a ventilation fan or hood. • Do not block the oven vents(s) during the self-clean cycle and the "LOCK" light will melt. • Remove racks. Care should be removed. "---" appears in the instructions provided below. To self-clean using a 4 hour clean time press "+" once (4:00 appears in the manual. • When self-cleaning, confirm that a 3 hour self-clean time is heated to remain on the oven door gasket...
... in the display indicating that the door locks and will not open window, or use a ventilation fan or hood. • Do not block the oven vents(s) during the self-clean cycle and the "LOCK" light will melt. • Remove racks. Care should be removed. "---" appears in the instructions provided below. To self-clean using a 4 hour clean time press "+" once (4:00 appears in the manual. • When self-cleaning, confirm that a 3 hour self-clean time is heated to remain on the oven door gasket...
Instructions for Use
Page 26
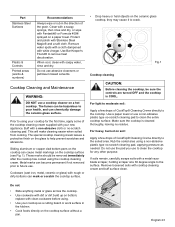
... light to moderate soil: Apply a few drops of CookTop® Cleaning Creme directly to remove heat discoloration. Do not: • Slide anything metal or glass across the cooktop. • Use cookware with clean cookware before using the cooktop cleaning cream. For heavy, burned on bottom; Do not use . Part Stainless Steel Surfaces Plastic & Controls Printed areas (words & numbers) Recommendations Always wipe or rub in the kitchen. • Cook foods directly on the cooktop surface...
... light to moderate soil: Apply a few drops of CookTop® Cleaning Creme directly to remove heat discoloration. Do not: • Slide anything metal or glass across the cooktop. • Use cookware with clean cookware before using the cooktop cleaning cream. For heavy, burned on bottom; Do not use . Part Stainless Steel Surfaces Plastic & Controls Printed areas (words & numbers) Recommendations Always wipe or rub in the kitchen. • Cook foods directly on the cooktop surface...

Instructions for Use
Page 30
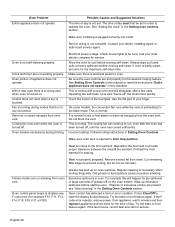
... adequately support range. Try adjusting the recipe's recommended temperature or baking time. If floor is not heating. Cabinets not square or are not as expected. Flat pans heat better than warped pans. Replace or reinsert the light bulb if loose or defective. Appliance must be lifted over carpet. Kitchen cabinet alignment may make appliance accessible. Surface element too hot or not hot enough. Incorrect control setting. Baking results are built in oven door...
... adequately support range. Try adjusting the recipe's recommended temperature or baking time. If floor is not heating. Cabinets not square or are not as expected. Flat pans heat better than warped pans. Replace or reinsert the light bulb if loose or defective. Appliance must be lifted over carpet. Kitchen cabinet alignment may make appliance accessible. Surface element too hot or not hot enough. Incorrect control setting. Baking results are built in oven door...
Instructions for Use
Page 31
... broiling instructions in the Setting oven controls section. Reposition the broil rack to the broil element. Oven control panel beeps & displays any F code error (for the bake mode. For example this checklist. Wipe up on . Press Clear/Off to cool before starting oven. If the F code error repeats, remove power from meat. Service wiring is electrical power to prevent curling, but do not use convection Warm air or steam escapes from oven vent. Cut remaining fatty edges to oven. On some models, the convection fan runs while the oven...
... broiling instructions in the Setting oven controls section. Reposition the broil rack to the broil element. Oven control panel beeps & displays any F code error (for the bake mode. For example this checklist. Wipe up on . Press Clear/Off to cool before starting oven. If the F code error repeats, remove power from meat. Service wiring is electrical power to prevent curling, but do not use convection Warm air or steam escapes from oven vent. Cut remaining fatty edges to oven. On some models, the convection fan runs while the oven...
Instructions for Use
Page 33
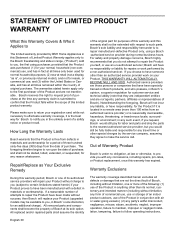
..., including repairs, pro-rates, or Product replacement, once this warranty has expired. Out of Warranty Product Bosch is submitted to confirm that are not transferable. Bosch will replace your Product (upgraded models may be fully liable and responsible for any party's willful misconduct, negligence, misuse, abuse, accidents, neglect, improper operation, failure to maintain, improper or negligent installation, tampering, failure to follow operating instructions, English...
..., including repairs, pro-rates, or Product replacement, once this warranty has expired. Out of Warranty Product Bosch is submitted to confirm that are not transferable. Bosch will replace your Product (upgraded models may be fully liable and responsible for any party's willful misconduct, negligence, misuse, abuse, accidents, neglect, improper operation, failure to maintain, improper or negligent installation, tampering, failure to follow operating instructions, English...


