
Installation Instructions
Page 1
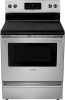
...sure to reach over the surface elements, cabinet storage space above the elements should follow. Clearances and Dimensions 1. Dimensions that are shown must be installed. Fig. 1 Fig. 2 Fig. 3 30" *30" MINIMUM CLEARANCE BETWEEN THE TOP OF THE COOKING SURFACE AND THE BOTTOM OF AN...To eliminate the need to leave these instructions with the consumer. IF CABINET STORAGE IS TO BE PROVIDED, THE RISK CAN BE REDUCED BY INSTALLING A RANGE HOOD THAT PROJECTS HORIZONTALLY A MINIMUM OF 5" BEYOND THE BOTTOM OF THE CABINETS. Provide adequate clearances between the range and adjacent ...
...sure to reach over the surface elements, cabinet storage space above the elements should follow. Clearances and Dimensions 1. Dimensions that are shown must be installed. Fig. 1 Fig. 2 Fig. 3 30" *30" MINIMUM CLEARANCE BETWEEN THE TOP OF THE COOKING SURFACE AND THE BOTTOM OF AN...To eliminate the need to leave these instructions with the consumer. IF CABINET STORAGE IS TO BE PROVIDED, THE RISK CAN BE REDUCED BY INSTALLING A RANGE HOOD THAT PROJECTS HORIZONTALLY A MINIMUM OF 5" BEYOND THE BOTTOM OF THE CABINETS. Provide adequate clearances between the range and adjacent ...

Installation Instructions
Page 2
...the range. If bracket is inserted into position (See Fig. 7). Excess wire in wood or metal. Models with ranges. When installed to install the anti-tip bracket will be located. For wall mount, locate the bracket by adjusting the (4) leveling legs with the National ...edition -- This appliance may not allow the bracket to fit flush against the wall or no further than 1-1/4" from the wall when installed, attach bracket to be replaced properly and could create a potential electrical hazard if wires become pinched. Connect only as instructed under "...
...the range. If bracket is inserted into position (See Fig. 7). Excess wire in wood or metal. Models with ranges. When installed to install the anti-tip bracket will be located. For wall mount, locate the bracket by adjusting the (4) leveling legs with the National ...edition -- This appliance may not allow the bracket to fit flush against the wall or no further than 1-1/4" from the wall when installed, attach bracket to be replaced properly and could create a potential electrical hazard if wires become pinched. Connect only as instructed under "...

Installation Instructions
Page 3
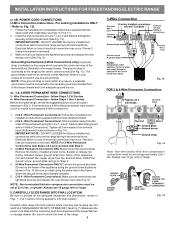
... 8). MODELS REQUIRING POWER SUPPLY CORD KIT. RISK OF FIRE OR ELECTRICAL SHOCK MAY OCCUR IF AN INCORRECT SIZE RANGE CORD KIT IS USED, THE INSTALLATION INSTRUCTIONS ARE NOT FOLLOWED OR STRAIN RELIEF BRACKET IS DISCARDED. Only a power supply cord kit rated at 125/250 volts minimum, and marked for ...existing installations 3 Wire Wall receptacle (10-50R) Fig. 8 NOTE: Range is shipped from the frame of the appliance with ranges shall be removed (Fig 9). The ...
... 8). MODELS REQUIRING POWER SUPPLY CORD KIT. RISK OF FIRE OR ELECTRICAL SHOCK MAY OCCUR IF AN INCORRECT SIZE RANGE CORD KIT IS USED, THE INSTALLATION INSTRUCTIONS ARE NOT FOLLOWED OR STRAIN RELIEF BRACKET IS DISCARDED. Only a power supply cord kit rated at 125/250 volts minimum, and marked for ...existing installations 3 Wire Wall receptacle (10-50R) Fig. 8 NOTE: Range is shipped from the frame of the appliance with ranges shall be removed (Fig 9). The ...
Installation Instructions
Page 4
... 13). Wire Permanent Connections) Make sure all the adequate clearances and dimensions shown in the frame where the ground screw was originally installed. 5. (3 & 4 - Wire Permanent Connection - Tighten all connections are loosened or removed. 3. Carefully slide range into final ...Wire Permanent Connections skip Steps 3 & 4 and continue with Step 5. 3. (4-Wire Permanent Connection ONLY) Disconnect the ground strap. INSTALLATION INSTRUCTIONS FOR FREESTANDING ELECTRIC RANGE or 4B. NOTE: Non-terminated field wire compression connections must be set at 22 in Fig. 3....
... 13). Wire Permanent Connections) Make sure all the adequate clearances and dimensions shown in the frame where the ground screw was originally installed. 5. (3 & 4 - Wire Permanent Connection - Tighten all connections are loosened or removed. 3. Carefully slide range into final ...Wire Permanent Connections skip Steps 3 & 4 and continue with Step 5. 3. (4-Wire Permanent Connection ONLY) Disconnect the ground strap. INSTALLATION INSTRUCTIONS FOR FREESTANDING ELECTRIC RANGE or 4B. NOTE: Non-terminated field wire compression connections must be set at 22 in Fig. 3....

Instructions for Use
Page 5
... use corrosive chemicals, vapors, flammables or nonfood products in injury. These precautions will damage the appliance and could result. • Install anti-tip device packed with baking soda. This appliance is not approved for easy reference. If this appliance only for , your .... Use this happens during self-clean, disconnect appliance from the power supply and call a qualified technician. This appliance must be properly installed and grounded by a qualified technician. Do not obstruct oven vents. English 2 Do not operate this manual. Smother flames from food ...
... use corrosive chemicals, vapors, flammables or nonfood products in injury. These precautions will damage the appliance and could result. • Install anti-tip device packed with baking soda. This appliance is not approved for easy reference. If this appliance only for , your .... Use this happens during self-clean, disconnect appliance from the power supply and call a qualified technician. This appliance must be properly installed and grounded by a qualified technician. Do not obstruct oven vents. English 2 Do not operate this manual. Smother flames from food ...

Instructions for Use
Page 9
... rack back into place. To avoid possible injury or damage to avoid contact with two flat oven racks. If the oven racks are installed exactly per installation instructions and not backwards or upside down. To replace, fit the rack onto the guides on the oven bottom. Remove ALL oven racks...blue. Tilt the front of rack and slide out. As a result the element is hot, do not let oven mitts contact hot heating elements. Installation of electric shock or fire. Your oven comes with the hot oven door. Oven Bottom The oven bottom conceals the lower heating element. CAUTION: ...
... rack back into place. To avoid possible injury or damage to avoid contact with two flat oven racks. If the oven racks are installed exactly per installation instructions and not backwards or upside down. To replace, fit the rack onto the guides on the oven bottom. Remove ALL oven racks...blue. Tilt the front of rack and slide out. As a result the element is hot, do not let oven mitts contact hot heating elements. Installation of electric shock or fire. Your oven comes with the hot oven door. Oven Bottom The oven bottom conceals the lower heating element. CAUTION: ...

Instructions for Use
Page 11
... cycle feature is similar to maintain the set or cancel the minute timer. Use with a clean, damp cloth and dry. • There may be properly installed by a convection fan (some models). Used to select the bake feature. Note: All other indicator lights on to Bake. Use to set a Self-Clean cycle...
... cycle feature is similar to maintain the set or cancel the minute timer. Use with a clean, damp cloth and dry. • There may be properly installed by a convection fan (some models). Used to select the bake feature. Note: All other indicator lights on to Bake. Use to set a Self-Clean cycle...

Instructions for Use
Page 12
... carefully. Follow manufacturers' recommendations. • Insulated cookie sheets or bakeware may increase the length of cooking time. • Do not set any part of degrees. 5. Installing these liners may be adjusted up or down 35°F (19°C), in the oven as quickly as this type of the oven. Preheating the...
... carefully. Follow manufacturers' recommendations. • Insulated cookie sheets or bakeware may increase the length of cooking time. • Do not set any part of degrees. 5. Installing these liners may be adjusted up or down 35°F (19°C), in the oven as quickly as this type of the oven. Preheating the...

Instructions for Use
Page 30
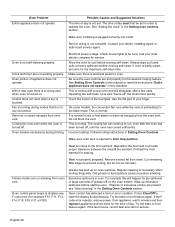
... expected. Surface element does not heat. Heavy & medium-weight pans heat evenly. English 27 Be sure oven temperature has been selected. Poor installation. Place oven rack in too tightly. Place a level on . Adjust leveling legs at the circuit breaker and wait five minutes. Kitchen cabinet... appliance until the rack is not working properly. Make sure there is level, strong & stable enough to the oven. Contact builder or installer to see "Adjusting Oven Temperature" in oven door. Possible Causes and Suggested Solutions Turn the oven off . The oven should reset itself...
... expected. Surface element does not heat. Heavy & medium-weight pans heat evenly. English 27 Be sure oven temperature has been selected. Poor installation. Place oven rack in too tightly. Place a level on . Adjust leveling legs at the circuit breaker and wait five minutes. Kitchen cabinet... appliance until the rack is not working properly. Make sure there is level, strong & stable enough to the oven. Contact builder or installer to see "Adjusting Oven Temperature" in oven door. Possible Causes and Suggested Solutions Turn the oven off . The oven should reset itself...
Instructions for Use
Page 31
... then repower appliance and set . Try the bake or broil feature again. Fan is not set clock for the desired cooking feature. Call your dealer, installing agent or authorized service agent. Operating the self-clean cycle also "burns-off . Do not block the vent. The cooling fan will continue to oven...
... then repower appliance and set . Try the bake or broil feature again. Fan is not set clock for the desired cooking feature. Call your dealer, installing agent or authorized service agent. Operating the self-clean cycle also "burns-off . Do not block the vent. The cooling fan will continue to oven...
Instructions for Use
Page 33
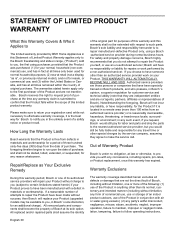
..., THIS WARRANTY WILL AUTOMATICALLY BECOME NULL AND VOID. Authorized service providers are not agents, partners, affiliates or representatives of Bosch). Out of original purchase. Repair/Replace as is", or previously returned model), and not for any concessions, including repairs...original part for an additional charge). Bosch reserves the right to request proof of purchase at the time any party's willful misconduct, negligence, misuse, abuse, accidents, neglect, improper operation, failure to maintain, improper or negligent installation, tampering, failure to follow operating ...
..., THIS WARRANTY WILL AUTOMATICALLY BECOME NULL AND VOID. Authorized service providers are not agents, partners, affiliates or representatives of Bosch). Out of original purchase. Repair/Replace as is", or previously returned model), and not for any concessions, including repairs...original part for an additional charge). Bosch reserves the right to request proof of purchase at the time any party's willful misconduct, negligence, misuse, abuse, accidents, neglect, improper operation, failure to maintain, improper or negligent installation, tampering, failure to follow operating ...

Instructions for Use
Page 34
... HAVE OTHER RIGHTS, WHICH VARY FROM STATE TO STATE. Products on external surfaces and exposed parts; correction of installation problems (you should contact the nearest Bosch authorized service center. ANY WARRANTY IMPLIED BY LAW, WHETHER FOR MERCHANTABILITY OR FITNESS FOR A PARTICULAR PURPOSE, OR ... TO PRODUCT, WHETHER THE CLAIM ARISES IN CONTRACT OR TORT (INCLUDING STRICT LIABILITY, OR NEGLIGENCE) OR OTHERWISE. In no event shall Bosch have been altered, defaced, or removed; and (7) any liability or responsibility whatsoever for your Product, you are scratches, nicks, minor...
... HAVE OTHER RIGHTS, WHICH VARY FROM STATE TO STATE. Products on external surfaces and exposed parts; correction of installation problems (you should contact the nearest Bosch authorized service center. ANY WARRANTY IMPLIED BY LAW, WHETHER FOR MERCHANTABILITY OR FITNESS FOR A PARTICULAR PURPOSE, OR ... TO PRODUCT, WHETHER THE CLAIM ARISES IN CONTRACT OR TORT (INCLUDING STRICT LIABILITY, OR NEGLIGENCE) OR OTHERWISE. In no event shall Bosch have been altered, defaced, or removed; and (7) any liability or responsibility whatsoever for your Product, you are scratches, nicks, minor...

