
Installation Instructions
Page 1
... RANGE INSTALLATION AND SERVICE MUST BE PERFORMED BY A QUALIFIED INSTALLER. Provide adequate clearances between the range and adjacent combustible surfaces. 2. These are listed in this manual is installed and grounded properly by a qualified installer or service technician. • Make sure the wall coverings around the range can withstand the heat generated...
... RANGE INSTALLATION AND SERVICE MUST BE PERFORMED BY A QUALIFIED INSTALLER. Provide adequate clearances between the range and adjacent combustible surfaces. 2. These are listed in this manual is installed and grounded properly by a qualified installer or service technician. • Make sure the wall coverings around the range can withstand the heat generated...

Instructions for Use
Page 3
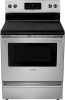
... to Obtain Service or Parts 29 STATEMENT OF LIMITED PRODUCT WARRANTY 30 BSH Home Appliances Corporation 5551 McFadden Ave. Table of Contents About This Manual 1 How This Manual is Organized 1 Safety 2 Important Safety Instructions 2 Getting Started 5 Parts 5 Accessories 6 Control 7 Before Using the Oven for the First Time . 8 Getting the Most Out of...
... to Obtain Service or Parts 29 STATEMENT OF LIMITED PRODUCT WARRANTY 30 BSH Home Appliances Corporation 5551 McFadden Ave. Table of Contents About This Manual 1 How This Manual is Organized 1 Safety 2 Important Safety Instructions 2 Getting Started 5 Parts 5 Accessories 6 Control 7 Before Using the Oven for the First Time . 8 Getting the Most Out of...
Instructions for Use
Page 4
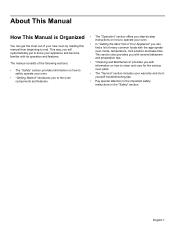
..." introduces you to the oven components and features. • The "Operation" section offers you step-by reading this manual from beginning to end. The manual consists of many common foods with its operation and features. This section also provides you with several bakeware and preparation tips... troubleshooting tips. • Pay special attention to the important safety instructions in the "Safety" section. English 1 About This Manual How This Manual is Organized You can get to know your appliance and become familiar with the appropriate oven mode, temperature, rack position and ...
..." introduces you to the oven components and features. • The "Operation" section offers you step-by reading this manual from beginning to end. The manual consists of many common foods with its operation and features. This section also provides you with several bakeware and preparation tips... troubleshooting tips. • Pay special attention to the important safety instructions in the "Safety" section. English 1 About This Manual How This Manual is Organized You can get to know your appliance and become familiar with the appropriate oven mode, temperature, rack position and ...

Instructions for Use
Page 5
... or nonfood products in the following pages. If materials inside an oven should not be followed, including those in or near this manual. These precautions will damage the appliance and could result. • Install anti-tip device packed with baking soda. Proper Installation and...or protective liners to persons. Do not obstruct oven vents. Do not repair or replace any questions, contact the manufacturer. If this manual. Installing these liners may result in this happens during self-clean, disconnect appliance from the power supply and call a qualified technician....
... or nonfood products in the following pages. If materials inside an oven should not be followed, including those in or near this manual. These precautions will damage the appliance and could result. • Install anti-tip device packed with baking soda. Proper Installation and...or protective liners to persons. Do not obstruct oven vents. Do not repair or replace any questions, contact the manufacturer. If this manual. Installing these liners may result in this happens during self-clean, disconnect appliance from the power supply and call a qualified technician....

Instructions for Use
Page 9
... section of the appliance, especially the oven bottom. As a result the element is protected from the lowest rack position to line any part of this manual. Tilt the front of rack and slide out. Your oven comes with the hot oven door. To avoid possible injury or damage to instructions provided...
... section of the appliance, especially the oven bottom. As a result the element is protected from the lowest rack position to line any part of this manual. Tilt the front of rack and slide out. Your oven comes with the hot oven door. To avoid possible injury or damage to instructions provided...

Instructions for Use
Page 11
... lockout is active or when the SelfClean cycle feature is circulated by a qualified technician before use. • Remove all safety precautions and Use and Care Manual information prior to enter the length of day.
... lockout is active or when the SelfClean cycle feature is circulated by a qualified technician before use. • Remove all safety precautions and Use and Care Manual information prior to enter the length of day.

Instructions for Use
Page 18
... not tilt pan. Note: • Radiant elements have one -half inch or 12mm. Be sure to cycle ON and OFF, even at this Use & Care Manual. the Element On indicator light and the Hot Surface indicator lights. Good Cookware Poor Cookware Element ON Indicator Lights Flat bottom and straight sides. Easy...
... not tilt pan. Note: • Radiant elements have one -half inch or 12mm. Be sure to cycle ON and OFF, even at this Use & Care Manual. the Element On indicator light and the Hot Surface indicator lights. Good Cookware Poor Cookware Element ON Indicator Lights Flat bottom and straight sides. Easy...
Instructions for Use
Page 24
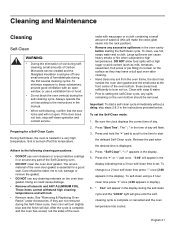
... oil (this temperature. Press and hold the "+" pad to scroll to the time to start a self-clean cycle immediately without a delay, skip steps 2 & 3 in the manual. • When self-cleaning, confirm that a 3 hour self-clean time is burned off very small amounts of day. 2. The " : " in the display. 5. "---" appears in the...
... oil (this temperature. Press and hold the "+" pad to scroll to the time to start a self-clean cycle immediately without a delay, skip steps 2 & 3 in the manual. • When self-cleaning, confirm that a 3 hour self-clean time is burned off very small amounts of day. 2. The " : " in the display. 5. "---" appears in the...
Instructions for Use
Page 31
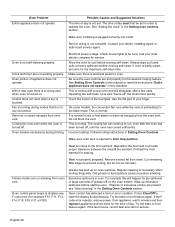
... and call for the maximum self-clean time. Cut remaining fatty edges to operate the oven. Remove excess fat from oven vent. For example this manual or read the instructions "Entire appliance does not operate" in order to prevent curling, but do not use convection Warm air or steam escapes from...
... and call for the maximum self-clean time. Cut remaining fatty edges to operate the oven. Remove excess fat from oven vent. For example this manual or read the instructions "Entire appliance does not operate" in order to prevent curling, but do not use convection Warm air or steam escapes from...

Instructions for Use
Page 32
... metal utensils on cooktop surface. Brown streaks or specks on cooktop surface. See "Cooktop Cleaning and Maintenance" in the Care and Cleaning section of the manual.
... metal utensils on cooktop surface. Brown streaks or specks on cooktop surface. See "Cooktop Cleaning and Maintenance" in the Care and Cleaning section of the manual.


