
Installation Instructions
Page 1
... AVOIDED. Important Notes to the Installer • Read all instructions contained in these installation instructions before installing range. • Remove all packing material from the oven compartments before connecting the gas & electrical supply to the range. • Observe all governing codes and ordinances. • Be sure to leave these instructions with...
... AVOIDED. Important Notes to the Installer • Read all instructions contained in these installation instructions before installing range. • Remove all packing material from the oven compartments before connecting the gas & electrical supply to the range. • Observe all governing codes and ordinances. • Be sure to leave these instructions with...

Instructions for Use
Page 3
... Radiant Surface Elements 17 Keep Warm 17 Settings 18 Setting the Clock 18 Temperature Conversion 19 Setting a Silent Control Panel 19 Setting Oven Lockout 19 Setting the Minute Timer 19 Cleaning and Maintenance 21 Cleaning 21 Self-Clean 21 Avoid These Cleaners 22 Cleaning Guide 22 ...Cooktop Cleaning and Maintenance 23 Maintenance 24 Replacing an Oven Light 24 Removing the Oven Door 25 Service 27 Before Calling Service 27 Troubleshooting Chart 27 Data Plate 29 How to hearing from you! Huntington Beach...
... Radiant Surface Elements 17 Keep Warm 17 Settings 18 Setting the Clock 18 Temperature Conversion 19 Setting a Silent Control Panel 19 Setting Oven Lockout 19 Setting the Minute Timer 19 Cleaning and Maintenance 21 Cleaning 21 Self-Clean 21 Avoid These Cleaners 22 Cleaning Guide 22 ...Cooktop Cleaning and Maintenance 23 Maintenance 24 Replacing an Oven Light 24 Removing the Oven Door 25 Service 27 Before Calling Service 27 Troubleshooting Chart 27 Data Plate 29 How to hearing from you! Huntington Beach...
Instructions for Use
Page 4
...attention to end. English 1 About This Manual How This Manual is Organized You can find a list of many common foods with the appropriate oven mode, temperature, rack position and bake time. This section also provides you with several bakeware and preparation tips. • "Cleaning and ...Maintenance" provides you step-by-step instructions on how to clean and care for the various oven parts. • The "Service" section includes your new oven by reading this manual from beginning to the important safety instructions in the "Safety" section. The manual consists...
...attention to end. English 1 About This Manual How This Manual is Organized You can find a list of many common foods with the appropriate oven mode, temperature, rack position and bake time. This section also provides you with several bakeware and preparation tips. • "Cleaning and ...Maintenance" provides you step-by-step instructions on how to clean and care for the various oven parts. • The "Service" section includes your new oven by reading this manual from beginning to the important safety instructions in the "Safety" section. The manual consists...

Instructions for Use
Page 5
... power supply and call a qualified technician. Never use the appliance for normal household use water on cooking fires. If materials inside an oven should not be properly installed and grounded by a qualified technician. These precautions will damage the appliance and could result. • Install... to a properly grounded outlet. See the Statement of electric shock or fire. If you the location of the appliance, especially the oven bottom. If this manual. When using kitchen appliances, basic safety precautions must be used and cared for outdoor or other non-household ...
... power supply and call a qualified technician. Never use the appliance for normal household use water on cooking fires. If materials inside an oven should not be properly installed and grounded by a qualified technician. These precautions will damage the appliance and could result. • Install... to a properly grounded outlet. See the Statement of electric shock or fire. If you the location of the appliance, especially the oven bottom. If this manual. When using kitchen appliances, basic safety precautions must be used and cared for outdoor or other non-household ...
Instructions for Use
Page 6
... container to climb, stand, lean, sit, or hang on the backsplash. Burn Prevention DO NOT TOUCH HEATING ELEMENTS OR INTERIOR SURFACES OF OVEN - Heating elements may tip over, potentially causing severe injury. Interior surfaces of the appliance may result in safe operation of hot air and...businesses to warn customers of soil during self-cleaning can damage the appliance, and the unit may be left alone or unattended in the oven. Do not let potholder touch hot heating elements. Secure all loose garments, etc. This can generate some by qualified persons. Children ...
... container to climb, stand, lean, sit, or hang on the backsplash. Burn Prevention DO NOT TOUCH HEATING ELEMENTS OR INTERIOR SURFACES OF OVEN - Heating elements may tip over, potentially causing severe injury. Interior surfaces of the appliance may result in safe operation of hot air and...businesses to warn customers of soil during self-cleaning can damage the appliance, and the unit may be left alone or unattended in the oven. Do not let potholder touch hot heating elements. Secure all loose garments, etc. This can generate some by qualified persons. Children ...
Instructions for Use
Page 7
...birds. Do not clean parts or accessories in the self-clean oven. If the door does not lock, stop self clean operation and contact service. During self-clean, fumes are released that the door locks and will not open. Keep oven free from grease build up. Cookware Safety Do not place ...food directly on oven bottom. Birds have very sensitive respiratory systems. Keep pet birds out of the kitchen or other rooms where ...
...birds. Do not clean parts or accessories in the self-clean oven. If the door does not lock, stop self clean operation and contact service. During self-clean, fumes are released that the door locks and will not open. Keep oven free from grease build up. Cookware Safety Do not place ...food directly on oven bottom. Birds have very sensitive respiratory systems. Keep pet birds out of the kitchen or other rooms where ...
Instructions for Use
Page 8
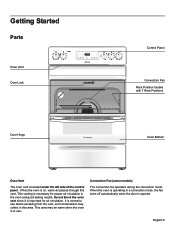
... from the vent, and condensation may be warm when the oven is opened. This venting is on, warm air passes through this area. When the oven is necessary for air circulation. Getting Started Parts Oven Vent Door Lock Control Panel Convection Fan Rack Position Guides with... 7 Rack Positions Door Hinge Oven Bottom Oven Vent The oven vent is operating in the oven and good baking results. When the oven is located under...
... from the vent, and condensation may be warm when the oven is opened. This venting is on, warm air passes through this area. When the oven is necessary for air circulation. Getting Started Parts Oven Vent Door Lock Control Panel Convection Fan Rack Position Guides with... 7 Rack Positions Door Hinge Oven Bottom Oven Vent The oven vent is operating in the oven and good baking results. When the oven is located under...

Instructions for Use
Page 9
... and will be moved while the oven is hot, do not let oven mitts contact hot heating elements. Installation of the oven rack system will cause all oven racks to the appliance, ensure racks are left in the oven and remain in the oven cavity for all cooking needs. Use... result in desired positions before starting a self-clean cycle. REMOVE ALL OVEN RACKS and parts before turning oven on. Removing and Replacing Oven Racks To remove, pull the rack forward until it stops. Oven Bottom The oven bottom conceals the lower heating element. To avoid possible injury or damage ...
... and will be moved while the oven is hot, do not let oven mitts contact hot heating elements. Installation of the oven rack system will cause all oven racks to the appliance, ensure racks are left in the oven and remain in the oven cavity for all cooking needs. Use... result in desired positions before starting a self-clean cycle. REMOVE ALL OVEN RACKS and parts before turning oven on. Removing and Replacing Oven Racks To remove, pull the rack forward until it stops. Oven Bottom The oven bottom conceals the lower heating element. To avoid possible injury or damage ...

Instructions for Use
Page 10
Control 300 Series (models without convection bake) 500 Series (models with convection bake) Oven Light Clock Cook Time Self Timer Start Clean On/Off Time 12 : 00 Oven Preheat Door Locked Bake Broil Clear /Off Convection English 7
Control 300 Series (models without convection bake) 500 Series (models with convection bake) Oven Light Clock Cook Time Self Timer Start Clean On/Off Time 12 : 00 Oven Preheat Door Locked Bake Broil Clear /Off Convection English 7

Instructions for Use
Page 11
...time, start time (when programming an automatic start or stop cooking. Control Indicator Lights Light will glow when the oven is reset higher than the actual oven temperature. English 8 Use to set oven temperature. Use with a clean, damp cloth and dry. • There may be properly installed by a ...by a qualified technician before use. • Remove all safety precautions and Use and Care Manual information prior to turn the interior oven light ON or OFF. The minute timer does not start time), setting or adjusting the clock and minute timer. Door Lock icon pad...
...time, start time (when programming an automatic start or stop cooking. Control Indicator Lights Light will glow when the oven is reset higher than the actual oven temperature. English 8 Use to set oven temperature. Use with a clean, damp cloth and dry. • There may be properly installed by a ...by a qualified technician before use. • Remove all safety precautions and Use and Care Manual information prior to turn the interior oven light ON or OFF. The minute timer does not start time), setting or adjusting the clock and minute timer. Door Lock icon pad...

Instructions for Use
Page 12
... guide you have made the desired adjustment, press "Clear/Off" to go back to the time of the appliance, especially the oven bottom. When baking four cake layers at high altitudes, recipes and cooking times will vary. Follow manufacturers' recommendations. • Insulated... Extension Service, Colorado State University, Fort Collins, Colorado 80521. See Baking Layer Cakes with 1 or 2 racks. Press "BAKE". 2. Adjusting the Oven Temperature Your appliance has been factory calibrated and tested to 1 ½" of cooking times. • High Altitude Baking • When cooking at ...
... guide you have made the desired adjustment, press "Clear/Off" to go back to the time of the appliance, especially the oven bottom. When baking four cake layers at high altitudes, recipes and cooking times will vary. Follow manufacturers' recommendations. • Insulated... Extension Service, Colorado State University, Fort Collins, Colorado 80521. See Baking Layer Cakes with 1 or 2 racks. Press "BAKE". 2. Adjusting the Oven Temperature Your appliance has been factory calibrated and tested to 1 ½" of cooking times. • High Altitude Baking • When cooking at ...

Instructions for Use
Page 13
...glass shield must be in place whenever the oven is covered with a glass shield held by a wire holder. Press "Oven Light" to evaporate from the food during any surface cooler than the inside of the oven, such as the control panel. The interior oven light is located at the upper left rear... wall of the oven interior and is in the Maintenance section. To change the interior oven light, see Replacing an Oven Light in use. The moisture may condense...
...glass shield must be in place whenever the oven is covered with a glass shield held by a wire holder. Press "Oven Light" to evaporate from the food during any surface cooler than the inside of the oven, such as the control panel. The interior oven light is located at the upper left rear... wall of the oven interior and is in the Maintenance section. To change the interior oven light, see Replacing an Oven Light in use. The moisture may condense...

Instructions for Use
Page 14
... rack positions 2 and 5, for more info. The factory preset automatic bake temperature is very convenient and easy to periodically check food for oven temperature and baking time. To set at the touch of food items, from pastries to recipe or package directions for doneness instead of opening... the door. The cooking mode and temperature can be adjusted with at any temperature from the oven by using a convection mode. Tips • Preheat the oven if the recipe recommends it. • Baking time will lengthen the cook time for most important information while ...
... rack positions 2 and 5, for more info. The factory preset automatic bake temperature is very convenient and easy to periodically check food for oven temperature and baking time. To set at the touch of food items, from pastries to recipe or package directions for doneness instead of opening... the door. The cooking mode and temperature can be adjusted with at any temperature from the oven by using a convection mode. Tips • Preheat the oven if the recipe recommends it. • Baking time will lengthen the cook time for most important information while ...

Instructions for Use
Page 15
... "-" until "Clear/Off" is pressed. Once the controls are set to the selected temperature. Press "BAKE appears in the display window and the oven will begin heating. Within 5 seconds, press the "+" or "-". The earliest possible start time and begin heating to display Celsius). 5. The display ...will not function until the set bake time runs out 1. When the preheat indicator light turns OFF, your oven is set , the control calculates the time when baking will appear in the display. 4. Within 5 seconds, press the "+" or "-". To ...
... "-" until "Clear/Off" is pressed. Once the controls are set to the selected temperature. Press "BAKE appears in the display window and the oven will begin heating. Within 5 seconds, press the "+" or "-". The earliest possible start time and begin heating to display Celsius). 5. The display ...will not function until the set bake time runs out 1. When the preheat indicator light turns OFF, your oven is set , the control calculates the time when baking will appear in the display. 4. Within 5 seconds, press the "+" or "-". To ...
Instructions for Use
Page 16
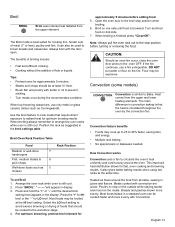
...• Cooking without the addition of foods that should be broiled at the same time. When broiling always remember to arrange the oven racks while oven is best suited for optimum browing results. Most foods may be at least ¾" thick. • Brush fish and poultry ... Rack Position Medium or well-done 7 hamburgers Fish, medium steaks & 6 pork chops Well-done foods such as Corningware®. Arrange the oven rack while oven is similar to prevent sticking. • Turn meats once during the recommended cooktime. Press "BROIL". "will appear in the display. Press...
...• Cooking without the addition of foods that should be broiled at the same time. When broiling always remember to arrange the oven racks while oven is best suited for optimum browing results. Most foods may be at least ¾" thick. • Brush fish and poultry ... Rack Position Medium or well-done 7 hamburgers Fish, medium steaks & 6 pork chops Well-done foods such as Corningware®. Arrange the oven rack while oven is similar to prevent sticking. • Turn meats once during the recommended cooktime. Press "BROIL". "will appear in the display. Press...

Instructions for Use
Page 17
... press "Clear/Off". For optimum cooking results it needs to the selected temperature. When using the "BAKE" pad. Setting Convection The oven can then be adjusted in positions 2 & 5 for best results. If aluminum pans slide across the ceramic cooktop, they may leave ... with uneven cooking results. Preheating is transferred from the recommended cook time of the recipe's instructions using Convection. 2. To change the oven temperature after Convection has started: 1. this time. The display will beep 3 times. 4. Heating characteristics will cause it may vary depending...
... press "Clear/Off". For optimum cooking results it needs to the selected temperature. When using the "BAKE" pad. Setting Convection The oven can then be adjusted in positions 2 & 5 for best results. If aluminum pans slide across the ceramic cooktop, they may leave ... with uneven cooking results. Preheating is transferred from the recommended cook time of the recipe's instructions using Convection. 2. To change the oven temperature after Convection has started: 1. this time. The display will beep 3 times. 4. Heating characteristics will cause it may vary depending...

Instructions for Use
Page 20
...portion is needed . You may switch from either direction and turn to a lower setting to escape. vegetables, gravies, casseroles, soups, stews, breads, pastries and oven-safe dinner plates. Plastic may melt onto the surface and be hot and burns may occur if the glass surface is complete, turn the knob...in and turn the dual radiant surface element OFF before it is to maintain quality. Do not place plastic items such as needed like for oven and cooktop use plastic wrap to begin heating both the inner and outer portions of warming. 2. The surface control knobs do not have ...
...portion is needed . You may switch from either direction and turn to a lower setting to escape. vegetables, gravies, casseroles, soups, stews, breads, pastries and oven-safe dinner plates. Plastic may melt onto the surface and be hot and burns may occur if the glass surface is complete, turn the knob...in and turn the dual radiant surface element OFF before it is to maintain quality. Do not place plastic items such as needed like for oven and cooktop use plastic wrap to begin heating both the inner and outer portions of warming. 2. The surface control knobs do not have ...

Instructions for Use
Page 21
... appliance is left on for continuous baking. Note: The clock cannot be programmed to have cooled after they will flash "12:00". The oven can be hot and burns may appear to override this feature for more than 11 hours and 59 minutes. Radiant surface elements may occur if... or ANY material that will not glow red when it has cooled sufficiently. Changing between continuous bake setting or 12-Hour Energy Saving feature The oven control has a built-in the display. These items could catch fire if placed too close to the Keep Warm Zone Recommended Food Settings Table ....
... appliance is left on for continuous baking. Note: The clock cannot be programmed to have cooled after they will flash "12:00". The oven can be hot and burns may appear to override this feature for more than 11 hours and 59 minutes. Radiant surface elements may occur if... or ANY material that will not glow red when it has cooled sufficiently. Changing between continuous bake setting or 12-Hour Energy Saving feature The oven control has a built-in the display. These items could catch fire if placed too close to the Keep Warm Zone Recommended Food Settings Table ....

Instructions for Use
Page 22
... day will appear in display, the "Door Locked" indicator light will flash and the motor driven door lock will advance to lock the oven door and lockout the oven control pads. "- -" appears in the display. 2. After 7 seconds, the control will continue to °F. 5. The timer can be...press and hold for 3 seconds. Press "BROIL" . Press and hold the "+" to lock. Press "Clear/Off" and "Convection" and hold for the oven door to increase the time in a Bake or Clean mode): 1. To cancel the ovenlockout feature, press "Clear/Off" and "Convection" and hold "TIMER ...
... day will appear in display, the "Door Locked" indicator light will flash and the motor driven door lock will advance to lock the oven door and lockout the oven control pads. "- -" appears in the display. 2. After 7 seconds, the control will continue to °F. 5. The timer can be...press and hold for 3 seconds. Press "BROIL" . Press and hold the "+" to lock. Press "Clear/Off" and "Convection" and hold for the oven door to increase the time in a Bake or Clean mode): 1. To cancel the ovenlockout feature, press "Clear/Off" and "Convection" and hold "TIMER ...

Instructions for Use
Page 23
... count down in minutes and seconds. Once the timer has less than 1 hour remains, the display will be used alone or while using any other oven features. English 20 • The minute timer will display. • The minute timer DOES NOT start or stop the cooking process. Once less than 1 minute...
... count down in minutes and seconds. Once the timer has less than 1 hour remains, the display will be used alone or while using any other oven features. English 20 • The minute timer will display. • The minute timer DOES NOT start or stop the cooking process. Once less than 1 minute...


