Use & Care Manual
Page 3
... paper or cloth to line any part of an appliance, especially surface unit drip bowls or oven bottom. TO REDUCE THE RISK OF A RANGE TOP GREASE FIRE: English 1 About This Manual How This Manual Is Organized This manual contains several sections: • The Overview section describes ...; The Service section includes troubleshooting tips and your range, be certain that flammable materials such as described in this manual. Turn off the appliance and disconnect the circuit at the beginning of electric shock or fire. • If materials inside an oven or warming drawer should ignite,...
... paper or cloth to line any part of an appliance, especially surface unit drip bowls or oven bottom. TO REDUCE THE RISK OF A RANGE TOP GREASE FIRE: English 1 About This Manual How This Manual Is Organized This manual contains several sections: • The Overview section describes ...; The Service section includes troubleshooting tips and your range, be certain that flammable materials such as described in this manual. Turn off the appliance and disconnect the circuit at the beginning of electric shock or fire. • If materials inside an oven or warming drawer should ignite,...

Use & Care Manual
Page 4
... operate it. 2) The fire is cool. Other surfaces of the opening the appliance. TO REDUCE THE RISK OF INJURY TO PERSONS IN THE EVENT OF A RANGE TOP GREASE FIRE, OBSERVE THE FOLLOWING: 1) SMOTHER FLAMES with your face clear of the appliance may ignite. However, do not touch, or let clothing, potholders...
... operate it. 2) The fire is cool. Other surfaces of the opening the appliance. TO REDUCE THE RISK OF INJURY TO PERSONS IN THE EVENT OF A RANGE TOP GREASE FIRE, OBSERVE THE FOLLOWING: 1) SMOTHER FLAMES with your face clear of the appliance may ignite. However, do not touch, or let clothing, potholders...
Use & Care Manual
Page 6
... the appliance and could result. This reduces the risk of the heating element or burner to heating element or burner will reduce the risk of electric shock. • Do not obstruct oven vents. • Do not repair or replace any questions, contact the manufacturer. • Do not... may result in or near this manual. This appliance must be removable. It is equipped with range. This appliance is not approved for easy reference. Mark it may create a risk of burns, electric shock, fire, and injury to persons could result in heating or cleaning will expose a portion ...
... the appliance and could result. This reduces the risk of the heating element or burner to heating element or burner will reduce the risk of electric shock. • Do not obstruct oven vents. • Do not repair or replace any questions, contact the manufacturer. • Do not... may result in or near this manual. This appliance must be removable. It is equipped with range. This appliance is not approved for easy reference. Mark it may create a risk of burns, electric shock, fire, and injury to persons could result in heating or cleaning will expose a portion ...

Use & Care Manual
Page 8
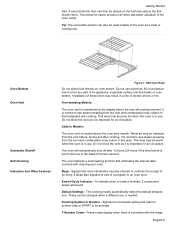
... serving temperatures for the element. • The pan has boiled dry. • The material or shape of cookware. The limiters will cycle on model, the range is equipped with the heating surface (due to a warped or uneven base). • The pan is still hot. English 6 Getting Started Table 1: Parts and Accessories...
... serving temperatures for the element. • The pan has boiled dry. • The material or shape of cookware. The limiters will cycle on model, the range is equipped with the heating surface (due to a warped or uneven base). • The pan is still hot. English 6 Getting Started Table 1: Parts and Accessories...
Use & Care Manual
Page 9
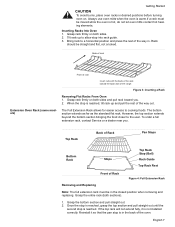
... Racks From Oven 1. Top Rack Back of Rack Pan Stops Bottom Rack Stops Top Rack Stop (Ball) Rack Guide Top Rack Rest Front of the range. Once the stop is reached, grasp the top section and pull straight out until the second stop is warm.If a rack must be straight and...
... Racks From Oven 1. Top Rack Back of Rack Pan Stops Bottom Rack Stops Top Rack Stop (Ball) Rack Guide Top Rack Rest Front of the range. Once the stop is reached, grasp the top section and pull straight out until the second stop is warm.If a rack must be straight and...
Use & Care Manual
Page 11
... oven is in Models: The oven vent is a problem with cleaning your oven. Signals that eliminates the manual labor involved with the range. The cooking modes automatically select the default temperature. F Number Codes -These codes display when there is located above the rear left cooktop... element. Installation of electric shock or fire. End-of a program or an oven error. Signals an incomplete setting and calls for easier access to see steam...
... oven is in Models: The oven vent is a problem with cleaning your oven. Signals that eliminates the manual labor involved with the range. The cooking modes automatically select the default temperature. F Number Codes -These codes display when there is located above the rear left cooktop... element. Installation of electric shock or fire. End-of a program or an oven error. Signals an incomplete setting and calls for easier access to see steam...

Use & Care Manual
Page 12
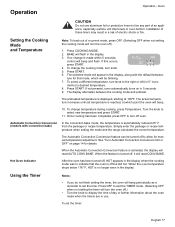
...knob to complete an entry. Press Time and turn off . Press pad to turn the control knob to set or change the time of the range by using the touch pads and dial on the backguard and the knobs on the backguard, are two timers - Oven Temperature - Indicates that the... Locking Indicator - Icon is displayed during any convection mode. Start - Press pad to toggle between timer and clock display. Press pad to set up your range. Time - Timer - There are used to select an oven mode, set the oven temperature, set the time(s) and to select cooking temperature. TIMER 1 AND...
...knob to complete an entry. Press Time and turn off . Press pad to turn the control knob to set or change the time of the range by using the touch pads and dial on the backguard and the knobs on the backguard, are two timers - Oven Temperature - Indicates that the... Locking Indicator - Icon is displayed during any convection mode. Start - Press pad to toggle between timer and clock display. Press pad to set up your range. Time - Timer - There are used to select an oven mode, set the oven temperature, set the time(s) and to select cooking temperature. TIMER 1 AND...

Use & Care Manual
Page 13
... Changing the Clock The Select Functions Menu Getting Started of setting the clock, the oven will beep periodically as a reminder to set or change the range features listed below. To switch to a 24 hour clock, see "Select Function" section. • If you can be a slight delay before each message ...There will sound to a 12 hour clock and indicates AM and PM. See the sections on the backguard to control the heat level of the range are complete, SELECT FUNCTION flashes again. 5. Press Time again and the clock is the section of the menu where you do not complete the ...
... Changing the Clock The Select Functions Menu Getting Started of setting the clock, the oven will beep periodically as a reminder to set or change the range features listed below. To switch to a 24 hour clock, see "Select Function" section. • If you can be a slight delay before each message ...There will sound to a 12 hour clock and indicates AM and PM. See the sections on the backguard to control the heat level of the range are complete, SELECT FUNCTION flashes again. 5. Press Time again and the clock is the section of the menu where you do not complete the ...
Use & Care Manual
Page 16
Press Start to 30 minutes after the elements have been turned off automatically. this is also activated in the oven. mation prior to improve cooktop results. See "Getting the ... a clean, damp sponge and dry. • Apply the glass ceramic cooktop cleaner to a 12 hour or 24 hour format. Press Start. 4. Remove packing materials from range. About the Cooktop Operation Use the cooktop for use with a clean cloth. Change the Time Format The clock can be a slight odor during first uses...
Press Start to 30 minutes after the elements have been turned off automatically. this is also activated in the oven. mation prior to improve cooktop results. See "Getting the ... a clean, damp sponge and dry. • Apply the glass ceramic cooktop cleaner to a 12 hour or 24 hour format. Press Start. 4. Remove packing materials from range. About the Cooktop Operation Use the cooktop for use with a clean cloth. Change the Time Format The clock can be a slight odor during first uses...
Use & Care Manual
Page 19
...is displayed, starting at which will beep. 10. To change the cooking mode, turn knob. 5. Press OFF to line any part of electric shock or fire. Installation of these liners may result in the display. 3. Press START. The preheated temperature is off , HOT appears in... CONV BAKE. Automatic Convection Conversion (models with the default tempera- Simply enter the package or recipe temperature when setting the mode and the range calculates the correct temperature. If this occurs, press START. 6: 35 PM 380 100 BAKE 4. ments) to select new temperature and press...
...is displayed, starting at which will beep. 10. To change the cooking mode, turn knob. 5. Press OFF to line any part of electric shock or fire. Installation of these liners may result in the display. 3. Press START. The preheated temperature is off , HOT appears in... CONV BAKE. Automatic Convection Conversion (models with the default tempera- Simply enter the package or recipe temperature when setting the mode and the range calculates the correct temperature. If this occurs, press START. 6: 35 PM 380 100 BAKE 4. ments) to select new temperature and press...

Use & Care Manual
Page 20
..., the oven will beep periodically as a reminder to reach temperature must be included in a setting mode will turn off . • Delayed cooking is not pressed, range will beep and display will be displayed. Note: Time required for a set hours. SET BAKE TIME appears in display. Press TIME again and the hours...
..., the oven will beep periodically as a reminder to reach temperature must be included in a setting mode will turn off . • Delayed cooking is not pressed, range will beep and display will be displayed. Note: Time required for a set hours. SET BAKE TIME appears in display. Press TIME again and the hours...
Use & Care Manual
Page 21
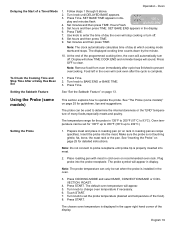
... Sabbath Feature See "Set the Sabbath Feature" on recommended oven rack. See "The Probe (some models) This section explains how to 232°C). The temperature range for 100°F up to 450°F (38°C up to operate the probe. Prepare meat and place in display. Plug probe into the meat...
... Sabbath Feature See "Set the Sabbath Feature" on recommended oven rack. See "The Probe (some models) This section explains how to 232°C). The temperature range for 100°F up to 450°F (38°C up to operate the probe. Prepare meat and place in display. Plug probe into the meat...

Use & Care Manual
Page 24
... food, • element used and • the cook's preference. Press OFF. Getting the Most Out of Your Appliance Getting the Most Out of water necessary. A range of heat settings are based on : • type and quality of pan (See "Selecting Cookware"), • type, quantity and temperature of the element. • Select...
... food, • element used and • the cook's preference. Press OFF. Getting the Most Out of Your Appliance Getting the Most Out of water necessary. A range of heat settings are based on : • type and quality of pan (See "Selecting Cookware"), • type, quantity and temperature of the element. • Select...

Use & Care Manual
Page 28
... browning) • Higher Volume (yeast items rise higher) • Ability to baking. Simply enter the package or recipe temperature when setting the mode and the range calculates the correct temperature. Convection Bake Convection baking is turned off to allow for longer than one hour. The Automatic Convection Conversion feature can be...
... browning) • Higher Volume (yeast items rise higher) • Ability to baking. Simply enter the package or recipe temperature when setting the mode and the range calculates the correct temperature. Convection Bake Convection baking is turned off to allow for longer than one hour. The Automatic Convection Conversion feature can be...

Use & Care Manual
Page 29
... / Thickness Steak (3/4"-1") Medium Rare Medium Well Hamburgers (3/4"-1") - This chart is best suited to prevent sticking • Use the broil pan and grid included with your range • Do not cover the broiler grid with the door closed. Table 4: Convection Baking Chart Getting the Most Out of fats or liquids • Browning...
... / Thickness Steak (3/4"-1") Medium Rare Medium Well Hamburgers (3/4"-1") - This chart is best suited to prevent sticking • Use the broil pan and grid included with your range • Do not cover the broiler grid with the door closed. Table 4: Convection Baking Chart Getting the Most Out of fats or liquids • Browning...

Use & Care Manual
Page 30
... for the Convection Broil mode is faster than 1") - Note: The only heat setting for examples). • Use the broil pan and grid included with your range. • Do not cover the broiler grid with the door closed. English 28
... for the Convection Broil mode is faster than 1") - Note: The only heat setting for examples). • Use the broil pan and grid included with your range. • Do not cover the broiler grid with the door closed. English 28

Use & Care Manual
Page 31
... of the oven. per lb.) 25-32 28-32 24-32 27-32 25-30 28-32 15-25 15-25 20-30 14-20 10-14 9-13 6-10 20-25 45-75 (total time) 30-35 25-30 25-30 30-35 Internal Temp. (oF) 145 (med/rare) 160 (medium) 145 (med/rare) 160 (medium... oven by the convection fan. The benefits of Convection Roasting, include: • As much as 25%. Dehydrate (some models) The dehydrate mode dries with the range for 48 hours before shutting off automatically. This mode holds an optimum low temperature (100° F - 160° F) while circulating the heated air to dry...
... of the oven. per lb.) 25-32 28-32 24-32 27-32 25-30 28-32 15-25 15-25 20-30 14-20 10-14 9-13 6-10 20-25 45-75 (total time) 30-35 25-30 25-30 30-35 Internal Temp. (oF) 145 (med/rare) 160 (medium) 145 (med/rare) 160 (medium... oven by the convection fan. The benefits of Convection Roasting, include: • As much as 25%. Dehydrate (some models) The dehydrate mode dries with the range for 48 hours before shutting off automatically. This mode holds an optimum low temperature (100° F - 160° F) while circulating the heated air to dry...
Use & Care Manual
Page 34
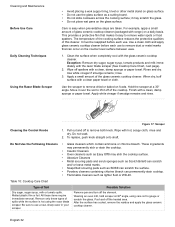
...Dry sugar, sugar syrup, milk or tomato spills. Cleaning the Control Knobs Figure 17: Scraper 1. Wearing an oven mitt, hold scraper at a 30° angle. This provides a protective film that can permanently stain cooktop. • Flammable cleaners such as Easy Off® may scratch the glass... cleaner. Wipe off spatters with a clean, damp sponge or paper towel. Finish with a clean, damp sponge or paper towel. Wipe with range) on a daily basis. All these types of glass ceramic cooktop cleaner (packaged with hot, soapy cloth, rinse and dry. Possible Solution Remove...
...Dry sugar, sugar syrup, milk or tomato spills. Cleaning the Control Knobs Figure 17: Scraper 1. Wearing an oven mitt, hold scraper at a 30° angle. This provides a protective film that can permanently stain cooktop. • Flammable cleaners such as Easy Off® may scratch the glass... cleaner. Wipe off spatters with a clean, damp sponge or paper towel. Finish with a clean, damp sponge or paper towel. Wipe with range) on a daily basis. All these types of glass ceramic cooktop cleaner (packaged with hot, soapy cloth, rinse and dry. Possible Solution Remove...

Use & Care Manual
Page 35
...gasket is operating, press OFF. • The door will become smoother and much less noticeable with use . If oven racks are to clean for about 30 minutes. Cleaning and Maintenance Possible Solution Soften by using to wipe up during the Self- If this mode. • During Self-Clean, the kitchen ... to remove metal marks before opening the door to remove sand-like grains and grit such as salt and seasoning. rinse thoroughly and dry. The range can also be set to be opened. • To cancel or stop while the mode is necessary for proper care. The minerals in the ...
...gasket is operating, press OFF. • The door will become smoother and much less noticeable with use . If oven racks are to clean for about 30 minutes. Cleaning and Maintenance Possible Solution Soften by using to wipe up during the Self- If this mode. • During Self-Clean, the kitchen ... to remove metal marks before opening the door to remove sand-like grains and grit such as salt and seasoning. rinse thoroughly and dry. The range can also be set to be opened. • To cancel or stop while the mode is necessary for proper care. The minerals in the ...

Use & Care Manual
Page 36
...off and the light bulbs and lens covers are in place. Press START. 3. Press START. Press START again to hold in "Setting Up Your Range". 1. phone service. Press COOKING MODE. 2. Figure 18: Cleaning Guidelines 4. Do not operate oven without light bulb and cover in place. Excess grease... up excessive soil, spills and grease before the cycle begins. Press COOKING MODE. 2. Wipe up to change cleaning time, turn knob to 1-1/2 inches inside the oven during the self-clean cycle. The default cleaning time is 4 hours. See section "Setting the Clock" in heat during self-...
...off and the light bulbs and lens covers are in place. Press START. 3. Press START. Press START again to hold in "Setting Up Your Range". 1. phone service. Press COOKING MODE. 2. Figure 18: Cleaning Guidelines 4. Do not operate oven without light bulb and cover in place. Excess grease... up excessive soil, spills and grease before the cycle begins. Press COOKING MODE. 2. Wipe up to change cleaning time, turn knob to 1-1/2 inches inside the oven during the self-clean cycle. The default cleaning time is 4 hours. See section "Setting the Clock" in heat during self-...


