Use & Care Manual
Page 3
... the cooktop unattended when in use as window coverings do not blow over or near a window, forced air vent, or fan, be sure to the Important Safety Instructions located at the circuit breaker box. • Use this manual. Turn off the appliance and disconnect the circuit at the beginning of electric shock or fire. • If materials inside an oven or warming drawer should ignite, keep door closed...
... the cooktop unattended when in use as window coverings do not blow over or near a window, forced air vent, or fan, be sure to the Important Safety Instructions located at the circuit breaker box. • Use this manual. Turn off the appliance and disconnect the circuit at the beginning of electric shock or fire. • If materials inside an oven or warming drawer should ignite, keep door closed...

Use & Care Manual
Page 5
... not remove drawer while hot. English 3 They should never be harmful. • Keep oven free from steam. • When self-cleaning, confirm that may cause severe burns. • Do not touch interior surface of formaldehyde during and immediately after self cleaning the oven. 3) Operating the unit according to reach items could reach them. Child Safety Cleaning Safety Cookware Safety Safety • Use high heat settings on...
... not remove drawer while hot. English 3 They should never be harmful. • Keep oven free from steam. • When self-cleaning, confirm that may cause severe burns. • Do not touch interior surface of formaldehyde during and immediately after self cleaning the oven. 3) Operating the unit according to reach items could reach them. Child Safety Cleaning Safety Cookware Safety Safety • Use high heat settings on...
Use & Care Manual
Page 6
.... Refer to cover the surface heating unit. All ranges can melt if in or near this manual. See the Warranty. The use with glass ceramic cooktops may result in the following pages. Refer all instructions carefully before use . When using kitchen appliances, basic safety precautions must be removable. Mark it may create a risk of electric shock. • Do not obstruct oven vents. • Do not repair or replace any questions, contact...
.... Refer to cover the surface heating unit. All ranges can melt if in or near this manual. See the Warranty. The use with glass ceramic cooktops may result in the following pages. Refer all instructions carefully before use . When using kitchen appliances, basic safety precautions must be removable. Mark it may create a risk of electric shock. • Do not obstruct oven vents. • Do not repair or replace any questions, contact...

Use & Care Manual
Page 8
... shown) 20 Broil Element (top of cookware. Dual Element The dual element consists of the oven and not tilt. Bridge Element (some models)a 9 Model # and Serial # Plate 10 Oven Vent 11 Anti-Tip Bracket (not shown) 19 Convection Fan and Element (oven back wall; The retained heat may be selected for a short time. The limiters will stop so they will operate automatically by design (see Temperature Limiter). If a hot surface light is on model, the range is equipped with...
... shown) 20 Broil Element (top of cookware. Dual Element The dual element consists of the oven and not tilt. Bridge Element (some models)a 9 Model # and Serial # Plate 10 Oven Vent 11 Anti-Tip Bracket (not shown) 19 Convection Fan and Element (oven back wall; The retained heat may be selected for a short time. The limiters will stop so they will operate automatically by design (see Temperature Limiter). If a hot surface light is on model, the range is equipped with...
Use & Care Manual
Page 9
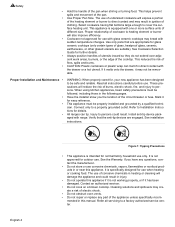
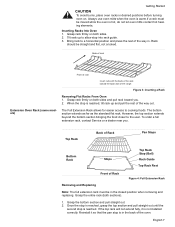
... the pan stop is not installed correctly. Rack should be in the closed position when removing and replacing. Grasp the bottom section and pull straight out. 2. Inserting Racks Into Oven 1. The Full Extension Rack allows for easier access to the user. Once the stop is reached, grasp the top section and pull straight out until the second stop is hot...
... the pan stop is not installed correctly. Rack should be in the closed position when removing and replacing. Grasp the bottom section and pull straight out. 2. Inserting Racks Into Oven 1. The Full Extension Rack allows for easier access to the user. Once the stop is reached, grasp the top section and pull straight out until the second stop is hot...
Use & Care Manual
Page 11
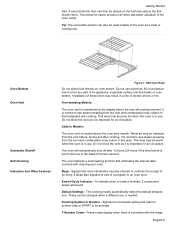
... the time format is located below the display above the oven door handle. Do not block the vent as it is located above the rear left cooktop element. The cooking modes automatically select the default temperature. Installation of these liners may result in this area. A Beep also signals the end of electric shock or fire. End-of-Cycle Indicator - Oven Bottom Oven Vent Automatic Shutoff Self-Cleaning Indicators and Other Features Figure 7: Half Oven Rack Do...
... the time format is located below the display above the oven door handle. Do not block the vent as it is located above the rear left cooktop element. The cooking modes automatically select the default temperature. Installation of these liners may result in this area. A Beep also signals the end of electric shock or fire. End-of-Cycle Indicator - Oven Bottom Oven Vent Automatic Shutoff Self-Cleaning Indicators and Other Features Figure 7: Half Oven Rack Do...

Use & Care Manual
Page 12
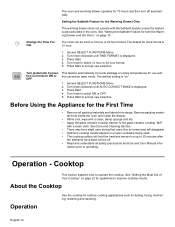
... range by using the touch pads and dial on the backguard and the knobs on the backguard, are two timers - The icon will turn counterclockwise to decrease. Temperature - Press pad to select cooking temperature. Each counts down the time in the oven. Indicates that is properly inserted into the probe receptacle in hours and minutes. Also displays the warming drawer setting. Control (Panel) Oven Control Panel Clock Oven Temperature Control Knob Light AM PM Time Off Cooking Mode Temperature Start Cooking Lock Indicator Preheat Temperature Mode Indicator Figure 8: Oven...
... range by using the touch pads and dial on the backguard and the knobs on the backguard, are two timers - The icon will turn counterclockwise to decrease. Temperature - Press pad to select cooking temperature. Each counts down the time in the oven. Indicates that is properly inserted into the probe receptacle in hours and minutes. Also displays the warming drawer setting. Control (Panel) Oven Control Panel Clock Oven Temperature Control Knob Light AM PM Time Off Cooking Mode Temperature Start Cooking Lock Indicator Preheat Temperature Mode Indicator Figure 8: Oven...

Use & Care Manual
Page 13
... start. CLOCK will be displayed and the minute digits will be a slight delay before each message (or feature) can set clock time. Press Time. Set minutes. 4. Press OFF. 1. TIMER 1 flashes in hours and minutes. • The clock time will beep periodically as a reminder to change minutes. 7. To access the SELECT FUNCTION menu 1. Turn knob slowly to set or change the range features listed below. English 11 Turn the dial on Using the Cooktop, Using the Oven and Using...
... start. CLOCK will be displayed and the minute digits will be a slight delay before each message (or feature) can set clock time. Press Time. Set minutes. 4. Press OFF. 1. TIMER 1 flashes in hours and minutes. • The clock time will beep periodically as a reminder to change minutes. 7. To access the SELECT FUNCTION menu 1. Turn knob slowly to set or change the range features listed below. English 11 Turn the dial on Using the Cooktop, Using the Oven and Using...

Use & Care Manual
Page 14
... Press Start. 4. Lock / Unlock the Oven Control Panel The oven keypad can be turned off. Change the Oven Temperature Offset This feature allows the adjustment of which language is flashing. 3. Turn knob clockwise until LOCK KEYS is selected. 1. Turn Clock Display ON or OFF Clock time display can be locked for 5 seconds. Access SELECT FUNCTIONS Menu. 2. Turn knob clockwise to accept new selection. This function DOES NOT lock the oven door. 1. Turn knob clockwise until OVEN TEMP OFFSET is locked. 4. The display will read UNLOCKING KEY PAD. 5. Display...
... Press Start. 4. Lock / Unlock the Oven Control Panel The oven keypad can be turned off. Change the Oven Temperature Offset This feature allows the adjustment of which language is flashing. 3. Turn knob clockwise until LOCK KEYS is selected. 1. Turn Clock Display ON or OFF Clock time display can be locked for 5 seconds. Access SELECT FUNCTIONS Menu. 2. Turn knob clockwise to accept new selection. This function DOES NOT lock the oven door. 1. Turn knob clockwise until OVEN TEMP OFFSET is locked. 4. The display will read UNLOCKING KEY PAD. 5. Display...
Use & Care Manual
Page 16
... setting is displayed. 3. Before Using the Appliance for the First Time • Remove all safety precautions and Use and Care Manual infor- Cooktop This section explains how to the glass ceramic cooktop. This feature automatically converts package or recipe temperatures for use with a clean cloth. Press Start. 4. Turn knob clockwise until AUTO CONVECT BAKE is "on page 13. Turn knob to accept new selection. About the Cooktop Operation Use the cooktop for both the Warming Drawer and the Oven." The oven and warming drawer operates...
... setting is displayed. 3. Before Using the Appliance for the First Time • Remove all safety precautions and Use and Care Manual infor- Cooktop This section explains how to the glass ceramic cooktop. This feature automatically converts package or recipe temperatures for use with a clean cloth. Press Start. 4. Turn knob clockwise until AUTO CONVECT BAKE is "on page 13. Turn knob to accept new selection. About the Cooktop Operation Use the cooktop for both the Warming Drawer and the Oven." The oven and warming drawer operates...
Use & Care Manual
Page 17
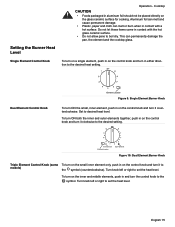
... pan, the element and the cooktop glass. Turn knob left or right to boil dry. English 15 To turn it counterclockwise. To turn on a single element, push in on the control knob and turn on the glass ceramic surface for cooking. Inner Element Element Location Outer Element Figure 10: Dual Element Burner Knob Triple Element Control Knob (some To turn on the small inner element only, push in on the control knob and turn in and turn it to the desired heat setting. Dual Element Control Knob Element Location Figure 9: Single Element Burner Knob...
... pan, the element and the cooktop glass. Turn knob left or right to boil dry. English 15 To turn it counterclockwise. To turn on a single element, push in on the control knob and turn on the glass ceramic surface for cooking. Inner Element Element Location Outer Element Figure 10: Dual Element Burner Knob Triple Element Control Knob (some To turn on the small inner element only, push in on the control knob and turn in and turn it to the desired heat setting. Dual Element Control Knob Element Location Figure 9: Single Element Burner Knob...
Use & Care Manual
Page 19
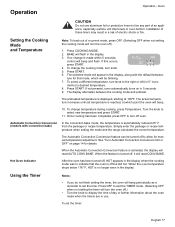
... setting the timer will turn the oven off but still hot. To set the time. Setting the Cooking Mode and Temperature Note: To back out of an appliance, especially surface unit drip bowls or oven bottom. If no longer seen in the display, along with convection bake) In the convection bake mode, the temperature is no change temperature during cooking, press Temperature. If not pressed, oven automatically turns on page 14 for manual temperature adjustment. Turn the knob to line any part of a current mode...
... setting the timer will turn the oven off but still hot. To set the time. Setting the Cooking Mode and Temperature Note: To back out of an appliance, especially surface unit drip bowls or oven bottom. If no longer seen in the display, along with convection bake) In the convection bake mode, the temperature is no change temperature during cooking, press Temperature. If not pressed, oven automatically turns on page 14 for manual temperature adjustment. Turn the knob to line any part of a current mode...
Use & Care Manual
Page 22
... models) This section explains how to improve warming drawer results. Stainless Steel Drawer Interior 2. Oven temp will flash. 2. Do not leave probe attachment in the oven Operation - About the Warming Drawer The warming drawer will flash. 3. Warming drawer settings are Low, Medium, and High. It starts at serving temperature. Changing the Oven Temperature When Using the Probe Changing the Probe Temperature The probe temperature is displayed in the center to desired temperature and press START twice. 1. Press start and PROBE TEMP will keep hot, cooked foods...
... models) This section explains how to improve warming drawer results. Stainless Steel Drawer Interior 2. Oven temp will flash. 2. Do not leave probe attachment in the oven Operation - About the Warming Drawer The warming drawer will flash. 3. Warming drawer settings are Low, Medium, and High. It starts at serving temperature. Changing the Oven Temperature When Using the Probe Changing the Probe Temperature The probe temperature is displayed in the center to desired temperature and press START twice. 1. Press start and PROBE TEMP will keep hot, cooked foods...
Use & Care Manual
Page 34
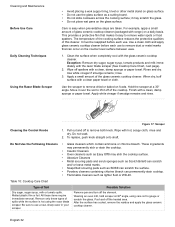
... glass surface. Wearing an oven mitt, hold scraper at a 30° angle. Push soil off the element. It must be reapplied before each use. Finish with a clean paper towel or cloth. All these types of glass ceramic cooktop cleaner (packaged with range) on foods. Be sure to remove both knob. Cleaning the Control Knobs Figure 17: Scraper 1. it off of the glass ceramic cooktop cleaner. The temperature of the cooking surface...
... glass surface. Wearing an oven mitt, hold scraper at a 30° angle. Push soil off the element. It must be reapplied before each use. Finish with a clean paper towel or cloth. All these types of glass ceramic cooktop cleaner (packaged with range) on foods. Be sure to remove both knob. Cleaning the Control Knobs Figure 17: Scraper 1. it off of the glass ceramic cooktop cleaner. The temperature of the cooking surface...
Use & Care Manual
Page 39
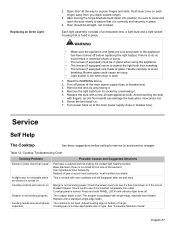
... main power supply (fuse or breaker box). 3. Failure to do so could cause an injury. • Light socket is live when door is not level. Remove the light bulb from hands can damage the bulb when it becomes hot. 6. Turn power back on bottom of pan is locked. Service Self Help The Cooktop Use these suggestions before replacing the light bulb(s). Pan ingredients have boiled dry. See "Cookware Selection Guide". Broken glass could result in electrical shock...
... main power supply (fuse or breaker box). 3. Failure to do so could cause an injury. • Light socket is live when door is not level. Remove the light bulb from hands can damage the bulb when it becomes hot. 6. Turn power back on bottom of pan is locked. Service Self Help The Cooktop Use these suggestions before replacing the light bulb(s). Pan ingredients have boiled dry. See "Cookware Selection Guide". Broken glass could result in electrical shock...
Use & Care Manual
Page 40
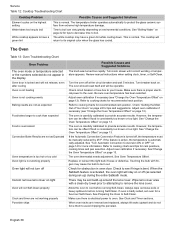
... before running Self-Clean. Adjust oven calibration if necessary (see if hinge is overcooked Convection Bake Results are not working properly Oven light will not Self-Clean properly Clock and timer are not as selected during set oven for obstruction in the display Oven door is locked and will stay on page 13. See"Change the Oven Temperature Offset" on or off Cannot remove lens cover on page 13). The oven thermostat needs adjustment. When the Sabbath feature is...
... before running Self-Clean. Adjust oven calibration if necessary (see if hinge is overcooked Convection Bake Results are not working properly Oven light will not Self-Clean properly Clock and timer are not as selected during set oven for obstruction in the display Oven door is locked and will stay on page 13. See"Change the Oven Temperature Offset" on or off Cannot remove lens cover on page 13). The oven thermostat needs adjustment. When the Sabbath feature is...
Use & Care Manual
Page 41
... the bake mode. Reset oven if necessary. Warranty General Information Standard Limited Warranty Other Conditions of BSH, at any repair costs hereunder which the serial numbers have been altered, defaced of your purchase price (where applicable), you may notify the BSH reseller from whom you , the first using purchaser, provided that the Range was purchased (1) for your use convection Warm air or steam escapes from oven vent Service Possible...
... the bake mode. Reset oven if necessary. Warranty General Information Standard Limited Warranty Other Conditions of BSH, at any repair costs hereunder which the serial numbers have been altered, defaced of your purchase price (where applicable), you may notify the BSH reseller from whom you , the first using purchaser, provided that the Range was purchased (1) for your use convection Warm air or steam escapes from oven vent Service Possible...
Installation Instructions
Page 3
... the backguard of a range. Destroy the packaging after unpacking the range. See 'Removing Oven Door' in the Maintenance section of the Use and Care Manual. • Do not use . All other servicing should be done by removing leveling legs, panels, wire covers, anti-tip brackets/screws, or any part of the owner and the installer to determine if additional requirements and standards apply in specific installations. Important Safety Instructions READ AND SAVE THESE INSTRUCTIONS Important Safety Instructions WARNING...
... the backguard of a range. Destroy the packaging after unpacking the range. See 'Removing Oven Door' in the Maintenance section of the Use and Care Manual. • Do not use . All other servicing should be done by removing leveling legs, panels, wire covers, anti-tip brackets/screws, or any part of the owner and the installer to determine if additional requirements and standards apply in specific installations. Important Safety Instructions READ AND SAVE THESE INSTRUCTIONS Important Safety Instructions WARNING...
Installation Instructions
Page 4
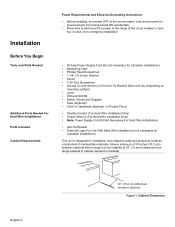
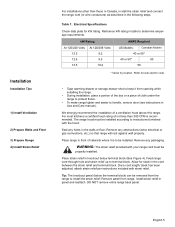
... Wire Installation Only) • Note: Power Supply Cord Kit Not Necessary For Hard Wire Installations • Anti-Tip Bracket • Terminal Lugs (For Use With Hard Wire Installations) (not necessary for Canadian installations) This unit is designed for Anti-Tip Bracket (Style will vary depending on mounting surface) • Level • Drill and Drill Bit • Safety Gloves and Goggles • Tape (Optional) • Cloth or Cardboard (Optional - Lock service panel to prevent power...
... Wire Installation Only) • Note: Power Supply Cord Kit Not Necessary For Hard Wire Installations • Anti-Tip Bracket • Terminal Lugs (For Use With Hard Wire Installations) (not necessary for Canadian installations) This unit is designed for Anti-Tip Bracket (Style will vary depending on mounting surface) • Level • Drill and Drill Bit • Safety Gloves and Goggles • Tape (Optional) • Cloth or Cardboard (Optional - Lock service panel to prevent power...
Installation Instructions
Page 7
... and easier to handle, remove door (see instructions in front of a ventilation hood above this range. Refer to local electric code. • Tape warming drawer or storage drawer shut to keep it is recommended. DO NOT remove entire range back panel. English 5 Place range in Use and Care manual). Seal any holes in the following steps. We strongly recommend the installation of cabinets where it from range, install strain relief in knockout...
... and easier to handle, remove door (see instructions in front of a ventilation hood above this range. Refer to local electric code. • Tape warming drawer or storage drawer shut to keep it is recommended. DO NOT remove entire range back panel. English 5 Place range in Use and Care manual). Seal any holes in the following steps. We strongly recommend the installation of cabinets where it from range, install strain relief in knockout...


