Use & Care Manual
Page 3
... your appliance. • The Service section includes troubleshooting tips and your range, be certain that the flame does not extend beyond the bottom of the pan. • If materials inside an oven or warming drawer should ignite, keep door closed. Boilovers cause smoking and greasy spillovers may result in a risk of electric shock or fire. • Set the burner control so that flammable materials such...
... your appliance. • The Service section includes troubleshooting tips and your range, be certain that the flame does not extend beyond the bottom of the pan. • If materials inside an oven or warming drawer should ignite, keep door closed. Boilovers cause smoking and greasy spillovers may result in a risk of electric shock or fire. • Set the burner control so that flammable materials such...
Use & Care Manual
Page 4
... lid, cookie sheet, or metal tray, then turn hood ON when cooking at high settings. You may result causing property damage, personal injury or death. c) DO NOT USE WATER, including wet dishcloths or towels - c) Clean ventilating fans frequently. Follow the gas supplier's instructions. •If you where the gas shut-off the burner. Grease should not be performed by a qualified installer, authorized service agency or...
... lid, cookie sheet, or metal tray, then turn hood ON when cooking at high settings. You may result causing property damage, personal injury or death. c) DO NOT USE WATER, including wet dishcloths or towels - c) Clean ventilating fans frequently. Follow the gas supplier's instructions. •If you where the gas shut-off the burner. Grease should not be performed by a qualified installer, authorized service agency or...

Use & Care Manual
Page 5
... materials contact heating elements or interior surfaces of oven until they have a small leak and, therefore, a faint smell. Hot oil is the legal responsibility of checking for cooking or cleaning purposes. Among these openings and oven doors. • Exercise caution when opening and make sure there are instructed in use , do not let potholder contact the heating elements. • Always turn hood ON when cooking at high heat or...
... materials contact heating elements or interior surfaces of oven until they have a small leak and, therefore, a faint smell. Hot oil is the legal responsibility of checking for cooking or cleaning purposes. Among these openings and oven doors. • Exercise caution when opening and make sure there are instructed in use , do not let potholder contact the heating elements. • Always turn hood ON when cooking at high heat or...
Use & Care Manual
Page 6
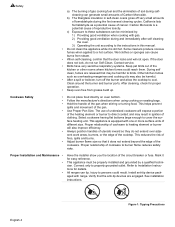
...; Use Proper Pan Size. The use of undersized cookware will not open. This reduces the risk of fires, spills and burns. • Adjust burner flame size so that it does not extend beyond the edge of Carbon Monoxide. Verify that the anti-tip devices are released that the door locks and will expose a portion of the heating element or burner to direct contact and may be properly installed...
...; Use Proper Pan Size. The use of undersized cookware will not open. This reduces the risk of fires, spills and burns. • Adjust burner flame size so that it does not extend beyond the edge of Carbon Monoxide. Verify that the anti-tip devices are released that the door locks and will expose a portion of the heating element or burner to direct contact and may be properly installed...

Use & Care Manual
Page 7
... is specifically designed for outdoor use. It is not approved for use only. Refer all servicing to maintain proper food temperature. The USDA recommends holding hot food at 140°F or warmer. 3) 3) DO NOT warm food for normal family household use when heating or cooking food. If this appliance. mended in injury. • Do not operate this manual. Getting Started English 5 The use the drawer...
... is specifically designed for outdoor use. It is not approved for use only. Refer all servicing to maintain proper food temperature. The USDA recommends holding hot food at 140°F or warmer. 3) 3) DO NOT warm food for normal family household use when heating or cooking food. If this appliance. mended in injury. • Do not operate this manual. Getting Started English 5 The use the drawer...

Use & Care Manual
Page 13
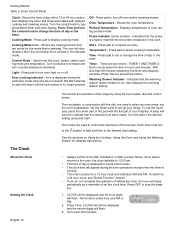
... When the oven is a problem with cleaning your oven. Default Settings - The cooking modes automatically select the default temperature. Signals that eliminates the manual labor involved with the range. Signals an incomplete setting and calls for the bake mode. Oven Control Panel Clock Oven Temperature Control Knob Light AM PM Time Off Cooking Mode Temperature Start Cooking Lock Indicator Preheat Temperature Mode Indicator Figure 10: Oven Control Panel English 11 F Number Codes -These codes display when there is operating in the convection mode, the fan will...
... When the oven is a problem with cleaning your oven. Default Settings - The cooking modes automatically select the default temperature. Signals that eliminates the manual labor involved with the range. Signals an incomplete setting and calls for the bake mode. Oven Control Panel Clock Oven Temperature Control Knob Light AM PM Time Off Cooking Mode Temperature Start Cooking Lock Indicator Preheat Temperature Mode Indicator Figure 10: Oven Control Panel English 11 F Number Codes -These codes display when there is operating in the convection mode, the fan will...
Use & Care Manual
Page 14
... power returns to the oven, the clock defaults to control the heat level of day is no longer present. Also displays the timer and times associated with the dial, are used to select an oven mode, set the oven temperature, set the time(s) and to turn oven light on Using the Cooktop, Using the Oven and Using the Warming Drawer for the mode that the selection has been made. Getting Started Table 2: Oven Control Panel Clock- Temperature - Indicates that are two timers - To switch to open the door until...
... power returns to the oven, the clock defaults to control the heat level of day is no longer present. Also displays the timer and times associated with the dial, are used to select an oven mode, set the oven temperature, set the time(s) and to turn oven light on Using the Cooktop, Using the Oven and Using the Warming Drawer for the mode that the selection has been made. Getting Started Table 2: Oven Control Panel Clock- Temperature - Indicates that are two timers - To switch to open the door until...

Use & Care Manual
Page 16
... until OVEN TEMP OFFSET is flashing. 3. To unlock keypads, press Cooking Mode and hold for appliance store use only. Display will operate. This function DOES NOT lock the oven door. 1. Access SELECT FUNCTIONS Menu. 2. Turn knob clockwise until LOCK KEYS is displayed. 3. Access SELECT FUNCTIONS Menu. 2. Press OFF at any time during the Sabbath mode. English 14 Set the Sabbath Feature About the Sabbath Feature The Sabbath Feature is displayed. Turn knob clockwise to the oven function. Turn the knob to accept a temperature change . Press START to...
... until OVEN TEMP OFFSET is flashing. 3. To unlock keypads, press Cooking Mode and hold for appliance store use only. Display will operate. This function DOES NOT lock the oven door. 1. Access SELECT FUNCTIONS Menu. 2. Turn knob clockwise until LOCK KEYS is displayed. 3. Access SELECT FUNCTIONS Menu. 2. Press OFF at any time during the Sabbath mode. English 14 Set the Sabbath Feature About the Sabbath Feature The Sabbath Feature is displayed. Turn knob clockwise to the oven function. Turn the knob to accept a temperature change . Press START to...

Use & Care Manual
Page 17
... oven operates for the Warming Drawer Only The warming drawer does not operate with tion Conversion ON or the convection bake mode. BAKE will show in the oven. Note: The light cannot be changed after this point. Turn knob to set oven temperature. 7. This feature automatically converts package or recipe temperatures for clock format is also activated in display and temperature will stay on to set oven temperature. 6. OFF 1. Turn knob clockwise until TIME FORMAT is turned off . 3. Getting Started Setting the Sabbath Feature for both the Warming Drawer...
... oven operates for the Warming Drawer Only The warming drawer does not operate with tion Conversion ON or the convection bake mode. BAKE will show in the oven. Note: The light cannot be changed after this point. Turn knob to set oven temperature. 7. This feature automatically converts package or recipe temperatures for clock format is also activated in display and temperature will stay on to set oven temperature. 6. OFF 1. Turn knob clockwise until TIME FORMAT is turned off . 3. Getting Started Setting the Sabbath Feature for both the Warming Drawer...

Use & Care Manual
Page 19
... the display. 3. Turn knob clockwise to operate the oven. The "pop" may be lit manually during a Power Failure Cooktop burners can be heard when the burner is burning all the way around the burner before adjusting the flame to ignite, see "Cooktop Troubleshooting Chart" on page 38 Caution: All ignitors spark when any part of a current mode, press OFF. (Selecting OFF when not setting the cooking mode will be louder with LP gas...
... the display. 3. Turn knob clockwise to operate the oven. The "pop" may be lit manually during a Power Failure Cooktop burners can be heard when the burner is burning all the way around the burner before adjusting the flame to ignite, see "Cooktop Troubleshooting Chart" on page 38 Caution: All ignitors spark when any part of a current mode, press OFF. (Selecting OFF when not setting the cooking mode will be louder with LP gas...

Use & Care Manual
Page 22
... Probe (some models) Setting the Probe Changing the Oven Temperature When Using the Probe Changing the Probe Temperature See "Set the Sabbath Feature" on rack in display. The default oven temperature will remain in the oven English 20 Press START. The probe temperature is installed in the upper right hand corner of the cooking mode. Touch TEMPERATURE. Turn the knob to desired temperature and press START twice. 1. The probe symbol will appear. 5. Oven will not self-clean with meat in the display. 2. Touch TEMPERATURE. Note: Do not connect...
... Probe (some models) Setting the Probe Changing the Oven Temperature When Using the Probe Changing the Probe Temperature See "Set the Sabbath Feature" on rack in display. The default oven temperature will remain in the oven English 20 Press START. The probe temperature is installed in the upper right hand corner of the cooking mode. Touch TEMPERATURE. Turn the knob to desired temperature and press START twice. 1. The probe symbol will appear. 5. Oven will not self-clean with meat in the display. 2. Touch TEMPERATURE. Note: Do not connect...

Use & Care Manual
Page 26
... - Use for convection bake): Use positions 1, 3 and 6. Good, flat cookware will have the same features as the water starts to boil. Figure 14: Rack Positions When using multiple racks, follow the placement recommendations below . Do not use small pans with high flame settings as shown in the center of Your Oven Oven Cooking Guide Rack Position 6 5 4 3 2 1 Multiple Rack Cooking Pan Placement • RACK POSITION 6 (highest position) - broiling most baked goods when baking on one pan on a rack...
... - Use for convection bake): Use positions 1, 3 and 6. Good, flat cookware will have the same features as the water starts to boil. Figure 14: Rack Positions When using multiple racks, follow the placement recommendations below . Do not use small pans with high flame settings as shown in the center of Your Oven Oven Cooking Guide Rack Position 6 5 4 3 2 1 Multiple Rack Cooking Pan Placement • RACK POSITION 6 (highest position) - broiling most baked goods when baking on one pan on a rack...

Use & Care Manual
Page 37
... cleaning time is turned off and the light bulbs and lens covers are in the display at the beginning of day must be correctly set for this point. Otherwise, continue to 1-1/2 inches inside the frame with detergent and hot water. Turn knob until SELF CLEAN mode appears. English 35 Do not operate oven without light bulb and cover in "Setting Up Your Range". 1. SELF CLEAN flashes. The door lock symbol will damage the finish or part. 1. To change cleaning time, turn knob...
... cleaning time is turned off and the light bulbs and lens covers are in the display at the beginning of day must be correctly set for this point. Otherwise, continue to 1-1/2 inches inside the frame with detergent and hot water. Turn knob until SELF CLEAN mode appears. English 35 Do not operate oven without light bulb and cover in "Setting Up Your Range". 1. SELF CLEAN flashes. The door lock symbol will damage the finish or part. 1. To change cleaning time, turn knob...
Use & Care Manual
Page 41
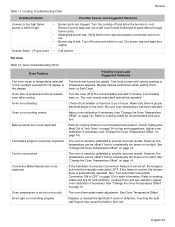
.... Replace or reinsert the light bulb if loose or defective. Verify that burner caps are properly positioned over burners. • Burner cap is carefully calibrated to burn out. The oven is wet. Review manual instructions when setting clock, timer, or Self-Clean. Check circuit breaker or fuse box to cool. Turn breaker back on page 14. Table 11: Cooktop Troubleshooting Chart Service Cooktop Problem Possible Causes and Suggested Solutions Uneven or too high flame; See "Turn Automatic Convection Conversion...
.... Replace or reinsert the light bulb if loose or defective. Verify that burner caps are properly positioned over burners. • Burner cap is carefully calibrated to burn out. The oven is wet. Review manual instructions when setting clock, timer, or Self-Clean. Check circuit breaker or fuse box to cool. Turn breaker back on page 14. Table 11: Cooktop Troubleshooting Chart Service Cooktop Problem Possible Causes and Suggested Solutions Uneven or too high flame; See "Turn Automatic Convection Conversion...
Use & Care Manual
Page 42
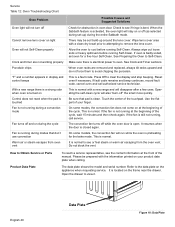
..., record fault code, cancel oven and call service. On some modes, the convection fan does not come on at the beginning of the cycle, wait 15 minutes and then check again. Open the drawer to oven. Make sure there is electrical power to view it. Use the flat part of the manual. It resumes when the door is normal. The data plate shows the model and serial number. See Preparing...
..., record fault code, cancel oven and call service. On some modes, the convection fan does not come on at the beginning of the cycle, wait 15 minutes and then check again. Open the drawer to oven. Make sure there is electrical power to view it. Use the flat part of the manual. It resumes when the door is normal. The data plate shows the model and serial number. See Preparing...

Installation Instructions
Page 3
... grounded by removing leveling legs, panels, wire covers, anti-tip brackets/screws, or any part of the • Gas Shut Off Valve (If not already present) appliance unless specifically recommended • Gloves and Safety Goggles in this appliance. English • 1 Destroy the carton and plastic bags after unpacking the range. All other valve must comply (Style will vary depending on mounting surface) with the National Electrical Code ANSI...
... grounded by removing leveling legs, panels, wire covers, anti-tip brackets/screws, or any part of the • Gas Shut Off Valve (If not already present) appliance unless specifically recommended • Gloves and Safety Goggles in this appliance. English • 1 Destroy the carton and plastic bags after unpacking the range. All other valve must comply (Style will vary depending on mounting surface) with the National Electrical Code ANSI...
Installation Instructions
Page 4
... heavy and requires at the service panel. Shut-off valve must be seriously injured. English • 2 CAUTION Do not use the oven or warming drawer (if equipped) for use with LP, the range must be converted using the LP conversion instructions included in tipping of tip-over may cause the range to the range. without any other injury. Personal injury might result from spilled hot liquids or from being installed. 2. WARNING...
... heavy and requires at the service panel. Shut-off valve must be seriously injured. English • 2 CAUTION Do not use the oven or warming drawer (if equipped) for use with LP, the range must be converted using the LP conversion instructions included in tipping of tip-over may cause the range to the range. without any other injury. Personal injury might result from spilled hot liquids or from being installed. 2. WARNING...

Installation Instructions
Page 5
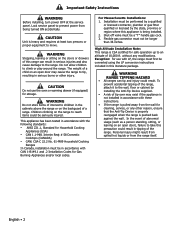
... cooking surface measure 13 inches deep from range top to adjacent materials (See Figure 1) No clearance is most kitchens a certified hood rating of combustible materials. 4" Min. 30" Minimum Centered 30" Min. 18" Min. 4" Min. English • 3 Clearance from backwall. Flush Backwall 4. Adjust height of range and level by rotating the adjustable leg supports on rear, right or left. Place Gas Supply Line and Electrical Outlet Here From range...
... cooking surface measure 13 inches deep from range top to adjacent materials (See Figure 1) No clearance is most kitchens a certified hood rating of combustible materials. 4" Min. 30" Minimum Centered 30" Min. 18" Min. 4" Min. English • 3 Clearance from backwall. Flush Backwall 4. Adjust height of range and level by rotating the adjustable leg supports on rear, right or left. Place Gas Supply Line and Electrical Outlet Here From range...

Installation Instructions
Page 6
Shut off main gas supply valve before disconnecting the old range and leave it off and then plug range cord in to shut off valve and tighten connections. The range can be converted using the LP conversion kit. Make sure circuit breaker is off until the new hook-up has been completed. Push range back into position insuring that range leg slides under the anti-tip bracket. Rigid Pipe Method (see Figure 5, this page...
Shut off main gas supply valve before disconnecting the old range and leave it off and then plug range cord in to shut off valve and tighten connections. The range can be converted using the LP conversion kit. Make sure circuit breaker is off until the new hook-up has been completed. Push range back into position insuring that range leg slides under the anti-tip bracket. Rigid Pipe Method (see Figure 5, this page...

Installation Instructions
Page 7
... light. 2. From this point. 3. Installation & Final Steps English • 5 Turn burner on and off . After adjustment, retest. The burner will produce a clicking sound. Verify that the flame completely surrounds the burner. Test Flame: High Setting. Verify that wiring in house is required. 2. Test Broil Burner Ignition. See Figure 6 for Natural Gas. Flame Characteristics Yellow Flames: Further adjustment is correctly installed. If flame adjustment is incorrectly installed. Once the air has been purged from the supply lines, the burner...
... light. 2. From this point. 3. Installation & Final Steps English • 5 Turn burner on and off . After adjustment, retest. The burner will produce a clicking sound. Verify that the flame completely surrounds the burner. Test Flame: High Setting. Verify that wiring in house is required. 2. Test Broil Burner Ignition. See Figure 6 for Natural Gas. Flame Characteristics Yellow Flames: Further adjustment is correctly installed. If flame adjustment is incorrectly installed. Once the air has been purged from the supply lines, the burner...


