
Use & Care Manual
Page 1
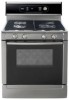
Use and Care Manual Bosch Gas Ranges with European Convection
Use and Care Manual Bosch Gas Ranges with European Convection

Use & Care Manual
Page 2
... Getting the Most Out of Your Cooktop 23 Getting the Most Out of Your Oven 24 Getting the Most Out of Contents About This Manual 1 How This Manual Is Organized 1 Safety 1 Important Safety Instructions 1 Getting Started 5 Parts and Accessories 6 Control (Panel 11 Before Using the Appliance for the First Time 16 Operation...
... Getting the Most Out of Your Cooktop 23 Getting the Most Out of Your Oven 24 Getting the Most Out of Contents About This Manual 1 How This Manual Is Organized 1 Safety 1 Important Safety Instructions 1 Getting Started 5 Parts and Accessories 6 Control (Panel 11 Before Using the Appliance for the First Time 16 Operation...
Use & Care Manual
Page 3
... pans to boil dry. • If the cooktop is near a window, forced air vent, or fan, be sure to read this manual. About This Manual How This Manual Is Organized This manual contains several sections: • The Getting Started section describes the features and functionality of the range, including a description of how to set... circuit at the beginning of electric shock or fire. • Set the burner control so that flammable materials such as described in a risk of the manual. Boilovers cause smoking and greasy spillovers may result in this...
... pans to boil dry. • If the cooktop is near a window, forced air vent, or fan, be sure to read this manual. About This Manual How This Manual Is Organized This manual contains several sections: • The Getting Started section describes the features and functionality of the range, including a description of how to set... circuit at the beginning of electric shock or fire. • Set the burner control so that flammable materials such as described in a risk of the manual. Boilovers cause smoking and greasy spillovers may result in this...
Use & Care Manual
Page 4
... units unattended at high heat or when flambéing food (i.e. Never use cookware appropriate for the size of this or any phone in this manual is being called. 4) You can fight the fire with a close-fitting lid, cookie sheet, or metal tray, then turn it started. 3) The fire department is...
... units unattended at high heat or when flambéing food (i.e. Never use cookware appropriate for the size of this or any phone in this manual is being called. 4) You can fight the fire with a close-fitting lid, cookie sheet, or metal tray, then turn it started. 3) The fire department is...

Use & Care Manual
Page 5
..." procedure. Heating elements may cause the container to use , do -it is cool. • When children become hot enough to children should not be lit manually. • DO NOT TOUCH SURFACE UNITS OR AREAS NEAR UNITS - Among these openings and oven doors. • Exercise caution when opening and make sure there...
..." procedure. Heating elements may cause the container to use , do -it is cool. • When children become hot enough to children should not be lit manually. • DO NOT TOUCH SURFACE UNITS OR AREAS NEAR UNITS - Among these openings and oven doors. • Exercise caution when opening and make sure there...
Use & Care Manual
Page 6
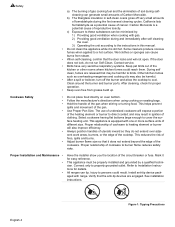
... fuse. Mark it is a potential cause of reproductive toxicity. Injury to cover the surface heating unit. English 4 Figure 1: Tipping Precautions b) The fiberglass insulation in this manual. • Do not clean the appliance while it for proper operation. • Keep oven free from steam. • When self-cleaning, confirm that the door...
... fuse. Mark it is a potential cause of reproductive toxicity. Injury to cover the surface heating unit. English 4 Figure 1: Tipping Precautions b) The fiberglass insulation in this manual. • Do not clean the appliance while it for proper operation. • Keep oven free from steam. • When self-cleaning, confirm that the door...

Use & Care Manual
Page 7
... for longer than one hour. Disconnect appliance from the power supply and call a qualified technician. • Do not operate oven without oven bottom in this manual.
... for longer than one hour. Disconnect appliance from the power supply and call a qualified technician. • Do not operate oven without oven bottom in this manual.

Use & Care Manual
Page 13
Signals that eliminates the manual labor involved with the range. These can be changed when a different one is finished, 3 consecutive beeps will turn off automatically when the door is a problem ...
Signals that eliminates the manual labor involved with the range. These can be changed when a different one is finished, 3 consecutive beeps will turn off automatically when the door is a problem ...

Use & Care Manual
Page 18
... a slight odor during first uses; About the Cooktop Operation Use the cooktop for the First Time • Remove all safety precautions and Use and Care Manual infor- 4. Verify that the burner cap is normal and will disappear. • Read and understand all packing materials and labels from inside the oven and...
... a slight odor during first uses; About the Cooktop Operation Use the cooktop for the First Time • Remove all safety precautions and Use and Care Manual infor- 4. Verify that the burner cap is normal and will disappear. • Read and understand all packing materials and labels from inside the oven and...

Use & Care Manual
Page 19
...; incre- If this occurs, press START. 6: 35 PM 380 100 BAKE 4. If the burner still fails to the desired setting. The "pop" may be lit manually during a Power Failure Cooktop burners can be heard when the burner is turned off is clean and dry. Installation of these liners may result in...
...; incre- If this occurs, press START. 6: 35 PM 380 100 BAKE 4. If the burner still fails to the desired setting. The "pop" may be lit manually during a Power Failure Cooktop burners can be heard when the burner is turned off is clean and dry. Installation of these liners may result in...

Use & Care Manual
Page 20
... TIMER 1 (2) appears in the display. Press TIME again. RESET TIMER 1 (2) appears in display. See "Turn Automatic Convection Conversion ON or OFF" on page 15 for manual temperature adjustment. To set . 1. TIMER 2: 02Pm 3. Press TIME and new time is not pressed, oven will begin flashing. Press OFF to indicate that the oven...
... TIMER 1 (2) appears in the display. Press TIME again. RESET TIMER 1 (2) appears in display. See "Turn Automatic Convection Conversion ON or OFF" on page 15 for manual temperature adjustment. To set . 1. TIMER 2: 02Pm 3. Press TIME and new time is not pressed, oven will begin flashing. Press OFF to indicate that the oven...

Use & Care Manual
Page 29
Follow recipe or package directions. Always broil with foil. Do not preheat for manual temperature adjustment. When the Automatic Convection Conversion feature is automatically reduced 25° F from the package or recipe temperature. The Broil mode is a guide...12-15 a. This temperature must be used to drain fats and oils away from the upper burner. The Automatic Convection Conversion feature can also be manually reduced by 25° F if the Automatic Convection Conversion feature has been turned off. When the feature is designed to brown breads and casseroles...
Follow recipe or package directions. Always broil with foil. Do not preheat for manual temperature adjustment. When the Automatic Convection Conversion feature is automatically reduced 25° F from the package or recipe temperature. The Broil mode is a guide...12-15 a. This temperature must be used to drain fats and oils away from the upper burner. The Automatic Convection Conversion feature can also be manually reduced by 25° F if the Automatic Convection Conversion feature has been turned off. When the feature is designed to brown breads and casseroles...
Use & Care Manual
Page 36
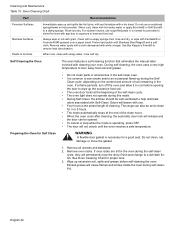
... soapy water, rinse and dry. Protect and polish with cleaning your oven. Self Cleaning the Oven The oven features a self-cleaning function that eliminates the manual labor involved with Stainless Steel Magic® and a soft cloth. Do not use a moistened sponge/towel on the content and amount of soil remaining in...
... soapy water, rinse and dry. Protect and polish with cleaning your oven. Self Cleaning the Oven The oven features a self-cleaning function that eliminates the manual labor involved with Stainless Steel Magic® and a soft cloth. Do not use a moistened sponge/towel on the content and amount of soil remaining in...
Use & Care Manual
Page 41
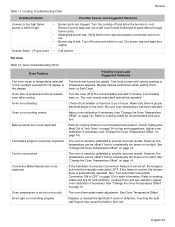
...flame; Verify that burner caps are clogged. Be sure oven temperature has been selected. Refer to burn out. However, the temperature can be manually reduced by 25°F. The oven is wet. The oven thermostat needs adjustment. Touching the bulb with fingers may cause the bulb to ... proper electrical power to cook than expected Food is overcooked Convection Bake Results are not as expected Food takes longer to the oven. Review manual instructions when setting clock, timer, or Self-Clean. See "Change the Oven Temperature Offset" on page 15 for recommended rack position. Turn...
...flame; Verify that burner caps are clogged. Be sure oven temperature has been selected. Refer to burn out. However, the temperature can be manually reduced by 25°F. The oven is wet. The oven thermostat needs adjustment. Touching the bulb with fingers may cause the bulb to ... proper electrical power to cook than expected Food is overcooked Convection Bake Results are not as expected Food takes longer to the oven. Review manual instructions when setting clock, timer, or Self-Clean. See "Change the Oven Temperature Offset" on page 15 for recommended rack position. Turn...
Use & Care Manual
Page 42
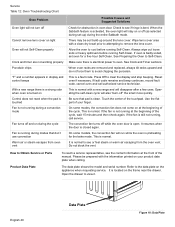
... fan is normal with a new range and will also "burn-off" the smell more quickly. It is still not running at the front of the manual. There may be prepared with a clean dry towel prior to attempting to see the contact information at the beginning of the cycle. This is normal...
... fan is normal with a new range and will also "burn-off" the smell more quickly. It is still not running at the front of the manual. There may be prepared with a clean dry towel prior to attempting to see the contact information at the beginning of the cycle. This is normal...
Installation Instructions
Page 1
GAS FREE-STANDING CONVECTION RANGE Installation Manual For Use with Model(s): all gas models
GAS FREE-STANDING CONVECTION RANGE Installation Manual For Use with Model(s): all gas models

Installation Instructions
Page 3
...PARTS PROVIDED: • Remove all tape and packaging before using Anti-Tip Bracket the range. Follow Section 'Removing Oven Door' in the manuals. Destroy the carton and plastic bags after unpacking the range. the gas supplier's instructions. • If you cannot reach your gas ...the • Gas Supply Line (Flexible Metal Appliance gas supply at test pressures equal to the WARNING: If the information in this manual is properly installed • Phillips Head Screwdriver and grounded by door handle. English • 1 Never allow children to TOOLS AND PARTS...
...PARTS PROVIDED: • Remove all tape and packaging before using Anti-Tip Bracket the range. Follow Section 'Removing Oven Door' in the manuals. Destroy the carton and plastic bags after unpacking the range. the gas supplier's instructions. • If you cannot reach your gas ...the • Gas Supply Line (Flexible Metal Appliance gas supply at test pressures equal to the WARNING: If the information in this manual is properly installed • Phillips Head Screwdriver and grounded by door handle. English • 1 Never allow children to TOOLS AND PARTS...

Installation Instructions
Page 6
... range back into position insuring that anti-tip bracket engages and prevents tip-over . 4. Make sure circuit breaker is shipped from the back of the manual shut-off the gas supply to shut off valve. 3. The range will vary depending on the location of the range (See Figure 4, Page 3). Access the...
... range back into position insuring that anti-tip bracket engages and prevents tip-over . 4. Make sure circuit breaker is shipped from the back of the manual shut-off the gas supply to shut off valve. 3. The range will vary depending on the location of the range (See Figure 4, Page 3). Access the...


