
Use & Care Manual
Page 1
Use and Care Manual Bosch Gas Ranges with European Convection
Use and Care Manual Bosch Gas Ranges with European Convection
Use & Care Manual
Page 3
...8226; The Cleaning and Maintenance section describes how to clean and maintain your appliance. • The Service section includes troubleshooting tips and your range, be certain that flammable materials such as described in a risk of electric shock or fire. • Set the burner control so ...8226; The Getting Started section describes the features and functionality of the range, including a description of how to set up the range and operate the control panel. • The Operation sections describe how to operate each range component. • The Getting the Most out of Your Appliance ...
...8226; The Cleaning and Maintenance section describes how to clean and maintain your appliance. • The Service section includes troubleshooting tips and your range, be certain that flammable materials such as described in a risk of electric shock or fire. • Set the burner control so ...8226; The Getting Started section describes the features and functionality of the range, including a description of how to set up the range and operate the control panel. • The Operation sections describe how to operate each range component. • The Getting the Most out of Your Appliance ...
Use & Care Manual
Page 4
... immediately, EVACUATE AND CALL THE FIRE DEPARTMENT. Installation and service must be burned. TO REDUCE THE RISK OF INJURY TO PERSONS IN THE EVENT OF A RANGE TOP GREASE FIRE, OBSERVE THE FOLLOWING: a) SMOTHER FLAMES with baking soda. Boilovers cause smoking and greasy spillovers that they extend beyond the edges of this...
... immediately, EVACUATE AND CALL THE FIRE DEPARTMENT. Installation and service must be burned. TO REDUCE THE RISK OF INJURY TO PERSONS IN THE EVENT OF A RANGE TOP GREASE FIRE, OBSERVE THE FOLLOWING: a) SMOTHER FLAMES with baking soda. Boilovers cause smoking and greasy spillovers that they extend beyond the edges of this...
Use & Care Manual
Page 6
... gas. 2) Providing good ventilation during and immediately after self cleaning the oven. 3) Operating the unit according to a hot surface. All ranges can cause burns from grease build up. Install anti-tip device packaged with one or more surface units of reproductive toxicity. This helps prevent...Wet clothes or sponges can tip. This appliance is a potential cause of different size. See installation instructions. Carbon Monoxide is equipped with range. If the door does not lock, do not extend over adjacent work areas, burners, or the edge of the cooktop. Verify that ...
... gas. 2) Providing good ventilation during and immediately after self cleaning the oven. 3) Operating the unit according to a hot surface. All ranges can cause burns from grease build up. Install anti-tip device packaged with one or more surface units of reproductive toxicity. This helps prevent...Wet clothes or sponges can tip. This appliance is a potential cause of different size. See installation instructions. Carbon Monoxide is equipped with range. If the door does not lock, do not extend over adjacent work areas, burners, or the edge of the cooktop. Verify that ...

Use & Care Manual
Page 9
... flat racks • Two flat racks and one full extension rack • Two flat racks and one for further information on . Depending on model, the range is turned on each. Burner Grates Getting Started may not light or the flame may not burn completely or correctly. They provide a more predictable heat.
... flat racks • Two flat racks and one full extension rack • Two flat racks and one for further information on . Depending on model, the range is turned on each. Burner Grates Getting Started may not light or the flame may not burn completely or correctly. They provide a more predictable heat.
Use & Care Manual
Page 10
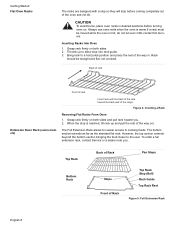
... warm.If a rack must be straight and flat, not crooked. Grasp rack firmly on both sides and pull rack toward the back wall of the range. Top Rack Bottom Rack Back of Rack Pan Stops Stops Front of Rack Top Rack Stop (Ball) Rack Guide Top Rack Rest Figure 5: Full Extension...
... warm.If a rack must be straight and flat, not crooked. Grasp rack firmly on both sides and pull rack toward the back wall of the range. Top Rack Bottom Rack Back of Rack Pan Stops Stops Front of Rack Top Rack Stop (Ball) Rack Guide Top Rack Rest Figure 5: Full Extension...

Use & Care Manual
Page 13
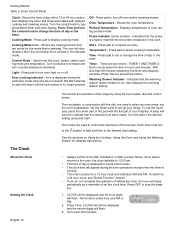
... fan operates during preheat for another step or START to be pressed. End-of an entry. Signals that eliminates the manual labor involved with the range. Oven Control Panel Clock Oven Temperature Control Knob Light AM PM Time Off Cooking Mode Temperature Start Cooking Lock Indicator Preheat Temperature Mode Indicator Figure...
... fan operates during preheat for another step or START to be pressed. End-of an entry. Signals that eliminates the manual labor involved with the range. Oven Control Panel Clock Oven Temperature Control Knob Light AM PM Time Off Cooking Mode Temperature Start Cooking Lock Indicator Preheat Temperature Mode Indicator Figure...
Use & Care Manual
Page 14
... Off - The icon will beep periodically as a reminder to turn to the symbol to light and then to set or change the time of the range by using the touch pads, dial and control knobs. Warming Drawer Indicator - The touchpads, in conjunction with a 12 or 24 hour option. DO ...NOT attempt to control the heat level of your range. Start - With less than 60 minutes remaining, the timer also displays seconds. See the sections on Using the Cooktop, Using the Oven and Using ...
... Off - The icon will beep periodically as a reminder to turn to the symbol to light and then to set or change the time of the range by using the touch pads, dial and control knobs. Warming Drawer Indicator - The touchpads, in conjunction with a 12 or 24 hour option. DO ...NOT attempt to control the heat level of your range. Start - With less than 60 minutes remaining, the timer also displays seconds. See the sections on Using the Cooktop, Using the Oven and Using ...

Use & Care Manual
Page 15
... for beep volume is displayed. 3. When all settings for display to change hours. 5. Turn knob clockwise until CLOCK DISPLAY is now set or change the range features listed below. Access SELECT FUNCTIONS Menu. 2. Press Time. Turn knob to show next feature. 3. Press START to select CLOCK. 3. Turn knob clockwise until SELECT...
... for beep volume is displayed. 3. When all settings for display to change hours. 5. Turn knob clockwise until CLOCK DISPLAY is now set or change the range features listed below. Access SELECT FUNCTIONS Menu. 2. Press Time. Turn knob to show next feature. 3. Press START to select CLOCK. 3. Turn knob clockwise until SELECT...

Use & Care Manual
Page 18
... results. this is positioned correctly on page 23 for surface cooking applications such as boiling, frying, simmering, steaming and sauteing. Operation - Remove packing materials from range. Press Start to operate the cooktop. Verify that the burner cap is normal and will disappear. • Read and understand all packing materials and labels...
... results. this is positioned correctly on page 23 for surface cooking applications such as boiling, frying, simmering, steaming and sauteing. Operation - Remove packing materials from range. Press Start to operate the cooktop. Verify that the burner cap is normal and will disappear. • Read and understand all packing materials and labels...

Use & Care Manual
Page 20
.... 11. Press TIME again and the hours will read AUTO CONV BAKE. Simply enter the package or recipe temperature when setting the mode and the range calculates the correct temperature. Press TIME again. Select either TIMER 1 or 2. 0: 00 AM 2. TIMER 1 English 18 Turn the knob to step 4. Once cooking has been...
.... 11. Press TIME again and the hours will read AUTO CONV BAKE. Simply enter the package or recipe temperature when setting the mode and the range calculates the correct temperature. Press TIME again. Select either TIMER 1 or 2. 0: 00 AM 2. TIMER 1 English 18 Turn the knob to step 4. Once cooking has been...

Use & Care Manual
Page 21
... exit the Timer mode. Press OFF to select CLEAR TIMER 1(2). Press START. 4. Press TIME. HR:MIN TIMED BAKE 7. Set minutes. After cooking is not pressed, range will beep and display will turn off . Follow steps 1 through 5 above. 2. Press TIME. 7. Note: The clock automatically calculates time of a Timed Mode 1. Note: Remove food...
... exit the Timer mode. Press OFF to select CLEAR TIMER 1(2). Press START. 4. Press TIME. HR:MIN TIMED BAKE 7. Set minutes. After cooking is not pressed, range will beep and display will turn off . Follow steps 1 through 5 above. 2. Press TIME. 7. Note: The clock automatically calculates time of a Timed Mode 1. Note: Remove food...

Use & Care Manual
Page 22
... the Probe Changing the Oven Temperature When Using the Probe Changing the Probe Temperature See "Set the Sabbath Feature" on recommended oven rack. The temperature range for detailed instructions. Insert the probe into meat. 2. Make sure the probe is complete. See "Inserting the Probe" on rack in the upper right hand...
... the Probe Changing the Oven Temperature When Using the Probe Changing the Probe Temperature See "Set the Sabbath Feature" on recommended oven rack. The temperature range for detailed instructions. Insert the probe into meat. 2. Make sure the probe is complete. See "Inserting the Probe" on rack in the upper right hand...

Use & Care Manual
Page 25
...; burner used and • the cook's preference. For best results select pans with a flat base (See "Cookware Selection Guide" on page 23 for heat settings. A range of heat settings are best. Use this chart as a guide for details). • Choose a medium-weight pan (rather than larger volumes. The bottom of the...
...; burner used and • the cook's preference. For best results select pans with a flat base (See "Cookware Selection Guide" on page 23 for heat settings. A range of heat settings are best. Use this chart as a guide for details). • Choose a medium-weight pan (rather than larger volumes. The bottom of the...

Use & Care Manual
Page 29
... • Browning as cookie sheets without sides. • Center baking pans side to prevent sticking • Use the broil pan and grid included with your range • Do not cover the broiler grid with the door closed. When the feature is automatically reduced 25° F from the package or recipe temperature... to cooking thin, tender cuts of meat (1" or less), poultry and fish. Simply enter the package or recipe temperature when setting the mode and the range calculates the correct temperature.
... • Browning as cookie sheets without sides. • Center baking pans side to prevent sticking • Use the broil pan and grid included with your range • Do not cover the broiler grid with the door closed. When the feature is automatically reduced 25° F from the package or recipe temperature... to cooking thin, tender cuts of meat (1" or less), poultry and fish. Simply enter the package or recipe temperature when setting the mode and the range calculates the correct temperature.

Use & Care Manual
Page 30
... with foil 10-15 minutes after removing from the lower burner and an element behind the backwall. Broiling times are based on cooking with the range for roasting. The Convection Roast mode is a crispier exterior that seals in juices. Never use cooking bags. • Use the broil pan and grid provided...
... with foil 10-15 minutes after removing from the lower burner and an element behind the backwall. Broiling times are based on cooking with the range for roasting. The Convection Roast mode is a crispier exterior that seals in juices. Never use cooking bags. • Use the broil pan and grid provided...

Use & Care Manual
Page 34
...; or S.O.S.®. from staining and pitting; • Wipe area dry to stainless steel. King® stainless steel liquid • Rub lightly in the direction of range. • Hot sudsy water; in knob with a stiff nylon bris- Cleaning and Maintenance Table 9: Cooktop Cleaning Chart Cooktop Part/Material Burner Base / Enameled Steel Burner...
...; or S.O.S.®. from staining and pitting; • Wipe area dry to stainless steel. King® stainless steel liquid • Rub lightly in the direction of range. • Hot sudsy water; in knob with a stiff nylon bris- Cleaning and Maintenance Table 9: Cooktop Cleaning Chart Cooktop Part/Material Burner Base / Enameled Steel Burner...
Use & Care Manual
Page 36
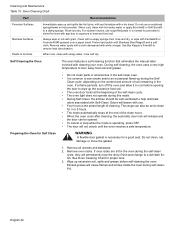
... soapy water, rinse and dry. Self Cleaning the Oven The oven features a self-cleaning function that eliminates the manual labor involved with white vinegar. The range can be set to cool before self-cleaning the oven. Remove all utensils and bakeware. 2. See Oven Cleaning Chart for Self Clean • Do not...
... soapy water, rinse and dry. Self Cleaning the Oven The oven features a self-cleaning function that eliminates the manual labor involved with white vinegar. The range can be set to cool before self-cleaning the oven. Remove all utensils and bakeware. 2. See Oven Cleaning Chart for Self Clean • Do not...

Use & Care Manual
Page 37
.... Do hand-clean frame area outside the gasket. Some areas of hours. Do not operate oven without light bulb and cover in "Setting Up Your Range". 1. Do not hand-clean the gasket. The door lock symbol will damage the finish or part. 1. If door does not lock, press OFF and do...
.... Do hand-clean frame area outside the gasket. Some areas of hours. Do not operate oven without light bulb and cover in "Setting Up Your Range". 1. Do not hand-clean the gasket. The door lock symbol will damage the finish or part. 1. If door does not lock, press OFF and do...

Use & Care Manual
Page 39
... heavy and fragile. Door should be sure that it may swing in personal injury or product damage. • To avoid injury from you (back toward range). 3. Handle carefully to remove the oven door. Hold firmly, the door is heavy. 6. Do not grasp the handle as it is fixed in a convenient and...
... heavy and fragile. Door should be sure that it may swing in personal injury or product damage. • To avoid injury from you (back toward range). 3. Handle carefully to remove the oven door. Hold firmly, the door is heavy. 6. Do not grasp the handle as it is fixed in a convenient and...


