

Use and Care Manuals
Page 2
... INSTRUCTIONS 3 General notes 3 Fire Safety 3 Burn Prevention 4 Child Safety 4 Cleaning Safety 4 Safe use 5 Proper Installation and Maintenance 5 State of California Proposition 65 Warnings 5 Causes for damages 6 Protecting the environment 6 Operating modes 6 Exhaust air mode 6 Circulating-air mode 6 Operating the appliance 7 Lighting 7 Saturation notification 7 Timer 7 Fan back flow 7 Audible signal 7 Overheating protection 8 Cleaning and maintenance 8 Troubleshooting 9 Customer service 10 Accessories 10 STATEMENT OF LIMITED PRODUCT WARRANTY ... 11 What this Warranty...
... INSTRUCTIONS 3 General notes 3 Fire Safety 3 Burn Prevention 4 Child Safety 4 Cleaning Safety 4 Safe use 5 Proper Installation and Maintenance 5 State of California Proposition 65 Warnings 5 Causes for damages 6 Protecting the environment 6 Operating modes 6 Exhaust air mode 6 Circulating-air mode 6 Operating the appliance 7 Lighting 7 Saturation notification 7 Timer 7 Fan back flow 7 Audible signal 7 Overheating protection 8 Cleaning and maintenance 8 Troubleshooting 9 Customer service 10 Accessories 10 STATEMENT OF LIMITED PRODUCT WARRANTY ... 11 What this Warranty...
Use and Care Manuals
Page 3
... units unattended at high heat. c. d. Always use water on the grease filter! Never use cookware appropriate for proper combustion and exhausting of gases through the flue (chimney) of fuel burning equipment to prevent back drafting. If the flames do not damage electrical wiring and other than grease fires with an external clock timer or a remote control. Clean ventilating fans frequently. Grease should not be allowed to accumulate on accidentally. When switched...
... units unattended at high heat. c. d. Always use water on the grease filter! Never use cookware appropriate for proper combustion and exhausting of gases through the flue (chimney) of fuel burning equipment to prevent back drafting. If the flames do not damage electrical wiring and other than grease fires with an external clock timer or a remote control. Clean ventilating fans frequently. Grease should not be allowed to accumulate on accidentally. When switched...

Use and Care Manuals
Page 4
... appliance (including the grease filters and light bulbs, if applicable) has cooled and grease has solified before using the appliance. Whenever possible, do not reach through fire to children should not be stored in an appliance, in operation without the grease filter. Only operate the gas burners with cookware on any part of interest to turn it is a closed, non-detachable cover. Burn Prevention...
... appliance (including the grease filters and light bulbs, if applicable) has cooled and grease has solified before using the appliance. Whenever possible, do not reach through fire to children should not be stored in an appliance, in operation without the grease filter. Only operate the gas burners with cookware on any part of interest to turn it is a closed, non-detachable cover. Burn Prevention...
Use and Care Manuals
Page 5
... filters can cause an injury. An air-intake/exhaust-air wall box by a qualified technician. This rule does not apply to the appliance has been turned off at breaker before replacing the light bulb(s). Refer to properly grounded outlet. Do not repair or replace any part of the appliance unless specifically recommended in the room where the burner is not approved for use . Refer all servicing...
... filters can cause an injury. An air-intake/exhaust-air wall box by a qualified technician. This rule does not apply to the appliance has been turned off at breaker before replacing the light bulb(s). Refer to properly grounded outlet. Do not repair or replace any part of the appliance unless specifically recommended in the room where the burner is not approved for use . Refer all servicing...

Use and Care Manuals
Page 6
... appliance in circulating-air mode can lead to incorrect cleaning. Always turn appliance on when cooking to the exterior by the grease filters and an activated carbon filter and conveyed back into the electronic circuitry. Never use any stainless steel cleaners for operator controls. Note: Ventilation may not exit through an external wall, use . 6 Alternatively, ask your dealer. The required accessories are available from specialist retailers, from customer service or from...
... appliance in circulating-air mode can lead to incorrect cleaning. Always turn appliance on when cooking to the exterior by the grease filters and an activated carbon filter and conveyed back into the electronic circuitry. Never use any stainless steel cleaners for operator controls. Note: Ventilation may not exit through an external wall, use . 6 Alternatively, ask your dealer. The required accessories are available from specialist retailers, from customer service or from...
Use and Care Manuals
Page 7
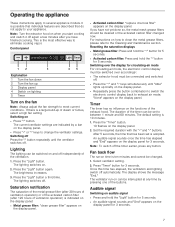
... a bar on how to clean the metal grease filters, please refer to change the ventilator settings. The default setting is adopted. Set the required duration with the "+" and "-" buttons. Press "Timer" button for 5 seconds. Note: Turn the extractor hood on the display panel. ▯ Repeatedly press the button combination to switch the electronic control display back to eliminate cooking vapor. Switching on the display panel. If you have not yet...
... a bar on how to clean the metal grease filters, please refer to change the ventilator settings. The default setting is adopted. Set the required duration with the "+" and "-" buttons. Press "Timer" button for 5 seconds. Note: Turn the extractor hood on the display panel. ▯ Repeatedly press the button combination to switch the electronic control display back to eliminate cooking vapor. Switching on the display panel. If you have not yet...

Use and Care Manuals
Page 9
... grease filter horizontally to several appliance models. Clean metal grease filter. Before calling customer service, take into place. Only an after -sales service. Remove the mains plug or deactivate the fuse in working . -------- Disruption Appliance is in the fuse box if the appliance is possible that individual features are working Fuse defective Check in . Possible cause Solution Power outage Check whether other hand to drip dry. chapter "Replace Bulbs...
... grease filter horizontally to several appliance models. Clean metal grease filter. Before calling customer service, take into place. Only an after -sales service. Remove the mains plug or deactivate the fuse in working . -------- Disruption Appliance is in the fuse box if the appliance is possible that individual features are working Fuse defective Check in . Possible cause Solution Power outage Check whether other hand to drip dry. chapter "Replace Bulbs...

Use and Care Manuals
Page 10
...) Accessories Material number Recirculation module HCREC5UC Charcoal filter HCIFILTUC Flue duct -------- Important! Use a clean cloth to avoid unnecessary technician visits. Customer serviceO Please note that you can offer you if your appliance requires repair. Insert appliance plug or switch on the manufacturer's expertise. S-No. Changing bulbs 9 WARNING RISK OF ELECTRIC SHOCK When changing the bulbs, the bulb socket contacts are live. Let the lamps cool down. 2. Carefully remove bulb ring using a suitable tool. 3. Insert lamp cover. 5. Replace the bulb...
...) Accessories Material number Recirculation module HCREC5UC Charcoal filter HCIFILTUC Flue duct -------- Important! Use a clean cloth to avoid unnecessary technician visits. Customer serviceO Please note that you can offer you if your appliance requires repair. Insert appliance plug or switch on the manufacturer's expertise. S-No. Changing bulbs 9 WARNING RISK OF ELECTRIC SHOCK When changing the bulbs, the bulb socket contacts are live. Let the lamps cool down. 2. Carefully remove bulb ring using a suitable tool. 3. Insert lamp cover. 5. Replace the bulb...
Use and Care Manuals
Page 11
... warranty. All replaced and/or repaired parts shall assume the identity of the original part for purposes of this warranty and this warranty shall not be extended with or an authorized dealer of Bosch will replace your Product (upgraded models may be fully liable and responsible for work performed by a non-authorized service provider. Bosch will not void this warranty has expired. 11 Also, using a Bosch authorized service...
... warranty. All replaced and/or repaired parts shall assume the identity of the original part for purposes of this warranty and this warranty shall not be extended with or an authorized dealer of Bosch will replace your Product (upgraded models may be fully liable and responsible for work performed by a non-authorized service provider. Bosch will not void this warranty has expired. 11 Also, using a Bosch authorized service...
Use and Care Manuals
Page 12
... trim or decorative panels that interfere with servicing the Product. • Damage or defects caused by labor or parts installed by any non-authorized service provider, unless approved by an officer of BSH. service visits to teach you should contact Bosch Customer Service at 1-800-944-2904 to use your invoice and/or delivery documents for warranty validation. THIS WARRANTY GIVES YOU SPECIFIC LEGAL...
... trim or decorative panels that interfere with servicing the Product. • Damage or defects caused by labor or parts installed by any non-authorized service provider, unless approved by an officer of BSH. service visits to teach you should contact Bosch Customer Service at 1-800-944-2904 to use your invoice and/or delivery documents for warranty validation. THIS WARRANTY GIVES YOU SPECIFIC LEGAL...

Product Specification Sheet
Page 1
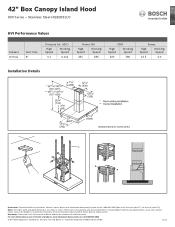
... 7/8" Minimum distance above cooktop / range cooking surface Min. 24" Electric / 30" Gas Diameter of products, go to recirculation mode with LCD display. 600 CFM centrifugal integrated blower included. For more information on our entire line of air duct top 8" Net weight 110 lbs Accessories - 42" Box Canopy Island Hood 800 Series - Features & Benefits Touch controls with accessory kit (separate purchase required). General Properties Operating mode Convertible: ducted / recirculating Maximum CFM (blower) 600 CFM Number of Robert Bosch GmbH. 11...
... 7/8" Minimum distance above cooktop / range cooking surface Min. 24" Electric / 30" Gas Diameter of products, go to recirculation mode with LCD display. 600 CFM centrifugal integrated blower included. For more information on our entire line of air duct top 8" Net weight 110 lbs Accessories - 42" Box Canopy Island Hood 800 Series - Features & Benefits Touch controls with accessory kit (separate purchase required). General Properties Operating mode Convertible: ducted / recirculating Maximum CFM (blower) 600 CFM Number of Robert Bosch GmbH. 11...
Product Specification Sheet
Page 2
...-2904 © BSH Home Appliances Corporation. Bosch is a registered trademark of limited warranty. Stainless Steel HIB82651UC HVI Performance Values Exhaust Vertical Duct Size 8" Pressure (in inches. For more information on our entire line of products, go to making cutout. H2O) High Speed Working Speed 0.1 0.012 Power (W) High Speed Working Speed 451 180 CFM High Speed Working Speed 520 180 Sones High Speed Working Speed 12.5 2.0 Installation Details Accessories: To purchase Bosch accessories, cleaners & parts please visit www.bosch-home.com/us or call 1-800...
...-2904 © BSH Home Appliances Corporation. Bosch is a registered trademark of limited warranty. Stainless Steel HIB82651UC HVI Performance Values Exhaust Vertical Duct Size 8" Pressure (in inches. For more information on our entire line of products, go to making cutout. H2O) High Speed Working Speed 0.1 0.012 Power (W) High Speed Working Speed 451 180 CFM High Speed Working Speed 520 180 Sones High Speed Working Speed 12.5 2.0 Installation Details Accessories: To purchase Bosch accessories, cleaners & parts please visit www.bosch-home.com/us or call 1-800...
Installation Instructions
Page 2
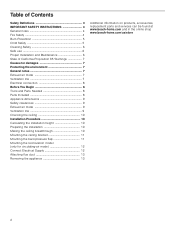
...8 Parts Included 8 Appliance dimensions 9 Safety clearances 9 Exhaust air mode 9 Ventilation line 9 Checking the ceiling 10 Installation Procedure 10 Calculating the installation height 10 Preparing the installation 10 Making the ceiling breakthrough 10 Mounting the ceiling bracket 11 Mounting the back-pressure flap 11 Mounting the recirculation model (only for circulating-air mode 12 Connect Electrical Supply 12 Attaching flue duct 13 Removing the appliance 13 .ofnitkudorPAdditional information on products, accessories, replacement parts and services can be found at www.bosch...
...8 Parts Included 8 Appliance dimensions 9 Safety clearances 9 Exhaust air mode 9 Ventilation line 9 Checking the ceiling 10 Installation Procedure 10 Calculating the installation height 10 Preparing the installation 10 Making the ceiling breakthrough 10 Mounting the ceiling bracket 11 Mounting the back-pressure flap 11 Mounting the recirculation model (only for circulating-air mode 12 Connect Electrical Supply 12 Attaching flue duct 13 Removing the appliance 13 .ofnitkudorPAdditional information on products, accessories, replacement parts and services can be found at www.bosch...
Installation Instructions
Page 4
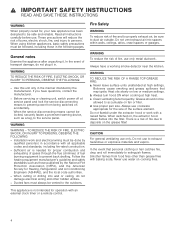
... THE FOLLOWING ▯ Installation work with all instructions carefully before use cookware appropriate for , your new appliance has been designed to the service panel. Do not use only. WARNING To reduce the risk of burns, electric shock, fire, and injury to prevent back drafting. Always turn hood ON when cooking at high settings. Do not flambé under the extractor hood or work and electrical wiring must always be done...
... THE FOLLOWING ▯ Installation work with all instructions carefully before use cookware appropriate for , your new appliance has been designed to the service panel. Do not use only. WARNING To reduce the risk of burns, electric shock, fire, and injury to prevent back drafting. Always turn hood ON when cooking at high settings. Do not flambé under the extractor hood or work and electrical wiring must always be done...

Installation Instructions
Page 5
... heat is small and contained in operation without the grease filter. WARNING RISK OF FIRE When gas burners are instructed in use the appliance, it can ignite. A ventilation appliance installed above it is the legal responsibility of the parents or legal guardians to ensure that they can damage the appliance, and the unit may tip over 17,000 Btu...
... heat is small and contained in operation without the grease filter. WARNING RISK OF FIRE When gas burners are instructed in use the appliance, it can ignite. A ventilation appliance installed above it is the legal responsibility of the parents or legal guardians to ensure that they can damage the appliance, and the unit may tip over 17,000 Btu...
Installation Instructions
Page 6
... also makes use of corrosive chemicals in heating or cleaning will be achieved if combustion air can cause an injury. The use . CAUTION Turn power off before replacing the light bulb(s). Note: When assessing the overall requirement, the combined ventilation system for easy reference. If you the location of the circuit breaker or fuse. Contact an authorized servicer. Failure to do so could result in electrical...
... also makes use of corrosive chemicals in heating or cleaning will be achieved if combustion air can cause an injury. The use . CAUTION Turn power off before replacing the light bulb(s). Note: When assessing the overall requirement, the combined ventilation system for easy reference. If you the location of the circuit breaker or fuse. Contact an authorized servicer. Failure to do so could result in electrical...

Installation Instructions
Page 7
... notes Exhaust air mode Note: Ventilation may not exit through an already operational smoke or exhaust chimney, nor a duct used for damages 9 CAUTION Risk of humidity into the electronic circuitry. Round pipes An inner diameter of 5 15/16" (150 mm), but at a slight downward slope away from condensation back flow. Never clean operator controls with environmental requirements. Surface damage due to incorrect cleaning. Install exhaust vent at...
... notes Exhaust air mode Note: Ventilation may not exit through an already operational smoke or exhaust chimney, nor a duct used for damages 9 CAUTION Risk of humidity into the electronic circuitry. Round pipes An inner diameter of 5 15/16" (150 mm), but at a slight downward slope away from condensation back flow. Never clean operator controls with environmental requirements. Surface damage due to incorrect cleaning. Install exhaust vent at...

Installation Instructions
Page 8
... be operated in the U.L. Ensure sufficient fuse protection of the appliance. Only connect the appliance with a gas line. For copies of the connecting cable, that the electrical connection meets the requirements of the latest version of the exhaust air duct) Saw Parts Included Extractor hood with fan, back-pressure flap Lamp, already installed Metal grease filter Drill template Installation manual and instructions for use 4x screws, 5x45 mm 64x screws, 4x8 mm 6x screws, 3.5x9.5 mm 4 flue ducts with...
... be operated in the U.L. Ensure sufficient fuse protection of the appliance. Only connect the appliance with a gas line. For copies of the connecting cable, that the electrical connection meets the requirements of the latest version of the exhaust air duct) Saw Parts Included Extractor hood with fan, back-pressure flap Lamp, already installed Metal grease filter Drill template Installation manual and instructions for use 4x screws, 5x45 mm 64x screws, 4x8 mm 6x screws, 3.5x9.5 mm 4 flue ducts with...

Installation Instructions
Page 9
... achieved and fan noise is not in case of electric cooktops and 30" (760 mm) in operation, the responsible area heating inspector must be installed directly next to a cabinet or wall on the cooktop and the bottom of the extractor hood may not exit through an already operational smoke or exhaust chimney, nor a duct used together, the largest given clearance applies. If gas and electric cooktops are used for the gas cooking appliance...
... achieved and fan noise is not in case of electric cooktops and 30" (760 mm) in operation, the responsible area heating inspector must be installed directly next to a cabinet or wall on the cooktop and the bottom of the extractor hood may not exit through an already operational smoke or exhaust chimney, nor a duct used together, the largest given clearance applies. If gas and electric cooktops are used for the gas cooking appliance...
Installation Instructions
Page 12
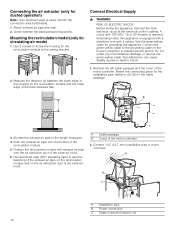
... cable passage. $ % Y 3. Connect 1/2" (12.7 mm) installation pipe to motor controller. $ % & A Installation pipe B Power connection C Cable connector listed in cULUS) to prevent electric sthock. Use 2 screws to the ceiling bracket. Remove the left cable passage and the cover of the extractor hood. Push the exhaust air pipe onto the bottom of the motor controller 2. Do not under any circumstances damage or remove the green-yellow cable. Check whether the back-pressure flap works. Use the green-yellow cable for the recirculation...
... cable passage. $ % Y 3. Connect 1/2" (12.7 mm) installation pipe to motor controller. $ % & A Installation pipe B Power connection C Cable connector listed in cULUS) to prevent electric sthock. Use 2 screws to the ceiling bracket. Remove the left cable passage and the cover of the extractor hood. Push the exhaust air pipe onto the bottom of the motor controller 2. Do not under any circumstances damage or remove the green-yellow cable. Check whether the back-pressure flap works. Use the green-yellow cable for the recirculation...


