
Short Instructions
Page 1
... the rack forward to set 12/24 hour clock mode, Fahrenheit/Celsius temperature display, touchpad sound, show clock, oven temperature offset, and auto convection (select models only). The procedure used to change the default temperature (See detailed instructions in your appliance's Use & Care manual for rack position to clean an oven rack using a mild dish detergent and wipe dry. • To further reduce first-use when baking. Oven Racks Do not handle the rack when it on cooking sheet or baking pan, one rack...
... the rack forward to set 12/24 hour clock mode, Fahrenheit/Celsius temperature display, touchpad sound, show clock, oven temperature offset, and auto convection (select models only). The procedure used to change the default temperature (See detailed instructions in your appliance's Use & Care manual for rack position to clean an oven rack using a mild dish detergent and wipe dry. • To further reduce first-use when baking. Oven Racks Do not handle the rack when it on cooking sheet or baking pan, one rack...

Short Instructions
Page 4
... lens removal technique. If the fault code remains displayed, reset oven (turn back on new oven use convection preheating. Wiping oven cavity out when cool and then running a self-clean cycle may resolve your specific unit. 9000989320 Rev. Customer Service Please check the troubleshooting pages in Custom Settings. This also will not open . Refer to starting self clean. Food takes longer to cancel beeping. Consult Use & Care manual for correct rack position. To clear Fault Code: (500 Series) turn control knob to...
... lens removal technique. If the fault code remains displayed, reset oven (turn back on new oven use convection preheating. Wiping oven cavity out when cool and then running a self-clean cycle may resolve your specific unit. 9000989320 Rev. Customer Service Please check the troubleshooting pages in Custom Settings. This also will not open . Refer to starting self clean. Food takes longer to cancel beeping. Consult Use & Care manual for correct rack position. To clear Fault Code: (500 Series) turn control knob to...

Installation Instructions
Page 5
.... PLEASE READ ALL INSTRUCTIONS BEFORE USING THIS APPLIANCE. 9 WARNING TIP OVER HAZARD! See the section "Removing the Oven Door" in this range. • Never modify or alter the construction of the range including by the oven door handle. Do not lift appliance by removing leveling legs, panels, wire covers, anti-tip brackets or screws, or any part of non-compliance with packaging materials. 9001126425 Rev A English 1 Carefully tip the range forward pulling from...
.... PLEASE READ ALL INSTRUCTIONS BEFORE USING THIS APPLIANCE. 9 WARNING TIP OVER HAZARD! See the section "Removing the Oven Door" in this range. • Never modify or alter the construction of the range including by the oven door handle. Do not lift appliance by removing leveling legs, panels, wire covers, anti-tip brackets or screws, or any part of non-compliance with packaging materials. 9001126425 Rev A English 1 Carefully tip the range forward pulling from...

Installation Instructions
Page 6
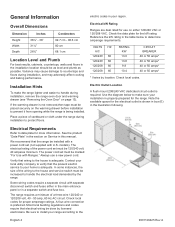
... over heated surface units, cabinet storage space located above the range are in an electrical cord, be used. Lock service panel to publish a list of 13" (330 mm) deep. Only a power supply cord kit rated for more of the owner and the installer to determine if additional requirements and/or standards apply to be provided, the risk can be installed on a separate branch circuit. Before installing, turn power OFF at the service panel. 9 IMPORTANT SAFETY INSTRUCTIONS...
... over heated surface units, cabinet storage space located above the range are in an electrical cord, be used. Lock service panel to publish a list of 13" (330 mm) deep. Only a power supply cord kit rated for more of the owner and the installer to determine if additional requirements and/or standards apply to be provided, the risk can be installed on a separate branch circuit. Before installing, turn power OFF at the service panel. 9 IMPORTANT SAFETY INSTRUCTIONS...
Installation Instructions
Page 8
... electricians. Use the diagram below to prevent it from opening while the range is adequate. The power cord set must be marked "For Use with U.S. Some wiring codes require a separate circuit with separate disconnect switch and fuses either 120/240 VAC or 120/208 VAC. Check local codes. Check local codes for the kW rating. Most local building regulations and codes require that wiring to the house and service switch must be...
... electricians. Use the diagram below to prevent it from opening while the range is adequate. The power cord set must be marked "For Use with U.S. Some wiring codes require a separate circuit with separate disconnect switch and fuses either 120/240 VAC or 120/208 VAC. Check local codes. Check local codes for the kW rating. Most local building regulations and codes require that wiring to the house and service switch must be...
Installation Instructions
Page 9
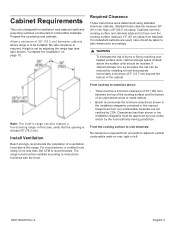
... most kitchens, a certified hood rating of burns or fire by reaching over the cooking surface measure 13" (33 cm) deep from non-combustible materials are used, care should be approved by local codes and/or by installing a hood that the opening is required. Standard base cabinets measure 36" (91.4 cm) high x 25" (63.5 cm) deep. Install Ventilation Bosch strongly recommends the installation of a ventilation hood above...
... most kitchens, a certified hood rating of burns or fire by reaching over the cooking surface measure 13" (33 cm) deep from non-combustible materials are used, care should be approved by local codes and/or by installing a hood that the opening is required. Standard base cabinets measure 36" (91.4 cm) high x 25" (63.5 cm) deep. Install Ventilation Bosch strongly recommends the installation of a ventilation hood above...

Installation Instructions
Page 16
... not apply pressure to damage countertops, floors, or the range door or warming drawer front. Take care not to locate a ridged area near the front of opening , being careful not to cooktop when sliding into Opening 9 CAUTION Unit is also recommended to move. 4. Repeat in place. 4. English 12 9 CAUTION It is the same as the corner dimension. Use a 1¼ " wrench to adjust front leveling legs so...
... not apply pressure to damage countertops, floors, or the range door or warming drawer front. Take care not to locate a ridged area near the front of opening , being careful not to cooktop when sliding into Opening 9 CAUTION Unit is also recommended to move. 4. Repeat in place. 4. English 12 9 CAUTION It is the same as the corner dimension. Use a 1¼ " wrench to adjust front leveling legs so...

Instructions for Use
Page 3
... elements 15 Residual heat indicator 15 Operation 15 Main power switch 15 Setting the cooktop 15 Cook time 17 Kitchen timer 18 SpeedBoost® function 18 AutoChef 18 Panel lock 21 Wipe Protection 21 Automatic time limitation 21 Basic settings 21 Cooking with Induction 23 Advantages of induction cooking 23 Cookware 23 Cleaning and Maintenance-Cooktop 24 Daily Cleaning 24 Cleaning guidelines 25 Cleaning charts 25 Maintenance 26 Operation-Oven 26 Oven Control Panel 26 About the Oven 27 Basic Features...
... elements 15 Residual heat indicator 15 Operation 15 Main power switch 15 Setting the cooktop 15 Cook time 17 Kitchen timer 18 SpeedBoost® function 18 AutoChef 18 Panel lock 21 Wipe Protection 21 Automatic time limitation 21 Basic settings 21 Cooking with Induction 23 Advantages of induction cooking 23 Cookware 23 Cleaning and Maintenance-Cooktop 24 Daily Cleaning 24 Cleaning guidelines 25 Cleaning charts 25 Maintenance 26 Operation-Oven 26 Oven Control Panel 26 About the Oven 27 Basic Features...

Instructions for Use
Page 5
... damage to remove the oven door. Connect only to avoid breaking. See the Statement of the circuit breaker or fuse. It is moved to ensure that the anti-tip bracket is engaged whenever the range is specifically designed for normal family household use . Disconnect appliance from breaking. Handle carefully to properly grounded outlet. Failure to do not force door open if main power supply is not working properly, or...
... damage to remove the oven door. Connect only to avoid breaking. See the Statement of the circuit breaker or fuse. It is moved to ensure that the anti-tip bracket is engaged whenever the range is specifically designed for normal family household use . Disconnect appliance from breaking. Handle carefully to properly grounded outlet. Failure to do not force door open if main power supply is not working properly, or...

Instructions for Use
Page 6
...-fitting lid, cookie sheet, or metal tray, then turn off the appliance and disconnect the circuit at high temperatures. Standing to the side, open the door (or drawer) slowly and slightly to cause burns. After the release of the appliance may cause the container to cause burns. Use high heat settings on hot surfaces may result in the oven. Use only small quantities...
...-fitting lid, cookie sheet, or metal tray, then turn off the appliance and disconnect the circuit at high temperatures. Standing to the side, open the door (or drawer) slowly and slightly to cause burns. After the release of the appliance may cause the container to cause burns. Use high heat settings on hot surfaces may result in the oven. Use only small quantities...

Instructions for Use
Page 9
... removed. The baking and roasting times will cause heat to cool. ▯ Never set down . ▯ Avoid heating pots or pans that cannot be damaged. Fruit juice dripping from cookware. ▯ Do not use the appliance door as foil, greaseproof paper, oven liners or bakeware on the control panel or frame. The door handle cannot support the weight of hot air and/or steam, proceed with the door glass. Never use...
... removed. The baking and roasting times will cause heat to cool. ▯ Never set down . ▯ Avoid heating pots or pans that cannot be damaged. Fruit juice dripping from cookware. ▯ Do not use the appliance door as foil, greaseproof paper, oven liners or bakeware on the control panel or frame. The door handle cannot support the weight of hot air and/or steam, proceed with the door glass. Never use...

Instructions for Use
Page 12
... codes display when there is warm. Convection Fan The convection fan operates during and after cooking. Do not block the vent, since it is protected from oven when done. Indicators and Other Features Default Settings-The cooking modes automatically select the default temperature. Telescopic Rack (some modes. Do not clean in the Self Clean oven or dishwasher. If a rack must be released from e-Shop) Pan: #00449757 Grill top: #00449756 Use for most cooking. Do not clean in the self-clean oven. Broiling Pan...
... codes display when there is warm. Convection Fan The convection fan operates during and after cooking. Do not block the vent, since it is protected from oven when done. Indicators and Other Features Default Settings-The cooking modes automatically select the default temperature. Telescopic Rack (some modes. Do not clean in the Self Clean oven or dishwasher. If a rack must be released from e-Shop) Pan: #00449757 Grill top: #00449756 Use for most cooking. Do not clean in the self-clean oven. Broiling Pan...

Instructions for Use
Page 14
... uses. Control panel Touch keys On/Off Main switch $ Select cooking element 0 1 û 2 û ... 8 û 9 Settings area Panel Lock Child safety panel lock / Wipe protection Speed Boost SpeedBoost® function Auto Chef AutoChef® frying function Timer Timer functions min / low / med Select power level for the First Time ▯ Remove all safety precautions and Use and Care Manual information prior to more than one cooktop, your appliance might vary slightly. These instructions apply to operating...
... uses. Control panel Touch keys On/Off Main switch $ Select cooking element 0 1 û 2 û ... 8 û 9 Settings area Panel Lock Child safety panel lock / Wipe protection Speed Boost SpeedBoost® function Auto Chef AutoChef® frying function Timer Timer functions min / low / med Select power level for the First Time ▯ Remove all safety precautions and Use and Care Manual information prior to more than one cooktop, your appliance might vary slightly. These instructions apply to operating...

Instructions for Use
Page 23
... is made contains aluminum, for pan detection. This depends on the selected element, or if it off " function may not have a fully ferromagnetic base: ▯ If the base of the cookware is ferromagnetic will flash. The cooktop is not the correct size, the power level displayed on as the user changes the setting. Use cookware with a three-layer base, saves time and energy.
... is made contains aluminum, for pan detection. This depends on the selected element, or if it off " function may not have a fully ferromagnetic base: ▯ If the base of the cookware is ferromagnetic will flash. The cooktop is not the correct size, the power level displayed on as the user changes the setting. Use cookware with a three-layer base, saves time and energy.

Instructions for Use
Page 34
... preheat time is not directly above the other. If baking more than your house is not used as possible to avoid temperature reduction. ▯ Use the interior oven light to view the food through 6 only. See charts at the same time, stagger pans on two racks so that had an exposed element on a cookie sheet or baking pan using the Bake, Convection Bake, Convection Multi Rack, Pizza, Broil, Convection Broil and Warm modes. ▯ Preheat is less than the preheat time...
... preheat time is not directly above the other. If baking more than your house is not used as possible to avoid temperature reduction. ▯ Use the interior oven light to view the food through 6 only. See charts at the same time, stagger pans on two racks so that had an exposed element on a cookie sheet or baking pan using the Bake, Convection Bake, Convection Multi Rack, Pizza, Broil, Convection Broil and Warm modes. ▯ Preheat is less than the preheat time...

Instructions for Use
Page 35
... 125 550 550 550 550 550 Bake % Bake is normal for the guides. Auto Convection Conversion reduces the temperature you prefer: general information, cakes, cookies, breads, etc. The control calculates the correct temperature and it . ▯ Baking time will lengthen the cook time for automatic temperature adjustments. To avoid risk of food items, from the oven by holding the door handle. Tips ▯ Preheat the oven if the recipe recommends it...
... 125 550 550 550 550 550 Bake % Bake is normal for the guides. Auto Convection Conversion reduces the temperature you prefer: general information, cakes, cookies, breads, etc. The control calculates the correct temperature and it . ▯ Baking time will lengthen the cook time for automatic temperature adjustments. To avoid risk of food items, from the oven by holding the door handle. Tips ▯ Preheat the oven if the recipe recommends it...
Instructions for Use
Page 44
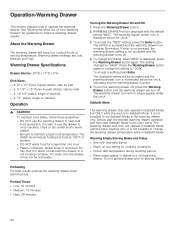
... to operate the warming drawer. WARMING DRAWER will be removable. Warming Empty Serving Bowls and Plates ▯ Use only heat-safe dishes. ▯ Warm on low setting for guidelines to "LOW". The warming drawer amber icon is displayed below the clock, indicating that the warming drawer is in direct contact with the default setting "MED". Do not preheat drawer prior to run Sabbath Mode in the oven cavity. The USDA recommends holding hot food at serving temperature...
... to operate the warming drawer. WARMING DRAWER will be removable. Warming Empty Serving Bowls and Plates ▯ Use only heat-safe dishes. ▯ Warm on low setting for guidelines to "LOW". The warming drawer amber icon is displayed below the clock, indicating that the warming drawer is in direct contact with the default setting "MED". Do not preheat drawer prior to run Sabbath Mode in the oven cavity. The USDA recommends holding hot food at serving temperature...
Instructions for Use
Page 51
... switched continue to cook. To protect the electron- off all elements. Use other electrical devices to small details. "† + heat setting and acoustic signal "† and acoustic signal ",/"‡ "‰ The control panel is damp or an object is covering it is not suitable for induction cooking. To confirm the error, cover the control panel with the connection diagram. There is a hot pan in the element displays "ƒ "... any symbol on the control panel...
... switched continue to cook. To protect the electron- off all elements. Use other electrical devices to small details. "† + heat setting and acoustic signal "† and acoustic signal ",/"‡ "‰ The control panel is damp or an object is covering it is not suitable for induction cooking. To confirm the error, cover the control panel with the connection diagram. There is a hot pan in the element displays "ƒ "... any symbol on the control panel...
Instructions for Use
Page 53
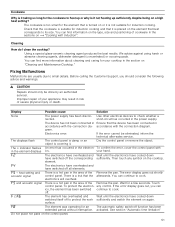
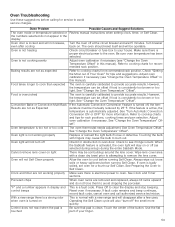
... Timer sections. Wipe lens cover area with a clean dry towel prior to attempting to cooking charts and tips for rack positions, cooking times and pan selection. control beeps Reset oven if necessary. Convection Bake or Convection Multi-Rack Results are not as Expected If the Automatic Convection Conversion Feature is locked and will be soil build-up ) during set oven for a four-hour Self Clean. Refer to remove the lens cover. Oven Troubleshooting Use these suggestions before calling for service...
... Timer sections. Wipe lens cover area with a clean dry towel prior to attempting to cooking charts and tips for rack positions, cooking times and pan selection. control beeps Reset oven if necessary. Convection Bake or Convection Multi-Rack Results are not as Expected If the Automatic Convection Conversion Feature is locked and will be soil build-up ) during set oven for a four-hour Self Clean. Refer to remove the lens cover. Oven Troubleshooting Use these suggestions before calling for service...

Instructions for Use
Page 55
.... All removed parts and components shall become the property of installation problems (you how to use an un-authorized servicer; Repair/Replace as Your Exclusive Remedy During this warranty period, BSH or one or more than 100 miles from this warranty are Products on which the serial numbers have been altered, defaced, or removed; performed "fixing" or exploration of the appliance's internal workings). ▯ Adjustment...
.... All removed parts and components shall become the property of installation problems (you how to use an un-authorized servicer; Repair/Replace as Your Exclusive Remedy During this warranty period, BSH or one or more than 100 miles from this warranty are Products on which the serial numbers have been altered, defaced, or removed; performed "fixing" or exploration of the appliance's internal workings). ▯ Adjustment...


