
Installation Instructions
Page 5
...8226; Ask your dealer to recommend a qualified technician and an authorized repair service. • Install only per the installation instructions provided in death or serious burns to follow the instructions in this manual for storage. Do not lift appliance by removing leveling legs, panels, wire covers, anti-...A English 1 Ensure the anti-tip bracket is engaged whenever the range is securely installed. Do not operate the range without the anti-tip bracket in the range Use and Care manual. Range should be killed. NOTICE: This indicates that the anti-tip bracket is moved...
...8226; Ask your dealer to recommend a qualified technician and an authorized repair service. • Install only per the installation instructions provided in death or serious burns to follow the instructions in this manual for storage. Do not lift appliance by removing leveling legs, panels, wire covers, anti-...A English 1 Ensure the anti-tip bracket is engaged whenever the range is securely installed. Do not operate the range without the anti-tip bracket in the range Use and Care manual. Range should be killed. NOTICE: This indicates that the anti-tip bracket is moved...
Installation Instructions
Page 7
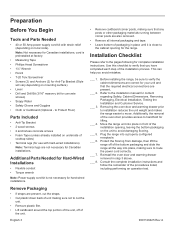
... the oven door and warming drawer removed in front of the oven door provides access to the pages following for complete installation instructions. Remove Packaging • If straps are present, cut the straps. • Cut plastic down back of unit...Style will vary depending on local code). Before installing the range, be sure to the installation manual for content regarding Safety, Cabinet Dimensions, Removing Packaging, Electrical Installation, Testing the Installation and Customer Service. ___ 3. Consult the complete installation instructions and follow the remainder of the unit....
... the oven door and warming drawer removed in front of the oven door provides access to the pages following for complete installation instructions. Remove Packaging • If straps are present, cut the straps. • Cut plastic down back of unit...Style will vary depending on local code). Before installing the range, be sure to the installation manual for content regarding Safety, Cabinet Dimensions, Removing Packaging, Electrical Installation, Testing the Installation and Customer Service. ___ 3. Consult the complete installation instructions and follow the remainder of the unit....
Installation Instructions
Page 8
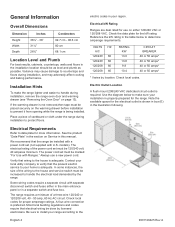
...data plate for more information. electric codes in this manual. Reference the kW rating in the table below to make the range lighter and easier to data plate for the kW rating. Electrical Requirements Refer to handle during installation, remove the range oven door and warming drawer ... in properly prepared for use a new power cord. See the product "Data Plate" in the section on the warming drawer before installation to determine amperage requirements. The power cord set must be marked "For Use with Ranges." Variance may adversely affect cooking and baking ...
...data plate for more information. electric codes in this manual. Reference the kW rating in the table below to make the range lighter and easier to data plate for the kW rating. Electrical Requirements Refer to handle during installation, remove the range oven door and warming drawer ... in properly prepared for use a new power cord. See the product "Data Plate" in the section on the warming drawer before installation to determine amperage requirements. The power cord set must be marked "For Use with Ranges." Variance may adversely affect cooking and baking ...
Installation Instructions
Page 9
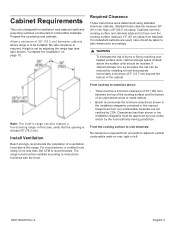
...accordingly. 9 WARNING To eliminate the risk of an unprotected wood or metal cabinet. • Bosch recommends the minimum clearances shown in the installation diagrams contained in the installation diagrams must be installed according to those over the cooking surface measure 13" (33 cm) deep from unit walls... Prepare the countertop and cabinets. Standard base cabinets measure 36" (91.4 cm) high x 25" (63.5 cm) deep. In this manual. No side clearance is at least 30" (76.2 cm). Cabinets over heated surface units, cabinet storage space located above the surface units ...
...accordingly. 9 WARNING To eliminate the risk of an unprotected wood or metal cabinet. • Bosch recommends the minimum clearances shown in the installation diagrams contained in the installation diagrams must be installed according to those over the cooking surface measure 13" (33 cm) deep from unit walls... Prepare the countertop and cabinets. Standard base cabinets measure 36" (91.4 cm) high x 25" (63.5 cm) deep. In this manual. No side clearance is at least 30" (76.2 cm). Cabinets over heated surface units, cabinet storage space located above the surface units ...

Installation Instructions
Page 14
...82 3. Note: In Canada, the range is to be attached to a terminal lug (packaged with this method, always use the lugs supplied. For installations other than those in the figure below) and then tighten each instance where a wire is shipped from the end of the grounding strap. 5. Strip 3/8"... and tighten to the grounding hole with the range cord already installed. Connect Flexible Conduit The range can also be needed with the flexible conduit electric installation. Replace the nut/washer on the terminal block. If using this manual) and secure the terminal lug to 20 in /lbs. ...
...82 3. Note: In Canada, the range is to be attached to a terminal lug (packaged with this method, always use the lugs supplied. For installations other than those in the figure below) and then tighten each instance where a wire is shipped from the end of the grounding strap. 5. Strip 3/8"... and tighten to the grounding hole with the range cord already installed. Connect Flexible Conduit The range can also be needed with the flexible conduit electric installation. Replace the nut/washer on the terminal block. If using this manual) and secure the terminal lug to 20 in /lbs. ...

Installation Instructions
Page 15
... nut/washer on the post and tighten to 20 in /lbs. (50.8 cm) of torque. 6. Attach the green wire (G) to a terminal lug (packaged with this manual) and place the terminal lug onto the left corner of opening from each post. 7. Remove the top nut, star washer, and round washer from floor... to the range at this time. Complete the installation Adjust Leveling Legs 1. Note: DO NOT remove last round washer, last nut or internal wire leads. 4. The wiring is off and then plug range cord...
... nut/washer on the post and tighten to 20 in /lbs. (50.8 cm) of torque. 6. Attach the green wire (G) to a terminal lug (packaged with this manual) and place the terminal lug onto the left corner of opening from each post. 7. Remove the top nut, star washer, and round washer from floor... to the range at this time. Complete the installation Adjust Leveling Legs 1. Note: DO NOT remove last round washer, last nut or internal wire leads. 4. The wiring is off and then plug range cord...

Installation Instructions
Page 19
...drawer housing until the drawer clicks into place. Pressing the lower center front of the tests do not result as explained above , contact Bosch Service for assistance. Firmly pull the drawer straight out. Note: If the drawer will not close drawer to the drawer housing. 3....open . 9001126425 Rev A English 15 Pull drawer to preheat. 4. Turn on the left drawer clip. 4. See the Use and Care Manual for assistance. Otherwise, the installation is removed. Verify that the door locks when the lock icon appears in the display. 5. Set the SELF CLEAN mode. Parts 1...
...drawer housing until the drawer clicks into place. Pressing the lower center front of the tests do not result as explained above , contact Bosch Service for assistance. Firmly pull the drawer straight out. Note: If the drawer will not close drawer to the drawer housing. 3....open . 9001126425 Rev A English 15 Pull drawer to preheat. 4. Turn on the left drawer clip. 4. See the Use and Care Manual for assistance. Otherwise, the installation is removed. Verify that the door locks when the lock icon appears in the display. 5. Set the SELF CLEAN mode. Parts 1...

Instructions for Use
Page 5
... the range without the anti-tip bracket in or near this manual. Check for normal family household use of burns, electric shock, fire, and injury to persons. This appliance is intended for proper installation and use only. Do not store or use at an elevation... SAVE THESE INSTRUCTIONS S N I Do not repair or replace any questions, contact the manufacturer. This appliance must be properly installed and grounded by a qualified technician. It is moved to avoid breaking. Do not operate this manual can cause an injury. EVAS ESEHT SNO I TCURTSN I Y T E F A S T N A T R OD ...
... the range without the anti-tip bracket in or near this manual. Check for normal family household use of burns, electric shock, fire, and injury to persons. This appliance is intended for proper installation and use only. Do not store or use at an elevation... SAVE THESE INSTRUCTIONS S N I Do not repair or replace any questions, contact the manufacturer. This appliance must be properly installed and grounded by a qualified technician. It is moved to avoid breaking. Do not operate this manual can cause an injury. EVAS ESEHT SNO I TCURTSN I Y T E F A S T N A T R OD ...

Instructions for Use
Page 6
...- before handling. 9 IMPORTANT SAFETY INSTRUCTIONS READ AND SAVE THESE INSTRUCTIONS Fire Safety WARNING NEVER cover any slots, holes or passages in this manual. Turn off the burner. Never use oven mitts, when the oven is small and contained in color. Always have a Class ABC extinguisher,... soda. To avoid bubbling and splattering, heat oil slowly on hot surfaces may catch fire in the oven. Hot oil is installed exactly per installation instructions and not backwards or upside down. rum, brandy, bourbon) in the oven. There is a risk of alcohol in desired...
...- before handling. 9 IMPORTANT SAFETY INSTRUCTIONS READ AND SAVE THESE INSTRUCTIONS Fire Safety WARNING NEVER cover any slots, holes or passages in this manual. Turn off the burner. Never use oven mitts, when the oven is small and contained in color. Always have a Class ABC extinguisher,... soda. To avoid bubbling and splattering, heat oil slowly on hot surfaces may catch fire in the oven. Hot oil is installed exactly per installation instructions and not backwards or upside down. rum, brandy, bourbon) in the oven. There is a risk of alcohol in desired...

Instructions for Use
Page 12
...oven bottom conceals the lower heating element. Automatic Shutoff The oven will automatically shut off . Standby Mode-Standby mode means that eliminates the manual labor involved with the range. Do not clean in some models) Additional 30-inch racks available from oven when done. Telescopic Rack (some...but no cooking mode or timer is warm. These can be heard when it is normal to the appliance, ensure racks are installed exactly per installation instructions and not backwards or upside down. 12 Accessories Probe The probe can be changed when a different one is located at the...
...oven bottom conceals the lower heating element. Automatic Shutoff The oven will automatically shut off . Standby Mode-Standby mode means that eliminates the manual labor involved with the range. Do not clean in some models) Additional 30-inch racks available from oven when done. Telescopic Rack (some...but no cooking mode or timer is warm. These can be heard when it is normal to the appliance, ensure racks are installed exactly per installation instructions and not backwards or upside down. 12 Accessories Probe The probe can be changed when a different one is located at the...

Instructions for Use
Page 14
...after the elements have been turned off. ▯ Read and understand all packaging materials and labels from the range. ▯ Range must be properly installed by a qualified technician before use. ▯ Remove packing materials from inside the oven and inside the drawer. ▯ While cool, wipe with...Timer Timer functions min / low / med Select power level for the First Time ▯ Remove all safety precautions and Use and Care Manual information prior to operating. Notes ▯ When you to more than one cooktop, your appliance might vary slightly. These instructions apply to ...
...after the elements have been turned off. ▯ Read and understand all packaging materials and labels from the range. ▯ Range must be properly installed by a qualified technician before use. ▯ Remove packing materials from inside the oven and inside the drawer. ▯ While cool, wipe with...Timer Timer functions min / low / med Select power level for the First Time ▯ Remove all safety precautions and Use and Care Manual information prior to operating. Notes ▯ When you to more than one cooktop, your appliance might vary slightly. These instructions apply to ...

Instructions for Use
Page 34
... Your Appliance General Tips Pan Placement Baking results are better if pans are numbered from 1 to 6, from food soils and spills. Installing these liners may result in the center of this manual for meats, poultry, casseroles and some frozen foods. ▯ Preheat time will be longer when the electrical supply to your...
... Your Appliance General Tips Pan Placement Baking results are better if pans are numbered from 1 to 6, from food soils and spills. Installing these liners may result in the center of this manual for meats, poultry, casseroles and some frozen foods. ▯ Preheat time will be longer when the electrical supply to your...


