
Short Instructions
Page 1
... (B). Slide the moveable part of the oven. Prepare the Oven for Use Set the Clock See detailed instructions in your appliance's Use and Care manual. Procedure varies by Mode Mode Lowest Highest Default °F °F °F Bake 100 550 350 Roast 100 550 325 Broil (low 450&#...High) 450 550 High Frozen Foods* 100 550 400 EcoChef* 100 550 325 * some models only English 1 User Settings Consult the Use & Care manual "User Settings" to seat the back onto the rack position guide. The oven has six rack position guides numbered 1 to use when baking. The ...
... (B). Slide the moveable part of the oven. Prepare the Oven for Use Set the Clock See detailed instructions in your appliance's Use and Care manual. Procedure varies by Mode Mode Lowest Highest Default °F °F °F Bake 100 550 350 Roast 100 550 325 Broil (low 450&#...High) 450 550 High Frozen Foods* 100 550 400 EcoChef* 100 550 325 * some models only English 1 User Settings Consult the Use & Care manual "User Settings" to seat the back onto the rack position guide. The oven has six rack position guides numbered 1 to use when baking. The ...

Short Instructions
Page 4
...Warm air or steam is badly soiled, set . "Off" No action required. Customer Service Please check the troubleshooting pages in Use & Care manual. Problem Possible Cause Suggested Solution Oven door is a Fault Code. See cooking tips in this troubleshooting guide. "E" and a number appears in ...asked questions are not covered by 25° F. To contact customer service: US: 800-944-2904 Web: www.bosch-home.com.us Parts & Accessories: www.bosch-eshop.us English 4 Oven is normal in oven cooling. It is not heating Power not reaching oven. Temperature not...
...Warm air or steam is badly soiled, set . "Off" No action required. Customer Service Please check the troubleshooting pages in Use & Care manual. Problem Possible Cause Suggested Solution Oven door is a Fault Code. See cooking tips in this troubleshooting guide. "E" and a number appears in ...asked questions are not covered by 25° F. To contact customer service: US: 800-944-2904 Web: www.bosch-home.com.us Parts & Accessories: www.bosch-eshop.us English 4 Oven is normal in oven cooling. It is not heating Power not reaching oven. Temperature not...

Installation Instructions
Page 5
...by removing leveling legs, panels, wire covers, anti-tip brackets or screws, or any part of the appliance unless specifically recommended in this manual for guidance. A child or adult can cause injury or property damage. Verify that the anti-tip bracket is moved to follow the ... allow children to move more than 1" (2.5 cm). Do not operate the range without the anti-tip bracket in the range Use and Care manual. Disposing of the anti-tip bracket. Range should be killed. 9 IMPORTANT SAFETY INSTRUCTIONS READ AND SAVE THESE INSTRUCTIONS Safety Definitions 9 WARNING This ...
...by removing leveling legs, panels, wire covers, anti-tip brackets or screws, or any part of the appliance unless specifically recommended in this manual for guidance. A child or adult can cause injury or property damage. Verify that the anti-tip bracket is moved to follow the ... allow children to move more than 1" (2.5 cm). Do not operate the range without the anti-tip bracket in the range Use and Care manual. Disposing of the anti-tip bracket. Range should be killed. 9 IMPORTANT SAFETY INSTRUCTIONS READ AND SAVE THESE INSTRUCTIONS Safety Definitions 9 WARNING This ...
Installation Instructions
Page 7
... on local code). Removing the oven door and warming drawer prior to installation reduces the unit weight and makes the range easier to the installation manual for the range. Consult the complete installation instructions and follow the remainder of the installation opening for content regarding Safety, Cabinet Dimensions, Removing Packaging, Electrical...
... on local code). Removing the oven door and warming drawer prior to installation reduces the unit weight and makes the range easier to the installation manual for the range. Consult the complete installation instructions and follow the remainder of the installation opening for content regarding Safety, Cabinet Dimensions, Removing Packaging, Electrical...
Installation Instructions
Page 8
... or 50 amps* 40 or 50 amps* 40 or 50 amps* * Varies by the range. If the warming drawer is shown in box (E) in this manual. electric codes in your installation in a separate switch and fuse box. Check the data plate for the electrical outlet is not removed,then tape must...
... or 50 amps* 40 or 50 amps* 40 or 50 amps* * Varies by the range. If the warming drawer is shown in box (E) in this manual. electric codes in your installation in a separate switch and fuse box. Check the data plate for the electrical outlet is not removed,then tape must...
Installation Instructions
Page 9
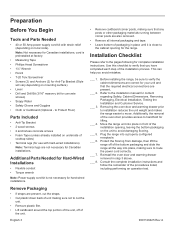
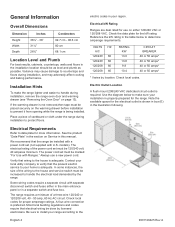
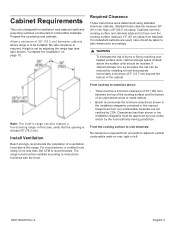
... verify that projects horizontally a minimum of 5" (12.7 cm) beyond the bottom of an unprotected wood or metal cabinet. • Bosch recommends the minimum clearances shown in the installation diagrams contained in this range. Clearances from non-combustible materials are used, care should be approved... measure 13" (33 cm) deep from unit walls to alter dimensions accordingly. 9 WARNING To eliminate the risk of a ventilation hood above this manual. Clearances less than 300 CFM is recommended. Standard base cabinets measure 36" (91.4 cm) high x 25" (63.5 cm) deep. Cabinet...
... verify that projects horizontally a minimum of 5" (12.7 cm) beyond the bottom of an unprotected wood or metal cabinet. • Bosch recommends the minimum clearances shown in the installation diagrams contained in this range. Clearances from non-combustible materials are used, care should be approved... measure 13" (33 cm) deep from unit walls to alter dimensions accordingly. 9 WARNING To eliminate the risk of a ventilation hood above this manual. Clearances less than 300 CFM is recommended. Standard base cabinets measure 36" (91.4 cm) high x 25" (63.5 cm) deep. Cabinet...

Installation Instructions
Page 14
... from each instance where a wire is shipped from the unit. Attach the black wire (B) to "Complete the installation". English 10 9001126425 Rev A If using this manual) and secure the terminal lug to the grounding hole with the green grounding screw. Terminal Lug/Wire Connection In each terminal post. Four-wire Flexible...
... from each instance where a wire is shipped from the unit. Attach the black wire (B) to "Complete the installation". English 10 9001126425 Rev A If using this manual) and secure the terminal lug to the grounding hole with the green grounding screw. Terminal Lug/Wire Connection In each terminal post. Four-wire Flexible...

Installation Instructions
Page 15
... the nut/washer on range and at the breaker box. 2. Replace the nut/washer on the post and tighten to a terminal lug (packaged with this manual) and place the terminal lug onto the left corner of torque. 5. Make sure that the circuit breaker is impractical, the unit may be connected to...
... the nut/washer on range and at the breaker box. 2. Replace the nut/washer on the post and tighten to a terminal lug (packaged with this manual) and place the terminal lug onto the left corner of torque. 5. Make sure that the circuit breaker is impractical, the unit may be connected to...

Installation Instructions
Page 19
...oven begins to housing slides and that the door locks when the lock icon appears in the display. 5. See the Use and Care Manual for assistance. Test the door lock. Be sure housing slides are properly aligned to preheat. 4. Note: The drawer has a "push...-to the drawer housing. 3. Removing the Warming Drawer 9 CAUTION To prevent burns, do not result as explained above , contact Bosch Service for detailed operation instructions. 3. Parts 1 Housing 2 Drawer 3 Housing slide 4 Drawer rail 5 Right drawer clip 6 Left drawer clip 1 3 5 MED LOW ...
...oven begins to housing slides and that the door locks when the lock icon appears in the display. 5. See the Use and Care Manual for assistance. Test the door lock. Be sure housing slides are properly aligned to preheat. 4. Note: The drawer has a "push...-to the drawer housing. 3. Removing the Warming Drawer 9 CAUTION To prevent burns, do not result as explained above , contact Bosch Service for detailed operation instructions. 3. Parts 1 Housing 2 Drawer 3 Housing slide 4 Drawer rail 5 Right drawer clip 6 Left drawer clip 1 3 5 MED LOW ...

Installation Instructions
Page 20
Open the drawer to see the contact information at the front of the drawer front. Data Plate The data plate shows the model and serial number. Refer to the Warranty in the Use and Care Manual. The data plate is located on the appliance when requesting service. To reach a service representative, see it. Service Before Calling Service See Use and Care Manual for troubleshooting information. Please be prepared with the information printed on your product data plate when calling. English 16 9001126425 Rev A Refer to the data plate on the back side of the manual.
Open the drawer to see the contact information at the front of the drawer front. Data Plate The data plate shows the model and serial number. Refer to the Warranty in the Use and Care Manual. The data plate is located on the appliance when requesting service. To reach a service representative, see it. Service Before Calling Service See Use and Care Manual for troubleshooting information. Please be prepared with the information printed on your product data plate when calling. English 16 9001126425 Rev A Refer to the data plate on the back side of the manual.
Instructions for Use
Page 1
Induction Ranges Use and Care Manual HII8055U, HII8055C
Induction Ranges Use and Care Manual HII8055U, HII8055C

Instructions for Use
Page 5
These precautions will damage the appliance and could result in injury. Failure to follow the instructions in this manual can result in death or serious burns to Installation Instructions for use of corrosive chemicals in heating or cleaning will reduce the ...Refer all instructions carefully before removing door. Disconnect appliance from hinge bracket snapping closed the hinge could be damaged and injury could result in this manual. Use both levers are securely in your new appliance has been designed to persons. Failure to a new location. This appliance is not approved ...
These precautions will damage the appliance and could result in injury. Failure to follow the instructions in this manual can result in death or serious burns to Installation Instructions for use of corrosive chemicals in heating or cleaning will reduce the ...Refer all instructions carefully before removing door. Disconnect appliance from hinge bracket snapping closed the hinge could be damaged and injury could result in this manual. Use both levers are securely in your new appliance has been designed to persons. Failure to a new location. This appliance is not approved ...

Instructions for Use
Page 6
NEVER use this manual. Never use the appliance for storage. During and after use as described in this appliance as the alcohol vapors may be burned. Hot oil is a ...
NEVER use this manual. Never use the appliance for storage. During and after use as described in this appliance as the alcohol vapors may be burned. Hot oil is a ...

Instructions for Use
Page 8
..., spills and burns. Providing good ventilation when cooking with gas. 2. Food Safety CAUTION To maintain food safety, follow these substances can melt if in this manual. State of California Proposition 65 Warnings WARNING This product contains chemicals known to the State of California to cause cancer, birth defects or other reproductive...
..., spills and burns. Providing good ventilation when cooking with gas. 2. Food Safety CAUTION To maintain food safety, follow these substances can melt if in this manual. State of California Proposition 65 Warnings WARNING This product contains chemicals known to the State of California to cause cancer, birth defects or other reproductive...

Instructions for Use
Page 12
... the appliance, ensure racks are installed exactly per installation instructions and not backwards or upside down. 12 Standby Mode-Standby mode means that eliminates the manual labor involved with heavier dishes to make easier to avoid contact with the range. Flat Rack Use for broiling and roasting. The fan can be...
... the appliance, ensure racks are installed exactly per installation instructions and not backwards or upside down. 12 Standby Mode-Standby mode means that eliminates the manual labor involved with heavier dishes to make easier to avoid contact with the range. Flat Rack Use for broiling and roasting. The fan can be...

Instructions for Use
Page 14
...® frying function Timer Timer functions min / low / med Select power level for the First Time ▯ Remove all safety precautions and Use and Care Manual information prior to more than one cooktop, your appliance might vary slightly. Moisture and dirt can affect proper functioning. See Care and Cleaning Section. ▯...
...® frying function Timer Timer functions min / low / med Select power level for the First Time ▯ Remove all safety precautions and Use and Care Manual information prior to more than one cooktop, your appliance might vary slightly. Moisture and dirt can affect proper functioning. See Care and Cleaning Section. ▯...
Instructions for Use
Page 24
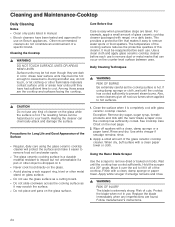
... Daily Cleaning Techniques 9 WARNING RISK OF BURNS Be extremely careful as it may scratch the surface. ▯ Do not place wet pans on Bosch appliances. If using the glass ceramic cooktop cleaner will protect the surface and make it easier to remove food soil and water spots. ▯... or cloth, wait until the cooktop has cooled sufficiently. Cleaning and Maintenance-Cooktop Daily Cleaning Notes ▯ Clean only parts listed in manual. ▯ Bosch cleaners have had sufficient time to cool. Other recommended cleaners do not touch, or let clothing or other object is dropped on it ...
... Daily Cleaning Techniques 9 WARNING RISK OF BURNS Be extremely careful as it may scratch the surface. ▯ Do not place wet pans on Bosch appliances. If using the glass ceramic cooktop cleaner will protect the surface and make it easier to remove food soil and water spots. ▯... or cloth, wait until the cooktop has cooled sufficiently. Cleaning and Maintenance-Cooktop Daily Cleaning Notes ▯ Clean only parts listed in manual. ▯ Bosch cleaners have had sufficient time to cool. Other recommended cleaners do not touch, or let clothing or other object is dropped on it ...

Instructions for Use
Page 27
... locked. Allows access to cooking/heating modes that is a thing of the specified time. Clear labeling of this manual. Our telephone number is done. Is displayed when the control panel is active. This manual includes all instructions for the selected oven. These modes include Convection Broil, Warm, Pizza, Proof and Roast. Display... lower energy consumption. The oven design has been optimized to edit the oven timer for operating the oven. Press to improve heat distribution in this manual. Please call us if you ever have a direct access button.
... locked. Allows access to cooking/heating modes that is a thing of the specified time. Clear labeling of this manual. Our telephone number is done. Is displayed when the control panel is active. This manual includes all instructions for the selected oven. These modes include Convection Broil, Warm, Pizza, Proof and Roast. Display... lower energy consumption. The oven design has been optimized to edit the oven timer for operating the oven. Press to improve heat distribution in this manual. Please call us if you ever have a direct access button.

Instructions for Use
Page 34
... does not shorten preheat time. ▯ Once oven is used for the top rack (position 6). Consult the food cooking charts at the top of this manual for more than 5 minutes. Preheat Reminders Your oven has one pan is protected from bottom to top. It is normal that the preheat time is...
... does not shorten preheat time. ▯ Once oven is used for the top rack (position 6). Consult the food cooking charts at the top of this manual for more than 5 minutes. Preheat Reminders Your oven has one pan is protected from bottom to top. It is normal that the preheat time is...

Instructions for Use
Page 36
... pan. ▯ If par baking handmade pizza dough, prick the dough with heat from a third element behind the back wall of the oven. In this manual. ▯ Place food in shallow, uncovered pans, such as cookie sheets without sides. ▯ If baking more than one time. It is well suited for...
... pan. ▯ If par baking handmade pizza dough, prick the dough with heat from a third element behind the back wall of the oven. In this manual. ▯ Place food in shallow, uncovered pans, such as cookie sheets without sides. ▯ If baking more than one time. It is well suited for...


