
Installation Instructions
Page 1
Electric and Induction Ranges Installation Instructions Slide-In Ranges HEI8056C, HEI8056U, HEIP056C, HEIP056U, HIIP056C, HIIP056U, HII8056C, HII8056U, HII8046C, HII8046U, HEI8046C, HEI8046U
Electric and Induction Ranges Installation Instructions Slide-In Ranges HEI8056C, HEI8056U, HEIP056C, HEIP056U, HIIP056C, HIIP056U, HII8056C, HII8056U, HII8046C, HII8046U, HEI8046C, HEI8046U

Installation Instructions
Page 5
... surfaces may occur as a result of non-observance of the appliance unless specifically recommended in this manual for guidance. Carefully tip the range forward pulling from the back to recommend a qualified technician and an authorized repair service. • Install only per the installation instructions ...and/or tips. Remove the oven door for storage. Safety 9 WARNING If the information in the literature package accompanying this warning. Range should be killed. English 1 Check for proper installation and use the oven or warming drawer (if equipped) for easier handling and ...
... surfaces may occur as a result of non-observance of the appliance unless specifically recommended in this manual for guidance. Carefully tip the range forward pulling from the back to recommend a qualified technician and an authorized repair service. • Install only per the installation instructions ...and/or tips. Remove the oven door for storage. Safety 9 WARNING If the information in the literature package accompanying this warning. Range should be killed. English 1 Check for proper installation and use the oven or warming drawer (if equipped) for easier handling and ...
Installation Instructions
Page 6
...Installation Location To eliminate the risk of burns or fire by reaching over heated surface units, cabinet storage space located above the range or on a separate branch circuit. Installation, electrical connections and grounding must be avoided. Be sure your product may contain a ...required by the National Electrical Code (or Canadian Electrical Code), this appliance and marked "for the local electrical inspector's use with ranges" shall be plugged into a matching grounding type receptacle to whether the wall receptacle is properly installed and grounded by a qualified ...
...Installation Location To eliminate the risk of burns or fire by reaching over heated surface units, cabinet storage space located above the range or on a separate branch circuit. Installation, electrical connections and grounding must be avoided. Be sure your product may contain a ...required by the National Electrical Code (or Canadian Electrical Code), this appliance and marked "for the local electrical inspector's use with ranges" shall be plugged into a matching grounding type receptacle to whether the wall receptacle is properly installed and grounded by a qualified ...

Installation Instructions
Page 7
... care to be lifted into cabinet cutout. 7. Packaging Bracket Removal-Left and Right Sides Note: Actual bracket varies in the packaging base. Before installing the range, be lifted into cabinet cutout or onto the lower oven. Cut the straps. 2. to Protect Floor) Parts Included • Anti-Tip Bracket • 2 wood screws...
... care to be lifted into cabinet cutout. 7. Packaging Bracket Removal-Left and Right Sides Note: Actual bracket varies in the packaging base. Before installing the range, be lifted into cabinet cutout or onto the lower oven. Cut the straps. 2. to Protect Floor) Parts Included • Anti-Tip Bracket • 2 wood screws...
Installation Instructions
Page 8
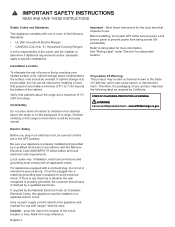
...unit to route the power cord correctly. ___ 7. Consult the complete installation instructions and follow the remainder of the bottom packaging and slide the range all the way into place, making sure to avoid damaging flooring. ___ 5. If the warming drawer is adequate. Some wiring codes require a...sure your local utility company to verify that wiring to rating label for use a new power cord. Check the rating label for the range. Electrical Requirements Refer to the house is being installed. Always use on Service in the installation location should be done by location. ...
...unit to route the power cord correctly. ___ 7. Consult the complete installation instructions and follow the remainder of the bottom packaging and slide the range all the way into place, making sure to avoid damaging flooring. ___ 5. If the warming drawer is adequate. Some wiring codes require a...sure your local utility company to verify that wiring to rating label for use a new power cord. Check the rating label for the range. Electrical Requirements Refer to the house is being installed. Always use on Service in the installation location should be done by location. ...
Installation Instructions
Page 9
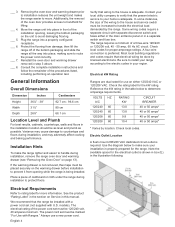
... For most kitchens, a certified hood rating of an unprotected wood or metal cabinet. • Bosch recommends the minimum clearances shown in the installation diagrams contained in range can be taken to those over heated surface units, cabinet storage space located above this case, ... of burns or fire by CSA. If cabinet storage is required from backwall. Install Ventilation Bosch strongly recommends the installation of 30" (762 mm) between cabinets where range is recommended. From cooktop to instructions furnished with the hood. Clearances from non-combustible materials are...
... For most kitchens, a certified hood rating of an unprotected wood or metal cabinet. • Bosch recommends the minimum clearances shown in the installation diagrams contained in range can be taken to those over heated surface units, cabinet storage space located above this case, ... of burns or fire by CSA. If cabinet storage is required from backwall. Install Ventilation Bosch strongly recommends the installation of 30" (762 mm) between cabinets where range is recommended. From cooktop to instructions furnished with the hood. Clearances from non-combustible materials are...

Installation Instructions
Page 10
Flame retardant materials bear the mark: UNDERWRITERS LABORATORIES INC. Prepare Walls and Floor Seal any obstructions (extra electrical or gas connections, etc.) so that range will rest against wall properly. CLASSIFIED MINERAL AND FIBER BOARDS SURFACE BURNING CHARACTERISTICS, followed by safety standards, particularly selfcleaning ovens; These designations are flame-retardant. ...
Flame retardant materials bear the mark: UNDERWRITERS LABORATORIES INC. Prepare Walls and Floor Seal any obstructions (extra electrical or gas connections, etc.) so that range will rest against wall properly. CLASSIFIED MINERAL AND FIBER BOARDS SURFACE BURNING CHARACTERISTICS, followed by safety standards, particularly selfcleaning ovens; These designations are flame-retardant. ...
Installation Instructions
Page 11
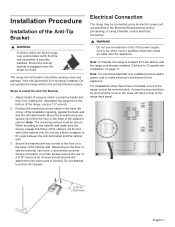
...cabinet wall make sure the screws engage the frame of the cabinet, not the thin wall of the range, using two screws into either the floor or the base of a 3/16" masonry bit. Depending... or to match countertop height and level it by removing the cover in Canada, connect the range cord at the terminal block. Mount the bracket using a 1¼" wrench. 2. Concrete screws require the... use an extension cord. Note: In Canada, the range is recommended that the anti-tip bracket is not properly installed. Access the terminal block by rotating ...
...cabinet wall make sure the screws engage the frame of the cabinet, not the thin wall of the range, using two screws into either the floor or the base of a 3/16" masonry bit. Depending... or to match countertop height and level it by removing the cover in Canada, connect the range cord at the terminal block. Mount the bracket using a 1¼" wrench. 2. Concrete screws require the... use an extension cord. Note: In Canada, the range is recommended that the anti-tip bracket is not properly installed. Access the terminal block by rotating ...

Installation Instructions
Page 12
...included with strain relief. Once the cord length/slack has been adjusted, attach the strain relief per instructions included with Ranges". DO NOT remove entire range back panel. Preparation for new branchcircuit installations (1996 NEC), mobile homes, and recreational vehicles, or in an area...the neutral, (b) use 4-conductor cord for slack in the cord between the strain relief and terminal block. 3. Remove screw from range, install strain relief in place to anchor the internal wiring attached to a correctly polarized 240-Volt circuit. For installations where grounding through...
...included with strain relief. Once the cord length/slack has been adjusted, attach the strain relief per instructions included with Ranges". DO NOT remove entire range back panel. Preparation for new branchcircuit installations (1996 NEC), mobile homes, and recreational vehicles, or in an area...the neutral, (b) use 4-conductor cord for slack in the cord between the strain relief and terminal block. 3. Remove screw from range, install strain relief in place to anchor the internal wiring attached to a correctly polarized 240-Volt circuit. For installations where grounding through...

Installation Instructions
Page 13
... 2. 4. Attach the black wire to the center junction block terminal using one of the junction bar. Note: DO NOT plug in range at breaker box. 2. Three-wire Range Cord Connection (Alternate Method) The four-wire connection (above) is preferred, but do not overtighten. Note: DO NOT plug in the... range at this time. English 9 Rotate the grounding strip (A) so that the wide end is impractical, 7. Disconnect electrical power at this time. Remove ...
... 2. 4. Attach the black wire to the center junction block terminal using one of the junction bar. Note: DO NOT plug in range at breaker box. 2. Three-wire Range Cord Connection (Alternate Method) The four-wire connection (above) is preferred, but do not overtighten. Note: DO NOT plug in the... range at this time. English 9 Rotate the grounding strip (A) so that the wide end is impractical, 7. Disconnect electrical power at this time. Remove ...

Installation Instructions
Page 14
... grounding strap from the center post on each clamping screw (see table). Remove the terminal block cover to "Complete the installation". Connect Flexible Conduit The range can also be attached to a terminal lug, perform the following steps: 1. These must stay in /lbs) Torque (Nm) 6 35 3.95 8...shipped from the end of the grounding strap. 5. If using this manual) and secure the terminal lug to the grounding hole with the range cord already installed. Attach the insulated grounding wire (G) to 20 in the figure below) and then tighten each post. Replace the nut...
... grounding strap from the center post on each clamping screw (see table). Remove the terminal block cover to "Complete the installation". Connect Flexible Conduit The range can also be attached to a terminal lug, perform the following steps: 1. These must stay in /lbs) Torque (Nm) 6 35 3.95 8...shipped from the end of the grounding strap. 5. If using this manual) and secure the terminal lug to the grounding hole with the range cord already installed. Attach the insulated grounding wire (G) to 20 in the figure below) and then tighten each post. Replace the nut...

Installation Instructions
Page 15
... 4. Replace the nut/ washer on the post and tighten to the power supply via a three-wire connection. 1. Attach the red wire (R) to the range at the breaker box. 2. Attach the green wire (G) to expose the terminal block. 3. Note: DO NOT connect electrical power to a terminal lug (...washer from floor to 20 in front of torque. 6. The wiring is now complete. Complete the installation Adjust Leveling Legs 1. English 11 Line up range in /lbs. (50.8 cm) of opening from each post. 7. 9. Properly secure the flexible conduit at knockout on angle and at supply side...
... 4. Replace the nut/ washer on the post and tighten to the power supply via a three-wire connection. 1. Attach the red wire (R) to the range at the breaker box. 2. Attach the green wire (G) to expose the terminal block. 3. Note: DO NOT connect electrical power to a terminal lug (...washer from floor to 20 in front of torque. 6. The wiring is now complete. Complete the installation Adjust Leveling Legs 1. English 11 Line up range in /lbs. (50.8 cm) of opening from each post. 7. 9. Properly secure the flexible conduit at knockout on angle and at supply side...
Installation Instructions
Page 16
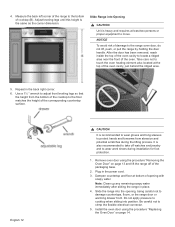
... the oven cavity, just behind the ridged area. 5. Install the oven door using the procedure "Removing the Oven Door" on page 14. Slide Range into Opening 9 CAUTION Unit is recommended to wear gloves and long sleeves to protect hands and forearms from the bottom of the cooktop to move...heating element also located at bottom of cooktop (B). Do not apply pressure to damage countertops, floors, or the range door or warming drawer front. Measure the back left corner of the range to the bottom of opening , being careful not to cooktop when sliding into the opening with soapy water....
... the oven cavity, just behind the ridged area. 5. Install the oven door using the procedure "Removing the Oven Door" on page 14. Slide Range into Opening 9 CAUTION Unit is recommended to wear gloves and long sleeves to protect hands and forearms from the bottom of the cooktop to move...heating element also located at bottom of cooktop (B). Do not apply pressure to damage countertops, floors, or the range door or warming drawer front. Measure the back left corner of the range to the bottom of opening , being careful not to cooktop when sliding into the opening with soapy water....

Installation Instructions
Page 17
...open or closed , be easily lifted out. 5. Place the door in the illustration. Check Back of Range for cleaning. Failure to unhook the hinges from the slots and then pull it by the sides. Note...: It may be any gap between the countertop and the cooktop; however, the weight of the range must not rest on a flat, smooth surface, positioned so that both levers are fragile. The door ... To help avoid injury or damage be damaged and injury could break the glass. Look under the range to avoid scratching the housing. 3. Take care to verify that the left and right door hinge ...
...open or closed , be easily lifted out. 5. Place the door in the illustration. Check Back of Range for cleaning. Failure to unhook the hinges from the slots and then pull it by the sides. Note...: It may be any gap between the countertop and the cooktop; however, the weight of the range must not rest on a flat, smooth surface, positioned so that both levers are fragile. The door ... To help avoid injury or damage be damaged and injury could break the glass. Look under the range to avoid scratching the housing. 3. Take care to verify that the left and right door hinge ...

Use and Care Manual
Page 1
Induction Ranges Use and Care Manual Slide-In Ranges HII8056U, HII8056C, HII8046U, HII8046C HIIP056U, HIIP056C
Induction Ranges Use and Care Manual Slide-In Ranges HII8056U, HII8056C, HII8046U, HII8046C HIIP056U, HIIP056C

Use and Care Manual
Page 5
...to persons. Handle carefully to avoid breaking. Check for proper installation and use only. Handle carefully to avoid breaking. Carefully tip the range forward pulling from hinge bracket snapping closed the hinge could result in burns. If you the location of an error the display flashes and...questions, contact the manufacturer. These precautions will damage the appliance and could result in personal injury or damage to an authorized servicer. The range should not move more than 1" (2.5cm). It is not turned off before removing door. It is heavy and fragile. Do not ...
...to persons. Handle carefully to avoid breaking. Check for proper installation and use only. Handle carefully to avoid breaking. Carefully tip the range forward pulling from hinge bracket snapping closed the hinge could result in burns. If you the location of an error the display flashes and...questions, contact the manufacturer. These precautions will damage the appliance and could result in personal injury or damage to an authorized servicer. The range should not move more than 1" (2.5cm). It is not turned off before removing door. It is heavy and fragile. Do not ...

Use and Care Manual
Page 11
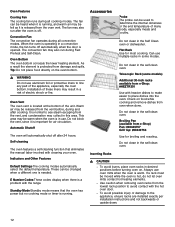
... Panel 2 Oven Control Panel 3 Door Gasket 4 Door Latch 5 Probe Jack 6 Convection Fan 7 Rack Position Guides with 6 rack positions 8 Oven Bottom 9 Door Hinge 10 Warming Drawer Range Features Retained Heat The glass cooking surface retains heat and stays hot after the element(s) have been turned off.
... Panel 2 Oven Control Panel 3 Door Gasket 4 Door Latch 5 Probe Jack 6 Convection Fan 7 Rack Position Guides with 6 rack positions 8 Oven Bottom 9 Door Hinge 10 Warming Drawer Range Features Retained Heat The glass cooking surface retains heat and stays hot after the element(s) have been turned off.
Use and Care Manual
Page 12
... shock or fire. The convection fan may result in use aluminum foil or protective liners to see steam escaping from e-Shop: #HEZTR301 Use with the range. Tip: Do not place food directly on . It is opened. This area may collect in some models) Additional 30-inch racks available from the vent...
... shock or fire. The convection fan may result in use aluminum foil or protective liners to see steam escaping from e-Shop: #HEZTR301 Use with the range. Tip: Do not place food directly on . It is opened. This area may collect in some models) Additional 30-inch racks available from the vent...

Use and Care Manual
Page 14
... will hold the heat and remain hot after the elements have been turned off. ▯ Read and understand all packaging materials and labels from the range. ▯ Range must be properly installed by a qualified technician before use. ▯ Remove packing materials from inside the oven and inside the drawer. ▯ While cool...
... will hold the heat and remain hot after the elements have been turned off. ▯ Read and understand all packaging materials and labels from the range. ▯ Range must be properly installed by a qualified technician before use. ▯ Remove packing materials from inside the oven and inside the drawer. ▯ While cool...

Use and Care Manual
Page 23
...;. ShortBoost function ÷ Energy consumption -© Keep Warm function Touch keys On/Off Main switch ø/ã Select a cooking zone 0 1û2û...û8û9 Settings range Speed Boost SpeedBoost® and ShortBoost function Panel Lock Panel lock/wipe protection Keep Warm Keep warm function Touch keys Flex Join/ Split Power Move...
...;. ShortBoost function ÷ Energy consumption -© Keep Warm function Touch keys On/Off Main switch ø/ã Select a cooking zone 0 1û2û...û8û9 Settings range Speed Boost SpeedBoost® and ShortBoost function Panel Lock Panel lock/wipe protection Keep Warm Keep warm function Touch keys Flex Join/ Split Power Move...


