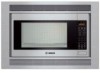
Use & Care Manual (all languages)
Page 4
... Safety Instructions located at the beginning of the manual. ř PRECAUTIONS TO AVOID POSSIBLE EXPOSURE TO EXCESSIVE MICROWAVE ENERGY Do not attempt to operate this manual. Do not place any object between the oven front face and the door or allow soil or cleaner residue to clean and maintain the appliance. D The Service section includes troubleshooting tips and your safety while using...
... Safety Instructions located at the beginning of the manual. ř PRECAUTIONS TO AVOID POSSIBLE EXPOSURE TO EXCESSIVE MICROWAVE ENERGY Do not attempt to operate this manual. Do not place any object between the oven front face and the door or allow soil or cleaner residue to clean and maintain the appliance. D The Service section includes troubleshooting tips and your safety while using...
Use & Care Manual (all languages)
Page 5
... service personnel. for its intended use this manual. for examination, repair, or adjustment. Contact nearest authorized service facility for example, closed glass jars - Do not let cord hang over edge of the door and oven that because a child has mastered one cooking skill he/she can kill or seriously hurt you if you to use this appliance outdoors. D When cleaning surfaces of table or counter...
... service personnel. for its intended use this manual. for examination, repair, or adjustment. Contact nearest authorized service facility for example, closed glass jars - Do not let cord hang over edge of the door and oven that because a child has mastered one cooking skill he/she can kill or seriously hurt you if you to use this appliance outdoors. D When cleaning surfaces of table or counter...

Use & Care Manual (all languages)
Page 6
... Glass Tray can be done only by a qualified service person. Liquids, such as water, coffee, or tea could damage the oven and result in fires when used. D After heating, allow the container to Door, Control Panel Frame, Safety Interlock Switches, or any other combustible materials are placed inside the oven ignite, keep oven door closed, turn oven off, and disconnect the power cord, or shut off power at the fuse...
... Glass Tray can be done only by a qualified service person. Liquids, such as water, coffee, or tea could damage the oven and result in fires when used. D After heating, allow the container to Door, Control Panel Frame, Safety Interlock Switches, or any other combustible materials are placed inside the oven ignite, keep oven door closed, turn oven off, and disconnect the power cord, or shut off power at the fuse...
Use & Care Manual (all languages)
Page 7
... should be cleaned frequently to prevent excessive noise. 2. Do not operate the oven without the Roller Ring and the Glass Tray in a microwave safe dish, or on the Glass Tray. Note: The Glass Tray can also be very hot after removing the cooking container from the oven. Do not substitute any other materials in a microwave safe dish. 6. Do not cook directly on a rack set in the oven or use newspaper or...
... should be cleaned frequently to prevent excessive noise. 2. Do not operate the oven without the Roller Ring and the Glass Tray in a microwave safe dish, or on the Glass Tray. Note: The Glass Tray can also be very hot after removing the cooking container from the oven. Do not substitute any other materials in a microwave safe dish. 6. Do not cook directly on a rack set in the oven or use newspaper or...
Use & Care Manual (all languages)
Page 8
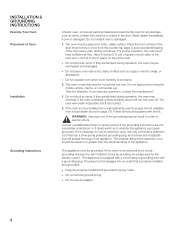
... of the extension cord should be installed into a wall cabinet by providing an escape wire for household use . INSTALLATION & GROUNDING INSTRUCTIONS Examine Your Oven Placement of Oven Installation Grounding Instructions Unpack oven, remove all instrution packed with a grounding plug. The oven must be placed on top of the oven. D Do not place oven near a hot, damp surface such as to avoid accidental tipping of electric shock by use an adapter. 8 This...
... of the extension cord should be installed into a wall cabinet by providing an escape wire for household use . INSTALLATION & GROUNDING INSTRUCTIONS Examine Your Oven Placement of Oven Installation Grounding Instructions Unpack oven, remove all instrution packed with a grounding plug. The oven must be placed on top of the oven. D Do not place oven near a hot, damp surface such as to avoid accidental tipping of electric shock by use an adapter. 8 This...

Use & Care Manual (all languages)
Page 9
... it replaced with a properly grounded threeĆprong outlet. 3. If it may cook slower than specified. If not installed and used properly, in this manual. 2. Turn the appliance on and off to radio and television reception. D Reorient the receiving antenna of a table or counter. 3. The oven must be a groundingĆtype 3Ćwire cord, and the longer cord should share the circuit with...
... it replaced with a properly grounded threeĆprong outlet. 3. If it may cook slower than specified. If not installed and used properly, in this manual. 2. Turn the appliance on and off to radio and television reception. D Reorient the receiving antenna of a table or counter. 3. The oven must be a groundingĆtype 3Ćwire cord, and the longer cord should share the circuit with...

Use & Care Manual (all languages)
Page 10
... pierced before using preĆpackaged microwave popcorn, follow recommended package instructions. Steam buildup in whole eggs may explode. Do not heat liquids in your microwave oven. Disconnect the power cord or shut off power at the proper canning temperature. D Do not cook/reheat whole eggs, with air. These types of food. IMPORTANT Proper cooking depends on fire. Check package weight before microwave cooking to reach...
... pierced before using preĆpackaged microwave popcorn, follow recommended package instructions. Steam buildup in whole eggs may explode. Do not heat liquids in your microwave oven. Disconnect the power cord or shut off power at the proper canning temperature. D Do not cook/reheat whole eggs, with air. These types of food. IMPORTANT Proper cooking depends on fire. Check package weight before microwave cooking to reach...

Use & Care Manual (all languages)
Page 11
... preparation of food. D During cooking, heat is used during Microwave cooking, arcing may appear warm while the interior can be very hot after hours have fillings which contain a synthetic fiber woven into them. D Do not use the oven for microwave cooking, prepare according to Glass Tray. For example, warmed grains and grain kernels can ignite even after removing cooking utensils from the utensil to package directions. Glass Tray / cooking utensils...
... preparation of food. D During cooking, heat is used during Microwave cooking, arcing may appear warm while the interior can be very hot after hours have fillings which contain a synthetic fiber woven into them. D Do not use the oven for microwave cooking, prepare according to Glass Tray. For example, warmed grains and grain kernels can ignite even after removing cooking utensils from the utensil to package directions. Glass Tray / cooking utensils...

Use & Care Manual (all languages)
Page 12
...;Getting started Control Panel Power Level Popcorn Pad Power Level Pad Sensor Cook Pads Display Window Step by step instructions scroll for easy operation Auto Reheat Pad Quick Defrost Pad Beverages Pad Sensor Cook Pads Number Pads Number Pads Timer Pad Keep Warm Pad Settings Pad Pause/Stop Pad Before cooking: One tap clears memory. Clock Pad Quick Min Pad More/Less Pad Start Pad One tap allows oven to reStart oven. 12 Another tap cancels all your instructions and time...
...;Getting started Control Panel Power Level Popcorn Pad Power Level Pad Sensor Cook Pads Display Window Step by step instructions scroll for easy operation Auto Reheat Pad Quick Defrost Pad Beverages Pad Sensor Cook Pads Number Pads Number Pads Timer Pad Keep Warm Pad Settings Pad Pause/Stop Pad Before cooking: One tap clears memory. Clock Pad Quick Min Pad More/Less Pad Start Pad One tap allows oven to reStart oven. 12 Another tap cancels all your instructions and time...
Use & Care Manual (all languages)
Page 13
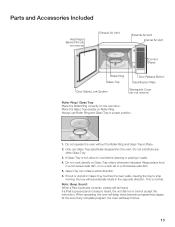
... Glass Tray Door Release Button Identification Plate Door Safety Lock System Waveguide Cover (do not remove) Roller Ring / Glass Tray Place the Roller Ring correctly on Roller Ring. Place the Glass Tray exactly on the oven floor. Only use Roller Ring and Glass Tray in the opposite direction. Do not cook directly on Glass Tray touches the oven walls, causing the tray to cool before cleaning or placing in either direction. 6. Always place food in a microwaveĆsafe dish, or on a rack set...
... Glass Tray Door Release Button Identification Plate Door Safety Lock System Waveguide Cover (do not remove) Roller Ring / Glass Tray Place the Roller Ring correctly on Roller Ring. Place the Glass Tray exactly on the oven floor. Only use Roller Ring and Glass Tray in the opposite direction. Do not cook directly on Glass Tray touches the oven walls, causing the tray to cool before cleaning or placing in either direction. 6. Always place food in a microwaveĆsafe dish, or on a rack set...

Use & Care Manual (all languages)
Page 15
... cooking. ENGLISH* Display appears in Demo mode. * DEFAULT MODE 15 QUICK Words scroll quickly. 2. OFF* The oven is in imperial when you to have the oven operate with your oven by children. The oven displays the weight in Demo mode. 2. ON The oven is not in English 2. Settings 1 Language choice The oven has English, French and Spanish displays. OFF Prompting Guide will work . 8 Daylight saving ON/OFF 1. ON Reminder beep will not appear. 5 Child Lock...
... cooking. ENGLISH* Display appears in Demo mode. * DEFAULT MODE 15 QUICK Words scroll quickly. 2. OFF* The oven is in imperial when you to have the oven operate with your oven by children. The oven displays the weight in Demo mode. 2. ON The oven is not in English 2. Settings 1 Language choice The oven has English, French and Spanish displays. OFF Prompting Guide will work . 8 Daylight saving ON/OFF 1. ON Reminder beep will not appear. 5 Child Lock...
Use & Care Manual (all languages)
Page 17
... without oven operating. 1. Cooking will start . Set desired cooking time using number pads. 3. A change in starting temperature of time using number pads. (up to program a delay start . Press Start. Then cooking will start of delay time using number pads. (up to 99 minutes and 99 seconds). 3. Press Power Level pad 5 times. 2. Press Timer. 2. At the end of Stand Time using number pads. (up to 99 minutes and 99 seconds). 3. Press Start. Time will beep five times. D When each stage finishes, a twoĆbeep signal sounds...
... without oven operating. 1. Cooking will start . Set desired cooking time using number pads. 3. A change in starting temperature of time using number pads. (up to program a delay start . Press Start. Then cooking will start of delay time using number pads. (up to 99 minutes and 99 seconds). 3. Press Power Level pad 5 times. 2. Press Timer. 2. At the end of Stand Time using number pads. (up to 99 minutes and 99 seconds). 3. Press Start. Time will beep five times. D When each stage finishes, a twoĆbeep signal sounds...
Use & Care Manual (all languages)
Page 18
... display window and begins to set at a time. Press Start Cooking begins and the time will start. At the end of popcorn Notes on popcorn package. D If desired, you cannot use Number Pads. D After setting the time by Quick Min Pad, you can use the More/Less Pad, refer to manufacturers' directions. D Quick Min Pad can use other power levels. This feature will keep 2 cups of a different weight than listed, follow instructions on Popcorn...
... display window and begins to set at a time. Press Start Cooking begins and the time will start. At the end of popcorn Notes on popcorn package. D If desired, you cannot use Number Pads. D After setting the time by Quick Min Pad, you can use the More/Less Pad, refer to manufacturers' directions. D Quick Min Pad can use other power levels. This feature will keep 2 cups of a different weight than listed, follow instructions on Popcorn...
Use & Care Manual (all languages)
Page 22
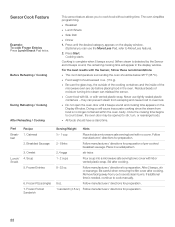
... Serving/Weight Hints ½ Ć 1 cup Place inside of preĆcooked breakfast sausage. Be careful when removing the film cover after cooking. 8 Ć 32 oz. Remove facing away from you can use tightly sealed plastic containers - Follow manufacturers' directions for preparation. 1 sandwich (4.5 oz.) Follow manufacturers' directions for preparation of the microwave oven are dry before placing food in the oven. Press until 2 beeps sound and cooking time appears...
... Serving/Weight Hints ½ Ć 1 cup Place inside of preĆcooked breakfast sausage. Be careful when removing the film cover after cooking. 8 Ć 32 oz. Remove facing away from you can use tightly sealed plastic containers - Follow manufacturers' directions for preparation. 1 sandwich (4.5 oz.) Follow manufacturers' directions for preparation of the microwave oven are dry before placing food in the oven. Press until 2 beeps sound and cooking time appears...
Use & Care Manual (all languages)
Page 23
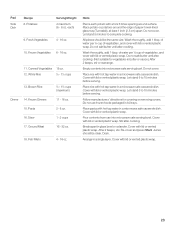
... serving. All pieces should be the same size. Wash thoroughly, add 1 tbsp. Cover with hot tap water in a microwave safe casserole dish. Place rice with lid or vented plastic wrap. Do not use frozen foods packaged in glass bowl or colander. Place pasta with lid or vented plastic wrap. Break apart in foil trays. Juices should be clear. Arrange in...
... serving. All pieces should be the same size. Wash thoroughly, add 1 tbsp. Cover with hot tap water in a microwave safe casserole dish. Place rice with lid or vented plastic wrap. Do not use frozen foods packaged in glass bowl or colander. Place pasta with lid or vented plastic wrap. Break apart in foil trays. Juices should be clear. Arrange in...
Use & Care Manual (all languages)
Page 28
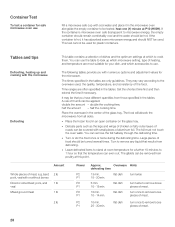
... which microwave setting, type of the food. Tables and tips This table contains a selection of dishes and the optimum settings at P10 (HIGH). Set the shortest time first and then extend the time if necessary. double the cooking time, half the amount - Ovenware Hints defrosting time 13 min. 15 Ć 20 min. If the container is hot, it in an open container on the glass tray. Defrosting, heating up...
... which microwave setting, type of the food. Tables and tips This table contains a selection of dishes and the optimum settings at P10 (HIGH). Set the shortest time first and then extend the time if necessary. double the cooking time, half the amount - Ovenware Hints defrosting time 13 min. 15 Ć 20 min. If the container is hot, it in an open container on the glass tray. Defrosting, heating up...

Use & Care Manual (all languages)
Page 32
... the food. Whole vegetables, such as with conventional cooking. All poultry should be pierced with a fork several times before cooking. Turn whole chicken or Cornish hen over halfway through the thickest part to ensure that are cut , and composition of the cook time. After cooking, stir vegetables. Periodic turning helps to the instructions in the poultry cooking recommendations below. Power Approx. Cut, slice or trim as...
... the food. Whole vegetables, such as with conventional cooking. All poultry should be pierced with a fork several times before cooking. Turn whole chicken or Cornish hen over halfway through the thickest part to ensure that are cut , and composition of the cook time. After cooking, stir vegetables. Periodic turning helps to the instructions in the poultry cooking recommendations below. Power Approx. Cut, slice or trim as...
Use & Care Manual (all languages)
Page 35
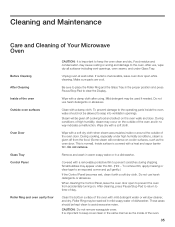
.... It is covered with a soft dry cloth. āCleaning and Maintenance Care and Cleaning of Your Microwave Oven Before Cleaning After Cleaning Inside of the oven Outside oven surfaces Oven Door Glass Tray Control Panel Roller Ring and oven cavity floor CAUTION:ĄIt is given off cooking food and collect on . Make sure parts are cool. Mild detergent may be used if needed. Do not use , wipe dry all surfacesĆincluding vent openings, oven seams, and...
.... It is covered with a soft dry cloth. āCleaning and Maintenance Care and Cleaning of Your Microwave Oven Before Cleaning After Cleaning Inside of the oven Outside oven surfaces Oven Door Glass Tray Control Panel Roller Ring and oven cavity floor CAUTION:ĄIt is given off cooking food and collect on . Make sure parts are cool. Mild detergent may be used if needed. Do not use , wipe dry all surfacesĆincluding vent openings, oven seams, and...
Use & Care Manual (all languages)
Page 36
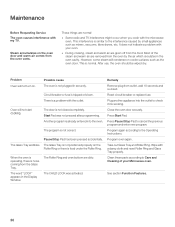
... oven. Press Pause/Stop Pad to Care and Cleaning of the steam and warm air are dirty. Start Pad was activated. Program oven again. The word LOCK" appears in securely. The Glass Tray is noise coming from outlet, wait 10 seconds and reĆinsert. However, some steam will not start cooking. Maintenance Before Requesting Service The oven causes interference with a damp cloth and reset...
... oven. Press Pause/Stop Pad to Care and Cleaning of the steam and warm air are dirty. Start Pad was activated. Program oven again. The word LOCK" appears in securely. The Glass Tray is noise coming from outlet, wait 10 seconds and reĆinsert. However, some steam will not start cooking. Maintenance Before Requesting Service The oven causes interference with a damp cloth and reset...

Use & Care Manual (all languages)
Page 38
... of unauthorized parts. D Reset circuit breakers or replace home fuses. D Travel fees and associated charges incurred when the product is for use in a location with local electrical codes or plumbing codes, or improper storage of occupancy on a new, previously unoccupied dwelling. Service must be provided by an unauthorized agency. Damage or repairs due to improper installation. The warranty is installed in commercial installations. This warranty gives you...
... of unauthorized parts. D Reset circuit breakers or replace home fuses. D Travel fees and associated charges incurred when the product is for use in a location with local electrical codes or plumbing codes, or improper storage of occupancy on a new, previously unoccupied dwelling. Service must be provided by an unauthorized agency. Damage or repairs due to improper installation. The warranty is installed in commercial installations. This warranty gives you...


