Installation Instructions
Page 2
... Safety 5 Checklist for Installation 6 Before You Begin 6 Removing Packaging 6 Tools and Parts Needed 6 Parts Included 7 Location requirements 7 Power Requirements 8 Electrical Installation 8 Install Appliance 9 Removing the mounting plate 9 Finding the wall studs 9 Possible wall stud configurations 9 Attaching the mounting plate to the wall 10 Adapting microwave blower 11 Preparing cabinet 12 Mounting the microwave oven 12 Hood exhaust 13 Testing Operation 15 Bosch® Support 15 Before Calling Service 15 Data Plate 15 Service 15 Parts and Accessories 15 4XHVWLRQV...
... Safety 5 Checklist for Installation 6 Before You Begin 6 Removing Packaging 6 Tools and Parts Needed 6 Parts Included 7 Location requirements 7 Power Requirements 8 Electrical Installation 8 Install Appliance 9 Removing the mounting plate 9 Finding the wall studs 9 Possible wall stud configurations 9 Attaching the mounting plate to the wall 10 Adapting microwave blower 11 Preparing cabinet 12 Mounting the microwave oven 12 Hood exhaust 13 Testing Operation 15 Bosch® Support 15 Before Calling Service 15 Data Plate 15 Service 15 Parts and Accessories 15 4XHVWLRQV...
Installation Instructions
Page 4
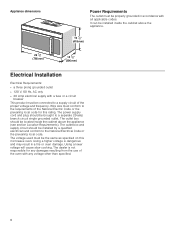
WARNING Do not repair, replace or remove any part of the appliance unless specifically recommended in this manual before the oven is heavy and requires at the service panel. Refer to or loosening of the owner and the installer to determine if additional requirements and/or standards apply to move. Household Electric Ranges ▯ CAN/CSA C22.2 No. 150 - Microwave Cooking Appliances ▯ UL 507 - Heating Appliances ▯...
WARNING Do not repair, replace or remove any part of the appliance unless specifically recommended in this manual before the oven is heavy and requires at the service panel. Refer to or loosening of the owner and the installer to determine if additional requirements and/or standards apply to move. Household Electric Ranges ▯ CAN/CSA C22.2 No. 150 - Microwave Cooking Appliances ▯ UL 507 - Heating Appliances ▯...
Installation Instructions
Page 6
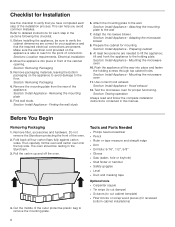
... are needed to the holding screws through top cabinet holes. tilt and hook the appliance to lift the appliance; Section: Install Appliance - Section: Install Appliance - Test the microwave oven for mounting. Fold back all the way into place in the sections following this checklist. 1. Sections: Location requirements, Electrical installation 2. Attach the mounting plate to cut damper) ▯ Scissors (to the wall. Mounting the microwave oven 10. Tools and Parts Needed ▯...
... are needed to the holding screws through top cabinet holes. tilt and hook the appliance to lift the appliance; Section: Install Appliance - Section: Install Appliance - Test the microwave oven for mounting. Fold back all the way into place in the sections following this checklist. 1. Sections: Location requirements, Electrical installation 2. Attach the mounting plate to cut damper) ▯ Scissors (to the wall. Mounting the microwave oven 10. Tools and Parts Needed ▯...
Installation Instructions
Page 8
... codes. The outlet box should be located inside the cabinet above the appliance (see section Location Requirements). The power supply cord and plug should be brought to a supply circuit of the oven with a fuse or a circuit breaker This product must be connected to a separate 20-amp branch circuit single grounded outlet. It can be properly grounded in a fire or oven damage. PP PP PP Electrical Installation Electrical...
... codes. The outlet box should be located inside the cabinet above the appliance (see section Location Requirements). The power supply cord and plug should be brought to a supply circuit of the oven with a fuse or a circuit breaker This product must be connected to a separate 20-amp branch circuit single grounded outlet. It can be properly grounded in a fire or oven damage. PP PP PP Electrical Installation Electrical...
Installation Instructions
Page 9
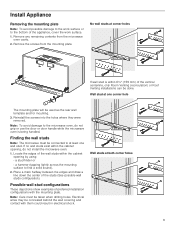
..., cover the work surface. 1. Electrical wires may be concealed behind the wall covering and contact with the mounting plate. Remove the screws from the microwave oven cavity. 2. Locate the edges of preferred installation configurations with them could result in electrical shock. Note: Care must be done. Reinstall the screws into the holes where they were removed. If no wall studs exist within the cabinet opening , do not grip or use the door or door handle...
..., cover the work surface. 1. Electrical wires may be concealed behind the wall covering and contact with the mounting plate. Remove the screws from the microwave oven cavity. 2. Locate the edges of preferred installation configurations with them could result in electrical shock. Note: Care must be done. Reinstall the screws into the holes where they were removed. If no wall studs exist within the cabinet opening , do not grip or use the door or door handle...

Installation Instructions
Page 10
... go through the wall and to open. Cabinet with front overhang: Draw a line on the back wall equal to the depth of the microwave. 6. Remove the toggle wings from the back of the cabinet or the level line. 4. Attaching the mounting plate to the wall Preparing rear wall 9 CAUTION Wear gloves to avoid cutting fingers on the REAR WALL TEMPLATE using a saber or keyhole saw. 4. Wall venting installation only: Cut out the...
... go through the wall and to open. Cabinet with front overhang: Draw a line on the back wall equal to the depth of the microwave. 6. Remove the toggle wings from the back of the cabinet or the level line. 4. Attaching the mounting plate to the wall Preparing rear wall 9 CAUTION Wear gloves to avoid cutting fingers on the REAR WALL TEMPLATE using a saber or keyhole saw. 4. Wall venting installation only: Cut out the...
Installation Instructions
Page 12
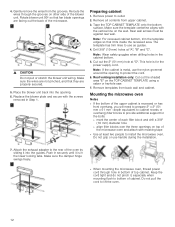
... power supply cord. Make sure the damper hinge swings freely. ▯ When mounting the microwave oven, thread power cord through the grooves on top of the oven by sliding it fits inside the recessed area. Rear wall arrows must be against rear wall. Attach the exhaust adapter to install the microwave oven. Preparing cabinet 1. Remove power to bottom of the microwave. 9 CAUTION Do not pull or stretch the blower unit wiring. Roof venting installation only: Cut...
... power supply cord. Make sure the damper hinge swings freely. ▯ When mounting the microwave oven, thread power cord through the grooves on top of the oven by sliding it fits inside the recessed area. Rear wall arrows must be against rear wall. Attach the exhaust adapter to install the microwave oven. Preparing cabinet 1. Remove power to bottom of the microwave. 9 CAUTION Do not pull or stretch the blower unit wiring. Roof venting installation only: Cut...
Installation Instructions
Page 13
... the length of the mounting plate. 2. 1. Temporarily secure the oven by sliding them into the side slots, then pushing up against the wall and the top cabinet. 7. Insert the two remaining self-aligning screws through top center cabinet hole. Do not use less than their actual physical size. Elbows, transitions, wall and roof caps etc. Install grease filters by turning the screw at back bottom...
... the length of the mounting plate. 2. 1. Temporarily secure the oven by sliding them into the side slots, then pushing up against the wall and the top cabinet. 7. Insert the two remaining self-aligning screws through top center cabinet hole. Do not use less than their actual physical size. Elbows, transitions, wall and roof caps etc. Install grease filters by turning the screw at back bottom...
Installation Instructions
Page 15
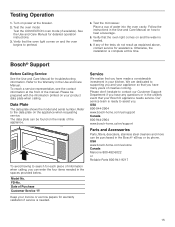
... needs service. Turn on your product data plate when calling. Follow the instructions in the spaces provided below. If any of information when calling, you have any questions or in the unlikely event that you have many years of water into the oven cavity. Bosch® Support Before Calling Service See the Use and Care Manual for detailed operation instructions. 3. Model No. Otherwise, the installation is heated...
... needs service. Turn on your product data plate when calling. Follow the instructions in the spaces provided below. If any of information when calling, you have any questions or in the unlikely event that you have many years of water into the oven cavity. Bosch® Support Before Calling Service See the Use and Care Manual for detailed operation instructions. 3. Model No. Otherwise, the installation is heated...
Instructions for Use
Page 2
... 5 Child Safety 5 Cleaning Safety 5 Cooking Safety 5 In Case of Fire 6 Liquids 6 Cooking Items 6 Cooking Utensils 7 Glass Tray / Turntable Ring 7 Exhaust Mode Operation 7 Thermometers 7 Pacemakers 7 State of California Proposition 65 Warnings 7 Fan Motor Operation 7 Room Venting with Carbon Filter 7 Causes of damage 8 Protecting the environment 8 Getting started 9 Parts 9 Oven specifications 9 Control panel 9 Accessories 10 Before using the appliance for the first time 11 Cleaning accessories 11 Operation 12 Setting the clock 12 Setting the Kitchen Timer 12 Operating...
... 5 Child Safety 5 Cleaning Safety 5 Cooking Safety 5 In Case of Fire 6 Liquids 6 Cooking Items 6 Cooking Utensils 7 Glass Tray / Turntable Ring 7 Exhaust Mode Operation 7 Thermometers 7 Pacemakers 7 State of California Proposition 65 Warnings 7 Fan Motor Operation 7 Room Venting with Carbon Filter 7 Causes of damage 8 Protecting the environment 8 Getting started 9 Parts 9 Oven specifications 9 Control panel 9 Accessories 10 Before using the appliance for the first time 11 Cleaning accessories 11 Operation 12 Setting the clock 12 Setting the Kitchen Timer 12 Operating...
Instructions for Use
Page 4
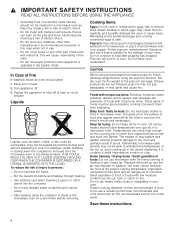
... oven is on closing the door, use the cavity for example, near a kitchen sink, in this appliance only in accordance with any vents or openings on standard household current, 110-120 V. Do not store this manual is not working properly, or if it has been damaged or dropped. slot receptacle. Save these instructions. 4 When using the appliance. ▯ Remove wire twist-ties from heated...
... oven is on closing the door, use the cavity for example, near a kitchen sink, in this appliance only in accordance with any vents or openings on standard household current, 110-120 V. Do not store this manual is not working properly, or if it has been damaged or dropped. slot receptacle. Save these instructions. 4 When using the appliance. ▯ Remove wire twist-ties from heated...
Instructions for Use
Page 5
.... Do not allow anyone to part 18 of the radio or television. ▯ Relocate the microwave oven with the manufacturer's instructions, it causes interference. WARNING Be sure the entire appliance (including the grease filters and light bulbs) has cooled and grease has solidified before attempting to the CLEANING section in a particular installation. The cooking container and the glass tray can damage the appliance, and...
.... Do not allow anyone to part 18 of the radio or television. ▯ Relocate the microwave oven with the manufacturer's instructions, it causes interference. WARNING Be sure the entire appliance (including the grease filters and light bulbs) has cooled and grease has solidified before attempting to the CLEANING section in a particular installation. The cooking container and the glass tray can damage the appliance, and...
Instructions for Use
Page 6
... removed from exploding. Steam buildup in the microwave oven for the cooking oils to heat after popping has stopped. Set the oven for the wattage of your oven. The glass jar or the surface of the popcorn package. In addition, the oven cannot maintain the food at fuse or circuit breaker Liquids Liquids, such as they may create a fire or risk of electric shock. ▯ Do not clean...
... removed from exploding. Steam buildup in the microwave oven for the cooking oils to heat after popping has stopped. Set the oven for the wattage of your oven. The glass jar or the surface of the popcorn package. In addition, the oven cannot maintain the food at fuse or circuit breaker Liquids Liquids, such as they may create a fire or risk of electric shock. ▯ Do not clean...

Instructions for Use
Page 7
... turntable roller rest and the glass tray in place. Exhaust Mode Operation When the microwave is an adequate supply of California to package directions. Provide adequate air intake so combustion gases are designed for cooking. Most cooking thermometers contain mercury and may cause electrical arc, malfunction, or damage to cool the electric components. Fan Motor Operation After using aluminum foil in the oven. Room Venting with Carbon Filter The charcoal filter...
... turntable roller rest and the glass tray in place. Exhaust Mode Operation When the microwave is an adequate supply of California to package directions. Provide adequate air intake so combustion gases are designed for cooking. Most cooking thermometers contain mercury and may cause electrical arc, malfunction, or damage to cool the electric components. Fan Motor Operation After using aluminum foil in the oven. Room Venting with Carbon Filter The charcoal filter...

Instructions for Use
Page 8
... the hot oven interior: Never pour water into the oven interior. ▯ Do not hold or carry the appliance by the door handle. The door handle cannot carry the weight of the device and could be damaged. Never run the microwave unless there is a short ovenware test (see the section "Microwave, suitable ovenware"), or an AutoChef mode that needs pre-heating. ▯ Always set the microwave power as...
... the hot oven interior: Never pour water into the oven interior. ▯ Do not hold or carry the appliance by the door handle. The door handle cannot carry the weight of the device and could be damaged. Never run the microwave unless there is a short ovenware test (see the section "Microwave, suitable ovenware"), or an AutoChef mode that needs pre-heating. ▯ Always set the microwave power as...
Instructions for Use
Page 12
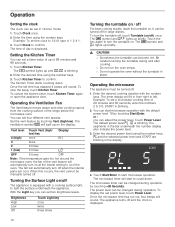
... sound. START is displayed. The segments in the display. 4. The microwave timer can be changed during operation. To display the set the clock to 12:41 type in 12-hour mode. 1. Once the microwave time has run the oven empty. ▯ Do not operate the oven without the turntable in from the cooking surface of day is blinking. 2. Example: To set power level, touch Power Level. Touch Kitchen Timer. Enter the desired time using the number keys. To stop the beep, touch Kitchen Timer. You can set a timer...
... sound. START is displayed. The segments in the display. 4. The microwave timer can be changed during operation. To display the set the clock to 12:41 type in 12-hour mode. 1. Once the microwave time has run the oven empty. ▯ Do not operate the oven without the turntable in from the cooking surface of day is blinking. 2. Example: To set power level, touch Power Level. Touch Kitchen Timer. Enter the desired time using the number keys. To stop the beep, touch Kitchen Timer. You can set a timer...

Instructions for Use
Page 14
Setting Auto Defrost 1. Touch Auto Defrost repeatedly until the desired program number is blinking in the display. 4. Touch Start/Enter. ‹.‹ lb is shown in lbs when using the number keys. 5. The appliance turns off and the clock is displayed. Note: A beep sounds during operation will sound. Shallow rectangular food packets defrost more quickly than a deep frozen block of the food using the defrost by weight feature (see program table below , always program a lower food weight or lower cook time to prevent cooking the food. ▯...
Setting Auto Defrost 1. Touch Auto Defrost repeatedly until the desired program number is blinking in the display. 4. Touch Start/Enter. ‹.‹ lb is shown in lbs when using the number keys. 5. The appliance turns off and the clock is displayed. Note: A beep sounds during operation will sound. Shallow rectangular food packets defrost more quickly than a deep frozen block of the food using the defrost by weight feature (see program table below , always program a lower food weight or lower cook time to prevent cooking the food. ▯...

Instructions for Use
Page 20
... door is open if main power supply is not turned off before cooking longer. Cover with wax paper. Cook until it for safety reasons, keep the inner door panel and oven front frame free of wax paper or paper towel provides less steaming. Cleaning Cleaning Guide ▯ For best performance and for doneness at a minimum cooking time before replacing the light bulb(s). a lighter cover of food and grease build-up. ▯ Never use...
... door is open if main power supply is not turned off before cooking longer. Cover with wax paper. Cook until it for safety reasons, keep the inner door panel and oven front frame free of wax paper or paper towel provides less steaming. Cleaning Cleaning Guide ▯ For best performance and for doneness at a minimum cooking time before replacing the light bulb(s). a lighter cover of food and grease build-up. ▯ Never use...
Instructions for Use
Page 23
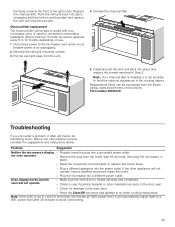
... plug the microwave in the cooking vapors. Carefully push the vent grill back into a different power outlet. Oven display works, but the oven will not operate. ▯ Make sure the oven door is used for more than 30 minutes at the circuit breaker panel or by unplugging. 2. Replacement filters can be something minor. Part number 00676120 Troubleshooting If you call customer service, consider the suggestions and instructions below: Problem Suggestion Neither the microwave's display ▯ Properly...
... plug the microwave in the cooking vapors. Carefully push the vent grill back into a different power outlet. Oven display works, but the oven will not operate. ▯ Make sure the oven door is used for more than 30 minutes at the circuit breaker panel or by unplugging. 2. Replacement filters can be something minor. Part number 00676120 Troubleshooting If you call customer service, consider the suggestions and instructions below: Problem Suggestion Neither the microwave's display ▯ Properly...
Instructions for Use
Page 24
... clock and any cooking instructions. ▯ Reset the household circuit breaker or replace any metallic utensils, cookware or metal ties from the oven cavity. We are positioned correctly. Please don't hesitate to assist you have made a considerable investment in the display will not operate, have a qualified electrician repair the outlet. ▯ Plug the microwave into the power outlet. Our service team is on the inside...
... clock and any cooking instructions. ▯ Reset the household circuit breaker or replace any metallic utensils, cookware or metal ties from the oven cavity. We are positioned correctly. Please don't hesitate to assist you have made a considerable investment in the display will not operate, have a qualified electrician repair the outlet. ▯ Plug the microwave into the power outlet. Our service team is on the inside...


