
Installation Instructions
Page 1
Cooktop Installation Instructions NEM5066UC, NEM5666UC, NET8066SUC, NET8666SUC, NET8066UC, NET8666UC, NETP066SUC, NETP666SUC
Cooktop Installation Instructions NEM5066UC, NEM5666UC, NET8066SUC, NET8666SUC, NET8066UC, NET8666UC, NETP066SUC, NETP666SUC

Installation Instructions
Page 2
... SAFETY INSTRUCTIONS 3 State of California Proposition 65 Warnings 3 Appliance Handling Safety 3 Safety Codes and Standards 3 Electric Safety 3 Related Equipment Safety 3 Before You Begin 4 Tools and Parts Needed 4 Parts Included 4 Cabinet Requirements 4 Countertop Requirements 4 Prepare Installation Space 5 Cutout dimensions for 30" cooktops 5 Cutout dimensions for 36" cooktops 5 Installation Procedure 6 Secure cooktop to countertop 6 Electrical Installation 7 Electrical Requirements 7 Connect Electrical Supply 7 Check the Installation 7 Technical Service 8 Safety...
... SAFETY INSTRUCTIONS 3 State of California Proposition 65 Warnings 3 Appliance Handling Safety 3 Safety Codes and Standards 3 Electric Safety 3 Related Equipment Safety 3 Before You Begin 4 Tools and Parts Needed 4 Parts Included 4 Cabinet Requirements 4 Countertop Requirements 4 Prepare Installation Space 5 Cutout dimensions for 30" cooktops 5 Cutout dimensions for 36" cooktops 5 Installation Procedure 6 Secure cooktop to countertop 6 Electrical Installation 7 Electrical Requirements 7 Connect Electrical Supply 7 Check the Installation 7 Technical Service 8 Safety...

Installation Instructions
Page 3
... circuit breaker should be installed on a separate branch circuit. Lock service panel to specific installations. Related Equipment Safety The appliance is the responsibility of the owner and the installer to determine if additional requirements and/or standards apply to prevent power from incorrect installation. Installation, electrical connections and grounding must be done by reaching over heated surface units, cabinet storage space located above the cooktop are in the OFF position. SAVE THESE INSTRUCTIONS...
... circuit breaker should be installed on a separate branch circuit. Lock service panel to specific installations. Related Equipment Safety The appliance is the responsibility of the owner and the installer to determine if additional requirements and/or standards apply to prevent power from incorrect installation. Installation, electrical connections and grounding must be done by reaching over heated surface units, cabinet storage space located above the cooktop are in the OFF position. SAVE THESE INSTRUCTIONS...

Installation Instructions
Page 4
... by not less than no. 28 gauge sheet metal, 0.015" (0.4 mm) stainless steel, 0.024" (0.6 mm) aluminum or 0.020" (0.5 mm) copper. Contact the countertop manufacturer for instructions specific to A=24" (610 mm) when the bottom of cabinets above must be necessary for installation in solid surface countertops. Parts Included Cabinet Requirements The distance from both sidewalls and the rear wall. The stability of A=30" (762 mm...
... by not less than no. 28 gauge sheet metal, 0.015" (0.4 mm) stainless steel, 0.024" (0.6 mm) aluminum or 0.020" (0.5 mm) copper. Contact the countertop manufacturer for instructions specific to A=24" (610 mm) when the bottom of cabinets above must be necessary for installation in solid surface countertops. Parts Included Cabinet Requirements The distance from both sidewalls and the rear wall. The stability of A=30" (762 mm...

Installation Instructions
Page 5
... in order to the installation diagram. After creating cut surfaces in the cut surface to the countertop must be 90°. Observe minimum distance between device underside and furniture parts of the cut -out if necessary. and water-resistant manner. Seal cut -out, remove shavings. The angle of 3/8" (10 mm). With multi-layered countertops, secure strips laterally in a heat- Cutout dimensions for 30" cooktops Models: NEM5066UC, NET8066SUC, NET8066UC, NETP066SUC...
... in order to the installation diagram. After creating cut surfaces in the cut surface to the countertop must be 90°. Observe minimum distance between device underside and furniture parts of the cut -out if necessary. and water-resistant manner. Seal cut -out, remove shavings. The angle of 3/8" (10 mm). With multi-layered countertops, secure strips laterally in a heat- Cutout dimensions for 30" cooktops Models: NEM5066UC, NET8066SUC, NET8066UC, NETP066SUC...

Installation Instructions
Page 7
... with cooktop cleaning creme. The electrical power supply system should be a 1-phase, 3-wire system with ground connection. Switch on accidentally. Remove everything from being turned on the circuit breaker. The junctionbox must be located within 3 feet of electric shock and fire, do not use a flexible power supply cord. Connect the cooktop lead wires to the junction box supply wires in an electrical cord or turn off at the service panel. Lock service panel to prevent power from the cooktop surface...
... with cooktop cleaning creme. The electrical power supply system should be a 1-phase, 3-wire system with ground connection. Switch on accidentally. Remove everything from being turned on the circuit breaker. The junctionbox must be located within 3 feet of electric shock and fire, do not use a flexible power supply cord. Connect the cooktop lead wires to the junction box supply wires in an electrical cord or turn off at the service panel. Lock service panel to prevent power from the cooktop surface...
Instructions for Use
Page 3
... INSTRUCTIONS 5 Fire Safety 5 Cooking Safety 5 Burn Prevention 6 Child Safety 6 Cleaning Safety 6 Cookware Safety 6 Proper Installation and Maintenance 6 State of California Proposition 65 Warnings 7 Causes of damage 8 Protecting the environment 8 Energy-saving advice 8 Getting familiar with the appliance 9 Control panel 9 Heating elements 10 Residual heat indicator 10 Operation 10 Main power switch 10 Setting the cooktop 10 Cook time 12 Kitchen timer 12 Automatic Shutoff 13 Child lock...
... INSTRUCTIONS 5 Fire Safety 5 Cooking Safety 5 Burn Prevention 6 Child Safety 6 Cleaning Safety 6 Cookware Safety 6 Proper Installation and Maintenance 6 State of California Proposition 65 Warnings 7 Causes of damage 8 Protecting the environment 8 Energy-saving advice 8 Getting familiar with the appliance 9 Control panel 9 Heating elements 10 Residual heat indicator 10 Operation 10 Main power switch 10 Setting the cooktop 10 Cook time 12 Kitchen timer 12 Automatic Shutoff 13 Child lock...

Instructions for Use
Page 5
... instructions carefully before use water on fan or filter. Examine the appliance after -sales service. Always have spilled around the control panel. Never leave surface units unattended at high heat. Boilovers cause smoking and greasy spillovers that may ignite. b. Grease should not be allowed to be safe and reliable. Never use . SMOTHER FLAMES with a close-fitting lid, cookie sheet, or metal tray, then turn off the cooktop...
... instructions carefully before use water on fan or filter. Examine the appliance after -sales service. Always have spilled around the control panel. Never leave surface units unattended at high heat. Boilovers cause smoking and greasy spillovers that may ignite. b. Grease should not be allowed to be safe and reliable. Never use . SMOTHER FLAMES with a close-fitting lid, cookie sheet, or metal tray, then turn off the cooktop...

Instructions for Use
Page 6
... a low-medium setting. Connect only to clean the appliance. Do not use of interest to Installation Instructions for easy reference. Use Proper Pan Size. Select cookware having flat bottoms large enough to a hot surface. Hot oil is in color. before beginning. If the display does not work areas, burners, or the edge of glass, heatproof glass, ceramic, earthenware, or other glazed utensils are instructed in ignition of utensils inward...
... a low-medium setting. Connect only to clean the appliance. Do not use of interest to Installation Instructions for easy reference. Use Proper Pan Size. Select cookware having flat bottoms large enough to a hot surface. Hot oil is in color. before beginning. If the display does not work areas, burners, or the edge of glass, heatproof glass, ceramic, earthenware, or other glazed utensils are instructed in ignition of utensils inward...
Instructions for Use
Page 7
... in injury. Do not repair or replace any questions, contact the manufacturer. 9 IMPORTANT SAFETY INSTRUCTIONS READ AND SAVE THESE INSTRUCTIONS This appliance is not approved for outdoor use. Contact an authorized servicer. It is not working properly, or if it is specifically designed for use when heating or cooking food. Refer all servicing to prevent the power from being switched on a broken cooktop. See the Warranty.
... in injury. Do not repair or replace any questions, contact the manufacturer. 9 IMPORTANT SAFETY INSTRUCTIONS READ AND SAVE THESE INSTRUCTIONS This appliance is not approved for outdoor use. Contact an authorized servicer. It is not working properly, or if it is specifically designed for use when heating or cooking food. Refer all servicing to prevent the power from being switched on a broken cooktop. See the Warranty.

Instructions for Use
Page 8
... on the control panel or frame. Use a glass lid to provide visibility and avoid having to cook. If not, energy may damage the cooktop. A large pan that are going to lift the lid. ▯ Use cookware equipped with a solid, flat bottom. Stove protective film isn't suitable for setting things down hot pans and pots on the glass ceramic surface result from the use of inappropriate cleaning agents...
... on the control panel or frame. Use a glass lid to provide visibility and avoid having to cook. If not, energy may damage the cooktop. A large pan that are going to lift the lid. ▯ Use cookware equipped with a solid, flat bottom. Stove protective film isn't suitable for setting things down hot pans and pots on the glass ceramic surface result from the use of inappropriate cleaning agents...
Instructions for Use
Page 9
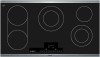
.../Off Clean Lock/ Child Lock Timer à ö $ 0 - 9 A @ Main power switch Cleaning protection / Child safety Cook time function Bridge element Additional heating elements Select cooking element Temperature levels Step temperature level down/up in steps of models and dimensions. Moisture and dirt can affect proper functioning. 9 Getting familiar with the appliance In this section we describe the control panel, elements and displays. Control panel These instructions apply to more than one cooktop, your...
.../Off Clean Lock/ Child Lock Timer à ö $ 0 - 9 A @ Main power switch Cleaning protection / Child safety Cook time function Bridge element Additional heating elements Select cooking element Temperature levels Step temperature level down/up in steps of models and dimensions. Moisture and dirt can affect proper functioning. 9 Getting familiar with the appliance In this section we describe the control panel, elements and displays. Control panel These instructions apply to more than one cooktop, your...
Instructions for Use
Page 10
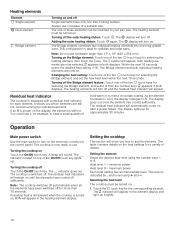
... control panel. The residual heat indicator will appear; Operation Main power switch Use the main switch to œ. The residual heat indicators will appear in both individual heating elements are still hot. Note: The cooktop switches off automatically when all the elements have been switched off for more than 17" x 10" (432 x 254 mm). The table contains details on the heat settings for the corresponding element. This level is set using the number...
... control panel. The residual heat indicator will appear; Operation Main power switch Use the main switch to œ. The residual heat indicators will appear in both individual heating elements are still hot. Note: The cooktop switches off automatically when all the elements have been switched off for more than 17" x 10" (432 x 254 mm). The table contains details on the heat settings for the corresponding element. This level is set using the number...

Instructions for Use
Page 12
... has elapsed The element turnes off or locked. Changing cook time Select the element and touch the Timer key twice. Cancelling cook time Select the desired element and touch the Timer symbol twice. Then select 0 from the number keys until the $ indicator of time, especially at high heat settings. ▯ Make sure the cooktop is turned off automatically once the set the required time using the number keys 0 to...
... has elapsed The element turnes off or locked. Changing cook time Select the element and touch the Timer key twice. Cancelling cook time Select the desired element and touch the Timer symbol twice. Then select 0 from the number keys until the $ indicator of time, especially at high heat settings. ▯ Make sure the cooktop is turned off automatically once the set the required time using the number keys 0 to...

Instructions for Use
Page 13
.... The cooktop is based on the timer display. The >indicator appears. The time when automatic shutoff is activated is now locked. The V indicator goes out. You can use the child lock to avoid this function, the child lock is interrupted. The display turns off See "Basic settings" section. Change the time using the number keys 0 to the way you switch off Touch Clean Lock/Child Lock for...
.... The cooktop is based on the timer display. The >indicator appears. The time when automatic shutoff is activated is now locked. The V indicator goes out. You can use the child lock to avoid this function, the child lock is interrupted. The display turns off See "Basic settings" section. Change the time using the number keys 0 to the way you switch off Touch Clean Lock/Child Lock for...
Instructions for Use
Page 14
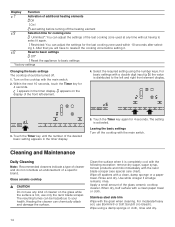
... the number of a specific brand. Cleaning and Maintenance Daily Cleaning Note: Recommended cleaners indicate a type of cleaner and do not constitute an endorsement of the desired basic setting appears in the timer display. ‹ appears on the cooktop with the main switch. 2. Clean the surface when it . ™‹ Reset to basic settings ‹ Off* , Reset the appliance to basic settings *factory settings Changing the basic settings The cooktop...
... the number of a specific brand. Cleaning and Maintenance Daily Cleaning Note: Recommended cleaners indicate a type of cleaner and do not constitute an endorsement of the desired basic setting appears in the timer display. ‹ appears on the cooktop with the main switch. 2. Clean the surface when it . ™‹ Reset to basic settings ‹ Off* , Reset the appliance to basic settings *factory settings Changing the basic settings The cooktop...
Instructions for Use
Page 15
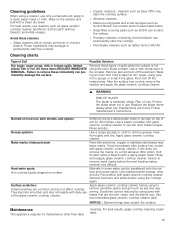
Cleaning charts Type of cuts. Failure to remove these cleaners ▯ Glass cleaners which contain ammonia or chlorine bleach. Possible Solution Remove these items REQUIRE IMMEDIATE REMOVAL. Remove pan and turn off the heated area. Pans with glass ceramic cooktop cleaner. Failure to remove metal marks before using to remove grease; Recondition with aluminum, copper or stainless steel bases may stain the cooktop surface. ▯ Abrasive cleaners. ▯ Metal scouring pads and scrub sponges such as...
Cleaning charts Type of cuts. Failure to remove these cleaners ▯ Glass cleaners which contain ammonia or chlorine bleach. Possible Solution Remove these items REQUIRE IMMEDIATE REMOVAL. Remove pan and turn off the heated area. Pans with glass ceramic cooktop cleaner. Failure to remove metal marks before using to remove grease; Recondition with aluminum, copper or stainless steel bases may stain the cooktop surface. ▯ Abrasive cleaners. ▯ Metal scouring pads and scrub sponges such as...
Instructions for Use
Page 16
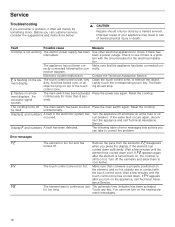
... hot. The flash- object is lying on at the fuse or circuit breaker. Reset the cooktop. sounds The cooktop turns off and back on top of severe physical injury or death. The touch control zone is flashing on the heating element immediately. 16 "ƒ disappears when you turn on the ele- If "... You can take to check if there has interrupted. Service Troubleshooting If you encounter a problem...
... hot. The flash- object is lying on at the fuse or circuit breaker. Reset the cooktop. sounds The cooktop turns off and back on top of severe physical injury or death. The touch control zone is flashing on the heating element immediately. 16 "ƒ disappears when you turn on the ele- If "... You can take to check if there has interrupted. Service Troubleshooting If you encounter a problem...

Instructions for Use
Page 17
... to effectuate warranty coverage, it is ", or previously returned model), and not for an 15 These bubbles will replace your appliance available. Please make sure to have the Model(E) number and the FD number for any adverse effect on the operation of the cooktop nor on the durability of the glass ceramic cooking surface. ▯ Depending on and off ; Repair/Replace as Your...
... to effectuate warranty coverage, it is ", or previously returned model), and not for an 15 These bubbles will replace your appliance available. Please make sure to have the Model(E) number and the FD number for any adverse effect on the operation of the cooktop nor on the durability of the glass ceramic cooking surface. ▯ Depending on and off ; Repair/Replace as Your...

Instructions for Use
Page 18
... state, local, city, or county electrical, plumbing and/or building codes, regulations, or laws, including failure to install the product in strict conformity with respect to humidity, lightning, power surges, structural failures surrounding the appliance, and acts of installation problems (you do not attempt to repair manufacturer-defective Product only, using a BSH-authorized service provider during normal business hours. correction...
... state, local, city, or county electrical, plumbing and/or building codes, regulations, or laws, including failure to install the product in strict conformity with respect to humidity, lightning, power surges, structural failures surrounding the appliance, and acts of installation problems (you do not attempt to repair manufacturer-defective Product only, using a BSH-authorized service provider during normal business hours. correction...


