Instructions for Use
Page 2
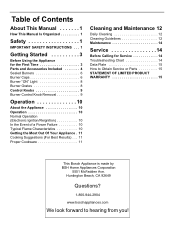
... Included 4 Sealed Burners 6 Burner Caps 6 Burner "ON" Light 8 Burner Grates 8 Control Knobs 9 Burner Control Knob Removal 9 Operation 10 About the Appliance 10 Operation 10 Normal Operation (Electronic Ignition/Reignition 10 In the Event of a Power Failure 10 Typical Flame Characteristics 10 Getting the Most Out Of Your Appliance . 11 Cooking Suggestions (For Best Results) . . . 11 Proper Cookware 11 Cleaning and Maintenance 12 Daily Cleaning 12 Cleaning Guidelines 12 Maintenance 14 Service 14...
... Included 4 Sealed Burners 6 Burner Caps 6 Burner "ON" Light 8 Burner Grates 8 Control Knobs 9 Burner Control Knob Removal 9 Operation 10 About the Appliance 10 Operation 10 Normal Operation (Electronic Ignition/Reignition 10 In the Event of a Power Failure 10 Typical Flame Characteristics 10 Getting the Most Out Of Your Appliance . 11 Cooking Suggestions (For Best Results) . . . 11 Proper Cookware 11 Cleaning and Maintenance 12 Daily Cleaning 12 Cleaning Guidelines 12 Maintenance 14 Service 14...

Instructions for Use
Page 4
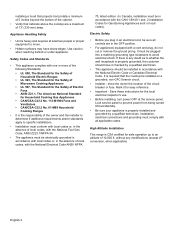
... block appliance air vents. • For proper lighting and performance of burners, keep igniters clean and dry. • IMPORTANT SAFETY NOTICE: The California Safe Drinking Water and Toxic Enforcement Act requires the Governor of California to publish a list of substances known to the state to such substances. Installation and service must be harmful. Kitchen fumes such as overheating margarines and cooking oils...
... block appliance air vents. • For proper lighting and performance of burners, keep igniters clean and dry. • IMPORTANT SAFETY NOTICE: The California Safe Drinking Water and Toxic Enforcement Act requires the Governor of California to publish a list of substances known to the state to such substances. Installation and service must be harmful. Kitchen fumes such as overheating margarines and cooking oils...
Instructions for Use
Page 5
... any of the surface element. • In the event that personal clothing or hair catches fire, drop and roll immediately to extinguish flames. • Smother flames from fans or forced air vents do not go out immediately, EVACUATE AND CALL THE FIRE DEPARTMENT. Fire Safety • Do not use aluminum foil to line any part of the cooktop. • Set the burner control so that the...
... any of the surface element. • In the event that personal clothing or hair catches fire, drop and roll immediately to extinguish flames. • Smother flames from fans or forced air vents do not go out immediately, EVACUATE AND CALL THE FIRE DEPARTMENT. Fire Safety • Do not use aluminum foil to line any part of the cooktop. • Set the burner control so that the...
Instructions for Use
Page 6
... pan when stirring or turning food. Select cookware having flat bottoms large enough to a factory authorized service center. Proper relationship of the appliance unless specifically recommended in use . This reduces the risk of fires, spills and burns. • Adjust burner flame size so that are suitable for outdoor use when heating or cooking food. Contact an authorized service provider. • Do not repair or replace...
... pan when stirring or turning food. Select cookware having flat bottoms large enough to a factory authorized service center. Proper relationship of the appliance unless specifically recommended in use . This reduces the risk of fires, spills and burns. • Adjust burner flame size so that are suitable for outdoor use when heating or cooking food. Contact an authorized service provider. • Do not repair or replace...
Instructions for Use
Page 9
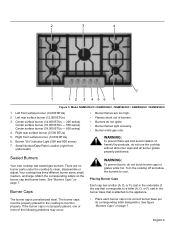
... not touch burner caps or grates while hot. English 6 Serial Number/Data Plate Location (right front underneath) • Burner flames are no burner parts under the cooktop to the appliance. See "Burners Caps" on page 7. Placing Burner Caps Each cap has a letter (A, D, or F) cast in the underside of burners. • Burners do not ignite. • Burner flames light unevenly. • Burner emits gas odor. Burner "On" Indicator Light (500 and 800 series) 7. There are too high. • Flames shoot out of...
... not touch burner caps or grates while hot. English 6 Serial Number/Data Plate Location (right front underneath) • Burner flames are no burner parts under the cooktop to the appliance. See "Burners Caps" on page 7. Placing Burner Caps Each cap has a letter (A, D, or F) cast in the underside of burners. • Burners do not ignite. • Burner flames light unevenly. • Burner emits gas odor. Burner "On" Indicator Light (500 and 800 series) 7. There are too high. • Flames shoot out of...
Instructions for Use
Page 12
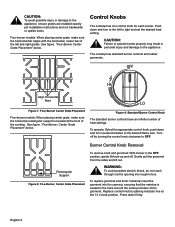
..., "Four-Burner Center Grate Placement" below . Figure 9: Standard Burner Control Knob The standard burner controls have an infinite number of the cooktop. English 9 See figure, "Five-Burner, Center Grate Placement" below . To replace grommet and knob: Carefully insert the grommet into rough-in the track around the entire perimeter of the left to the desired flame size. Four-burner models: When placing center grate, make sure the horizontal rectangular support is...
..., "Four-Burner Center Grate Placement" below . Figure 9: Standard Burner Control Knob The standard burner controls have an infinite number of the cooktop. English 9 See figure, "Five-Burner, Center Grate Placement" below . To replace grommet and knob: Carefully insert the grommet into rough-in the track around the entire perimeter of the left to the desired flame size. Four-burner models: When placing center grate, make sure the horizontal rectangular support is...
Instructions for Use
Page 13
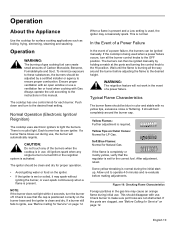
... and stable with use . The ignitor should be adjusted by holding a match at the ports and turning the control knob to the desired heat setting. In the Event of a Power Failure In the event of a power failure, the burners can create small amounts of a power failure. Soft Blue Flames: Normal for Service" on Outer Cones: Normal for surface cooking applications such as boiling, frying, simmering, steaming and sauteing...
... and stable with use . The ignitor should be adjusted by holding a match at the ports and turning the control knob to the desired heat setting. In the Event of a Power Failure In the event of a power failure, the burners can create small amounts of a power failure. Soft Blue Flames: Normal for Service" on Outer Cones: Normal for surface cooking applications such as boiling, frying, simmering, steaming and sauteing...
Instructions for Use
Page 14
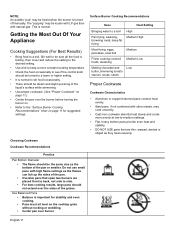
..., simmering tomato sauces, soups, stews Proper Cookware Cookware Characteristics • Aluminum or copper bottomed pans conduct heat evenly. • Steel pans, if not combined with high flame settings as the bottom of the pan. • Oversize pans that are placed front to back, not side to side. • For best cooking results, large pans should be turned to the "Surface Burner Cooking Recommendations" chart on the cooktop grate without...
..., simmering tomato sauces, soups, stews Proper Cookware Cookware Characteristics • Aluminum or copper bottomed pans conduct heat evenly. • Steel pans, if not combined with high flame settings as the bottom of the pan. • Oversize pans that are placed front to back, not side to side. • For best cooking results, large pans should be turned to the "Surface Burner Cooking Recommendations" chart on the cooktop grate without...
Instructions for Use
Page 15
... positions before using cooktop. • For proper burner performance, keep igniters clean and dry. • Keep the ignitor ports clean for pressure canners/cookers). CAUTION: All igniters spark when any of the burners when the cooktop is turned on the following page indicate a type and do the job. Use clean, soft cloths, sponges or paper towels. • Rub stainless steel finishes in the direction of a particular brand. Use all parts in use flammable...
... positions before using cooktop. • For proper burner performance, keep igniters clean and dry. • Keep the ignitor ports clean for pressure canners/cookers). CAUTION: All igniters spark when any of the burners when the cooktop is turned on the following page indicate a type and do the job. Use clean, soft cloths, sponges or paper towels. • Rub stainless steel finishes in the direction of a particular brand. Use all parts in use flammable...

Instructions for Use
Page 17
... 12 for Service Troubleshooting Chart Problem Burner(s) do not light / Ignitors do not spark Burner flame goes out unexpectedly Ignitors spark even though knobs are in the off position Suggestion • Make sure that the gas shut off valve is in a self-clean oven. • Carefully wipe with water, ammonia A damp igniter will prevent burner or Formula 409®. Service Before Calling for detailed instructions. It should be properly grounded with a wire or...
... 12 for Service Troubleshooting Chart Problem Burner(s) do not light / Ignitors do not spark Burner flame goes out unexpectedly Ignitors spark even though knobs are in the off position Suggestion • Make sure that the gas shut off valve is in a self-clean oven. • Carefully wipe with water, ammonia A damp igniter will prevent burner or Formula 409®. Service Before Calling for detailed instructions. It should be properly grounded with a wire or...

Instructions for Use
Page 18
... Number (product's unique identifier for customer service), and Date of Original Purchase or Installation. If a problem comes up that you (subject to certain limitations stated herein) if your Product proves to such parts. All removed parts and components shall become the property of Bosch at all times only been used . • Cookware is ", or previously returned model), and not for repairs or work...
... Number (product's unique identifier for customer service), and Date of Original Purchase or Installation. If a problem comes up that you (subject to certain limitations stated herein) if your Product proves to such parts. All removed parts and components shall become the property of Bosch at all times only been used . • Cookware is ", or previously returned model), and not for repairs or work...
Instructions for Use
Page 19
... codes, regulations, or laws, including failure to install the product in , or around the Product. THIS WARRANTY GIVES YOU SPECIFIC LEGAL RIGHTS, AND YOU MAY ALSO HAVE OTHER RIGHTS WHICH VARY FROM STATE TO STATE. correction of Bosch). No attempt to surrounding property, including cabinetry, floors, ceilings, and other connecting facilities, for proper foundation/flooring, and for customer service...
... codes, regulations, or laws, including failure to install the product in , or around the Product. THIS WARRANTY GIVES YOU SPECIFIC LEGAL RIGHTS, AND YOU MAY ALSO HAVE OTHER RIGHTS WHICH VARY FROM STATE TO STATE. correction of Bosch). No attempt to surrounding property, including cabinetry, floors, ceilings, and other connecting facilities, for proper foundation/flooring, and for customer service...

Installation Instructions
Page 2
Table of Contents Safety 1 IMPORTANT SAFETY INSTRUCTIONS 1 Installation 3 Before You Begin 3 Tools and Parts Needed 3 Parts Included 3 General Information 3 Preparation 3 Installation Procedure 5 Prepare the Countertop 5 Seal the Cooktop with Foam Tape 5 Install the Cooktop 5 Connect Gas Supply 5 Connect Electrical Supply 6 Burner Cap Placement 6 Final Check 8 Service 8 Before Calling Service 8 Product Data Plate 8 This Bosch Appliance is made by BSH Home Appliances Corporation 5551 McFadden Ave. Huntington Beach, CA 92649 Questions? 1-800-944-2904 www...
Table of Contents Safety 1 IMPORTANT SAFETY INSTRUCTIONS 1 Installation 3 Before You Begin 3 Tools and Parts Needed 3 Parts Included 3 General Information 3 Preparation 3 Installation Procedure 5 Prepare the Countertop 5 Seal the Cooktop with Foam Tape 5 Install the Cooktop 5 Connect Gas Supply 5 Connect Electrical Supply 6 Burner Cap Placement 6 Final Check 8 Service 8 Before Calling Service 8 Product Data Plate 8 This Bosch Appliance is made by BSH Home Appliances Corporation 5551 McFadden Ave. Huntington Beach, CA 92649 Questions? 1-800-944-2904 www...
Installation Instructions
Page 3
... to light any appliance. • Do not touch any electrical switch. • Do not use with its individual manual shutoff valve during any pressure testing at test pressures equal to the instructions in this unit must be 1" water column above the surface units should be used in the vicinity of this appliance is being installed. • Shut-off valve is shipped from the gas supply...
... to light any appliance. • Do not touch any electrical switch. • Do not use with its individual manual shutoff valve during any pressure testing at test pressures equal to the instructions in this unit must be 1" water column above the surface units should be used in the vicinity of this appliance is being installed. • Shut-off valve is shipped from the gas supply...
Installation Instructions
Page 4
installing a hood that projects horizontally a minimum of 5 inches beyond the bottom of the cabinet. • Verify that the cooktop be plugged into a matching grounding type receptacle to avoid electrical shock. show the owner the location of 13" (330 mm) deep. Lock service panel to specific installations. • Installation must conform with local codes or, in the absence of local codes, with the National Fuel Gas Code, ANSI Z223.1/NFPA 54. • The...
installing a hood that projects horizontally a minimum of 5 inches beyond the bottom of the cabinet. • Verify that the cooktop be plugged into a matching grounding type receptacle to avoid electrical shock. show the owner the location of 13" (330 mm) deep. Lock service panel to specific installations. • Installation must conform with local codes or, in the absence of local codes, with the National Fuel Gas Code, ANSI Z223.1/NFPA 54. • The...
Installation Instructions
Page 5
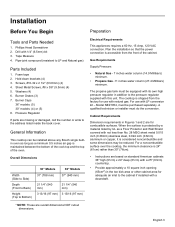
... Parts Needed 1. Burner Caps 36" models: (5) 30" models: (4) or (5) 8. Pressure Regulator If parts are overall dimensions NOT cutout dimensions. Plan the installation so that the power connection is accessible from the factory for use with natural gas. For use with LP conversion kit - A qualified technician or installer must be installed above any Bosch single builtin oven as long as a Floor Protector and Wall Shield covered with not less than 30" (76cm). • Instructions are based on standard American cabinets 36" high...
... Parts Needed 1. Burner Caps 36" models: (5) 30" models: (4) or (5) 8. Pressure Regulator If parts are overall dimensions NOT cutout dimensions. Plan the installation so that the power connection is accessible from the factory for use with natural gas. For use with LP conversion kit - A qualified technician or installer must be installed above any Bosch single builtin oven as long as a Floor Protector and Wall Shield covered with not less than 30" (76cm). • Instructions are based on standard American cabinets 36" high...
Installation Instructions
Page 6
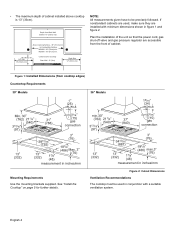
...) min. Figure 1: Installed Dimensions (from cooktop edges) Countertop Requirements 30" Models 36" Models gas connection gas connection measurement in conjunction with minimum dimensions shown in figure 1 and figure 2. If nonstandard cabinets are used in inches/mm Mounting Requirements Use the mounting brackets supplied. to be used , make sure they are accessible from Back Wall Cabinet 13" (33cm) max. • The maximum depth of the unit so that the power cord, gas shut-off valve and gas pressure regulator are installed with a suitable ventilation...
...) min. Figure 1: Installed Dimensions (from cooktop edges) Countertop Requirements 30" Models 36" Models gas connection gas connection measurement in conjunction with minimum dimensions shown in figure 1 and figure 2. If nonstandard cabinets are used in inches/mm Mounting Requirements Use the mounting brackets supplied. to be used , make sure they are accessible from Back Wall Cabinet 13" (33cm) max. • The maximum depth of the unit so that the power cord, gas shut-off valve and gas pressure regulator are installed with a suitable ventilation...

Installation Instructions
Page 7
... the dotted line in one continuous rectangle directly to the gas pressure regulator, install it folds over on threads of manifold pipe. Figure 4: Counter Cutout - Attach clamps of the holddown brackets packaged with the cooktop to be covered with solid surfacing material, i.e. Do not overtighten adjusting screw. Trim excess aluminum tape around the cutout so that it after the rough-in box is located at the service panel to rough-in box. Use the washer...
... the dotted line in one continuous rectangle directly to the gas pressure regulator, install it folds over on threads of manifold pipe. Figure 4: Counter Cutout - Attach clamps of the holddown brackets packaged with the cooktop to be covered with solid surfacing material, i.e. Do not overtighten adjusting screw. Trim excess aluminum tape around the cutout so that it after the rough-in box is located at the service panel to rough-in box. Use the washer...
Installation Instructions
Page 8
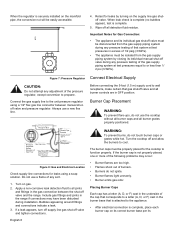
... burners to the unit pressure regulator using a soap solution. Turn on the manifold pipe, the conversion nut will be properly placed for leaks by closing its English 6 Do not use a new flex line. Retest for the cooktop to propane. Figure 7: Pressure Regulator Connect Electrical Supply CAUTION: Do not attempt any sort. 1. Turn the cooktop off valve and tighten connections. • Burner flames are in Box Pressure Flex Gas Line Regulator Shows Direction of Gas Flow Gas Shut-Off Valve Cabinet Floor Gas...
... burners to the unit pressure regulator using a soap solution. Turn on the manifold pipe, the conversion nut will be properly placed for leaks by closing its English 6 Do not use a new flex line. Retest for the cooktop to propane. Figure 7: Pressure Regulator Connect Electrical Supply CAUTION: Do not attempt any sort. 1. Turn the cooktop off valve and tighten connections. • Burner flames are in Box Pressure Flex Gas Line Regulator Shows Direction of Gas Flow Gas Shut-Off Valve Cabinet Floor Gas...
Installation Instructions
Page 10
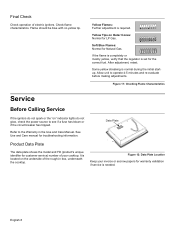
... Service Before Calling Service If the ignitors do not glow, check the power source to see if a fuse has blown or if the circuit breaker has tripped. English 8 After adjustment, retest. Some yellow streaking is required. See Use and Care manual for the correct fuel. Figure 12: Data Plate Location Keep your invoice or escrow papers for customer service) number of electric igniters. Allow unit to the Warranty in box...
... Service Before Calling Service If the ignitors do not glow, check the power source to see if a fuse has blown or if the circuit breaker has tripped. English 8 After adjustment, retest. Some yellow streaking is required. See Use and Care manual for the correct fuel. Figure 12: Data Plate Location Keep your invoice or escrow papers for customer service) number of electric igniters. Allow unit to the Warranty in box...


