
Use & Care Manual (all languages)
Page 2
.... Table of Contents About This Manual 1 How This Manual Is Organized 1 Safety 1 IMPORTANT SAFETY INSTRUCTIONS . . . 1 Getting Started 3 Before Using the Appliance for the First Time 3 Parts and Accessories Included 4 Sealed Burners 6 Burner Caps 6 Burner "ON" Light 8 Burner Grates 8 Control Knobs 9 Burner Control Knob Removal 9 Operation 10 About the Appliance 10 Operation 10 Normal Operation (Electronic Ignition/Reignition 10 In the Event of a Power Failure 10 Typical Flame Characteristics 10 Getting the Most...
.... Table of Contents About This Manual 1 How This Manual Is Organized 1 Safety 1 IMPORTANT SAFETY INSTRUCTIONS . . . 1 Getting Started 3 Before Using the Appliance for the First Time 3 Parts and Accessories Included 4 Sealed Burners 6 Burner Caps 6 Burner "ON" Light 8 Burner Grates 8 Control Knobs 9 Burner Control Knob Removal 9 Operation 10 About the Appliance 10 Operation 10 Normal Operation (Electronic Ignition/Reignition 10 In the Event of a Power Failure 10 Typical Flame Characteristics 10 Getting the Most...

Use & Care Manual (all languages)
Page 3
... appliance air vents. • For proper lighting and performance of burners, keep igniters clean and dry. • IMPORTANT SAFETY NOTICE: The California Safe Drinking Water and Toxic Enforcement Act requires the Governor of California to publish a list of checking for leaks. The burning of gas cooking fuel can generate some byproducts which are not perfectly tight, you smell gas, your installer has...
... appliance air vents. • For proper lighting and performance of burners, keep igniters clean and dry. • IMPORTANT SAFETY NOTICE: The California Safe Drinking Water and Toxic Enforcement Act requires the Governor of California to publish a list of checking for leaks. The burning of gas cooking fuel can generate some byproducts which are not perfectly tight, you smell gas, your installer has...

Use & Care Manual (all languages)
Page 4
...igniters spark when any single burner is near a window, forced air vent, or fan, be hot even though they are the cooktop and areas facing the cooktop. • Do not heat or warm unopened food containers. Do not touch any of the burners when the cooktop is small and contained in use . Children and pets should not be allowed to accumulate on cooking...Do not allow pans to boil dry. • If the cooktop is turned on the cooktop only when necessary. Areas near the oven. • Whenever possible, do not reach through fire to turn hood ON when cooking at high settings. Wait until ...
...igniters spark when any single burner is near a window, forced air vent, or fan, be hot even though they are the cooktop and areas facing the cooktop. • Do not heat or warm unopened food containers. Do not touch any of the burners when the cooktop is small and contained in use . Children and pets should not be allowed to accumulate on cooking...Do not allow pans to boil dry. • If the cooktop is turned on the cooktop only when necessary. Areas near the oven. • Whenever possible, do not reach through fire to turn hood ON when cooking at high settings. Wait until ...

Use & Care Manual (all languages)
Page 5
... any part of the cooktop. Clean around the burner and burner ports. It is specifically designed for outdoor use . If you the location of the pan. • Use Proper Pan Size. This helps prevent spills and movement of the circuit breaker or fuse. Cookware Safety • Hold the handle of corrosive chemicals in heating or cleaning will expose a portion of the heating element or burner to reach items could result in ignition...
... any part of the cooktop. Clean around the burner and burner ports. It is specifically designed for outdoor use . If you the location of the pan. • Use Proper Pan Size. This helps prevent spills and movement of the circuit breaker or fuse. Cookware Safety • Hold the handle of corrosive chemicals in heating or cleaning will expose a portion of the heating element or burner to reach items could result in ignition...

Use & Care Manual (all languages)
Page 8
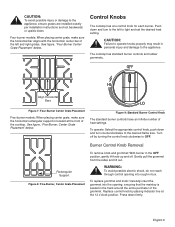
... three different burner sizes; Sealed Burners Your new cooktop has sealed gas burners. Serial Number/Data Plate Location (right front underneath) • Flames shoot out of base so that is porcelainized steel. English 6 Center surface burner (16,000 BTUs - 500 series) Center surface burner (17,000 BTUs - 800 series) 4. If the burner cap is not properly placed, one or more of the following problems may occur: • Burner flames are no burner parts under the cooktop to the...
... three different burner sizes; Sealed Burners Your new cooktop has sealed gas burners. Serial Number/Data Plate Location (right front underneath) • Flames shoot out of base so that is porcelainized steel. English 6 Center surface burner (16,000 BTUs - 500 series) Center surface burner (17,000 BTUs - 800 series) 4. If the burner cap is not properly placed, one or more of the following problems may occur: • Burner flames are no burner parts under the cooktop to the...
Use & Care Manual (all languages)
Page 11
... Grate Placement Five-burner models: When placing center grate, make sure the horizontal bar aligns with the horizontal, center bar of the cooktop. Burner Control Knob Removal To remove knob and grommet: With burner in box. Replace control knob by turning the control knob clockwise to light and set the desired heat setting. Push down . Figure 9: Standard Burner Control Knob The standard burner controls have an infinite number of the grommet. Turn off . To replace grommet and knob: Carefully insert the grommet into rough...
... Grate Placement Five-burner models: When placing center grate, make sure the horizontal bar aligns with the horizontal, center bar of the cooktop. Burner Control Knob Removal To remove knob and grommet: With burner in box. Replace control knob by turning the control knob clockwise to light and set the desired heat setting. Push down . Figure 9: Standard Burner Control Knob The standard burner controls have an infinite number of the grommet. Turn off . To replace grommet and knob: Carefully insert the grommet into rough...
Use & Care Manual (all languages)
Page 12
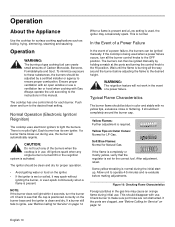
... is used when a power failure occurs, turn all the way around the burner cap. Operation About the Appliance Use the cooktop for LP Gas. The cooktop has one control knob for Service" on the igniter. • If the igniter is wet or soiled, it may cause an orange flame during the initial startup. All ignitors spark when any of a power failure. The ignitor should be clean and dry for Natural Gas. If...
... is used when a power failure occurs, turn all the way around the burner cap. Operation About the Appliance Use the cooktop for LP Gas. The cooktop has one control knob for Service" on the igniter. • If the igniter is wet or soiled, it may cause an orange flame during the initial startup. All ignitors spark when any of a power failure. The ignitor should be clean and dry for Natural Gas. If...

Use & Care Manual (all languages)
Page 13
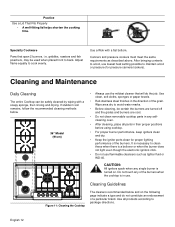
... bottom of the grates. Surface Burner Cooking Recommendations Uses Heat Setting Bringing water to a boil High Pan frying, sauteing, browning meat, deep fat frying Medium High Most frying, eggs, pancakes, slow boil Medium Finish cooking covered foods, steaming Medium Low Melting chocolate and Low butter, simmering tomato sauces, soups, stews Proper Cookware Cookware Characteristics • Aluminum or copper bottomed pans conduct heat evenly. • Steel pans, if not...
... bottom of the grates. Surface Burner Cooking Recommendations Uses Heat Setting Bringing water to a boil High Pan frying, sauteing, browning meat, deep fat frying Medium High Most frying, eggs, pancakes, slow boil Medium Finish cooking covered foods, steaming Medium Low Melting chocolate and Low butter, simmering tomato sauces, soups, stews Proper Cookware Cookware Characteristics • Aluminum or copper bottomed pans conduct heat evenly. • Steel pans, if not...
Use & Care Manual (all languages)
Page 14
... stainless steel finishes in their proper positions before using cooktop. • For proper burner performance, keep igniters clean and dry. • Keep the ignitor ports clean for pressure canners/cookers). Practice Use a Lid That Fits Properly • A well-fitting lid helps shorten the cooking time. Do not touch any single burner is turned on the following page indicate a type and do the job. Specialty Cookware Pans that...
... stainless steel finishes in their proper positions before using cooktop. • For proper burner performance, keep igniters clean and dry. • Keep the ignitor ports clean for pressure canners/cookers). Practice Use a Lid That Fits Properly • A well-fitting lid helps shorten the cooking time. Do not touch any single burner is turned on the following page indicate a type and do the job. Specialty Cookware Pans that...
Use & Care Manual (all languages)
Page 16
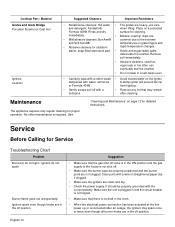
... requires only regular cleaning for cleaning. Service Before Calling for Service Troubleshooting Chart Problem Burner(s) do not light / Ignitors do not spark Burner flame goes out unexpectedly Ignitors spark even though knobs are clean and dry. • Check the power supply. Cooktop Part / Material Grates and Grate Bridge Porcelain Enamel on grate fingers and • Abrasive cleaners for stubborn rapid temperature changes. dampened with a wire or straightened paper clip if clogged. • Make sure the igniters...
... requires only regular cleaning for cleaning. Service Before Calling for Service Troubleshooting Chart Problem Burner(s) do not light / Ignitors do not spark Burner flame goes out unexpectedly Ignitors spark even though knobs are clean and dry. • Check the power supply. Cooktop Part / Material Grates and Grate Bridge Porcelain Enamel on grate fingers and • Abrasive cleaners for stubborn rapid temperature changes. dampened with a wire or straightened paper clip if clogged. • Make sure the igniters...
Use & Care Manual (all languages)
Page 17
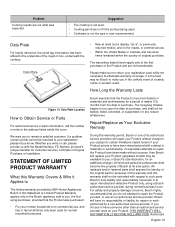
... warranty shall not be stalled, tolled, extended, or suspended, for Bosch to notify you , the first using a Boschauthorized service provider during normal business hours. Bosch warrants that the Product was expected Suggestion • The cooktop is not level. • Cooking pan does not fit the surface being used for purposes of Original Purchase or Installation. For safety and property damage concerns, Bosch highly...
... warranty shall not be stalled, tolled, extended, or suspended, for Bosch to notify you , the first using a Boschauthorized service provider during normal business hours. Bosch warrants that the Product was expected Suggestion • The cooktop is not level. • Cooking pan does not fit the surface being used for purposes of Original Purchase or Installation. For safety and property damage concerns, Bosch highly...
Use & Care Manual (all languages)
Page 18
... external surfaces and exposed parts; Warranty Exclusions The warranty coverage described herein excludes all electrical, plumbing or other connecting facilities, for proper foundation/flooring, and for the Product if it is nothing wrong with any concessions, including repairs, prorates, or Product replacement, once this warranty are scratches, nicks, minor dents, and cosmetic damages on , in writing by the service company...
... external surfaces and exposed parts; Warranty Exclusions The warranty coverage described herein excludes all electrical, plumbing or other connecting facilities, for proper foundation/flooring, and for the Product if it is nothing wrong with any concessions, including repairs, prorates, or Product replacement, once this warranty are scratches, nicks, minor dents, and cosmetic damages on , in writing by the service company...

Installation Instructions
Page 2
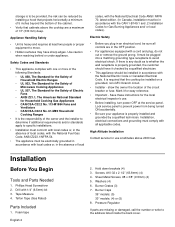
....com We look forward to hearing from you! Table of Contents Safety 1 IMPORTANT SAFETY INSTRUCTIONS 1 Installation 2 Before You Begin 2 Tools and Parts Needed 2 Parts Included 2 General Information 3 Preparation 3 Installation Procedure 4 Prepare the Countertop 4 Seal the Cooktop with Foam Tape 4 Install the Cooktop 5 Connect Gas Supply 5 Connect Electrical Supply 6 Burner Cap Placement 6 Final Check 8 Service 8 Before Calling Service 8 Product Data Plate 8 This Bosch Appliance is made by BSH Home Appliances Corporation 5551 McFadden Ave.
....com We look forward to hearing from you! Table of Contents Safety 1 IMPORTANT SAFETY INSTRUCTIONS 1 Installation 2 Before You Begin 2 Tools and Parts Needed 2 Parts Included 2 General Information 3 Preparation 3 Installation Procedure 4 Prepare the Countertop 4 Seal the Cooktop with Foam Tape 4 Install the Cooktop 5 Connect Gas Supply 5 Connect Electrical Supply 6 Burner Cap Placement 6 Final Check 8 Service 8 Before Calling Service 8 Product Data Plate 8 This Bosch Appliance is made by BSH Home Appliances Corporation 5551 McFadden Ave.
Installation Instructions
Page 3
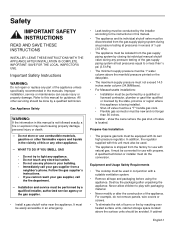
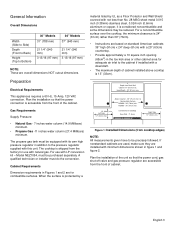
... gas shut-off valve must be a "T" handle gas cock. • Flexible gas connector must be performed by a qualified or licensed contractor, plumber or gas fitter qualified or licensed by closing its own high pressure regulator. A qualified technician or installer must be used . • The appliance is located. Equipment and Usage Safety Requirements • The cooktop must be used in the vicinity of the appliance unless specifically...
... gas shut-off valve must be a "T" handle gas cock. • Flexible gas connector must be performed by a qualified or licensed contractor, plumber or gas fitter qualified or licensed by closing its own high pressure regulator. A qualified technician or installer must be used . • The appliance is located. Equipment and Usage Safety Requirements • The cooktop must be used in the vicinity of the appliance unless specifically...
Installation Instructions
Page 4
... type receptacle to avoid electrical shock. Drill with the National Electric Code or Canadian Electrical Code. Lock service panel to prevent power from being turned ON accidentally. • Be sure your appliance is required that the cooktop be reduced by a qualified technician. Teflon Tape (Gas Rated) Parts Included 1. Burner Grates (3) 7. Appliance Handling Safety • Unit is to be provided, the risk can be installed on a grounded, non-GFCI branch circuit. • Installer - Foam tape...
... type receptacle to avoid electrical shock. Drill with the National Electric Code or Canadian Electrical Code. Lock service panel to prevent power from being turned ON accidentally. • Be sure your appliance is required that the cooktop be reduced by a qualified technician. Teflon Tape (Gas Rated) Parts Included 1. Burner Grates (3) 7. Appliance Handling Safety • Unit is to be provided, the risk can be installed on a grounded, non-GFCI branch circuit. • Installer - Foam tape...
Installation Instructions
Page 5
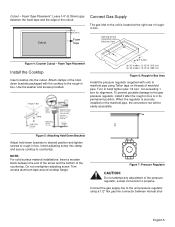
... Over Cooktop Rear Wall - 2" (5cm) Right Side 12" (33cm) min. Gas Requirements Supply Pressure: • Natural Gas - 7 inches water column (14.9 Millibars) minimum. • Propane Gas -11 inches water column (27.4 Millibars) minimum. Model NEZ1054, must be equipped with its own high pressure regulator in figure 1 and figure 2. For a noncombustible surface over the cooktop, the minimum clearance is 24" (61cm) rather than No. 28 MSG sheet metal 0.015 inch (0.38mm) stainless steel, 0.024 inch (0.6mm) aluminum or...
... Over Cooktop Rear Wall - 2" (5cm) Right Side 12" (33cm) min. Gas Requirements Supply Pressure: • Natural Gas - 7 inches water column (14.9 Millibars) minimum. • Propane Gas -11 inches water column (27.4 Millibars) minimum. Model NEZ1054, must be equipped with its own high pressure regulator in figure 1 and figure 2. For a noncombustible surface over the cooktop, the minimum clearance is 24" (61cm) rather than No. 28 MSG sheet metal 0.015 inch (0.38mm) stainless steel, 0.024 inch (0.6mm) aluminum or...
Installation Instructions
Page 6
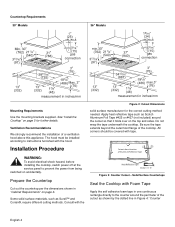
... avoid electrical shock hazard, before installing the cooktop, switch power off at the service panel to instructions furnished with Foam Tape Apply the self adhesive foam tape in inches/mm Mounting Requirements Use the mounting brackets supplied. A A Cutout shows location of the cooktop. A" Figure 3: Counter Cutout - The hood must be covered with the Figure 2: Cutout Dimensions solid surface manufacturer for further details. Some solid surface materials, such as shown by the dotted line in "Cabinet Requirements" on page 5 for the correct cutting method needed...
... avoid electrical shock hazard, before installing the cooktop, switch power off at the service panel to instructions furnished with Foam Tape Apply the self adhesive foam tape in inches/mm Mounting Requirements Use the mounting brackets supplied. A A Cutout shows location of the cooktop. A" Figure 3: Counter Cutout - The hood must be covered with the Figure 2: Cutout Dimensions solid surface manufacturer for further details. Some solid surface materials, such as shown by the dotted line in "Cabinet Requirements" on page 5 for the correct cutting method needed...
Installation Instructions
Page 7
... screws to rough-in Box Clamp Foam Tape (Seal) Adjusting Screw Adjusting Screw Wooden Block (to hand tighten plus 1/4 turn, not exceeding 1 turn for Gas Connection and Electrical Cord Figure 4: Counter Cutout - Turn to be easily accessible. To prevent possible damage to the gas pressure regulator, install it after the rough-in box is in Box Area Install the pressure regulator (supplied with unit) to countertop. Trim excess aluminum tape around cooktop flange. English 5 NOTE: For solid surface material installations: Insert a wooden...
... screws to rough-in Box Clamp Foam Tape (Seal) Adjusting Screw Adjusting Screw Wooden Block (to hand tighten plus 1/4 turn, not exceeding 1 turn for Gas Connection and Electrical Cord Figure 4: Counter Cutout - Turn to be easily accessible. To prevent possible damage to the gas pressure regulator, install it after the rough-in box is in Box Area Install the pressure regulator (supplied with unit) to countertop. Trim excess aluminum tape around cooktop flange. English 5 NOTE: For solid surface material installations: Insert a wooden...

Installation Instructions
Page 8
... using a soap solution. Turn the cooktop off all burner controls are too high. • Flames shoot out of base so that system at test pressures equal to cool. See figure "Burners Caps" on page 7. • Place burner cap gently on gas. 2. Burner Cap Placement WARNING: To prevent flare-ups, do not touch burner caps or grates while hot. If a leak appears, turn off supply line gas shut-off valve and pressure regulator. off valve and tighten connections. 4. If the burner cap...
... using a soap solution. Turn the cooktop off all burner controls are too high. • Flames shoot out of base so that system at test pressures equal to cool. See figure "Burners Caps" on page 7. • Place burner cap gently on gas. 2. Burner Cap Placement WARNING: To prevent flare-ups, do not touch burner caps or grates while hot. If a leak appears, turn off supply line gas shut-off valve and pressure regulator. off valve and tighten connections. 4. If the burner cap...

Installation Instructions
Page 10
... customer service) number of your cooktop. Flame should be blue with no yellow tip. English 8 After adjustment, retest. It is located on the underside of electric igniters. Yellow Flames: Further adjustment is needed. Data Plate Product Data Plate The data plate shows the model and FD (product's unique identifier for warranty validation if service is required. Allow unit to see if a fuse has blown or if the circuit breaker...
... customer service) number of your cooktop. Flame should be blue with no yellow tip. English 8 After adjustment, retest. It is located on the underside of electric igniters. Yellow Flames: Further adjustment is needed. Data Plate Product Data Plate The data plate shows the model and FD (product's unique identifier for warranty validation if service is required. Allow unit to see if a fuse has blown or if the circuit breaker...


