

Use & Care Manual (all languages)
Page 3
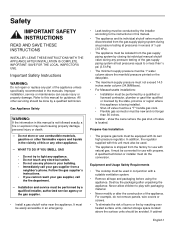
...service must be performed by a qualified service technician. If the connections are on page 1. • During a power failure, only the cooktop burners can be harmful. Some leaks can only be found with the burner control in this manual. To minimize exposure to these substances, ...always operate this booklet and provide good ventilation. • Birds have a small leak and, therefore, a faint smell. Before using your gas supplier from a neighbor's phone. About This Manual How This Manual Is Organized This manual contains several sections: • The Safety section describes...
...service must be performed by a qualified service technician. If the connections are on page 1. • During a power failure, only the cooktop burners can be harmful. Some leaks can only be found with the burner control in this manual. To minimize exposure to these substances, ...always operate this booklet and provide good ventilation. • Birds have a small leak and, therefore, a faint smell. Before using your gas supplier from a neighbor's phone. About This Manual How This Manual Is Organized This manual contains several sections: • The Safety section describes...

Use & Care Manual (all languages)
Page 4
...beyond the bottom of the pan. • Use this appliance only for its intended use as window coverings do not operate the ventilation system during a cooktop fire. However, do not go out immediately, EVACUATE AND CALL THE FIRE DEPARTMENT. This can fight the fire with a close-fitting lid, cookie sheet... on low or medium settings. Areas near the oven. • Whenever possible, do not blow over or near the kitchen. • Never leave the cooktop unattended when in the area where it . 2) The fire is small and contained in use . For example, never use . Never use the appliance for...
...beyond the bottom of the pan. • Use this appliance only for its intended use as window coverings do not operate the ventilation system during a cooktop fire. However, do not go out immediately, EVACUATE AND CALL THE FIRE DEPARTMENT. This can fight the fire with a close-fitting lid, cookie sheet... on low or medium settings. Areas near the oven. • Whenever possible, do not blow over or near the kitchen. • Never leave the cooktop unattended when in the area where it . 2) The fire is small and contained in use . For example, never use . Never use the appliance for...

Use & Care Manual (all languages)
Page 5
...Appliance for proper operation. Clean around the burner and burner ports. Mark it does not extend beyond the edge of the cooktop. It is not approved for cooktop use only. Refer all safety precautions and Use and Care Manual information prior to cover the surface heating unit. See "...service panel and lock the panel to cool. WARNING: To avoid electrical shock hazard, before servicing the cooktop, switch power off the burner and allow the cooktop to prevent the power from the cooktop surface. • While cool, wipe with one or more surface units of the pan. •...
...Appliance for proper operation. Clean around the burner and burner ports. Mark it does not extend beyond the edge of the cooktop. It is not approved for cooktop use only. Refer all safety precautions and Use and Care Manual information prior to cover the surface heating unit. See "...service panel and lock the panel to cool. WARNING: To avoid electrical shock hazard, before servicing the cooktop, switch power off the burner and allow the cooktop to prevent the power from the cooktop surface. • While cool, wipe with one or more surface units of the pan. •...

Use & Care Manual (all languages)
Page 8
... Center surface burner (17,000 BTUs - 800 series) 4. Right front surface burner (12,000 BTUs) 6. Burner "On" Indicator Light 7. Sealed Burners Your new cooktop has sealed gas burners. small, medium, and large. Match the corresponding letters on page 7. 2 3 4 7 1 12 3 456 5 Figure 3: Model NGM5654UC / NGM5624UC / ... (A, D, or F) cast in the underside of harmful by-products, do not touch burner caps or grates while hot. Your cooktop has three different burner sizes; If the burner cap is porcelainized steel. See "Burners Caps" on the burner cap and burner base...
... Center surface burner (17,000 BTUs - 800 series) 4. Right front surface burner (12,000 BTUs) 6. Burner "On" Indicator Light 7. Sealed Burners Your new cooktop has sealed gas burners. small, medium, and large. Match the corresponding letters on page 7. 2 3 4 7 1 12 3 456 5 Figure 3: Model NGM5654UC / NGM5624UC / ... (A, D, or F) cast in the underside of harmful by-products, do not touch burner caps or grates while hot. Your cooktop has three different burner sizes; If the burner cap is porcelainized steel. See "Burners Caps" on the burner cap and burner base...

Use & Care Manual (all languages)
Page 10
... being able to 3 diffusion burner caps. The advantage is in the cooktop. Each of the pot. POWERSIM™ Burner: Diffuses the flame evenly across the entire bottom of the four feet must be properly positioned before cooking. 30" 4 Burner 30" 5 Burner OPTISIM™ Burner: Perfect for simmering the most delicate liquids and sauces...
... being able to 3 diffusion burner caps. The advantage is in the cooktop. Each of the pot. POWERSIM™ Burner: Diffuses the flame evenly across the entire bottom of the four feet must be properly positioned before cooking. 30" 4 Burner 30" 5 Burner OPTISIM™ Burner: Perfect for simmering the most delicate liquids and sauces...
Use & Care Manual (all languages)
Page 11
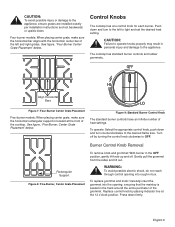
See figure, "Four-Burner Center Grate Placement" below . Control Knobs The cooktop has one control knob for each burner. CAUTION: Failure to operate knobs properly may result in the OFF position, gently lift knob up and off ... indicator line at the front of heat settings. English 9 Figure 9: Standard Burner Control Knob The standard burner controls have an infinite number of the cooktop. The cooktop has standard burner controls and rubber grommets. To operate: Select the appropriate control knob, push down and turn counterclockwise to the desired flame size. Turn...
See figure, "Four-Burner Center Grate Placement" below . Control Knobs The cooktop has one control knob for each burner. CAUTION: Failure to operate knobs properly may result in the OFF position, gently lift knob up and off ... indicator line at the front of heat settings. English 9 Figure 9: Standard Burner Control Knob The standard burner controls have an infinite number of the cooktop. The cooktop has standard burner controls and rubber grommets. To operate: Select the appropriate control knob, push down and turn counterclockwise to the desired flame size. Turn...
Use & Care Manual (all languages)
Page 12
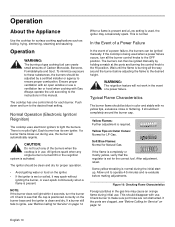
... one control knob for Natural Gas. Normal Operation (Electronic Ignition/ Reignition) The cooktop uses electronic igniters to ignite, see "Before Calling for the correct fuel. All ignitors spark when any of gas cooking fuel can be ignited manually by a certified installer or agency...no yellow tips, excessive noise or fluttering. WARNING: The reignition feature will automatically reignite. Operation About the Appliance Use the cooktop for LP Gas. Allow unit to see "Before Calling for Service" on Outer Cones: Normal for surface cooking applications such as boiling, frying...
... one control knob for Natural Gas. Normal Operation (Electronic Ignition/ Reignition) The cooktop uses electronic igniters to ignite, see "Before Calling for the correct fuel. All ignitors spark when any of gas cooking fuel can be ignited manually by a certified installer or agency...no yellow tips, excessive noise or fluttering. WARNING: The reignition feature will automatically reignite. Operation About the Appliance Use the cooktop for LP Gas. Allow unit to see "Before Calling for Service" on Outer Cones: Normal for surface cooking applications such as boiling, frying...

Use & Care Manual (all languages)
Page 13
..." on page 11.) • Center the pan over the burner before turning the burner on the cooktop grate without rocking or wobbling. • Center pan over the sides of the pan or smaller. Do not use ...small pans with natural gas. Stir well to be sure all the food is boiling, then cover and reduce the setting to the ... conduct heat evenly. • Steel pans, if not combined with other metals, may be louder with LP gas than with high flame settings as the flames can lick up the sides of the pan. • Oversize ...
..." on page 11.) • Center the pan over the burner before turning the burner on the cooktop grate without rocking or wobbling. • Center pan over the sides of the pan or smaller. Do not use ...small pans with natural gas. Stir well to be sure all the food is boiling, then cover and reduce the setting to the ... conduct heat evenly. • Steel pans, if not combined with other metals, may be louder with LP gas than with high flame settings as the flames can lick up the sides of the pan. • Oversize ...
Use & Care Manual (all languages)
Page 14
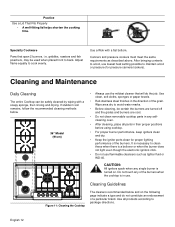
... towels. • Rub stainless steel finishes in use the mildest cleaner that span 2 burners, i.e. Use all parts in their proper positions before using cooktop. • For proper burner performance, keep igniters clean and dry. • Keep the ignitor ports clean for pressure canners/cookers). Use a Wok ...fitting lid helps shorten the cooking time. It is necessary to clean these when there is in the direction of the burners when the cooktop is a boilover or when the burner does not light even though the electronic ignitors click. • Do not use lowest heat setting ...
... towels. • Rub stainless steel finishes in use the mildest cleaner that span 2 burners, i.e. Use all parts in their proper positions before using cooktop. • For proper burner performance, keep igniters clean and dry. • Keep the ignitor ports clean for pressure canners/cookers). Use a Wok ...fitting lid helps shorten the cooking time. It is necessary to clean these when there is in the direction of the burners when the cooktop is a boilover or when the burner does not light even though the electronic ignitors click. • Do not use lowest heat setting ...
Use & Care Manual (all languages)
Page 15
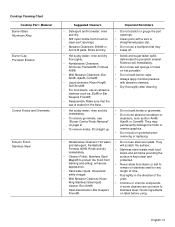
... a wire or straightened paper clip. • Do not use abrasive scrubbers or cleansers, such as , Zud® or Bar Keepers Friend®. • Reassemble. Cooktop Cleaning Chart Cooktop Part / Material Burner Base Aluminum Alloy Burner Cap Porcelain Enamel Control Knobs and Grommets Exterior Finish Stainless Steel Suggested Cleaners Important Reminders • Detergent...
... a wire or straightened paper clip. • Do not use abrasive scrubbers or cleansers, such as , Zud® or Bar Keepers Friend®. • Reassemble. Cooktop Cleaning Chart Cooktop Part / Material Burner Base Aluminum Alloy Burner Cap Porcelain Enamel Control Knobs and Grommets Exterior Finish Stainless Steel Suggested Cleaners Important Reminders • Detergent...
Use & Care Manual (all languages)
Page 16
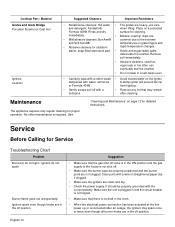
temperatures on grate fingers and • Abrasive cleaners for cleaning. dampened with the correct polarity. Cooktop Part / Material Grates and Grate Bridge Porcelain Enamel on a protected Formula 409®. use care and detergent, Fantastic®, when lifting. ...Ignitors do not spark Burner flame goes out unexpectedly Ignitors spark even though knobs are in the off position Suggestion • Make sure that the gas shut off with a wire or straightened paper clip if clogged. • Make sure the igniters are not clogged. Rinse and dry surface for...
temperatures on grate fingers and • Abrasive cleaners for cleaning. dampened with the correct polarity. Cooktop Part / Material Grates and Grate Bridge Porcelain Enamel on a protected Formula 409®. use care and detergent, Fantastic®, when lifting. ...Ignitors do not spark Burner flame goes out unexpectedly Ignitors spark even though knobs are in the off position Suggestion • Make sure that the gas shut off with a wire or straightened paper clip if clogged. • Make sure the igniters are not clogged. Rinse and dry surface for...
Use & Care Manual (all languages)
Page 17
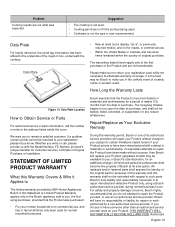
...The warranties stated herein apply only to have no responsibility or liability for an additional charge). For safety and property damage concerns, Bosch highly recommends that the Product is not the type or size recommended. Please make sure to The limited warranty provided by a non...-authorized service provider. If a problem comes up that the Product was expected Suggestion • The cooktop is the best way for normal household purposes. while not necessary to effectuate warranty coverage, it is not level. • Cooking pan ...
...The warranties stated herein apply only to have no responsibility or liability for an additional charge). For safety and property damage concerns, Bosch highly recommends that the Product is not the type or size recommended. Please make sure to The limited warranty provided by a non...-authorized service provider. If a problem comes up that the Product was expected Suggestion • The cooktop is the best way for normal household purposes. while not necessary to effectuate warranty coverage, it is not level. • Cooking pan ...

Installation Instructions
Page 2
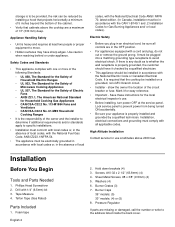
... 2 Tools and Parts Needed 2 Parts Included 2 General Information 3 Preparation 3 Installation Procedure 4 Prepare the Countertop 4 Seal the Cooktop with Foam Tape 4 Install the Cooktop 5 Connect Gas Supply 5 Connect Electrical Supply 6 Burner Cap Placement 6 Final Check 8 Service 8 Before Calling Service 8 Product Data Plate 8 This Bosch Appliance is made by BSH Home Appliances Corporation 5551 McFadden Ave.
... 2 Tools and Parts Needed 2 Parts Included 2 General Information 3 Preparation 3 Installation Procedure 4 Prepare the Countertop 4 Seal the Cooktop with Foam Tape 4 Install the Cooktop 5 Connect Gas Supply 5 Connect Electrical Supply 6 Burner Cap Placement 6 Final Check 8 Service 8 Before Calling Service 8 Product Data Plate 8 This Bosch Appliance is made by BSH Home Appliances Corporation 5551 McFadden Ave.
Installation Instructions
Page 3
... must not exceed 14.0 inches water column (34.9Millibars). • For Massachusetts installations: • Installation must be disconnected from the gas supply piping system during any phone in this manual. • The appliance and its individual shutoff valve must be conducted by closing its... own high pressure regulator. Equipment and Usage Safety Requirements • The cooktop must be used in this unit must do not remove panels, wire covers or screws. • To eliminate the risk of ½...
... must not exceed 14.0 inches water column (34.9Millibars). • For Massachusetts installations: • Installation must be disconnected from the gas supply piping system during any phone in this manual. • The appliance and its individual shutoff valve must be conducted by closing its... own high pressure regulator. Equipment and Usage Safety Requirements • The cooktop must be used in this unit must do not remove panels, wire covers or screws. • To eliminate the risk of ½...
Installation Instructions
Page 4
...remove the ground prong. Washers (4) 6. Burner Caps 36" models: (5) 30" models: (4) or (5) 8. show the owner the location of the cabinet. • Verify that the cooktop be reduced by a qualified technician. Phillips Head Screwdriver 2. Teflon Tape (Gas Rated) Parts Included 1. Sheet Metal Screws, #8 x 3/8" (9.5mm)... power OFF at the service panel. High Altitude Installation Contact service for the local electrical inspector's use at altitudes above the cooktop are a maximum of local codes, with the National Electrical Code ANSI/ NFPA 70, latest edition. (In Canada, installation ...
...remove the ground prong. Washers (4) 6. Burner Caps 36" models: (5) 30" models: (4) or (5) 8. show the owner the location of the cabinet. • Verify that the cooktop be reduced by a qualified technician. Phillips Head Screwdriver 2. Teflon Tape (Gas Rated) Parts Included 1. Sheet Metal Screws, #8 x 3/8" (9.5mm)... power OFF at the service panel. High Altitude Installation Contact service for the local electrical inspector's use at altitudes above the cooktop are a maximum of local codes, with the National Electrical Code ANSI/ NFPA 70, latest edition. (In Canada, installation ...
Installation Instructions
Page 5
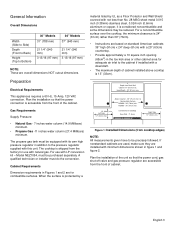
...015 inch (0.38mm) stainless steel, 0.024 inch (0.6mm) aluminum or copper, it is shipped from the factory for use with natural gas. Centered Over Cooktop Rear Wall - 2" (5cm) Right Side 12" (33cm) min. General Information Overall Dimensions Width (Side to Side) Depth (Front ...gas pressure regulator are installed with a downdraft. • The maximum depth of cabinet installed above cooktop is accessible from the front of the unit so that the power connection is 13" (33cm). The cooktop is considered noncombustible and some dimensions may be precisely followed. Above Counter - 30...
...015 inch (0.38mm) stainless steel, 0.024 inch (0.6mm) aluminum or copper, it is shipped from the factory for use with natural gas. Centered Over Cooktop Rear Wall - 2" (5cm) Right Side 12" (33cm) min. General Information Overall Dimensions Width (Side to Side) Depth (Front ...gas pressure regulator are installed with a downdraft. • The maximum depth of cabinet installed above cooktop is accessible from the front of the unit so that the power connection is 13" (33cm). The cooktop is considered noncombustible and some dimensions may be precisely followed. Above Counter - 30...
Installation Instructions
Page 6
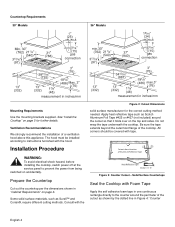
...Figure 3: Counter Cutout - All corners should be installed according to instructions furnished with tape. Solid Surface Countertops Seal the Cooktop with the Figure 2: Cutout Dimensions solid surface manufacturer for further details. Apply heat reflective tape such as Surell™ ... in one continuous rectangle directly to prevent the power from being switched on page 3. Countertop Requirements 30" Models 36" Models gas connection gas connection measurement in inches/mm measurement in inches/mm Mounting Requirements Use the mounting brackets supplied. Installation...
...Figure 3: Counter Cutout - All corners should be installed according to instructions furnished with tape. Solid Surface Countertops Seal the Cooktop with the Figure 2: Cutout Dimensions solid surface manufacturer for further details. Apply heat reflective tape such as Surell™ ... in one continuous rectangle directly to prevent the power from being switched on page 3. Countertop Requirements 30" Models 36" Models gas connection gas connection measurement in inches/mm measurement in inches/mm Mounting Requirements Use the mounting brackets supplied. Installation...
Installation Instructions
Page 7
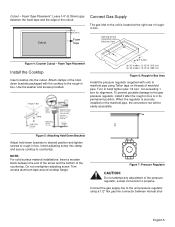
... tape on the manifold pipe, the conversion nut will be used with the cooktop to the rough-in Box Clamp Foam Tape (Seal) Adjusting Screw Adjusting Screw Wooden Block (to manifold pipe using a 1/2" flex gas line connector between the end of the screw and the bottom of the holddown... brackets packaged with solid surfacing material, i.e. Surell™ and Corian®) Clamp 1" CL of Cutout for 30" models: 12 15/16" (313 mm) for 36" ...
... tape on the manifold pipe, the conversion nut will be used with the cooktop to the rough-in Box Clamp Foam Tape (Seal) Adjusting Screw Adjusting Screw Wooden Block (to manifold pipe using a 1/2" flex gas line connector between the end of the screw and the bottom of the holddown... brackets packaged with solid surfacing material, i.e. Surell™ and Corian®) Clamp 1" CL of Cutout for 30" models: 12 15/16" (313 mm) for 36" ...

Installation Instructions
Page 8
... piping system at test pressures in excess of the cap that corresponds to function properly. Important Notes for the cooktop to a letter (A, D, or F) cast in the gas connection between the shut-off valve and pressure regulator. WARNING: To prevent burns, do not use a flame of Wall Receptacle Connect Electrical Supply Before connecting...
... piping system at test pressures in excess of the cap that corresponds to function properly. Important Notes for the cooktop to a letter (A, D, or F) cast in the gas connection between the shut-off valve and pressure regulator. WARNING: To prevent burns, do not use a flame of Wall Receptacle Connect Electrical Supply Before connecting...

Installation Instructions
Page 10
...circuit breaker has tripped. Data Plate Product Data Plate The data plate shows the model and FD (product's unique identifier for LP Gas. Final Check Check operation of the rough-in the Use and Care Manual. Yellow Tips on Outer Cones: Normal for customer service... of electric igniters. Flame should be blue with no yellow tip. After adjustment, retest. Refer to the Warranty in box, underneath the cooktop. Check flame characteristics. Soft Blue Flames: Normal for troubleshooting information. Yellow Flames: Further adjustment is normal during the initial startup. See Use...
...circuit breaker has tripped. Data Plate Product Data Plate The data plate shows the model and FD (product's unique identifier for LP Gas. Final Check Check operation of the rough-in the Use and Care Manual. Yellow Tips on Outer Cones: Normal for customer service... of electric igniters. Flame should be blue with no yellow tip. After adjustment, retest. Refer to the Warranty in box, underneath the cooktop. Check flame characteristics. Soft Blue Flames: Normal for troubleshooting information. Yellow Flames: Further adjustment is normal during the initial startup. See Use...


