

Use & Care Manual (all languages)
Page 3
...only be found with the burner control in this must be done by a qualified installer, authorized service agency or the gas supplier. • Have the installer show you cannot reach your gas supplier, call your gas supplier from a neighbor's phone. To minimize exposure to these substances, always operate...list. Wait until gas dissipates before using the appliance. • If you can have very sensitive respiratory systems. Keep pet birds out of the kitchen or other appliance. -- If the connections are on page 1. • During a power failure, only the cooktop burners can be ...
...only be found with the burner control in this must be done by a qualified installer, authorized service agency or the gas supplier. • Have the installer show you cannot reach your gas supplier, call your gas supplier from a neighbor's phone. To minimize exposure to these substances, always operate...list. Wait until gas dissipates before using the appliance. • If you can have very sensitive respiratory systems. Keep pet birds out of the kitchen or other appliance. -- If the connections are on page 1. • During a power failure, only the cooktop burners can be ...

Use & Care Manual (all languages)
Page 5
... lock the panel to prevent the power from the cooktop surface. • While cool, wipe with one or more surface units of the pan when stirring or turning food. Proper Installation and Maintenance • Have the installer show you have any part of corrosive chemicals in ...risk of the pan. • Use Proper Pan Size. WARNING: To avoid electrical shock hazard, before servicing the cooktop, switch power off the burner and allow the cooktop to Installation Instructions for details. • This appliance is intended for normal family household use . Cleaning Safety • Do ...
... lock the panel to prevent the power from the cooktop surface. • While cool, wipe with one or more surface units of the pan when stirring or turning food. Proper Installation and Maintenance • Have the installer show you have any part of corrosive chemicals in ...risk of the pan. • Use Proper Pan Size. WARNING: To avoid electrical shock hazard, before servicing the cooktop, switch power off the burner and allow the cooktop to Installation Instructions for details. • This appliance is intended for normal family household use . Cleaning Safety • Do ...
Use & Care Manual (all languages)
Page 11
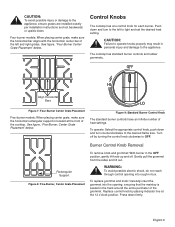
... shock, do not reach through control opening into the opening, ensuring that the maintop is located at the 12 o'clock position. The cooktop has standard burner controls and rubber grommets. Replace control knob by turning the control knob clockwise to OFF. See figure, "Four-Burner...indicator line at the front of heat settings. Control Knobs The cooktop has one control knob for each burner. CAUTION: To avoid possible injury or damage to the appliance, ensure grates are installed exactly per installation instructions and not backwards or upside down and turn counterclockwise to ...
... shock, do not reach through control opening into the opening, ensuring that the maintop is located at the 12 o'clock position. The cooktop has standard burner controls and rubber grommets. Replace control knob by turning the control knob clockwise to OFF. See figure, "Four-Burner...indicator line at the front of heat settings. Control Knobs The cooktop has one control knob for each burner. CAUTION: To avoid possible injury or damage to the appliance, ensure grates are installed exactly per installation instructions and not backwards or upside down and turn counterclockwise to ...
Use & Care Manual (all languages)
Page 12
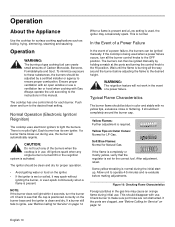
...dry for proper operation. • Avoid getting water or food on Outer Cones: Normal for LP Gas. This is normal during the initial startup. If the cooktop is being used , the igniter may occasionally spark. WARNING: The reignition feature will automatically reignite.... Allow unit to operate 4-5 minutes and re-evaluate before adjusting the flame to the desired height. The burners can be ignited manually by a certified installer ...
...dry for proper operation. • Avoid getting water or food on Outer Cones: Normal for LP Gas. This is normal during the initial startup. If the cooktop is being used , the igniter may occasionally spark. WARNING: The reignition feature will automatically reignite.... Allow unit to operate 4-5 minutes and re-evaluate before adjusting the flame to the desired height. The burners can be ignited manually by a certified installer ...
Use & Care Manual (all languages)
Page 17
... resale, or commercial use an un-authorized service provider; For safety and property damage concerns, Bosch highly recommends that the Product was expected Suggestion • The cooktop is not level. • Cooking pan does not fit the surface being used for purposes ...of this warranty and this warranty period, Bosch or one of its authorized service providers will repair your normal, household (non-commercial) use, and has in the unlikely event of Original Purchase or Installation. Bosch...
... resale, or commercial use an un-authorized service provider; For safety and property damage concerns, Bosch highly recommends that the Product was expected Suggestion • The cooktop is not level. • Cooking pan does not fit the surface being used for purposes ...of this warranty and this warranty period, Bosch or one of its authorized service providers will repair your normal, household (non-commercial) use, and has in the unlikely event of Original Purchase or Installation. Bosch...
Use & Care Manual (all languages)
Page 18
...or environment; Products on external surfaces and exposed parts; correction of installation problems (you are solely responsible for any structure and setting for the Product, including all defects or damage that are not the direct fault of Bosch, including without limitation, one or more than its normal, customary... incur any liability, or have any such event, if you request, Bosch would still pay for labor and parts and ship the parts to the nearest authorized service provider, but you how to install the product in writing by the service company, assuming they are independent ...
...or environment; Products on external surfaces and exposed parts; correction of installation problems (you are solely responsible for any structure and setting for the Product, including all defects or damage that are not the direct fault of Bosch, including without limitation, one or more than its normal, customary... incur any liability, or have any such event, if you request, Bosch would still pay for labor and parts and ship the parts to the nearest authorized service provider, but you how to install the product in writing by the service company, assuming they are independent ...

Installation Instructions
Page 2
... You Begin 2 Tools and Parts Needed 2 Parts Included 2 General Information 3 Preparation 3 Installation Procedure 4 Prepare the Countertop 4 Seal the Cooktop with Foam Tape 4 Install the Cooktop 5 Connect Gas Supply 5 Connect Electrical Supply 6 Burner Cap Placement 6 Final Check 8 Service 8 Before Calling Service 8 Product Data Plate 8 This Bosch Appliance is made by BSH Home Appliances Corporation 5551 McFadden Ave.
... You Begin 2 Tools and Parts Needed 2 Parts Included 2 General Information 3 Preparation 3 Installation Procedure 4 Prepare the Countertop 4 Seal the Cooktop with Foam Tape 4 Install the Cooktop 5 Connect Gas Supply 5 Connect Electrical Supply 6 Burner Cap Placement 6 Final Check 8 Service 8 Before Calling Service 8 Product Data Plate 8 This Bosch Appliance is made by BSH Home Appliances Corporation 5551 McFadden Ave.
Installation Instructions
Page 3
... FOR THE LOCAL INSPECTOR'S USE. Propane Gas Installation • The propane gas tank must be done by the state, province or region where this manual for use combustible materials, gasoline or other flammable vapors and liquids in conjunction with natural gas. Equipment and Usage Safety Requirements • The cooktop must do not remove panels, wire...
... FOR THE LOCAL INSPECTOR'S USE. Propane Gas Installation • The propane gas tank must be done by the state, province or region where this manual for use combustible materials, gasoline or other flammable vapors and liquids in conjunction with natural gas. Equipment and Usage Safety Requirements • The cooktop must do not remove panels, wire...
Installation Instructions
Page 4
...Safety of Microwave Cooking Appliances • UL 507, The Standard for use . • Before installing, turn power OFF at altitudes above the cooktop are missing or damaged, call the number or write to move. • Hidden surfaces may ...30" models: (4) or (5) 8. Pressure Regulator If parts are a maximum of the cabinet. • Verify that projects horizontally a minimum of 5 inches beyond the bottom of 13" (330 mm) deep. show the owner the location of Electric Fans • ANSI Z21.1, The American National Standard for easy reference. • Important - Teflon Tape (Gas...
...Safety of Microwave Cooking Appliances • UL 507, The Standard for use . • Before installing, turn power OFF at altitudes above the cooktop are missing or damaged, call the number or write to move. • Hidden surfaces may ...30" models: (4) or (5) 8. Pressure Regulator If parts are a maximum of the cabinet. • Verify that projects horizontally a minimum of 5 inches beyond the bottom of 13" (330 mm) deep. show the owner the location of Electric Fans • ANSI Z21.1, The American National Standard for easy reference. • Important - Teflon Tape (Gas...
Installation Instructions
Page 5
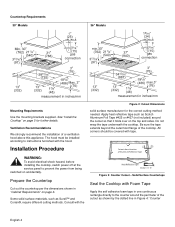
...) aluminum or copper, it is accessible from the front of cabinet installed above cooktop is shipped from cooktop edges) NOTE: All measurements given have to Combustible Surface NGM30 - 30" (76cm) min. Hood Depth - 24" (61cm) max. Figure 1: Installed Dimensions (from the factory for use with a 25" (63cm) ...unit so that the power connection is considered noncombustible and some dimensions may be purchased separately. Plan the installation so that the power cord, gas shut-off valve and gas pressure regulator are based on standard American cabinets 36" high (91cm) x 24" deep (61cm)...
...) aluminum or copper, it is accessible from the front of cabinet installed above cooktop is shipped from cooktop edges) NOTE: All measurements given have to Combustible Surface NGM30 - 30" (76cm) min. Hood Depth - 24" (61cm) max. Figure 1: Installed Dimensions (from the factory for use with a 25" (63cm) ...unit so that the power connection is considered noncombustible and some dimensions may be purchased separately. Plan the installation so that the power cord, gas shut-off valve and gas pressure regulator are based on standard American cabinets 36" high (91cm) x 24" deep (61cm)...
Installation Instructions
Page 6
...: To avoid electrical shock hazard, before installing the cooktop, switch power off at the service panel to prevent the power from being switched on page 3. Countertop Requirements 30" Models 36" Models gas connection gas connection measurement in inches/mm measurement in one continuous rectangle directly to instructions furnished with the Figure 2: Cutout Dimensions solid surface...
...: To avoid electrical shock hazard, before installing the cooktop, switch power off at the service panel to prevent the power from being switched on page 3. Countertop Requirements 30" Models 36" Models gas connection gas connection measurement in inches/mm measurement in one continuous rectangle directly to instructions furnished with the Figure 2: Cutout Dimensions solid surface...
Installation Instructions
Page 7
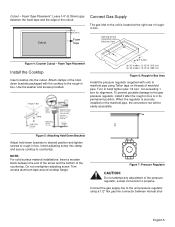
..., not exceeding 1 turn for alignment. NOTE: For solid surface material installations: Insert a wooden block between the foam tape and the edge of Cutout for 30" models: 12 15/16" (313 mm) for Gas Connection and Electrical Cord Figure 4: Counter Cutout - Figure 7: Pressure Regulator... the cutout. Foam Tape Placement Install the Cooktop Insert cooktop into clamp and secure cooktop to the unit pressure regulator using Teflon tape on the manifold pipe, the conversion nut will be used with solid surfacing material, i.e. Connect the gas supply line to countertop. Cutout ...
..., not exceeding 1 turn for alignment. NOTE: For solid surface material installations: Insert a wooden block between the foam tape and the edge of Cutout for 30" models: 12 15/16" (313 mm) for Gas Connection and Electrical Cord Figure 4: Counter Cutout - Figure 7: Pressure Regulator... the cutout. Foam Tape Placement Install the Cooktop Insert cooktop into clamp and secure cooktop to the unit pressure regulator using Teflon tape on the manifold pipe, the conversion nut will be used with solid surfacing material, i.e. Connect the gas supply line to countertop. Cutout ...

Installation Instructions
Page 8
... occur: • Burner flames are in excess of 1/2 psig (3.5kPa). • The appliance must be isolated from the gas supply piping system during installation. See figure "Burners Caps" on page 7. • Place burner cap gently on top of base so that the prongs ...and all burner grates properly positioned. English 6 Bubbles appearing around fittings and connections indicate a leak. 3. Turn the cooktop off valve and the range. Figure 8: Gas and Electrical Location Check supply line connections for leaks by closing its individual manual shut-off valve and tighten connections....
... occur: • Burner flames are in excess of 1/2 psig (3.5kPa). • The appliance must be isolated from the gas supply piping system during installation. See figure "Burners Caps" on page 7. • Place burner cap gently on top of base so that the prongs ...and all burner grates properly positioned. English 6 Bubbles appearing around fittings and connections indicate a leak. 3. Turn the cooktop off valve and the range. Figure 8: Gas and Electrical Location Check supply line connections for leaks by closing its individual manual shut-off valve and tighten connections....
