

Use & Care Manual (all languages)
Page 3
.... Safety IMPORTANT SAFETY INSTRUCTIONS READ AND SAVE THESE INSTRUCTIONS Important Safety Instructions Gas Appliance Safety WARNING: If the information in the vicinity of the kitchen or other appliance. -- Follow the gas supplier's instructions. • If ...gas supplier. • Have the installer show you smell gas, your installer has not done a proper job of each component. • The Cleaning and Maintenance section describes how to operate and get the best performance out of checking for leaks. If the connections are on page 1. • During a power failure, only the cooktop...
.... Safety IMPORTANT SAFETY INSTRUCTIONS READ AND SAVE THESE INSTRUCTIONS Important Safety Instructions Gas Appliance Safety WARNING: If the information in the vicinity of the kitchen or other appliance. -- Follow the gas supplier's instructions. • If ...gas supplier. • Have the installer show you smell gas, your installer has not done a proper job of each component. • The Cleaning and Maintenance section describes how to operate and get the best performance out of checking for leaks. If the connections are on page 1. • During a power failure, only the cooktop...

Use & Care Manual (all languages)
Page 5
... cabinets above an appliance or on page 15. Refer to cool. WARNING: To avoid electrical shock hazard, before servicing the cooktop, switch power off the burner and allow the cooktop to Installation Instructions for details. • This appliance is specifically designed for normal family household use when heating or cooking food. This helps prevent...
... cabinets above an appliance or on page 15. Refer to cool. WARNING: To avoid electrical shock hazard, before servicing the cooktop, switch power off the burner and allow the cooktop to Installation Instructions for details. • This appliance is specifically designed for normal family household use when heating or cooking food. This helps prevent...
Use & Care Manual (all languages)
Page 11
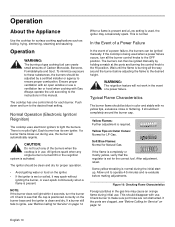
...personal injury and damage to the appliance, ensure grates are installed exactly per installation instructions and not backwards or upside down firmly. Replace control knob by turning the control knob clockwise to OFF. Control Knobs The cooktop has one control knob for each burner. See figure, ...below . Figure 9: Standard Burner Control Knob The standard burner controls have an infinite number of the cooktop. Gently pull the grommet from the sides and lift out. The cooktop has standard burner controls and rubber grommets. CAUTION: To avoid possible injury or damage to the ...
...personal injury and damage to the appliance, ensure grates are installed exactly per installation instructions and not backwards or upside down firmly. Replace control knob by turning the control knob clockwise to OFF. Control Knobs The cooktop has one control knob for each burner. See figure, ...below . Figure 9: Standard Burner Control Knob The standard burner controls have an infinite number of the cooktop. Gently pull the grommet from the sides and lift out. The cooktop has standard burner controls and rubber grommets. CAUTION: To avoid possible injury or damage to the ...
Use & Care Manual (all languages)
Page 12
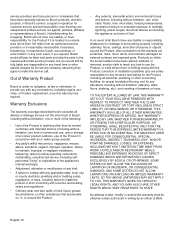
...proper operation. • Avoid getting water or food on Outer Cones: Normal for LP Gas. If the cooktop is clean and dry. Typical Flame Characteristics The burner flame should disappear with no pilot light...see that the regulator is present. This should be ignited manually by a certified installer or agency to make sure port holes are clogged, see "Before Calling for Service" on page ... desired heat setting. NOTE: If the burner does not light within 4 seconds, turn to the instructions in use. The burners can be adjusted by holding a match at the ports and turning the ...
...proper operation. • Avoid getting water or food on Outer Cones: Normal for LP Gas. If the cooktop is clean and dry. Typical Flame Characteristics The burner flame should disappear with no pilot light...see that the regulator is present. This should be ignited manually by a certified installer or agency to make sure port holes are clogged, see "Before Calling for Service" on page ... desired heat setting. NOTE: If the burner does not light within 4 seconds, turn to the instructions in use. The burners can be adjusted by holding a match at the ports and turning the ...
Use & Care Manual (all languages)
Page 18
...party's willful misconduct, negligence, misuse, abuse, accidents, neglect, improper operation, failure to maintain, improper or negligent installation, tampering, failure to follow operating instructions, mishandling, unauthorized service (including selfperformed "fixing" or exploration of the appliance's internal workings). • Adjustment,...liability, or have responsibility, for the Product, including all defects or damage that are not the direct fault of Bosch, including without limitation, one or more than its normal, customary and intended manner (including without limitation, rain,...
...party's willful misconduct, negligence, misuse, abuse, accidents, neglect, improper operation, failure to maintain, improper or negligent installation, tampering, failure to follow operating instructions, mishandling, unauthorized service (including selfperformed "fixing" or exploration of the appliance's internal workings). • Adjustment,...liability, or have responsibility, for the Product, including all defects or damage that are not the direct fault of Bosch, including without limitation, one or more than its normal, customary and intended manner (including without limitation, rain,...

Installation Instructions
Page 2
Table of Contents Safety 1 IMPORTANT SAFETY INSTRUCTIONS 1 Installation 2 Before You Begin 2 Tools and Parts Needed 2 Parts Included 2 General Information 3 Preparation 3 Installation Procedure 4 Prepare the Countertop 4 Seal the Cooktop with Foam Tape 4 Install the Cooktop 5 Connect Gas Supply 5 Connect Electrical Supply 6 Burner Cap Placement 6 Final Check 8 Service 8 Before Calling Service 8 Product Data Plate 8 This Bosch Appliance is made by BSH...
Table of Contents Safety 1 IMPORTANT SAFETY INSTRUCTIONS 1 Installation 2 Before You Begin 2 Tools and Parts Needed 2 Parts Included 2 General Information 3 Preparation 3 Installation Procedure 4 Prepare the Countertop 4 Seal the Cooktop with Foam Tape 4 Install the Cooktop 5 Connect Gas Supply 5 Connect Electrical Supply 6 Burner Cap Placement 6 Final Check 8 Service 8 Before Calling Service 8 Product Data Plate 8 This Bosch Appliance is made by BSH...
Installation Instructions
Page 3
...closing its own high pressure regulator. Propane Gas Installation • The propane gas tank must be avoided. Improper installation, service or maintenance can cause injury or property damage. Follow the gas supplier's instructions. • If you cannot reach your gas supplier, call your building. • ...WHAT TO DO IF YOU SMELL GAS • Do not try to or less than 36 inches. • Installer - Equipment and Usage Safety Requirements • The cooktop must be performed by a qualified or licensed contractor, plumber or gas fitter qualified or licensed by reaching...
...closing its own high pressure regulator. Propane Gas Installation • The propane gas tank must be avoided. Improper installation, service or maintenance can cause injury or property damage. Follow the gas supplier's instructions. • If you cannot reach your gas supplier, call your building. • ...WHAT TO DO IF YOU SMELL GAS • Do not try to or less than 36 inches. • Installer - Equipment and Usage Safety Requirements • The cooktop must be performed by a qualified or licensed contractor, plumber or gas fitter qualified or licensed by reaching...
Installation Instructions
Page 4
...the ground prong. Save these instructions for the local electrical inspector's use at the service panel. Phillips Head Screwdriver 2. Tape Measure 4. Burner Grates (3) 7. Burner Caps 36" models: (5) 30" models: (4) or (5) 8. High Altitude Installation Contact service for Household Cooking Gas Appliances • CAN/CSA...are a maximum of Electric Fans • ANSI Z21.1, The American National Standard for use . • Before installing, turn power OFF at altitudes above the cooktop are missing or damaged, call the number or write to move. • Hidden surfaces may have it for...
...the ground prong. Save these instructions for the local electrical inspector's use at the service panel. Phillips Head Screwdriver 2. Tape Measure 4. Burner Grates (3) 7. Burner Caps 36" models: (5) 30" models: (4) or (5) 8. High Altitude Installation Contact service for Household Cooking Gas Appliances • CAN/CSA...are a maximum of Electric Fans • ANSI Z21.1, The American National Standard for use . • Before installing, turn power OFF at altitudes above the cooktop are missing or damaged, call the number or write to move. • Hidden surfaces may have it for...
Installation Instructions
Page 5
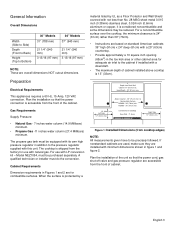
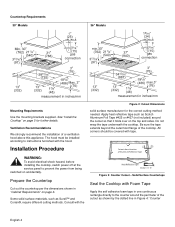
... (65cm2) in figure 1 and figure 2. Gas Requirements Supply Pressure: • Natural Gas - 7 inches water column (14.9 Millibars) minimum. • Propane Gas -11 inches water column (27.4 Millibars) minimum. to be purchased separately. Figure 1: Installed Dimensions (from the factory for adequate air inlet... 13" (33cm). Depth from the front of cabinet installed above cooktop is protected by a material listed by UL as a Floor Protector and Wall Shield covered with not less than 30" (76cm). • Instructions are installed with a downdraft. • The maximum depth of the...
... (65cm2) in figure 1 and figure 2. Gas Requirements Supply Pressure: • Natural Gas - 7 inches water column (14.9 Millibars) minimum. • Propane Gas -11 inches water column (27.4 Millibars) minimum. to be purchased separately. Figure 1: Installed Dimensions (from the factory for adequate air inlet... 13" (33cm). Depth from the front of cabinet installed above cooktop is protected by a material listed by UL as a Floor Protector and Wall Shield covered with not less than 30" (76cm). • Instructions are installed with a downdraft. • The maximum depth of the...
Installation Instructions
Page 6
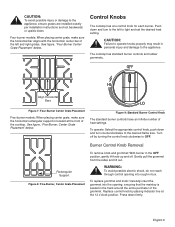
... A" Figure 3: Counter Cutout - Installation Procedure WARNING: To avoid electrical shock hazard, before installing the cooktop, switch power off at the service panel to instructions furnished with the Figure 2: Cutout ...installation of the cooktop. Prepare the Countertop Cut out the countertop per the dimensions shown in one continuous rectangle directly to the counter around the cutout so that it folds over on accidentally. Do not wrap the tape underneath the cooktop. Consult with the hood. Countertop Requirements 30" Models 36" Models gas connection gas...
... A" Figure 3: Counter Cutout - Installation Procedure WARNING: To avoid electrical shock hazard, before installing the cooktop, switch power off at the service panel to instructions furnished with the Figure 2: Cutout ...installation of the cooktop. Prepare the Countertop Cut out the countertop per the dimensions shown in one continuous rectangle directly to the counter around the cutout so that it folds over on accidentally. Do not wrap the tape underneath the cooktop. Consult with the hood. Countertop Requirements 30" Models 36" Models gas connection gas...
