Installation Instructions
Page 3
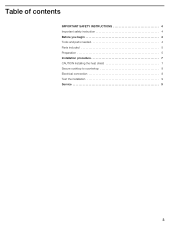
Table of contents IMPORTANT SAFETY INSTRUCTIONS 4 Important safety instruction 4 Before you begin 4 Tools and parts needed 4 Parts included 5 Preparation 5 Installation procedure 7 CAUTION Installing the heat shield 7 Secure cooktop to countertop 8 Electrical connection 8 Test the installation 9 Service 9 3
Table of contents IMPORTANT SAFETY INSTRUCTIONS 4 Important safety instruction 4 Before you begin 4 Tools and parts needed 4 Parts included 5 Preparation 5 Installation procedure 7 CAUTION Installing the heat shield 7 Secure cooktop to countertop 8 Electrical connection 8 Test the installation 9 Service 9 3
Installation Instructions
Page 4
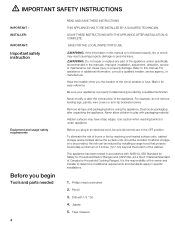
... usage safety requirements Before you the location of the circuit breaker or fuse. Have the installer show you begin Tools and parts needed 4 READ AND SAVE THESE INSTRUCTIONS THIS APPLIANCE HAS TO BE INSTALLED BY A QUALIFIED TECHNICIAN. Mark it for Household Cooking Ranges. It is to determine if additional requirements and standards apply in the manuals. dWARNING: Do not repair or replace any part of the cabinet. SAVE...
... usage safety requirements Before you the location of the circuit breaker or fuse. Have the installer show you begin Tools and parts needed 4 READ AND SAVE THESE INSTRUCTIONS THIS APPLIANCE HAS TO BE INSTALLED BY A QUALIFIED TECHNICIAN. Mark it for Household Cooking Ranges. It is to determine if additional requirements and standards apply in the manuals. dWARNING: Do not repair or replace any part of the cabinet. SAVE...

Installation Instructions
Page 5
... After preparing cutout, remove shavings as they can affect the function of ignition combustible materials surround the installed cooktop are not permitted. WARNING: To reduce the risk of electrical components. For example, heat reflective tape and rounded corners may be necessary. Clamping screws, #10Ć32 x 2 1/2" (63,8 mm) (4) 3. Solid surface countertops often require special installations. Washers (4) 5. Hold down brackets 2. Note: Parts included Preparation Countertop requirements Additional materials...
... After preparing cutout, remove shavings as they can affect the function of ignition combustible materials surround the installed cooktop are not permitted. WARNING: To reduce the risk of electrical components. For example, heat reflective tape and rounded corners may be necessary. Clamping screws, #10Ć32 x 2 1/2" (63,8 mm) (4) 3. Solid surface countertops often require special installations. Washers (4) 5. Hold down brackets 2. Note: Parts included Preparation Countertop requirements Additional materials...
Installation Instructions
Page 6
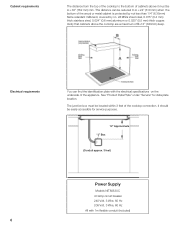
... Plate" under Service" for service purposes. 12" Approximate J" Box (Conduit approx. 3 feet) Power Supply Models NIT8053UC 40 Amp circuit breaker 240 Volt, 3 Wire, 60 Hz 208 Volt, 3 Wire, 60 Hz All with the electrical specifications on the underside of the wood or metal cabinet is protected by not less than 1/4" (6.35mm) flame retardant millboard, covered by no. 28 MSG sheet steel, 0.015" (0.4 mm) thick stainless steel, 0.024" (0.6 mm) aluminum or 0.020...
... Plate" under Service" for service purposes. 12" Approximate J" Box (Conduit approx. 3 feet) Power Supply Models NIT8053UC 40 Amp circuit breaker 240 Volt, 3 Wire, 60 Hz 208 Volt, 3 Wire, 60 Hz All with the electrical specifications on the underside of the wood or metal cabinet is protected by not less than 1/4" (6.35mm) flame retardant millboard, covered by no. 28 MSG sheet steel, 0.015" (0.4 mm) thick stainless steel, 0.024" (0.6 mm) aluminum or 0.020...

Installation Instructions
Page 7
...) high. Screw the heat shield to the burner box. Installation procedure d CAUTION Installing the heat shield Transport For safety reasons, the heat shield must be properly installed. The cooktop is screwed to the base of the burner box using the preĆdrilled holes, as the cooktop. Installer After unpacking the cooktop, unscrew the heat shield (see illustration). Once the heat shield has been installed, the total height of hot air from...
...) high. Screw the heat shield to the burner box. Installation procedure d CAUTION Installing the heat shield Transport For safety reasons, the heat shield must be properly installed. The cooktop is screwed to the base of the burner box using the preĆdrilled holes, as the cooktop. Installer After unpacking the cooktop, unscrew the heat shield (see illustration). Once the heat shield has been installed, the total height of hot air from...

Installation Instructions
Page 8
...: Before installing, turn cooktop upside down brackets provided. Lock service panel to protect fragile countertop materials. Attach flexible conduit to branch-circuit neutral conductor in usual manner. Secure cooktop to countertop Electrical connection NOTE: 8 The cooktop should be conform to the requeriments of the National Electrical Code or Canadian Electrical Code and all local codes and ordinances. Place cooktop into the bracket and secure cooktop to ground If the cooktop is installed and connected as...
...: Before installing, turn cooktop upside down brackets provided. Lock service panel to protect fragile countertop materials. Attach flexible conduit to branch-circuit neutral conductor in usual manner. Secure cooktop to countertop Electrical connection NOTE: 8 The cooktop should be conform to the requeriments of the National Electrical Code or Canadian Electrical Code and all local codes and ordinances. Place cooktop into the bracket and secure cooktop to ground If the cooktop is installed and connected as...

Installation Instructions
Page 9
Test the installation Service Remove everything from you with details on the underside of the appliance. Clean cooktop surface with these numbers on a center close to you contact our customer service, please have the E number and the FD number for your appliance needs repair. When you . Please contact us. Our central Customer Service Center (see below) will also be happy to hearing from the cooktop surface. Verify that...
Test the installation Service Remove everything from you with details on the underside of the appliance. Clean cooktop surface with these numbers on a center close to you contact our customer service, please have the E number and the FD number for your appliance needs repair. When you . Please contact us. Our central Customer Service Center (see below) will also be happy to hearing from the cooktop surface. Verify that...
Use & Care Manual
Page 5
... your appliance is installed and grounded by qualified persons. Areas near units until it for normal family household use the cooktop to the cooktop. Boilovers cause smoking, and greasy spillovers may ignite. Build-up of fire, electric shock, or injury to come in color. Mark it is cool. Always turn hood ON when cooking at high heat or when flambeing food...
... your appliance is installed and grounded by qualified persons. Areas near units until it for normal family household use the cooktop to the cooktop. Boilovers cause smoking, and greasy spillovers may ignite. Build-up of fire, electric shock, or injury to come in color. Mark it is cool. Always turn hood ON when cooking at high heat or when flambeing food...
Use & Care Manual
Page 6
... damaged. The use . Clean ventilating fans frequently. Contact an authorized servicer. Always have a working properly, or if it is used to clean spills on the cooktop to reach items could be allowed to accumulate on any part unless specifically recommended in ignition of clothing. To avoid electrical shock hazard, before servicing the cooktop, switch power off at the back of the pan when stirring or turning food. This...
... damaged. The use . Clean ventilating fans frequently. Contact an authorized servicer. Always have a working properly, or if it is used to clean spills on the cooktop to reach items could be allowed to accumulate on any part unless specifically recommended in ignition of clothing. To avoid electrical shock hazard, before servicing the cooktop, switch power off at the back of the pan when stirring or turning food. This...

Use & Care Manual
Page 7
... or flame or use when heating or cooking food. If the flames do not operate the ventilation system during a cooktop fire. Use an extinguisher only if: You know hou have a Class ABS extinguisher and you know to turn off . You can fight the fire with a cooling fan mounted underneath. Smother flames from a grease fire with baking soda. Be careful to extinguish flames. Do...
... or flame or use when heating or cooking food. If the flames do not operate the ventilation system during a cooktop fire. Use an extinguisher only if: You know hou have a Class ABS extinguisher and you know to turn off . You can fight the fire with a cooling fan mounted underneath. Smother flames from a grease fire with baking soda. Be careful to extinguish flames. Do...

Use & Care Manual
Page 8
... the responsibility of FCC rules, which are necessary before using special cookware. Turn the appliance on the touch key panel, the display area or the frame. Saucepan and pan bases Hot pans and saucepans Salt, sugar and sand Hard and pointed objects Rough saucepan bases can scratch the glass ceramic surface. Never place hot pans or saucepans on and off to determine if it...
... the responsibility of FCC rules, which are necessary before using special cookware. Turn the appliance on the touch key panel, the display area or the frame. Saucepan and pan bases Hot pans and saucepans Salt, sugar and sand Hard and pointed objects Rough saucepan bases can scratch the glass ceramic surface. Never place hot pans or saucepans on and off to determine if it...
Use & Care Manual
Page 11
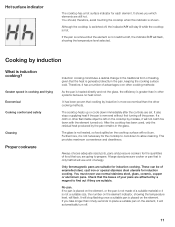
... stainless steel utensils for induction cooking. After the cooktop has been used, only the residual heat produced by induction What is removed without first turning off , the indicator s/t will flash. A large sized pressure cooker or pan that is more economical than ninety seconds to allow cleaning. It shows you which elements are set. Although the cooktop is switched off . 11 Therefore, it is generated directly in the glass. If a cloth or other cooking...
... stainless steel utensils for induction cooking. After the cooktop has been used, only the residual heat produced by induction What is removed without first turning off , the indicator s/t will flash. A large sized pressure cooker or pan that is more economical than ninety seconds to allow cleaning. It shows you which elements are set. Although the cooktop is switched off . 11 Therefore, it is generated directly in the glass. If a cloth or other cooking...
Use & Care Manual
Page 12
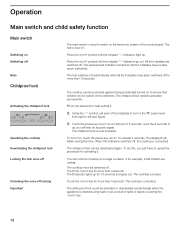
... to heat setting 2. 2. The cooktop can be activated or deactivated unintentionally when the appliance is cleaned using water or as a result of the control panel. To turn to the "k" power level, from right to left (see figure). 3. The Y indicator lights up . The cooktop is now activated. The hob is locked. The childproof lock remains activated permanently. 1Turn the elements to ensure that children do this indication switches...
... to heat setting 2. 2. The cooktop can be activated or deactivated unintentionally when the appliance is cleaned using water or as a result of the control panel. To turn to the "k" power level, from right to left (see figure). 3. The Y indicator lights up . The cooktop is now activated. The hob is locked. The childproof lock remains activated permanently. 1Turn the elements to ensure that children do this indication switches...
Use & Care Manual
Page 15
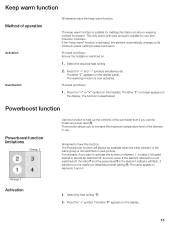
... available when the other element of the element in the element indicator will always be switched off , the letter x and the power level j in use with pots and pans suitable for melting chocolate or butter or keeping cooked food warm. The same applies to is switched on (see picture). Select the heat setting "j". 2. Press the "+" symbol. This only works with induction cooktops. Press the "+" and...
... available when the other element of the element in the element indicator will always be switched off , the letter x and the power level j in use with pots and pans suitable for melting chocolate or butter or keeping cooked food warm. The same applies to is switched on (see picture). Select the heat setting "j". 2. Press the "+" symbol. This only works with induction cooktops. Press the "+" and...

Use & Care Manual
Page 18
... soil for 30 minutes. Hard Water Spots Hot cooking liquids dripped on top of the glass ceramic cooktop cleaner. Surface scratches Small scratches are smooth, clean, and dry before use the razor blade scraper. They become smoother and less noticeable with glass ceramic cooktop cleaner. Apply glass ceramic cooktop cleaner before using to remove metal marks before using pans with aluminum, copper or stainless steel bases may leave marks. Can be reduced by...
... soil for 30 minutes. Hard Water Spots Hot cooking liquids dripped on top of the glass ceramic cooktop cleaner. Surface scratches Small scratches are smooth, clean, and dry before use the razor blade scraper. They become smoother and less noticeable with glass ceramic cooktop cleaner. Apply glass ceramic cooktop cleaner before using to remove metal marks before using pans with aluminum, copper or stainless steel bases may leave marks. Can be reduced by...
Use & Care Manual
Page 19
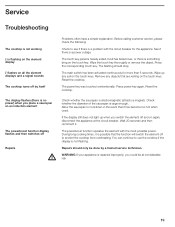
... element off to use the cooktop if the display is not flashing. The display flashes (there is no power) when you place a saucepan on an induction element The powerboost function display flashes and then switches off by a trained service technician. During long cooking times, it . āService Troubleshooting The cooktop is not working E is flashing on the element display E flashes on all the element displays and a signal sounds The cooktop turns off Repairs...
... element off to use the cooktop if the display is not flashing. The display flashes (there is no power) when you place a saucepan on an induction element The powerboost function display flashes and then switches off by a trained service technician. During long cooking times, it . āService Troubleshooting The cooktop is not working E is flashing on the element display E flashes on all the element displays and a signal sounds The cooktop turns off Repairs...
Use & Care Manual
Page 20
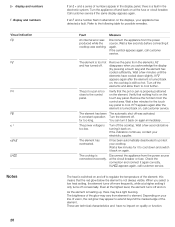
... cooktop is still too hot. The element is too close to cool. Remove the pans from the power source. Verify that nothing hot is on quality or function. The element has been The automatic shut off was working. Wait a few seconds before connecting it back on your appliance has detected a fault. Call customer service if the same display appears again. Fault Measure An internal error...
... cooktop is still too hot. The element is too close to cool. Remove the pans from the power source. Verify that nothing hot is on quality or function. The element has been The automatic shut off was working. Wait a few seconds before connecting it back on your appliance has detected a fault. Call customer service if the same display appears again. Fault Measure An internal error...
Use & Care Manual
Page 21
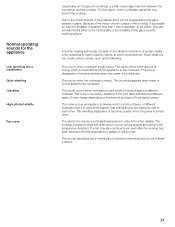
... induction technology and do not indicate a defect. 21 The noise is added to function reliably. They are a normal part of food being cooked. This sound disappears when water or food is caused by vibrations in cookware which consists of layers of energy which is used which runs at the highest heat setting and on the type of the glass ceramic cooking surface...
... induction technology and do not indicate a defect. 21 The noise is added to function reliably. They are a normal part of food being cooked. This sound disappears when water or food is caused by vibrations in cookware which consists of layers of energy which is used which runs at the highest heat setting and on the type of the glass ceramic cooking surface...

Use & Care Manual
Page 22
... that the electric heating elements and controls of the Cooktop and the ceramic glass of the Cooktop shall be free from defects in this Statement of Limited Warranty, the term Date of Installation" shall refer to the first using purchaser, provided that its authorized service center will replace any Cooktop), transportation, and/or shipping costs incurred in materials and workmanship for your appliance needs repair. in materials...
... that the electric heating elements and controls of the Cooktop and the ceramic glass of the Cooktop shall be free from defects in this Statement of Limited Warranty, the term Date of Installation" shall refer to the first using purchaser, provided that its authorized service center will replace any Cooktop), transportation, and/or shipping costs incurred in materials and workmanship for your appliance needs repair. in materials...
Use & Care Manual
Page 23
...serial numbers have been altered, defaced of removed. No attempt to you, you may have the Cooktop repaired at any kind, (5) a failure to comply with respect to products covered by an officer of the Cooktop. 23 To the extent allowed by law, this warranty sets out your Cooktop needs warranty service and there is covered by this warranty...scratches and damages on external surfaces and exposed parts of Cooktops on which exceed the depreciated value of BSH. If your exclusive remedies with applicable state, local, city, and county electrical and/or building codes, (6) spills of food ...
...serial numbers have been altered, defaced of removed. No attempt to you, you may have the Cooktop repaired at any kind, (5) a failure to comply with respect to products covered by an officer of the Cooktop. 23 To the extent allowed by law, this warranty sets out your Cooktop needs warranty service and there is covered by this warranty...scratches and damages on external surfaces and exposed parts of Cooktops on which exceed the depreciated value of BSH. If your exclusive remedies with applicable state, local, city, and county electrical and/or building codes, (6) spills of food ...


