
Installation Instructions
Page 6
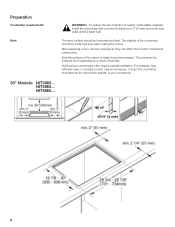
... ř WARNING:ĄTo reduce the risk of ignition of nearby combustible materials, install the countertop with a minimum distance of the cutout to your countertop. 30" Models: NIT3065... Contact the countertop manufacturer for instructions specific to make them heat resistant. Seal the surfaces of 2" (51mm) from expanding as they can affect...
... ř WARNING:ĄTo reduce the risk of ignition of nearby combustible materials, install the countertop with a minimum distance of the cutout to your countertop. 30" Models: NIT3065... Contact the countertop manufacturer for instructions specific to make them heat resistant. Seal the surfaces of 2" (51mm) from expanding as they can affect...
Installation Instructions
Page 8
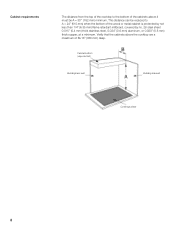
This distance can be A = 30" (762 mm) minimum. Cabinet bottom (unprotected) Building back wall Building side wall Cooking surface 8 Verify that the cabinets above it must be reduced to the bottom of the cabinets above the cooktop are a maximum of the wood or metal cabinet is protected by not less than 1/4" (6.35 mm... sheet 0.015" (0.4 mm) thick stainless steel, 0.024" (0.6 mm) aluminum, or 0.020" (0.5 mm) thick copper, at a minimum. Cabinet requirements The distance from the top of the cooktop to A = 24" (610 mm) when the bottom of B=13" (330 mm) deep.
This distance can be A = 30" (762 mm) minimum. Cabinet bottom (unprotected) Building back wall Building side wall Cooking surface 8 Verify that the cabinets above it must be reduced to the bottom of the cabinets above the cooktop are a maximum of the wood or metal cabinet is protected by not less than 1/4" (6.35 mm... sheet 0.015" (0.4 mm) thick stainless steel, 0.024" (0.6 mm) aluminum, or 0.020" (0.5 mm) thick copper, at a minimum. Cabinet requirements The distance from the top of the cooktop to A = 24" (610 mm) when the bottom of B=13" (330 mm) deep.

Short Instructions
Page 1
... and damage to the pan. Cooking table frying level Total frying time from signal min 20-30 min low 4-12 min med 10-12 min med 8-15 min low 10-20 min med.... Turn the food as usual so that it does not burn. 3. Quick Reference Guide AutoChef™ Electric cooktop model: NIT 8065 UC, NIT 8665 UC This guide is activated. A lights up . 3. The temperature symbol... 240988 • 9000373641 (1W090Z) 00-8810 5551 McFadden Ave., Huntington Beach, CA 92649 • 1-800-944-2904 www.boschappliances.com • © BSH Home Appliances Corporation 2008 Touch AutoChef™. Within ...
... and damage to the pan. Cooking table frying level Total frying time from signal min 20-30 min low 4-12 min med 10-12 min med 8-15 min low 10-20 min med.... Turn the food as usual so that it does not burn. 3. Quick Reference Guide AutoChef™ Electric cooktop model: NIT 8065 UC, NIT 8665 UC This guide is activated. A lights up . 3. The temperature symbol... 240988 • 9000373641 (1W090Z) 00-8810 5551 McFadden Ave., Huntington Beach, CA 92649 • 1-800-944-2904 www.boschappliances.com • © BSH Home Appliances Corporation 2008 Touch AutoChef™. Within ...

Instructions for Use
Page 19
...time from signal low 10-17 Min med 6-10 Min low 15-20 Min max 8-10 Min med 8-12 Min min 20-30 Min min 25-35 Min low 8-20 Min low 6-12 Min med 7-12 Min med 6-10 Min min 5-8 Min low ...frying min 2-6 Min min 2-4 Min min continuous frying max 6-12 Min low 15-25 Min min 20-30 Min min 2-10 Min low 4-12 Min med 10-15 Min med 10-12 Min med 8-15 Min min 10...-30 Min low 10-30 Min low 10-20 Min med 8-12 Min max 4-6 Min min 8-15 Min low 10-30 Min low 10-15 Min min 10-20 Min min 4-6 Min low...
...time from signal low 10-17 Min med 6-10 Min low 15-20 Min max 8-10 Min med 8-12 Min min 20-30 Min min 25-35 Min low 8-20 Min low 6-12 Min med 7-12 Min med 6-10 Min min 5-8 Min low ...frying min 2-6 Min min 2-4 Min min continuous frying max 6-12 Min low 15-25 Min min 20-30 Min min 2-10 Min low 4-12 Min med 10-15 Min med 10-12 Min med 8-15 Min min 10...-30 Min low 10-30 Min low 10-20 Min med 8-12 Min max 4-6 Min min 8-15 Min low 10-30 Min low 10-15 Min min 10-20 Min min 4-6 Min low...

Instructions for Use
Page 25
...k majority of beeps deactivated b some beeps deactivated c all the customized settings b 10 seconds c 30 seconds d 1 minute b = 1000 W minimum power b. - Restoring the default cooktop settings This clears all beeps activated* element automatic OFF function The element always switches off . Automatic ...deactivated* b minute = minimum time jj minutes= maximum time o g o h o j o k * Basic settings Alarm duration of the cooktop by the selected heat setting (from 1500 to warn that an incorrect operation has been performed. Increasing the setting level increases the power of time...
...k majority of beeps deactivated b some beeps deactivated c all the customized settings b 10 seconds c 30 seconds d 1 minute b = 1000 W minimum power b. - Restoring the default cooktop settings This clears all beeps activated* element automatic OFF function The element always switches off . Automatic ...deactivated* b minute = minimum time jj minutes= maximum time o g o h o j o k * Basic settings Alarm duration of the cooktop by the selected heat setting (from 1500 to warn that an incorrect operation has been performed. Increasing the setting level increases the power of time...

Instructions for Use
Page 28
... by laying a damp paper towel or sponge on surface Surface scratches Small scratches are smooth, clean, and dry before using the cooktop again. Push soil off the element. Recondition with bases that are common and do not affect cooking. Apply glass ceramic... salt and seasoning. Soften by using the razor blade scraper. rinse thoroughly and dry. Apply glass ceramic cooktop cleaner. For best results, apply cooktop cleaning cream daily. All these types of soil for 30 minutes. If this does not remove the marks, try a mild abrasive (Bon Ami, Soft Scrub...
... by laying a damp paper towel or sponge on surface Surface scratches Small scratches are smooth, clean, and dry before using the cooktop again. Push soil off the element. Recondition with bases that are common and do not affect cooking. Apply glass ceramic... salt and seasoning. Soften by using the razor blade scraper. rinse thoroughly and dry. Apply glass ceramic cooktop cleaner. For best results, apply cooktop cleaning cream daily. All these types of soil for 30 minutes. If this does not remove the marks, try a mild abrasive (Bon Ami, Soft Scrub...

Instructions for Use
Page 30
... is properly positioned on , the cooktop is turned back on the element. A gap may form between the countertop and the cooktop. Contact technical service. F2 disappears ...control panel. The cooking sensor is a flexible seal all the way around the cooktop. For this reason, there is too hot. They are not detrimental either to... the glass ceramic surface. Due to the functionality or the durability of the cooktop, it is too hot and has turned off. Lower the cooking sensor. ... hot is on the cooktop. Turn off was activated. Because of the mirror-smooth surface of the glass...
... is properly positioned on , the cooktop is turned back on the element. A gap may form between the countertop and the cooktop. Contact technical service. F2 disappears ...control panel. The cooking sensor is a flexible seal all the way around the cooktop. For this reason, there is too hot. They are not detrimental either to... the glass ceramic surface. Due to the functionality or the durability of the cooktop, it is too hot and has turned off. Lower the cooking sensor. ... hot is on the cooktop. Turn off was activated. Because of the mirror-smooth surface of the glass...