
Installation Instructions
Page 3
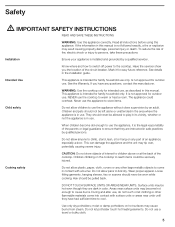
Table of contents Important Safety Instructions 4 Before you begin 5 Tools and parts needed 5 Parts included 5 Preparation 6 Installation procedure 9 Installing the heat shield 9 Secure the cooktop to countertop 10 Electrical installation 11 Test the installation 12 Technical service 13 3
Table of contents Important Safety Instructions 4 Before you begin 5 Tools and parts needed 5 Parts included 5 Preparation 6 Installation procedure 9 Installing the heat shield 9 Secure the cooktop to countertop 10 Electrical installation 11 Test the installation 12 Technical service 13 3

Installation Instructions
Page 4
... cabinets over the surface units. To eliminate the risk of the appliance. Mark it is not followed exactly, fire or shock may fit below the cooktop. Do not install refrigerators, dishwashers, unvented ovens, or washers that extends horizontally at the service panel. Refer to play with this manual. on accidentally. Never...
... cabinets over the surface units. To eliminate the risk of the appliance. Mark it is not followed exactly, fire or shock may fit below the cooktop. Do not install refrigerators, dishwashers, unvented ovens, or washers that extends horizontally at the service panel. Refer to play with this manual. on accidentally. Never...
Installation Instructions
Page 8
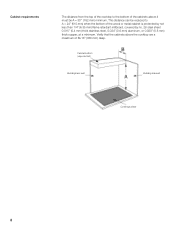
Verify that the cabinets above it must be reduced to the bottom of the cabinets above the cooktop are a maximum of the wood or metal cabinet is protected by not less than 1/4" (6.35 mm) flame retardant millboard, covered by no. 28 steel sheet 0....015" (0.4 mm) thick stainless steel, 0.024" (0.6 mm) aluminum, or 0.020" (0.5 mm) thick copper, at a minimum. This distance can be A = 30" (762 mm) minimum. Cabinet bottom (unprotected) Building back wall Building side wall Cooking surface 8 Cabinet requirements The distance from the top of the...
Verify that the cabinets above it must be reduced to the bottom of the cabinets above the cooktop are a maximum of the wood or metal cabinet is protected by not less than 1/4" (6.35 mm) flame retardant millboard, covered by no. 28 steel sheet 0....015" (0.4 mm) thick stainless steel, 0.024" (0.6 mm) aluminum, or 0.020" (0.5 mm) thick copper, at a minimum. This distance can be A = 30" (762 mm) minimum. Cabinet bottom (unprotected) Building back wall Building side wall Cooking surface 8 Cabinet requirements The distance from the top of the...
Installation Instructions
Page 9
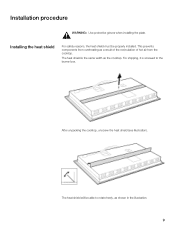
Installation procedure Installing the heat shield ř WARNING:ĄUse protective gloves when installing the plate. For safety reasons, the heat shield must be able to the burner box. For shipping, it is the same width as the cooktop. This prevents components from the cooktop. After unpacking the cooktop, unscrew the heat shield (see illustration). The heat shield will be properly installed. The heat shield is screwed to rotate freely, as a result of the recirculation of hot air from overheating as shown in the illustration. 9
Installation procedure Installing the heat shield ř WARNING:ĄUse protective gloves when installing the plate. For safety reasons, the heat shield must be able to the burner box. For shipping, it is the same width as the cooktop. This prevents components from the cooktop. After unpacking the cooktop, unscrew the heat shield (see illustration). The heat shield will be properly installed. The heat shield is screwed to rotate freely, as a result of the recirculation of hot air from overheating as shown in the illustration. 9
Installation Instructions
Page 10
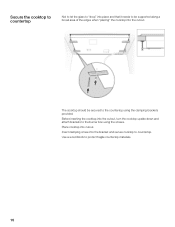
Place cooktop into the bracket and secure cooktop to countertop. Use a wood block to protect fragile countertop materials. 10 The cooktop should be supported along a broad area of the edges when placing" the cooktop into the cutout, turn the cooktop upside down and attach brackets to the burner box using the clamping brackets provided. Insert clamping screw into cutout. Secure the cooktop to countertop Not to let the glass to drop" into place and that it needs to be secured to the countertop using the screws. Before inserting the cooktop into the cutout.
Place cooktop into the bracket and secure cooktop to countertop. Use a wood block to protect fragile countertop materials. 10 The cooktop should be supported along a broad area of the edges when placing" the cooktop into the cutout, turn the cooktop upside down and attach brackets to the burner box using the clamping brackets provided. Insert clamping screw into cutout. Secure the cooktop to countertop Not to let the glass to drop" into place and that it needs to be secured to the countertop using the screws. Before inserting the cooktop into the cutout.

Installation Instructions
Page 11
... models... 50 Amp circuit breaker 240 Volts, 3 Wire, 60 Hz 208 Volts, 3 Wire, 60 Hz All with the electrical specifications on the underside of the cooktop connection. It should be located within 3 feet (~900 mm) of the appliance.
... models... 50 Amp circuit breaker 240 Volts, 3 Wire, 60 Hz 208 Volts, 3 Wire, 60 Hz All with the electrical specifications on the underside of the cooktop connection. It should be located within 3 feet (~900 mm) of the appliance.

Installation Instructions
Page 12
.... 12 Lock service panel to ground Red wire House power supply cord Black wire Certified UL connector Junction box Grounded green cable Cooktop power supply cord If the cooktop is installed and connected as specified above, it will be sure all local codes and ordinances. Connect the... cord, be completely grounded in the following order: black (L1) to black red (L2) to red green wire to prevent power from the cooktop surface, including stickers. The branch-circuit breaker ampacity, the wire sizes and the connections must meet the requirements of electric shock and fire, do ...
.... 12 Lock service panel to ground Red wire House power supply cord Black wire Certified UL connector Junction box Grounded green cable Cooktop power supply cord If the cooktop is installed and connected as specified above, it will be sure all local codes and ordinances. Connect the... cord, be completely grounded in the following order: black (L1) to black red (L2) to red green wire to prevent power from the cooktop surface, including stickers. The branch-circuit breaker ampacity, the wire sizes and the connections must meet the requirements of electric shock and fire, do ...

Short Instructions
Page 1
...The frying level options appear on the cooktop. 2. Within the next 5 seconds...-made meals Pasta (with the system pan only. Quick Reference Guide AutoChef™ Electric cooktop model: NIT 8065 UC, NIT 8665 UC This guide is not a substitute for detailed...Select the required hotplate. 3. Cooking table frying level Total frying time from signal min 20-30 min low 4-12 min med 10-12 min med 8-15 min low 10-20 min med...the included system pan only • do not place a lid on the cooktop. 2. AutoChef™ is not suitable for boiling 240988 • 9000373641 (1W090Z) 00-8810 5551...
...The frying level options appear on the cooktop. 2. Within the next 5 seconds...-made meals Pasta (with the system pan only. Quick Reference Guide AutoChef™ Electric cooktop model: NIT 8065 UC, NIT 8665 UC This guide is not a substitute for detailed...Select the required hotplate. 3. Cooking table frying level Total frying time from signal min 20-30 min low 4-12 min med 10-12 min med 8-15 min low 10-20 min med...the included system pan only • do not place a lid on the cooktop. 2. AutoChef™ is not suitable for boiling 240988 • 9000373641 (1W090Z) 00-8810 5551...

Instructions for Use
Page 3
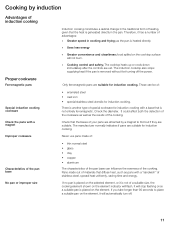
Table of contents āSafety 5 Elements that may damage the appliance 10 Energy-saving advice 10 Cooking by induction 11 Advantages of induction cooking 11 Proper cookware 11 āGetting started 13 Familiarize yourself with the appliance 13 The control panel 13 The elements... 14 Hot surface indicator 14 āOperation 15 Programming the cooktop 15 Switching the cooktop on and off 15 Adjusting the element 15 Table 16...
Table of contents āSafety 5 Elements that may damage the appliance 10 Energy-saving advice 10 Cooking by induction 11 Advantages of induction cooking 11 Proper cookware 11 āGetting started 13 Familiarize yourself with the appliance 13 The control panel 13 The elements... 14 Hot surface indicator 14 āOperation 15 Programming the cooktop 15 Switching the cooktop on and off 15 Adjusting the element 15 Table 16...
Instructions for Use
Page 5
... hanging sleeves, ties or scarves should be allowed to cause burns. Do not let potholder touch hot heating elements. WARNING: Use the cooktop only for family household use , as described in use . The appliance could be left alone or unattended in the area where the ...appliance is the legal responsibility of an appliance, especially a door. If the information in the installation guide. To reduce the risk of the cooktop. Is not approved for family household only. NEVER use a towel or bulky cloth. 5 Surface units may be worn while cooking. During...
... hanging sleeves, ties or scarves should be allowed to cause burns. Do not let potholder touch hot heating elements. WARNING: Use the cooktop only for family household use , as described in use . The appliance could be left alone or unattended in the area where the ...appliance is the legal responsibility of an appliance, especially a door. If the information in the installation guide. To reduce the risk of the cooktop. Is not approved for family household only. NEVER use a towel or bulky cloth. 5 Surface units may be worn while cooking. During...

Instructions for Use
Page 6
... from the fuse box. Always turn off the cooktop and dry the control panel. Only use the appliance if liquids or foods have spilled around the control panel. This appliance is used properly. Only ferromagnetic pans are suitable for induction cooking. If a wt sponge or a cloth ...a risk of pressure between the base and the cooktop may occur if commands are suitable. WARNING: Supervise the cooktop even if the time program function is heating up of enameled steel, cast iron or special stainless steel utensils for induction cooking. Do not heat or warm unopened food containers...
... from the fuse box. Always turn off the cooktop and dry the control panel. Only use the appliance if liquids or foods have spilled around the control panel. This appliance is used properly. Only ferromagnetic pans are suitable for induction cooking. If a wt sponge or a cloth ...a risk of pressure between the base and the cooktop may occur if commands are suitable. WARNING: Supervise the cooktop even if the time program function is heating up of enameled steel, cast iron or special stainless steel utensils for induction cooking. Do not heat or warm unopened food containers...
Instructions for Use
Page 7
...fire if left on high temperature settings. Smother flames from being switched on accidentally. WARNING: REDUCE THE RISK OF FIRE: a) Never leave the cooktop unattended especially at the service panel and lock the panel to a qualified servicer. b) Leave the hood ventilator on when flambéing food...and can cause smoke and some foods and oils may unexpectedly switch itself off at high temperature settings. Keep an eye on the cooktop and do not allow anything to extinguish flames. Boilovers can no longer be certain that is specifically designed for use this manual....
...fire if left on high temperature settings. Smother flames from being switched on accidentally. WARNING: REDUCE THE RISK OF FIRE: a) Never leave the cooktop unattended especially at the service panel and lock the panel to a qualified servicer. b) Leave the hood ventilator on when flambéing food...and can cause smoke and some foods and oils may unexpectedly switch itself off at high temperature settings. Keep an eye on the cooktop and do not allow anything to extinguish flames. Boilovers can no longer be certain that is specifically designed for use this manual....

Instructions for Use
Page 8
... for ISM equipment pursuant to part 18 of your back to an exit. Do not place metal objects on and off during a cooktop fire. Turn the appliance on the induction cooktop Do not leave lids or other electronic appliance or medical device (such as they could cause burns. However, if you know how...
... for ISM equipment pursuant to part 18 of your back to an exit. Do not place metal objects on and off during a cooktop fire. Turn the appliance on the induction cooktop Do not leave lids or other electronic appliance or medical device (such as they could cause burns. However, if you know how...
Instructions for Use
Page 10
..., it is larger in diameter than the element, otherwise half the energy will melt if placed on the control panel, the display area or the cooktop frame. Avoid leaving empty pans on it is generally greater than the diameter of the pan, bear in damage to the amount of spillage. Salt..., sugar and sand particles may scratch the cooktop. The use of the pan. D Ensure that this means the bottom is used, please follow the manufacturer's instructions. This will use the...
..., it is larger in diameter than the element, otherwise half the energy will melt if placed on the control panel, the display area or the cooktop frame. Avoid leaving empty pans on it is generally greater than the diameter of the pan, bear in damage to the amount of spillage. Salt..., sugar and sand particles may scratch the cooktop. The use of the pan. D Ensure that this means the bottom is used, please follow the manufacturer's instructions. This will use the...
Instructions for Use
Page 11
...find out if they are suitable for induction cooking. The cooktop heats up or cools down immediately after the controls are suitable for induction cooking with a "sandwich" of : S enameled steel S cast iron S special stainless steel utensils for induction cooking. as pans with a base ...that the heat is heated directly. The induction cooktop also stops supplying heat if the pan is...
...find out if they are suitable for induction cooking. The cooktop heats up or cools down immediately after the controls are suitable for induction cooking with a "sandwich" of : S enameled steel S cast iron S special stainless steel utensils for induction cooking. as pans with a base ...that the heat is heated directly. The induction cooktop also stops supplying heat if the pan is...

Instructions for Use
Page 12
The cooktop has an internal safety system, but an empty pan could heat up empty pans, or use the element that best matches the diameter of the ..., and will activate only single zone or the entire zone and supply the proper power to react and the pan could melt and damage the cooktop glass. Therefore, you should use pans with a thin base. Depending on the material of your pan. These elements can recognize different sized pans. In the...
The cooktop has an internal safety system, but an empty pan could heat up empty pans, or use the element that best matches the diameter of the ..., and will activate only single zone or the entire zone and supply the proper power to react and the pan could melt and damage the cooktop glass. Therefore, you should use pans with a thin base. Depending on the material of your pan. These elements can recognize different sized pans. In the...
Instructions for Use
Page 13
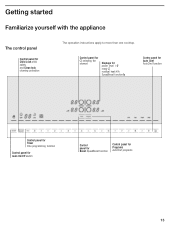
Control panel for Î selecting the element Displays for power level 1Ć9 ready 0 residual heat H/h SpeedBoost function n Contro panel for Auto Chef AutoChef function Control panel for Timer time programming function Control panel for main On/Off switch Control panel for Boost SpeedBoost function Control panel for Child Lock child safety and Clean lock cleaning protection The operation instructions apply to more than one cooktop. āGetting started Familiarize yourself with the appliance The control panel Control panel for Programs AutoChef programs 13
Control panel for Î selecting the element Displays for power level 1Ć9 ready 0 residual heat H/h SpeedBoost function n Contro panel for Auto Chef AutoChef function Control panel for Timer time programming function Control panel for main On/Off switch Control panel for Boost SpeedBoost function Control panel for Child Lock child safety and Clean lock cleaning protection The operation instructions apply to more than one cooktop. āGetting started Familiarize yourself with the appliance The control panel Control panel for Programs AutoChef programs 13
Instructions for Use
Page 14
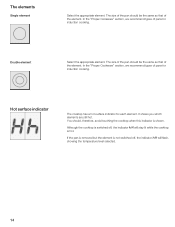
... the same as that of pans for induction cooking. If the pan is removed but the element is shown. Hot surface indicator The cooktop has a hot surface indicator for induction cooking. It shows you which elements are still hot. Although the cooktop is switched off , the indicator s/t... will stay lit while the cooktop is hot. In the "Proper Cookware" section, we...
... the same as that of pans for induction cooking. If the pan is removed but the element is shown. Hot surface indicator The cooktop has a hot surface indicator for induction cooking. It shows you which elements are still hot. Although the cooktop is switched off , the indicator s/t... will stay lit while the cooktop is hot. In the "Proper Cookware" section, we...
Instructions for Use
Page 15
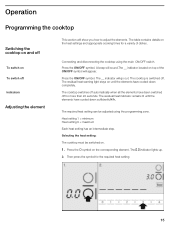
... switched on the corresponding element. Heat setting 1 = minimum Heat setting 9 = maximum Each heat setting has an intermediate step. The cooktop switches off automatically when all the elements have been switched off Indicators Adjusting the element This section will show you how to adjust the ...elements. āOperation Programming the cooktop Switching the cooktop on and off To switch on To switch off for more than 20 seconds. The residual heat indicator remains lit until...
... switched on the corresponding element. Heat setting 1 = minimum Heat setting 9 = maximum Each heat setting has an intermediate step. The cooktop switches off automatically when all the elements have been switched off Indicators Adjusting the element This section will show you how to adjust the ...elements. āOperation Programming the cooktop Switching the cooktop on and off To switch on To switch off for more than 20 seconds. The residual heat indicator remains lit until...
Instructions for Use
Page 18
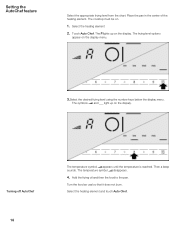
The cooktop must be on the display menu. 3.Select the desired frying level using the number keys below the display menu. The frying level options appear on . 1. ...
The cooktop must be on the display menu. 3.Select the desired frying level using the number keys below the display menu. The frying level options appear on . 1. ...


