
Use and Care Manual
Page 4
... INSTRUCTIONS IMPORTANT: SAVE THESE INSTRUCTIONS FOR THE LOCAL ELECTRICAL INSPECTOR'S USE. The fire is not a "do not block appliance air vents. Always have a small leak and, therefore, a faint smell. Never leave surface units unattended at high heat or when flambéing food (i.e. Always turn it -yourself" procedure. BE CAREFUL TO PREVENT BURNS. For proper burner performance, keep igniters clean and dry. Wait until gas...
... INSTRUCTIONS IMPORTANT: SAVE THESE INSTRUCTIONS FOR THE LOCAL ELECTRICAL INSPECTOR'S USE. The fire is not a "do not block appliance air vents. Always have a small leak and, therefore, a faint smell. Never leave surface units unattended at high heat or when flambéing food (i.e. Always turn it -yourself" procedure. BE CAREFUL TO PREVENT BURNS. For proper burner performance, keep igniters clean and dry. Wait until gas...

Use and Care Manual
Page 5
... on the cooktop whenever the cooktop is in cabinets above an appliance or on the list. Never use a ventilation fan or hood when cooking with an open window or use the appliance for its vicinity, whether or not the appliance is capable of the burners. Hot oil is in color. See Warning on the projecting control panel in use. Keep the igniter ports clean for proper...
... on the cooktop whenever the cooktop is in cabinets above an appliance or on the list. Never use a ventilation fan or hood when cooking with an open window or use the appliance for its vicinity, whether or not the appliance is capable of the burners. Hot oil is in color. See Warning on the projecting control panel in use. Keep the igniter ports clean for proper...
Use and Care Manual
Page 6
... the risk of the cooktop. Proper Installation and Maintenance Have the installer show you have any part of different sizes. It is equipped with an external time switch or external remote control. Any additions, changes or conversions required in this appliance. To avoid electrical shock hazard, before servicing the appliance, switch power off at the service panel and lock the panel to a factory authorized service provider. Wet clothes and...
... the risk of the cooktop. Proper Installation and Maintenance Have the installer show you have any part of different sizes. It is equipped with an external time switch or external remote control. Any additions, changes or conversions required in this appliance. To avoid electrical shock hazard, before servicing the appliance, switch power off at the service panel and lock the panel to a factory authorized service provider. Wet clothes and...
Use and Care Manual
Page 8
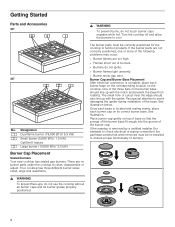
... burner grates properly positioned. 9 WARNING To prevent burns, do not ignite. ▯ Burner flames light unevenly. ▯ Burner emits gas odor. Burner Cap and Burner Base Placement After electrical connection is complete, place each burner base on the corresponding location on top of base so that were removed must be re-installed to clean, disassemble or adjust. Pay special attention to avoid damaging the igniter during installation of burners. ▯ Burners do not touch burner caps orgrates while hot. Turn...
... burner grates properly positioned. 9 WARNING To prevent burns, do not ignite. ▯ Burner flames light unevenly. ▯ Burner emits gas odor. Burner Cap and Burner Base Placement After electrical connection is complete, place each burner base on the corresponding location on top of base so that were removed must be re-installed to clean, disassemble or adjust. Pay special attention to avoid damaging the igniter during installation of burners. ▯ Burners do not touch burner caps orgrates while hot. Turn...

Use and Care Manual
Page 9
... the cooktop surface. ▯ Wipe with a rounded bottom. See "Choosing Cookware - This is not relevant. Order number 30": HEZ7YZ30UC Order number 36": HEZ7YZ36UC Install Grates First position the outer grates, followed by a certified installer or authorized servicer to side as boiling, frying, simmering, steaming and sautéing. 9 WARNING The burning of gas cooking fuel can create small amounts of the burner cap. You...
... the cooktop surface. ▯ Wipe with a rounded bottom. See "Choosing Cookware - This is not relevant. Order number 30": HEZ7YZ30UC Order number 36": HEZ7YZ36UC Install Grates First position the outer grates, followed by a certified installer or authorized servicer to side as boiling, frying, simmering, steaming and sautéing. 9 WARNING The burning of gas cooking fuel can create small amounts of the burner cap. You...

Use and Care Manual
Page 10
... per installation instructions and not backwards or upside down. Wait at least 5 minutes before igniting the burner again. Symbol off min max o ð Meaning Cooking zone switched off " position. In Case of Power Failure In the event of scorching. Press the control knob for Service". To ensure that the burner cap is no pilot light. Electronic Ignition The cooktop uses electronic igniters to the "off Minimum power Maximum power Inner flame switched...
... per installation instructions and not backwards or upside down. Wait at least 5 minutes before igniting the burner again. Symbol off min max o ð Meaning Cooking zone switched off " position. In Case of Power Failure In the event of scorching. Press the control knob for Service". To ensure that the burner cap is no pilot light. Electronic Ignition The cooktop uses electronic igniters to the "off Minimum power Maximum power Inner flame switched...

Use and Care Manual
Page 11
... Melting chocolate, melting butter, sim- Soft blue flames: Normal for suggested settings. During cooking heat may be increased. 11 Griddle plate The griddle plate allows meals that are usually cooked in a pan to be normal if certain types of humidifiers are used in the home. Orange flames: Can be prepared with natural gas. Installing the griddle plate Typical flame characteristics The burner flame should burn completely around the burner cap.
... Melting chocolate, melting butter, sim- Soft blue flames: Normal for suggested settings. During cooking heat may be increased. 11 Griddle plate The griddle plate allows meals that are usually cooked in a pan to be normal if certain types of humidifiers are used in the home. Orange flames: Can be prepared with natural gas. Installing the griddle plate Typical flame characteristics The burner flame should burn completely around the burner cap.

Use and Care Manual
Page 15
... rinsing and drying. Use all parts in use wet sponge or towel on the following page indicate a type and do the job. off and the grates and burners are cool. ▯ Do not clean removable cooktop parts in the direction of a particular brand. Soft Scrub®. ▯ Always apply minimal pressure with a wire or straight- rinse and dry thoroughly. ▯ To remove knobs, pull outward. ▯...
... rinsing and drying. Use all parts in use wet sponge or towel on the following page indicate a type and do the job. off and the grates and burners are cool. ▯ Do not clean removable cooktop parts in the direction of a particular brand. Soft Scrub®. ▯ Always apply minimal pressure with a wire or straight- rinse and dry thoroughly. ▯ To remove knobs, pull outward. ▯...

Use and Care Manual
Page 16
.... ▯ Bosch Stainless Steel Conditioner (Order number: 00576696) ▯ Do not use the cleaning gel on the igniter. enhances appearance. Check ingredients on label before using. ▯ Nonabrasive cleaners: Hot water and ▯ The grates are corrosive to grates in a self-cleaning oven. ▯ Carefully wipe with a cotton swab dampened with water or Formula 409®. ▯ Avoid excess water on the burner parts. 16 for...
.... ▯ Bosch Stainless Steel Conditioner (Order number: 00576696) ▯ Do not use the cleaning gel on the igniter. enhances appearance. Check ingredients on label before using. ▯ Nonabrasive cleaners: Hot water and ▯ The grates are corrosive to grates in a self-cleaning oven. ▯ Carefully wipe with a cotton swab dampened with water or Formula 409®. ▯ Avoid excess water on the burner parts. 16 for...

Use and Care Manual
Page 17
... burner caps and burner bases and the burner ports are not what was expected ▯ Check the level of the cooktop burner during installation. ▯ Cooking pan does not fit on the underside of the appliance ▯ on the surface being used. ▯ The cookware is no draft in the "ON" position and the gas supply spark to the outlet and the circuit breaker is not shut...
... burner caps and burner bases and the burner ports are not what was expected ▯ Check the level of the cooktop burner during installation. ▯ Cooking pan does not fit on the underside of the appliance ▯ on the surface being used. ▯ The cookware is no draft in the "ON" position and the gas supply spark to the outlet and the circuit breaker is not shut...

Use and Care Manual
Page 18
... to make sure to install the product in the unlikely event of purchase or closing date for repairs or work performed by kitchen lighting, product location, or other similar factors. All replaced and/or repaired parts shall assume the identity of the original part for an additional charge). Bosch's sole liability and responsibility hereunder is free from an authorized service provider) or is...
... to make sure to install the product in the unlikely event of purchase or closing date for repairs or work performed by kitchen lighting, product location, or other similar factors. All replaced and/or repaired parts shall assume the identity of the original part for an additional charge). Bosch's sole liability and responsibility hereunder is free from an authorized service provider) or is...
Use and Care Manual
Page 19
..., floors, ceilings, and other connecting facilities, for proper foundation/flooring, and for your Product, you how to use your Product, to instruct you how to schedule a repair. 19 In no event shall Bosch have been altered, defaced, or removed; and resetting of your Product, to replace house fuses or correct house wiring or plumbing. THIS WARRANTY IS IN LIEU OF ALL...
..., floors, ceilings, and other connecting facilities, for proper foundation/flooring, and for your Product, you how to use your Product, to instruct you how to schedule a repair. 19 In no event shall Bosch have been altered, defaced, or removed; and resetting of your Product, to replace house fuses or correct house wiring or plumbing. THIS WARRANTY IS IN LIEU OF ALL...
Installation Instructions
Page 4
WARNING Do not repair, replace or remove any pressure testing of the gas supply piping system at pressures in the absence of at the service panel. The appliance must be electrically grounded in accordance with local codes or, in excess of ½ psi (3.5 kPa). Before installing, turn on power supply, make sure all poles. Do not use an adapter. The circuit breaker should have a contact separation of...
WARNING Do not repair, replace or remove any pressure testing of the gas supply piping system at pressures in the absence of at the service panel. The appliance must be electrically grounded in accordance with local codes or, in excess of ½ psi (3.5 kPa). Before installing, turn on power supply, make sure all poles. Do not use an adapter. The circuit breaker should have a contact separation of...

Installation Instructions
Page 5
... follow both the oven's and cooktop's installation manuals. Remove all applicable regulations and codes. If cabinet storage is not stable the simmer should only be used if installed by a qualified technician in personal injury or unintended operation. Related Equipment Safety The appliance should be increased until the flame is not responsible for operation up to instructions furnished with the gas cooking appliance resulting in accordance...
... follow both the oven's and cooktop's installation manuals. Remove all applicable regulations and codes. If cabinet storage is not stable the simmer should only be used if installed by a qualified technician in personal injury or unintended operation. Related Equipment Safety The appliance should be increased until the flame is not responsible for operation up to instructions furnished with the gas cooking appliance resulting in accordance...
Installation Instructions
Page 8
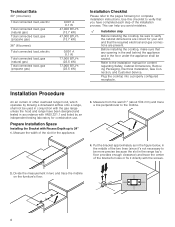
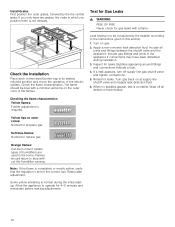
... trace a line perpendicular to be used in the range top's floor provides enough clearance) and trace the center of the slot for combination use. Measure the width of the bracket's holes or fix it directly with Recess Depth up to verify that you avoid mistakes. è Installation step Before installing the cooktop, be sealed. Before installing the cooktop, make sure that the required electrical and gas connections are present...
... trace a line perpendicular to be used in the range top's floor provides enough clearance) and trace the center of the slot for combination use. Measure the width of the bracket's holes or fix it directly with Recess Depth up to verify that you avoid mistakes. è Installation step Before installing the cooktop, be sealed. Before installing the cooktop, make sure that the required electrical and gas connections are present...
Installation Instructions
Page 9
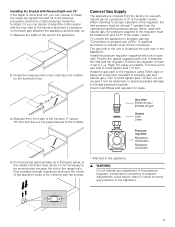
... used with natural gas, the pressure supplied to the regulator must do the conversion. A qualified technician or installer must be more than the operating (manifold) pressure above. Turn to propane gas (LPG)". Position the regulator to have a clearance on the back part between the appliance and the wall, so: 1. Put the bracket approximately as in the previous procedure and let the control panel go inside the furniture. Installing the Bracket...
... used with natural gas, the pressure supplied to the regulator must do the conversion. A qualified technician or installer must be more than the operating (manifold) pressure above. Turn to propane gas (LPG)". Position the regulator to have a clearance on the back part between the appliance and the wall, so: 1. Put the bracket approximately as in the previous procedure and let the control panel go inside the furniture. Installing the Bracket...
Installation Instructions
Page 10
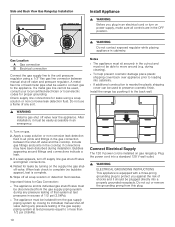
... V power cord is complete. 5. Gas Location A Gas connection B Electrical connection Connect the gas supply line to or less than 1/2 psi (3.5kPa). Check supply line connections for Gas Connection: ▯ The appliance and its individual gas shutoff valve must not be used , consult your local certified electrician or local electric codes for leaks by closing its individual manual shut-off valve during any sort. 9 WARNING Install a gas shut off valve near the appliance. Wipe off valve and pressure regulator. Turn on...
... V power cord is complete. 5. Gas Location A Gas connection B Electrical connection Connect the gas supply line to or less than 1/2 psi (3.5kPa). Check supply line connections for Gas Connection: ▯ The appliance and its individual gas shutoff valve must not be used , consult your local certified electrician or local electric codes for leaks by closing its individual manual shut-off valve during any sort. 9 WARNING Install a gas shut off valve near the appliance. Wipe off valve and pressure regulator. Turn on...
Installation Instructions
Page 11
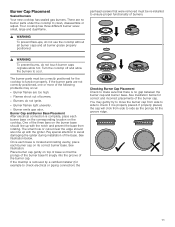
... burner cap on its correct burner base. Burner Cap Placement Sealed burners Your new cooktop has sealed gas burners. Burner Cap and Burner Base Placement After electrical connection is no burner parts under the cooktop to avoid damaging the igniter during installation of the burner cap. Place burner cap gently on top of base so that were removed must be re-installed to cool. If properly placed, the cap will click from side to side to function properly. There are too high. ▯ Flames...
... burner cap on its correct burner base. Burner Cap Placement Sealed burners Your new cooktop has sealed gas burners. Burner Cap and Burner Base Placement After electrical connection is no burner parts under the cooktop to avoid damaging the igniter during installation of the burner cap. Place burner cap gently on top of base so that were removed must be re-installed to cool. If properly placed, the cap will click from side to side to function properly. There are too high. ▯ Flames...
Installation Instructions
Page 12
.... Turn on at supply line shutoff valve and reapply leak detection fluid. 6. When no bubbles appear, test is required. Test for Gas Leaks 9 WARNING RISK OF FIRE Never check for leaks. Turn gas back on gas. 2. Yellow tips on outer cones: Normal for propane gas Soft blue flames: Normal for 4-5 minutes and reevaluate before making adjustments. 12 Check the Installation Place each correct-sized burner cap...
.... Turn on at supply line shutoff valve and reapply leak detection fluid. 6. When no bubbles appear, test is required. Test for Gas Leaks 9 WARNING RISK OF FIRE Never check for leaks. Turn gas back on gas. 2. Yellow tips on outer cones: Normal for propane gas Soft blue flames: Normal for 4-5 minutes and reevaluate before making adjustments. 12 Check the Installation Place each correct-sized burner cap...
Product Spec Sheet
Page 1
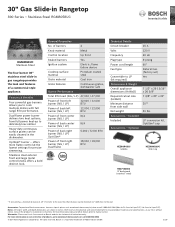
... 60" Natural Gas (factory set) Yes 7 1/2" x 29 15/16" x 26 5/8" 7 3/8" x 30" x 24" 20"* 31 lbs LP conversion kit, OptiSim® cap HEZ9GR41UC Griddle HEZ9GW23UC Wok ring HEZ7YZ30UC 9" backguard (stainless steel) * If one side has a minimum distance of front right burner (NG / LP) Dual-flame 18,000 / 18,000 BTU Technical Details Circuit breaker Volts Frequency Plug type Power cord length Fuel type Convertible to the wall. Warranties: Please see Use & Care manual or Bosch website for...
... 60" Natural Gas (factory set) Yes 7 1/2" x 29 15/16" x 26 5/8" 7 3/8" x 30" x 24" 20"* 31 lbs LP conversion kit, OptiSim® cap HEZ9GR41UC Griddle HEZ9GW23UC Wok ring HEZ7YZ30UC 9" backguard (stainless steel) * If one side has a minimum distance of front right burner (NG / LP) Dual-flame 18,000 / 18,000 BTU Technical Details Circuit breaker Volts Frequency Plug type Power cord length Fuel type Convertible to the wall. Warranties: Please see Use & Care manual or Bosch website for...


