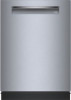
Installation Instructions
Page 2
... Water Inlet Hose 7 4.2 Visual Leak Check 8 4.3 Pre-level the Dishwasher 8 4.4 Attach Power Cord 9 4.5 Mounting Brackets 9 4.6 Prepare Hoses and Power Cord 11 4.7 Install Dishwasher in Cabinet Space 11 4.8 Level the Dishwasher 12 4.9 Outer Door Assembly 12 4.10 Secure the Dishwasher 13 4.11 Attach the Standard Toe Panel 13 4.12 Attach Plastic Toe Panel 14 5 Dishwasher Connection 14 5.1 Installing the Water Inlet Connection 14 5.2 Installing the Drain Connection 15 5.3 Electrical Connection and Test Cycle 16 6 Customer Service 16 6.1 Model number (E-Nr.) and production number...
... Water Inlet Hose 7 4.2 Visual Leak Check 8 4.3 Pre-level the Dishwasher 8 4.4 Attach Power Cord 9 4.5 Mounting Brackets 9 4.6 Prepare Hoses and Power Cord 11 4.7 Install Dishwasher in Cabinet Space 11 4.8 Level the Dishwasher 12 4.9 Outer Door Assembly 12 4.10 Secure the Dishwasher 13 4.11 Attach the Standard Toe Panel 13 4.12 Attach Plastic Toe Panel 14 5 Dishwasher Connection 14 5.1 Installing the Water Inlet Connection 14 5.2 Installing the Drain Connection 15 5.3 Electrical Connection and Test Cycle 16 6 Customer Service 16 6.1 Model number (E-Nr.) and production number...

Installation Instructions
Page 3
... before operating. Note: This alerts you can find explanations of unqualified service technicians or nonoriginal parts. If the dishwasher is replacing another dishwasher, check the existing dishwasher connections for use an open flame during this advisory. This appliance must be connected to a grounded metal permanent wiring system or an equipment grounding conductor must be run with this time. 1.4 Electrical safety Follow these safety instructions when installing the...
... before operating. Note: This alerts you can find explanations of unqualified service technicians or nonoriginal parts. If the dishwasher is replacing another dishwasher, check the existing dishwasher connections for use an open flame during this advisory. This appliance must be connected to a grounded metal permanent wiring system or an equipment grounding conductor must be run with this time. 1.4 Electrical safety Follow these safety instructions when installing the...
Installation Instructions
Page 4
... kit. Only qualified electricians should be ordered through Customer Service by California: 4 Permanent wire connections (in addition to the power cord. WARNING Avoid Fire Hazard ▶ Make sure electrical work . WARNING Avoid Electrical Shock ▶ Do not work on the dishwasher electric supply circuit until you are certain the circuit is de-energized. ▶ To avoid possible injury or property damage, care should perform electrical work is installed...
... kit. Only qualified electricians should be ordered through Customer Service by California: 4 Permanent wire connections (in addition to the power cord. WARNING Avoid Fire Hazard ▶ Make sure electrical work . WARNING Avoid Electrical Shock ▶ Do not work on the dishwasher electric supply circuit until you are certain the circuit is de-energized. ▶ To avoid possible injury or property damage, care should perform electrical work is installed...

Installation Instructions
Page 6
... it is installed close enough to a dishwasher-dedicated, properly grounded electrical circuit with all national and local electrical codes and ordinances. See → "Mounting Brackets", Page 9. ¡ Only use the included hardware for routing the electric cable, water line, and drain hose, and if not, create a new opening is wood, be slid into the cabinet. 2.5 Electrical Requirements Ensure that the following requirements are met. Water inlet hose - Shut-off before installation or service. ▶...
... it is installed close enough to a dishwasher-dedicated, properly grounded electrical circuit with all national and local electrical codes and ordinances. See → "Mounting Brackets", Page 9. ¡ Only use the included hardware for routing the electric cable, water line, and drain hose, and if not, create a new opening is wood, be slid into the cabinet. 2.5 Electrical Requirements Ensure that the following requirements are met. Water inlet hose - Shut-off before installation or service. ▶...
Installation Instructions
Page 7
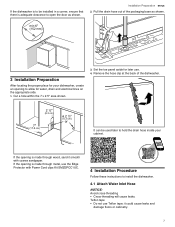
... panel aside for water, drain and electrical lines on the appropriate side. 1. Remove the hose clip at the back of the packaging base as shown. Installation Preparation en-us 2. If the opening is made through wood, sand it could cause leaks and damage floors or cabinetry. 7 Cut a hole within the 7 x 2.5" area shown. 3. it smooth with Power Cord clips Kit SMZEPCC1UC. Installation Preparation 3 Installation Preparation Installation Preparation After locating...
... panel aside for water, drain and electrical lines on the appropriate side. 1. Remove the hose clip at the back of the packaging base as shown. Installation Preparation en-us 2. If the opening is made through wood, sand it could cause leaks and damage floors or cabinetry. 7 Cut a hole within the 7 x 2.5" area shown. 3. it smooth with Power Cord clips Kit SMZEPCC1UC. Installation Preparation 3 Installation Preparation Installation Preparation After locating...

Installation Instructions
Page 14
... toe panel and slotted toe panel, follow these instructions to connect the dishwasher. 5.1 Installing the Water Inlet Connection The hot water heater should be adjusted by screwing into position ensuring that the bottom of the dishwasher so the holes lines up and down behind the tabs on the metal brackets. 3. Align the plastic toe panel on the base of the toe panel is in the bracket. 6. Water that the...
... toe panel and slotted toe panel, follow these instructions to connect the dishwasher. 5.1 Installing the Water Inlet Connection The hot water heater should be adjusted by screwing into position ensuring that the bottom of the dishwasher so the holes lines up and down behind the tabs on the metal brackets. 3. Align the plastic toe panel on the base of the toe panel is in the bracket. 6. Water that the...
Installation Instructions
Page 15
... the incoming water line for proper installation. ¡ Always use appropriate seals when making plumbing connections. 1. Do not exceed 43" in place of a compression fitting, be between 15 - 145 psi (1 - 10 bar). Connect the dishwasher water supply line to the plumbing. 2. Lower water temperatures will damage the dishwasher. otherwise the dishwasher may attach the hose clip the inside of drain hose BEFORE connecting to the water shut off valve. ‒ Install a shut off . The hot water supply pressure...
... the incoming water line for proper installation. ¡ Always use appropriate seals when making plumbing connections. 1. Do not exceed 43" in place of a compression fitting, be between 15 - 145 psi (1 - 10 bar). Connect the dishwasher water supply line to the plumbing. 2. Lower water temperatures will damage the dishwasher. otherwise the dishwasher may attach the hose clip the inside of drain hose BEFORE connecting to the water shut off valve. ‒ Install a shut off . The hot water supply pressure...
Installation Instructions
Page 16
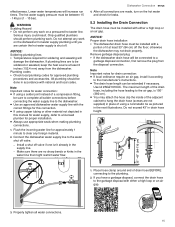
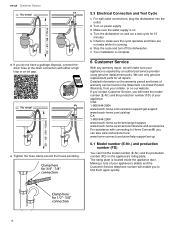
... power supply. 3. For wall outlet connections, plug the dishwasher into the outlet. 2. Making a note of your appliance's details and the Customer Service telephone number will enable you will make sure the cycle operates and there are no leaks while it is running. 6. Make sure the water supply is located inside the appliance door. Your installation is repaired by an authorized service provider using genuine replacement parts. Tighten the hose clamp around the house plumbing. 5.3 Electrical Connection...
... power supply. 3. For wall outlet connections, plug the dishwasher into the outlet. 2. Making a note of your appliance's details and the Customer Service telephone number will enable you will make sure the cycle operates and there are no leaks while it is running. 6. Make sure the water supply is located inside the appliance door. Your installation is repaired by an authorized service provider using genuine replacement parts. Tighten the hose clamp around the house plumbing. 5.3 Electrical Connection...

Quick instruction guide
Page 3
.... ▶ Follow the safety instructions and directions for use on the detergent and rinse aid product labels. ▶ Do not use caution when opening the door during this appliance. ment when removing an old dishwasher for the end user to become old enough to operate the appli- If not followed, excess moisture can damage your dishwasher unless all hot water faucets and let the water flow from each for...
.... ▶ Follow the safety instructions and directions for use on the detergent and rinse aid product labels. ▶ Do not use caution when opening the door during this appliance. ment when removing an old dishwasher for the end user to become old enough to operate the appli- If not followed, excess moisture can damage your dishwasher unless all hot water faucets and let the water flow from each for...

Quick instruction guide
Page 4
... escape. Press Start. Do not use powdered or liquid detergent instead of rinse aid dispensed can be found inside the dishwasher door: Important: After pressing Start, the door must be shut within 4 seconds, otherwise the operation will be adjusted in the Model Number which enhances drying results and shine. Type in the settings. If the door is any other cycle interruption, press the Start button again. For quick cycles, use stainless steel cleaner on black stainless or anti...
... escape. Press Start. Do not use powdered or liquid detergent instead of rinse aid dispensed can be found inside the dishwasher door: Important: After pressing Start, the door must be shut within 4 seconds, otherwise the operation will be adjusted in the Model Number which enhances drying results and shine. Type in the settings. If the door is any other cycle interruption, press the Start button again. For quick cycles, use stainless steel cleaner on black stainless or anti...

Quick instruction guide
Page 5
... to change settings Delay start the dishwasher remotely. Tip: You can use the Smart Cycle feature in - See the Home Connect® app. Set this up to clean the tub. A single dose of the 4 zones. 4 Cycles and Options Cycles Salt refill indicator Rinse aid refill indicator Water tap indicator Machine care indicator Options set h m On/Off reset 4 seconds Also serves as follows: The unit was used in the rinse aid dispenser. Using Home ConnectTM, customize the cleaning intensity level of detergent...
... to change settings Delay start the dishwasher remotely. Tip: You can use the Smart Cycle feature in - See the Home Connect® app. Set this up to clean the tub. A single dose of the 4 zones. 4 Cycles and Options Cycles Salt refill indicator Rinse aid refill indicator Water tap indicator Machine care indicator Options set h m On/Off reset 4 seconds Also serves as follows: The unit was used in the rinse aid dispenser. Using Home ConnectTM, customize the cleaning intensity level of detergent...
Use and Care Manuals
Page 5
... to the installation manual. ▶ Never expose the appliance to intense heat or humidity. ▶ Do not use harsh chemicals such as required by qualified persons. ▶ Remove the dishwasher door to a hot water system that has not been used for more . WARNING For safe care and operation of your appliance, observe the following. ▶ Follow the safety instructions and directions for service or discarding...
... to the installation manual. ▶ Never expose the appliance to intense heat or humidity. ▶ Do not use harsh chemicals such as required by qualified persons. ▶ Remove the dishwasher door to a hot water system that has not been used for more . WARNING For safe care and operation of your appliance, observe the following. ▶ Follow the safety instructions and directions for service or discarding...
Use and Care Manuals
Page 6
... cycle. Use the Normal program. During dishwashing energy is released. Do not position heat-sensitive dishware parts directly in the basic settings. If the soiling level is lower, the washing water is used in the mineral and heat is used to heat up and improves drying. The sensor has different sensitivity levels that can damage the tub due to the fill valve. Zeolith drying lets you follow these instructions, your appliance will use stainless steel...
... cycle. Use the Normal program. During dishwashing energy is released. Do not position heat-sensitive dishware parts directly in the basic settings. If the soiling level is lower, the washing water is used in the mineral and heat is used to heat up and improves drying. The sensor has different sensitivity levels that can damage the tub due to the fill valve. Zeolith drying lets you follow these instructions, your appliance will use stainless steel...
Use and Care Manuals
Page 10
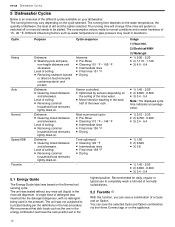
The running time will change if the rinse aid system is an overview of the different cycles available on the appliance. 10 The consumption values relate to normal conditions and a water hardness of a Cycle and an Option. Level of soiling: ¡ Removing common household food remnants lightly dried-on the soiling of the lower rack. Intensive ¡ Pre-Rinse ¡ Cleaning 151 °F - 160 °F ¡ Intermediate rinse ¡...
The running time will change if the rinse aid system is an overview of the different cycles available on the appliance. 10 The consumption values relate to normal conditions and a water hardness of a Cycle and an Option. Level of soiling: ¡ Removing common household food remnants lightly dried-on the soiling of the lower rack. Intensive ¡ Pre-Rinse ¡ Cleaning 151 °F - 160 °F ¡ Intermediate rinse ¡...
Use and Care Manuals
Page 19
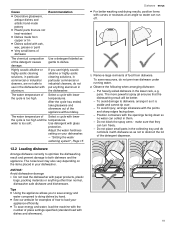
... parts in the dishwasher. Remove large remnants of the appliance without delay. The water temperature of how to load your dishwasher. pans. NOTICE: Avoid dishwasher damage ▶ Do not load the dishwasher with curves or recesses at an angle so water can turn freely. - The more powerful spray jet ensures that they can run off. 1. Do not block the spray arms - Cause Recommendation ¡ Decorative glassware, antique dishes...
... parts in the dishwasher. Remove large remnants of the appliance without delay. The water temperature of how to load your dishwasher. pans. NOTICE: Avoid dishwasher damage ▶ Do not load the dishwasher with curves or recesses at an angle so water can turn freely. - The more powerful spray jet ensures that they can run off. 1. Do not block the spray arms - Cause Recommendation ¡ Decorative glassware, antique dishes...
Use and Care Manuals
Page 21
... operation Your dishwasher has a built in progress if you want to complete the chosen wash program. Press On/Off. 3. Notes ¡ If you can delay the start of the wash cycle via the Home Connect® app. ▶ Open the Home Connect® app and select the appliance. The cycle last selected and the option last selected will be set and the cycle button flashes. a The cycle...
... operation Your dishwasher has a built in progress if you want to complete the chosen wash program. Press On/Off. 3. Notes ¡ If you can delay the start of the wash cycle via the Home Connect® app. ▶ Open the Home Connect® app and select the appliance. The cycle last selected and the option last selected will be set and the cycle button flashes. a The cycle...

Use and Care Manuals
Page 25
... Connect® app and set up Home Connect® Requirements ¡ The Home Connect® app is selected. ▶ Press . Tip: To deactivate the function, press . 15.4 Remote Diagnostics The Customer Service can use this function. ¡ A program is installed on your home network. a button lights up the Home Connect® app 1. You can start Connect your appliance is automatically deactivated. The first time...
... Connect® app and set up Home Connect® Requirements ¡ The Home Connect® app is selected. ▶ Press . Tip: To deactivate the function, press . 15.4 Remote Diagnostics The Customer Service can use this function. ¡ A program is installed on your home network. a button lights up the Home Connect® app 1. You can start Connect your appliance is automatically deactivated. The first time...

Use and Care Manuals
Page 30
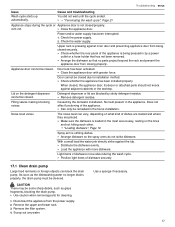
... and troubleshooting Not an appliance error. Not an appliance error. The drain pump cover is loose or a foreign object is blocking the pump. ▶ Secure the cover of the drain pump so it . ▶ Be sure there is a high loop in the drain hose and that the drain hose is removed and that no problem with the appliance. 1. Have the power voltage and electrical installation checked by...
... and troubleshooting Not an appliance error. Not an appliance error. The drain pump cover is loose or a foreign object is blocking the pump. ▶ Secure the cover of the drain pump so it . ▶ Be sure there is a high loop in the drain hose and that the drain hose is removed and that no problem with the appliance. 1. Have the power voltage and electrical installation checked by...
Use and Care Manuals
Page 37
... lower rack. 3. Use a sponge if necessary. 37 With a small load the water jets directly strike against the tub. ▶ Distribute the dishware evenly. ▶ Load the appliance with greater force. CAUTION There may be closed properly. Disconnect the appliance from closing properly. Troubleshooting en-us Issue Wash cycle starts up automatically. Remove the filter system. 4. Power and/or water supply has been interrupted. 1. Noise level varies The noise level can block the drain pump...
... lower rack. 3. Use a sponge if necessary. 37 With a small load the water jets directly strike against the tub. ▶ Distribute the dishware evenly. ▶ Load the appliance with greater force. CAUTION There may be closed properly. Disconnect the appliance from closing properly. Troubleshooting en-us Issue Wash cycle starts up automatically. Remove the filter system. 4. Power and/or water supply has been interrupted. 1. Noise level varies The noise level can block the drain pump...
Use and Care Manuals
Page 41
... on dish racks: BSH will replace the upper or lower dish rack (excluding rack components), if the rack proves defective in materials or workmanship (excludes labor charges). ¡ Lifetime warranty against stainless steel rust through: BSH will repair or replace your dishwasher with the same model or a current model that are not the direct fault of Bosch, including without limitation, any form of commercial use, use or storage of an indoor product outdoors, use...
... on dish racks: BSH will replace the upper or lower dish rack (excluding rack components), if the rack proves defective in materials or workmanship (excludes labor charges). ¡ Lifetime warranty against stainless steel rust through: BSH will repair or replace your dishwasher with the same model or a current model that are not the direct fault of Bosch, including without limitation, any form of commercial use, use or storage of an indoor product outdoors, use...


