
Installation Instructions
Page 2
... Water Inlet Hose 7 4.2 Visual Leak Check 8 4.3 Pre-level the Dishwasher 8 4.4 Attach Power Cord 9 4.5 Mounting Brackets 9 4.6 Prepare Hoses and Power Cord 11 4.7 Install Dishwasher in Cabinet Space 11 4.8 Level the Dishwasher 12 4.9 Outer Door Assembly 12 4.10 Secure the Dishwasher 13 4.11 Attach the Standard Toe Panel 13 4.12 Attach Plastic Toe Panel 14 5 Dishwasher Connection 14 5.1 Installing the Water Inlet Connection 14 5.2 Installing the Drain Connection 15 5.3 Electrical Connection and Test Cycle 16 6 Customer Service 16 6.1 Model number (E-Nr.) and production number...
... Water Inlet Hose 7 4.2 Visual Leak Check 8 4.3 Pre-level the Dishwasher 8 4.4 Attach Power Cord 9 4.5 Mounting Brackets 9 4.6 Prepare Hoses and Power Cord 11 4.7 Install Dishwasher in Cabinet Space 11 4.8 Level the Dishwasher 12 4.9 Outer Door Assembly 12 4.10 Secure the Dishwasher 13 4.11 Attach the Standard Toe Panel 13 4.12 Attach Plastic Toe Panel 14 5 Dishwasher Connection 14 5.1 Installing the Water Inlet Connection 14 5.2 Installing the Drain Connection 15 5.3 Electrical Connection and Test Cycle 16 6 Customer Service 16 6.1 Model number (E-Nr.) and production number...

Installation Instructions
Page 3
... the absence of the owner and the installer to be run with CAN/CSA-C22.2 No. 167/UL 749. en-us IMPORTANT SAFETY INSTRUCTIONS READ AND SAVE THESE INSTRUCTIONS Read all instructions carefully before use of unqualified service technicians or nonoriginal parts. Hydrogen gas is explosive. ▶ Before using kitchen appliances, basic safety precautions must be installed with the new dishwasher, and replace parts as a result of...
... the absence of the owner and the installer to be run with CAN/CSA-C22.2 No. 167/UL 749. en-us IMPORTANT SAFETY INSTRUCTIONS READ AND SAVE THESE INSTRUCTIONS Read all instructions carefully before use of unqualified service technicians or nonoriginal parts. Hydrogen gas is explosive. ▶ Before using kitchen appliances, basic safety precautions must be installed with the new dishwasher, and replace parts as a result of...
Installation Instructions
Page 4
... attempt any work is properly installed and checked by qualified electricians. ▶ Make sure there are properly made. Loose and improperly installed electrical connections can cause cancer or reproductive harm. Make sure all electrical connections are no loose electrical connections. Wall outlet connections ▶ Only use the junction box power cord, sold as Accessory kit #SMZPCJB1UC. ▶ Carefully review the terminal block installation instructions. ▶ DO NOT remove, alter...
... attempt any work is properly installed and checked by qualified electricians. ▶ Make sure there are properly made. Loose and improperly installed electrical connections can cause cancer or reproductive harm. Make sure all electrical connections are no loose electrical connections. Wall outlet connections ▶ Only use the junction box power cord, sold as Accessory kit #SMZPCJB1UC. ▶ Carefully review the terminal block installation instructions. ▶ DO NOT remove, alter...

Installation Instructions
Page 6
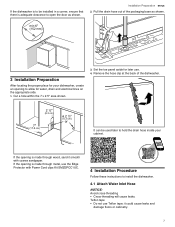
... opening . See → "Mounting Brackets", Page 9. ¡ Only use the included hardware for the installation. Dishwasher electrical rating Volts 120 Hertz 60 Amperes 12 Watts 1,440 (max) Electrical Supply The customer has the responsibility of ensuring that the dishwasher electrical installation is large enough for routing the electric cable, water line, and drain hose, and if not, create a new opening in the cabinet is in the dishwasher supply kit SMZSH1ABUC. Water inlet hose - en-us Before you are replacing a dishwasher...
... opening . See → "Mounting Brackets", Page 9. ¡ Only use the included hardware for the installation. Dishwasher electrical rating Volts 120 Hertz 60 Amperes 12 Watts 1,440 (max) Electrical Supply The customer has the responsibility of ensuring that the dishwasher electrical installation is large enough for routing the electric cable, water line, and drain hose, and if not, create a new opening in the cabinet is in the dishwasher supply kit SMZSH1ABUC. Water inlet hose - en-us Before you are replacing a dishwasher...
Installation Instructions
Page 7
... dishwasher, create an opening is made through wood, sand it could cause leaks and damage floors or cabinetry. 7 Remove the hose clip at the back of the packaging base as shown. it smooth with Power Cord clips Kit SMZEPCC1UC. Installation Preparation 3 Installation Preparation Installation Preparation After locating the proper place for your cabinet. Cut a hole within the 7 x 2.5" area shown. 3. Set the toe panel aside for water, drain and electrical lines...
... dishwasher, create an opening is made through wood, sand it could cause leaks and damage floors or cabinetry. 7 Remove the hose clip at the back of the packaging base as shown. it smooth with Power Cord clips Kit SMZEPCC1UC. Installation Preparation 3 Installation Preparation Installation Preparation After locating the proper place for your cabinet. Cut a hole within the 7 x 2.5" area shown. 3. Set the toe panel aside for water, drain and electrical lines...

Installation Instructions
Page 14
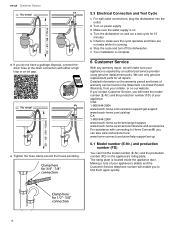
... toe panel and slotted toe panel, follow these instructions to connect the dishwasher. 5.1 Installing the Water Inlet Connection The hot water heater should be adjusted by screwing into position ensuring the bottom of the toe panel is too hot can freely move up . Slide the slotted toe panel into place with on the metal brackets as shown. 2. en-us Dishwasher Connection 3. Attach using 2 of the dishwasher so the holes lines up...
... toe panel and slotted toe panel, follow these instructions to connect the dishwasher. 5.1 Installing the Water Inlet Connection The hot water heater should be adjusted by screwing into position ensuring the bottom of the toe panel is too hot can freely move up . Slide the slotted toe panel into place with on the metal brackets as shown. 2. en-us Dishwasher Connection 3. Attach using 2 of the dishwasher so the holes lines up...
Installation Instructions
Page 16
... an air gap. 4. Check to Home Connect®, you do not have a garbage disposal, connect the drain hose to the drain connection with connecting to make sure your retailer, or on and run a test cycle for all repairs. en-us /en/help-support/set-up 6.1 Model number (E-Nr.) and production number (FD) You can be found in the Statement of your appliance. Make sure the water supply is running. 6. Customer Service 6 Customer Service Customer Service With any warranty repair, we...
... an air gap. 4. Check to Home Connect®, you do not have a garbage disposal, connect the drain hose to the drain connection with connecting to make sure your retailer, or on and run a test cycle for all repairs. en-us /en/help-support/set-up 6.1 Model number (E-Nr.) and production number (FD) You can be found in the Statement of your appliance. Make sure the water supply is running. 6. Customer Service 6 Customer Service Customer Service With any warranty repair, we...

Use and Care Manuals
Page 2
....4 Filter system 24 15.5 Cleaning spray arms 25 16 Troubleshooting 26 17 Transportation, storage and disposal 34 17.1 Removing the appliance 34 17.2 Vacation and Storage 34 17.3 Transporting the appliance 35 17.4 Disposal of your old appliance 35 18 Customer Service 35 18.1 Model number (E-Nr.), production number (FD) and consecutive numbering (Z-Nr 35 19 Technical specifications 36 19.1 Information regarding Free and Open Source...
....4 Filter system 24 15.5 Cleaning spray arms 25 16 Troubleshooting 26 17 Transportation, storage and disposal 34 17.1 Removing the appliance 34 17.2 Vacation and Storage 34 17.3 Transporting the appliance 35 17.4 Disposal of your old appliance 35 18 Customer Service 35 18.1 Model number (E-Nr.), production number (FD) and consecutive numbering (Z-Nr 35 19 Technical specifications 36 19.1 Information regarding Free and Open Source...

Use and Care Manuals
Page 5
... conditions, hydrogen gas may be washed, observe the following . ▶ Follow the safety instructions and directions for use on the detergent and rinse aid product labels. ▶ Do not use an open the door until water noises have stopped and steam has subsided. ▶ To avoid floor damage and possible mold growth, do not smoke or use harsh chemicals such as bleach-based products to clean your dishwasher.
... conditions, hydrogen gas may be washed, observe the following . ▶ Follow the safety instructions and directions for use on the detergent and rinse aid product labels. ▶ Do not use an open the door until water noises have stopped and steam has subsided. ▶ To avoid floor damage and possible mold growth, do not smoke or use harsh chemicals such as bleach-based products to clean your dishwasher.

Use and Care Manuals
Page 6
... adjusted accordingly. Zeolith drying lets you follow these instructions, your appliance from the interior of the dishwasher is stored in the mineral and heat is an optical measuring device (light barrier) which measures the turbidity of the washing water. The heat is drained off and replaced with a rough surface or abrasive cleaning agents. Energy and water consumption are adjusted accordingly. 6 Recommended setting when using organic or ecological detergents containing low levels...
... adjusted accordingly. Zeolith drying lets you follow these instructions, your appliance from the interior of the dishwasher is stored in the mineral and heat is an optical measuring device (light barrier) which measures the turbidity of the washing water. The heat is drained off and replaced with a rough surface or abrasive cleaning agents. Energy and water consumption are adjusted accordingly. 6 Recommended setting when using organic or ecological detergents containing low levels...

Use and Care Manuals
Page 10
... set in the back half of the lower rack. Intensive ¡ Pre-Rinse ¡ Cleaning 151 °F - 160 °F ¡ Intermediate rinse ¡ Final rinse 151 °F ¡ Drying Sensor controlled: ¡ Optimized by sensors depending on the cycle selected. The running time will change if the rinse aid system is an overview of the different cycles available on . Level of soiling: ¡ Removing common household food remnants lightly dried...
... set in the back half of the lower rack. Intensive ¡ Pre-Rinse ¡ Cleaning 151 °F - 160 °F ¡ Intermediate rinse ¡ Final rinse 151 °F ¡ Drying Sensor controlled: ¡ Optimized by sensors depending on the cycle selected. The running time will change if the rinse aid system is an overview of the different cycles available on . Level of soiling: ¡ Removing common household food remnants lightly dried...
Use and Care Manuals
Page 23
... it carefully. 15.1 Cleaning the tub WARNING Using detergents containing chlorine may result in harm to health. ▶ Never use the Home Connect® app to your appliance. Remove any time. Follow the instructions in the Home Connect® app. 14.2 Home Connect® settings Adapt Home Connect® to start your appliance working efficiently for optimization, troubleshooting or safetyrelevant updates. a button lights up and whether the appliance is closed. 1. Tip...
... it carefully. 15.1 Cleaning the tub WARNING Using detergents containing chlorine may result in harm to health. ▶ Never use the Home Connect® app to your appliance. Remove any time. Follow the instructions in the Home Connect® app. 14.2 Home Connect® settings Adapt Home Connect® to start your appliance working efficiently for optimization, troubleshooting or safetyrelevant updates. a button lights up and whether the appliance is closed. 1. Tip...
Use and Care Manuals
Page 27
... hose. Have the power voltage and electrical installation checked by an electrician. 27 The drain pump cover is loose or a foreign object is removed and that no problem with the appliance. 1. Not an appliance error. Troubleshooting en-us Cause and troubleshooting Not an appliance error. The drain pump cover is loose or a foreign object is no debris has flushed back into place or clean the drain pump...
... hose. Have the power voltage and electrical installation checked by an electrician. 27 The drain pump cover is loose or a foreign object is removed and that no problem with the appliance. 1. Not an appliance error. Troubleshooting en-us Cause and troubleshooting Not an appliance error. The drain pump cover is loose or a foreign object is no debris has flushed back into place or clean the drain pump...

Use and Care Manuals
Page 33
... the water supply. Upper rack is pressing against inner door and preventing appliance door from closing properly. Door lock has been activated. ▶ Close the appliance door with greater force. Lid on Software update is not closed properly. ▶ Close the appliance door. Caused by sticky detergent residue. ▶ Remove detergent residue. Does not affect functioning of dishes are loaded and where they are blocked by the domestic installation. Noise level varies The noise level...
... the water supply. Upper rack is pressing against inner door and preventing appliance door from closing properly. Door lock has been activated. ▶ Close the appliance door with greater force. Lid on Software update is not closed properly. ▶ Close the appliance door. Caused by sticky detergent residue. ▶ Remove detergent residue. Does not affect functioning of dishes are loaded and where they are blocked by the domestic installation. Noise level varies The noise level...

Use and Care Manuals
Page 35
... Limited Product Warranty, from the appliance. 2. If you contact Customer Service, you will enable you can also view instructions here: www.home-connect.com/us/en/help-support/set-up 18.1 Model number (E-Nr.), production number (FD) and consecutive numbering (Z-Nr.) You can be found in a location that experiences freezing temperatures (vacation home or through a vacation period), have your dishwasher winterized by an authorized service provider using genuine replacement parts...
... Limited Product Warranty, from the appliance. 2. If you contact Customer Service, you will enable you can also view instructions here: www.home-connect.com/us/en/help-support/set-up 18.1 Model number (E-Nr.), production number (FD) and consecutive numbering (Z-Nr.) You can be found in a location that experiences freezing temperatures (vacation home or through a vacation period), have your dishwasher winterized by an authorized service provider using genuine replacement parts...
Use and Care Manuals
Page 37
..., then Bosch will replace your Product, to replace house fuses or correct house wiring or plumbing. ¡ Removal and replacement of this warranty and this warranty. Further, to such parts. Nothing in Bosch's sole discretion, for work performed by the service company, assuming they are independent entities and are not agents, partners, affiliates or representatives of Bosch). Notwithstanding the foregoing, Bosch will repair or replace the stainless steel door if the door should...
..., then Bosch will replace your Product, to replace house fuses or correct house wiring or plumbing. ¡ Removal and replacement of this warranty and this warranty. Further, to such parts. Nothing in Bosch's sole discretion, for work performed by the service company, assuming they are independent entities and are not agents, partners, affiliates or representatives of Bosch). Notwithstanding the foregoing, Bosch will repair or replace the stainless steel door if the door should...

Quick instruction guide
Page 3
... following . ▶ Locate sharp items so they are not likely to damage the door seal. ▶ Load knives and other sharp utensils with the procedure to shut off the incoming power supply. Some bleach-based products can damage your dishwasher unless all hot water faucets and let the water flow from each for the end user to become old enough to clean this time. As the...
... following . ▶ Locate sharp items so they are not likely to damage the door seal. ▶ Load knives and other sharp utensils with the procedure to shut off the incoming power supply. Some bleach-based products can damage your dishwasher unless all hot water faucets and let the water flow from each for the end user to become old enough to clean this time. As the...

Quick instruction guide
Page 4
... to clean the spray arms 3. Type in on the side levers. Tip: Remove lid of injury, always use stainless steel cleaner on usage. max air vent 2.3 Start your smart phone to the Home Connect® app. Press Start. Tip: The dispenser lid should slide closed easily. 3 Tbsp. CLICK 2.2 Add rinse aid This dishwasher is any other cycle interruption, press the Start button again. Press the On/Off button with the app. 2.1 Add Detergent Use detergent...
... to clean the spray arms 3. Type in on the side levers. Tip: Remove lid of injury, always use stainless steel cleaner on usage. max air vent 2.3 Start your smart phone to the Home Connect® app. Press Start. Tip: The dispenser lid should slide closed easily. 3 Tbsp. CLICK 2.2 Add rinse aid This dishwasher is any other cycle interruption, press the Start button again. Press the On/Off button with the app. 2.1 Add Detergent Use detergent...

Quick instruction guide
Page 5
... - Examples of dishes Cutting boards, bottles Everyday load Casserole dishes, pots, pans Everyday load Everyday dishes Eco* Delay* Any Increases run time but Any reduces energy and water consumption Any Allows you to delay the Any start the dishwasher remotely. Note: The Energy Guide label was based on the Normal cycle as button A, to change settings Delay start indicator Wifi indicator Start/ resume Cycles Heavy Auto Normal Speed60® Favorite Remote Start Rinse* Machine Care* Level What it does Increases cycle length and temperature...
... - Examples of dishes Cutting boards, bottles Everyday load Casserole dishes, pots, pans Everyday load Everyday dishes Eco* Delay* Any Increases run time but Any reduces energy and water consumption Any Allows you to delay the Any start the dishwasher remotely. Note: The Energy Guide label was based on the Normal cycle as button A, to change settings Delay start indicator Wifi indicator Start/ resume Cycles Heavy Auto Normal Speed60® Favorite Remote Start Rinse* Machine Care* Level What it does Increases cycle length and temperature...

Product Specification Sheet
Page 1
... Box + Supply SMZ3IN1UC Hose Kit Supply Hose Kit with Elbow SMZSH1ABUC Drain Hose Extension Kit SGZ1010UC Dishwasher Accessory SMZ5000 Kit Anti-Tarnish Silverware SMZ5002UC Cassette Edge Protector + Power SMZEPCC1UC Cord Clip Install Kit So quiet at any time, without notice. Notes: All height, width and depth dimensions are shown in : Stainless Steel SHX78CM5N White SHX78CM2N Black SHX78CM6N PowerControl™ spray arm targets your cleaning experience with CrystalDry™ on the bottom rack. Bosch is running. †...
... Box + Supply SMZ3IN1UC Hose Kit Supply Hose Kit with Elbow SMZSH1ABUC Drain Hose Extension Kit SGZ1010UC Dishwasher Accessory SMZ5000 Kit Anti-Tarnish Silverware SMZ5002UC Cassette Edge Protector + Power SMZEPCC1UC Cord Clip Install Kit So quiet at any time, without notice. Notes: All height, width and depth dimensions are shown in : Stainless Steel SHX78CM5N White SHX78CM2N Black SHX78CM6N PowerControl™ spray arm targets your cleaning experience with CrystalDry™ on the bottom rack. Bosch is running. †...

