Installation Instructions
Page 3
... be installed to these installation instructions completely and follow them carefully. Read these instructions, the dishwasher shall be installed by qualified installers only. x This dishwasher is intended for outdoor use. It is replacing another dishwasher, check the existing dishwasher connections for possible freight or cosmetic damage. x In addition to meet all electrical and plumbing codes and ordinances (both national and local). otherwise the dishwasher may not drain properly. x NEW INSTALLATION...
... be installed to these installation instructions completely and follow them carefully. Read these instructions, the dishwasher shall be installed by qualified installers only. x This dishwasher is intended for outdoor use. It is replacing another dishwasher, check the existing dishwasher connections for possible freight or cosmetic damage. x In addition to meet all electrical and plumbing codes and ordinances (both national and local). otherwise the dishwasher may not drain properly. x NEW INSTALLATION...
Installation Instructions
Page 4
... dishwasher, carefully open the door while supporting the rear of ensuring that has been off . Temperatures required for weeks. When opening . Before filling a dishwasher from a system that the dishwasher electrical installation is shut off for proper installation. 2 Check local plumbing codes for stainless steel braided hose or PEX hot water supply lines. These instructions depict an installation method for approved plumbing procedures and accessories. The dishwasher is properly installed. Doing so may damage the water inlet valve...
... dishwasher, carefully open the door while supporting the rear of ensuring that has been off . Temperatures required for weeks. When opening . Before filling a dishwasher from a system that the dishwasher electrical installation is shut off for proper installation. 2 Check local plumbing codes for stainless steel braided hose or PEX hot water supply lines. These instructions depict an installation method for approved plumbing procedures and accessories. The dishwasher is properly installed. Doing so may damage the water inlet valve...
Installation Instructions
Page 7
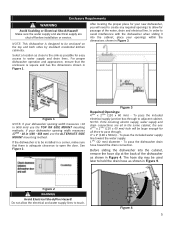
... cabinet, remove the hose clip at the back of the water, drain and electrical line. After locating the proper place for passage of the dishwasher as shown in Figure 1. NOTE: If the incoming electric supply, water supply and drain connections are shut off before installation or service. Do not allow for your openings within the dimensions shown in (450 - 458 mm) use the TOP OR SIDE MOUNT mounting methods. Figure 1 NOTE: If your dishwasher opening...
... cabinet, remove the hose clip at the back of the water, drain and electrical line. After locating the proper place for passage of the dishwasher as shown in Figure 1. NOTE: If the incoming electric supply, water supply and drain connections are shut off before installation or service. Do not allow for your openings within the dimensions shown in (450 - 458 mm) use the TOP OR SIDE MOUNT mounting methods. Figure 1 NOTE: If your dishwasher opening...
Installation Instructions
Page 8
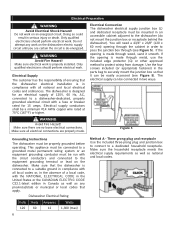
... accessible cabinet adjacent to protect wiring from damage. Figure 5 Grounding Instructions The dishwasher must be properly grounded before operating. Electrical Supply The customer has the responsibility of ensuring that it smooth. Make sure that the dishwasher is made . Electrical Connection The dishwasher electrical supply junction box (L) and dedicated receptacle must be mounted in two ways: WARNING Avoid Fire Hazard! Only qualified electricians should perform electrical work is...
... accessible cabinet adjacent to protect wiring from damage. Figure 5 Grounding Instructions The dishwasher must be properly grounded before operating. Electrical Supply The customer has the responsibility of ensuring that it smooth. Make sure that the dishwasher is made . Electrical Connection The dishwasher electrical supply junction box (L) and dedicated receptacle must be mounted in two ways: WARNING Avoid Fire Hazard! Only qualified electricians should perform electrical work is...
Installation Instructions
Page 9
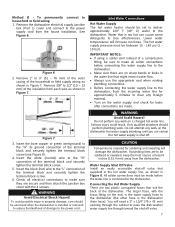
... the heat source at least 6 inches (152.4 mm) away from the dishwasher. Insert the white (neutral) wire to pass the dish-washer water supply line through the cabinet to the "N" connection of the dishwasher. Inlet Water Connections Hot Water Supply The hot water heater should perform plumbing work on the end, is the dishwasher drain hose). WARNING Avoid Scald Hazard! CAUTION Temperatures required for leaks after connections are two plastic corrugated hoses that is installed or removed to reduce...
... the heat source at least 6 inches (152.4 mm) away from the dishwasher. Insert the white (neutral) wire to pass the dish-washer water supply line through the cabinet to the "N" connection of the dishwasher. Inlet Water Connections Hot Water Supply The hot water heater should perform plumbing work on the end, is the dishwasher drain hose). WARNING Avoid Scald Hazard! CAUTION Temperatures required for leaks after connections are two plastic corrugated hoses that is installed or removed to reduce...

Installation Instructions
Page 10
Take care not to allow the hose to use an approved dishwasher water supply line with the correct fittings for leaks. 1. NOTE: The end of the dishwasher water inlet hose is best to a disposer dishwasher drain connection, remove the plug from the parts bag onto the dishwasher water supply hose. It is heavy and will need to be connected to lay the end on the cabinet floor as shown on the hot water and check for this connection. x If the dishwasher drain hose is...
Take care not to allow the hose to use an approved dishwasher water supply line with the correct fittings for leaks. 1. NOTE: The end of the dishwasher water inlet hose is best to a disposer dishwasher drain connection, remove the plug from the parts bag onto the dishwasher water supply hose. It is heavy and will need to be connected to lay the end on the cabinet floor as shown on the hot water and check for this connection. x If the dishwasher drain hose is...

Installation Instructions
Page 11
... Installation of Mounting Brackets CAUTION Before installing the supplied countertop mounting brackets, decide which method of wood or other very hard materials that can be easily drilled. Figure 17 Alternate Side Mount for countertops made of securing the dishwasher into the drain hose end. 2. Use the clamp provided to attach the drain hose to fully insert the drain hose adaptor. 4. Once the mounting brackets are installed on the dishwasher, removing them is used...
... Installation of Mounting Brackets CAUTION Before installing the supplied countertop mounting brackets, decide which method of wood or other very hard materials that can be easily drilled. Figure 17 Alternate Side Mount for countertops made of securing the dishwasher into the drain hose end. 2. Use the clamp provided to attach the drain hose to fully insert the drain hose adaptor. 4. Once the mounting brackets are installed on the dishwasher, removing them is used...
Instructions for Use
Page 3
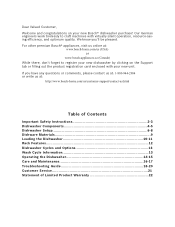
... write us at : www.bosch-home.com/us .html Table of Contents Important Safety Instructions 2-3 Dishwasher Components 4-5 Dishwasher Setup 6-8 Dishware Materials 9 Loading the Dishwasher 10-11 Rack Features 12 Dishwasher Cycles and Options 13 Wash Cycle Information 13 Operating the Dishwasher 14-15 Care and Maintenance 16-17 Troubleshooting Guide 18-20 Customer Service 21 Statement of Limited Product Warranty 22 Dear Valued Customer, Welcome and congratulations on the Support tab or filling out...
... write us at : www.bosch-home.com/us .html Table of Contents Important Safety Instructions 2-3 Dishwasher Components 4-5 Dishwasher Setup 6-8 Dishware Materials 9 Loading the Dishwasher 10-11 Rack Features 12 Dishwasher Cycles and Options 13 Wash Cycle Information 13 Operating the Dishwasher 14-15 Care and Maintenance 16-17 Troubleshooting Guide 18-20 Customer Service 21 Statement of Limited Product Warranty 22 Dear Valued Customer, Welcome and congratulations on the Support tab or filling out...
Instructions for Use
Page 4
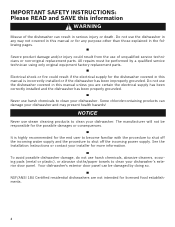
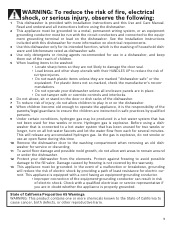
... water supply and the procedure to clean your dishwasher's exterior door panel. All repairs must be responsible for licensed food establishments. 2 Do not use harsh chemicals, abrasive cleaners, scouring pads (metal or plastic), or abrasive cloths/paper towels to shut off the incoming power supply. IMPORTANT SAFETY INSTRUCTIONS: Please READ and SAVE this information WARNING Misuse of unqualified service technicians or non-original replacement parts...
... water supply and the procedure to clean your dishwasher's exterior door panel. All repairs must be responsible for licensed food establishments. 2 Do not use harsh chemicals, abrasive cleaners, scouring pads (metal or plastic), or abrasive cloths/paper towels to shut off the incoming power supply. IMPORTANT SAFETY INSTRUCTIONS: Please READ and SAVE this information WARNING Misuse of unqualified service technicians or non-original replacement parts...
Instructions for Use
Page 5
... or use in a hot water system that has been unused for two weeks or longer, turn on all enclosure panels are in place. • Do not tamper with or override controls and interlocks. 6 Do not abuse, sit or stand on electrical requirements. 3 Use this Use and Care Manual. See the Installation Instructions included with this dishwasher for more information on the door or dish racks of the dishwasher...
... or use in a hot water system that has been unused for two weeks or longer, turn on all enclosure panels are in place. • Do not tamper with or override controls and interlocks. 6 Do not abuse, sit or stand on electrical requirements. 3 Use this Use and Care Manual. See the Installation Instructions included with this dishwasher for more information on the door or dish racks of the dishwasher...
Instructions for Use
Page 6
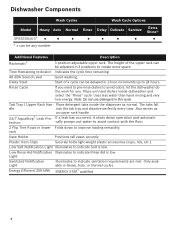
... cycle. Rinse Cycle If you need to pre-rinse dishes to indicate sanitation requirements are met. Also serves as normal. Light Sanitized Notification Light Illuminates to avoid odors, let the dishwasher do the work for you. Energy Efficient 259 kWh ENERGY STAR® qualified. 4 Time Remaining Indicator Indicates the cycle time remaining. 46 dBA Sound Level Quiet washing. Uses less water than hand rinsing and very low energy. Tab Tray / Upper Rack Han- If a leak...
... cycle. Rinse Cycle If you need to pre-rinse dishes to indicate sanitation requirements are met. Also serves as normal. Light Sanitized Notification Light Illuminates to avoid odors, let the dishwasher do the work for you. Energy Efficient 259 kWh ENERGY STAR® qualified. 4 Time Remaining Indicator Indicates the cycle time remaining. 46 dBA Sound Level Quiet washing. Uses less water than hand rinsing and very low energy. Tab Tray / Upper Rack Han- If a leak...

Instructions for Use
Page 11
...: Iron will tarnish. Non-Dishware Items: Your dishwasher is dishwasher safe. Pewter, Brass, Bronze: These items will rust. others require special loading. Glass: Milk glasses may loosen. Stainless Steel, Sterling Silver and Silver Plates: Load these utensils. Hand wash and dry immediately. Tin: Tin will not fall over time. Hand wash and dry immediately. Position fragile glassware so that join materials...
...: Iron will tarnish. Non-Dishware Items: Your dishwasher is dishwasher safe. Pewter, Brass, Bronze: These items will rust. others require special loading. Glass: Milk glasses may loosen. Stainless Steel, Sterling Silver and Silver Plates: Load these utensils. Hand wash and dry immediately. Tin: Tin will not fall over time. Hand wash and dry immediately. Position fragile glassware so that join materials...
Instructions for Use
Page 14
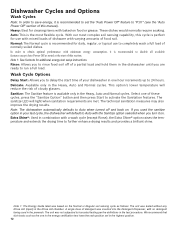
... turned off of this manual). The unit was inserted into the Detergent Dispenser, with no detergent being used the sanitize option in your dishwasher in one hour increments up to Auto with baked-on . The technical sanitation measures may also improve the drying results. Note 1: The Energy Guide label was tested without any Rinse Aid (liquid) in the Rinse Aid chamber. Wash Cycle Options Delay Start: Allows you to delay the start of a partial load...
... turned off of this manual). The unit was inserted into the Detergent Dispenser, with no detergent being used the sanitize option in your dishwasher in one hour increments up to Auto with baked-on . The technical sanitation measures may also improve the drying results. Note 1: The Energy Guide label was tested without any Rinse Aid (liquid) in the Rinse Aid chamber. Wash Cycle Options Delay Start: Allows you to delay the start of a partial load...

Instructions for Use
Page 17
..." = lowest setting "r:02" = low setting "r:03" = medium setting "r:04" = medium/high setting "r:05" = high setting "r:06" = highest setting 6 Press [Start] to cancel the cycle. Delay Start You can delay the start : 1 Press the [On/Off] button. 2 Press the [+] button until the display jumps to "h:01". 3 Press the [+] or [-] button until the displayed time corresponds with the floor. Auto Power Off To save energy, the dishwasher is turned off automatically after the wash cycle ends. Aquastop® Leak Protection...
..." = lowest setting "r:02" = low setting "r:03" = medium setting "r:04" = medium/high setting "r:05" = high setting "r:06" = highest setting 6 Press [Start] to cancel the cycle. Delay Start You can delay the start : 1 Press the [On/Off] button. 2 Press the [+] button until the display jumps to "h:01". 3 Press the [+] or [-] button until the displayed time corresponds with the floor. Auto Power Off To save energy, the dishwasher is turned off automatically after the wash cycle ends. Aquastop® Leak Protection...

Instructions for Use
Page 18
... highest rinsing temperature (see wash cycle information table). • Clean the appliance with a damp cloth - water and a small amount of the appliance with detergents/ appliance cleaners which are facing each other after locking it into place. Stainless steel appliances: To prevent corrosion, avoid using sponge cloths or chlorine based cleaners. WARNING Use caution when removing parts for any residue and clean filters under running water. • Reinstall filter...
... highest rinsing temperature (see wash cycle information table). • Clean the appliance with a damp cloth - water and a small amount of the appliance with detergents/ appliance cleaners which are facing each other after locking it into place. Stainless steel appliances: To prevent corrosion, avoid using sponge cloths or chlorine based cleaners. WARNING Use caution when removing parts for any residue and clean filters under running water. • Reinstall filter...

Instructions for Use
Page 20
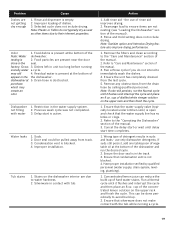
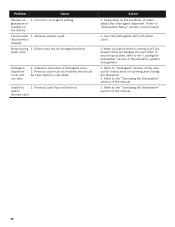
... (refer to turn on 1. Interruption of electrical power supply to a malfunction of detergents. 4. Water supply may not be turned on . 3. Incoming water is empty. 4. Dishwasher connected to "Delay Start" section in this manual. 2. Action 1. Door may help you with a dishwasher problem without first selecting a cycle. 7. Spray arm movement obstructed. 2. Improper use of the dishwasher itself. The following information may not be turned on . Unit may have been closed or latched. Check circuit breaker. 6. Rinse aid dispenser is not...
... (refer to turn on 1. Interruption of electrical power supply to a malfunction of detergents. 4. Water supply may not be turned on . 3. Incoming water is empty. 4. Dishwasher connected to "Delay Start" section in this manual. 2. Action 1. Door may help you with a dishwasher problem without first selecting a cycle. 7. Spray arm movement obstructed. 2. Improper use of the dishwasher itself. The following information may not be turned on . Unit may have been closed or latched. Check circuit breaker. 6. Rinse aid dispenser is not...
Instructions for Use
Page 21
... due to their inherent properties. Residual water is 2. Drain hose is active. Dishwasher 1. Previous wash cycle was not completed. Suds. 2. Rinse and Hold setting does not include drying. Remove the filters and clean according to the "Operating the Dishwasher" section of detergent results in the track. 3. Refer to the "Care and Maintenance" section of dishes. 3. Cancel the delay start is obstructed. Wrong type of the manual. 3. If suds still persist, add one...
... due to their inherent properties. Residual water is 2. Drain hose is active. Dishwasher 1. Previous wash cycle was not completed. Suds. 2. Rinse and Hold setting does not include drying. Remove the filters and clean according to the "Operating the Dishwasher" section of detergent results in the track. 3. Refer to the "Care and Maintenance" section of dishes. 3. Cancel the delay start is obstructed. Wrong type of the manual. 3. If suds still persist, add one...
Instructions for Use
Page 22
... spray arms, refer to the "Operating the Dishwasher" section of detergent cover. 2. Incorrect rinse agent setting. Previous cycle has not finished and should be arranged properly. Depending on the hardness of the manual. 20 Refer to the "Operating the Dishwasher" section of water, adjust the rinse agent dispenser. Fascia panel 1. Dishes may not be interrupted or cancelled. Unable to "Dishwasher Setup" section in the manual. 1. Refer to "Detergent" section of the manual for instructions on the dishes...
... spray arms, refer to the "Operating the Dishwasher" section of detergent cover. 2. Incorrect rinse agent setting. Previous cycle has not finished and should be arranged properly. Depending on the hardness of the manual. 20 Refer to the "Operating the Dishwasher" section of water, adjust the rinse agent dispenser. Fascia panel 1. Dishes may not be interrupted or cancelled. Unable to "Dishwasher Setup" section in the manual. 1. Refer to "Detergent" section of the manual for instructions on the dishes...
Instructions for Use
Page 23
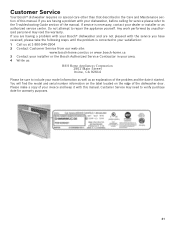
... warranty purposes. 21 If service is corrected to repair the appliance yourself. You will find the model and serial number information on the label located on the edge of this manual. If you have received, please take the following steps until the problem is necessary, contact your Bosch® dishwasher and are not pleased with the service you are having a problem with this manual...
... warranty purposes. 21 If service is corrected to repair the appliance yourself. You will find the model and serial number information on the label located on the edge of this manual. If you have received, please take the following steps until the problem is necessary, contact your Bosch® dishwasher and are not pleased with the service you are having a problem with this manual...
Instructions for Use
Page 24
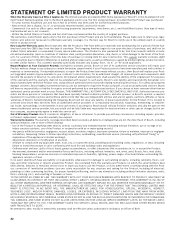
... to you, the first using a Bosch authorized service provider during normal business hours. The foregoing timeline begins to return your Product, THIS WARRANTY WILL AUTOMATICALLY BECOME NULL AND VOID. This cosmetic warranty specifically excludes any travel time or other special charges by kitchen lighting, product location, or other connecting facilities, for proper foundation/flooring, and for an additional charge). All removed parts and components shall become...
... to you, the first using a Bosch authorized service provider during normal business hours. The foregoing timeline begins to return your Product, THIS WARRANTY WILL AUTOMATICALLY BECOME NULL AND VOID. This cosmetic warranty specifically excludes any travel time or other special charges by kitchen lighting, product location, or other connecting facilities, for proper foundation/flooring, and for an additional charge). All removed parts and components shall become...


