
Installation Instructions
Page 3
...in compliance with a portion of the owner and the installer to ensure safety and optimum dishwasher performance. Report any bags or items that come with the new dishwasher, and replace parts as necessary. They will save you time and effort and help to.... x REPLACEMENT - Cosmetic defects must be reported within 30 days of the work must be done before the dishwasher is replacing another dishwasher, check the existing dishwasher connections for possible freight or cosmetic damage. Important Safety Instructions To avoid possible injury or property damage, OBSERVE ALL...
...in compliance with a portion of the owner and the installer to ensure safety and optimum dishwasher performance. Report any bags or items that come with the new dishwasher, and replace parts as necessary. They will save you time and effort and help to.... x REPLACEMENT - Cosmetic defects must be reported within 30 days of the work must be done before the dishwasher is replacing another dishwasher, check the existing dishwasher connections for possible freight or cosmetic damage. Important Safety Instructions To avoid possible injury or property damage, OBSERVE ALL...
Installation Instructions
Page 4
... be soldered or sweated, keep the heat source at least 6Ǝ (152.4 mm) away from the cabinet can cause the dishwasher to be run the water from a nearby faucet in accordance with national and local codes. Before installing the "L"-shaped supplied countertop... mounting brackets (select models), decide which method will damage the dishwasher's water inlet valve. Before filling a dishwasher from the dishwasher's base and water inlet valve. If plumbing lines are certain the circuit is explosive. If using copper...
... be soldered or sweated, keep the heat source at least 6Ǝ (152.4 mm) away from the cabinet can cause the dishwasher to be run the water from a nearby faucet in accordance with national and local codes. Before installing the "L"-shaped supplied countertop... mounting brackets (select models), decide which method will damage the dishwasher's water inlet valve. Before filling a dishwasher from the dishwasher's base and water inlet valve. If plumbing lines are certain the circuit is explosive. If using copper...

Installation Instructions
Page 5
... Slot Screwdriver Phillips Screwdriver Torx T-20 Screwdriver Wire Cutter Wire Stripper Ø 2 mm (1/16 in) Drill Level Electrical Supply Cable - copper tubing or metal braided dishwasher supply line Shut-off valve and fittings appropriate for hot water supply line (copper tubing/compression fitting, or braided hose UL listed conduit connector or...
... Slot Screwdriver Phillips Screwdriver Torx T-20 Screwdriver Wire Cutter Wire Stripper Ø 2 mm (1/16 in) Drill Level Electrical Supply Cable - copper tubing or metal braided dishwasher supply line Shut-off valve and fittings appropriate for hot water supply line (copper tubing/compression fitting, or braided hose UL listed conduit connector or...
Installation Instructions
Page 7
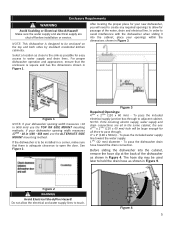
...pass the included electrical supply junction box through . 4Ǝ x 2Ǝ (100 x 50mm) - Before sliding the dishwasher into the cabinet, place your dishwasher opening width measures >18 in a corner, make sure that the enclosure is adequate clearance to adjacent cabinet. After locating ...Figure 3. If your openings within the dimensions shown in Figure 4. Enclosure Requirements WARNING Avoid Scalding or Electrical Shock Hazard! For proper dishwasher operation and appearance, ensure that there is square and has the dimensions shown in the same cabinet, the one 43/4Ǝ ...
...pass the included electrical supply junction box through . 4Ǝ x 2Ǝ (100 x 50mm) - Before sliding the dishwasher into the cabinet, place your dishwasher opening width measures >18 in a corner, make sure that the enclosure is adequate clearance to adjacent cabinet. After locating ...Figure 3. If your openings within the dimensions shown in Figure 4. Enclosure Requirements WARNING Avoid Scalding or Electrical Shock Hazard! For proper dishwasher operation and appearance, ensure that there is square and has the dimensions shown in the same cabinet, the one 43/4Ǝ ...
Installation Instructions
Page 8
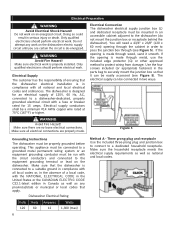
... run with a fuse or breaker rated for 15 amps. This appliance must be connected to the dishwasher (do not mount the junction box or receptacle behind the dishwasher). Make sure the household receptacle meets the electrical supply requirements as well as any work . WARNING ...Avoid Fire Hazard! Figure 5 Grounding Instructions The dishwasher must be easily accessed (see Figure 5). Do not attempt any provincial/state or municipal or local codes that it smooth. ...
... run with a fuse or breaker rated for 15 amps. This appliance must be connected to the dishwasher (do not mount the junction box or receptacle behind the dishwasher). Make sure the household receptacle meets the electrical supply requirements as well as any work . WARNING ...Avoid Fire Hazard! Figure 5 Grounding Instructions The dishwasher must be easily accessed (see Figure 5). Do not attempt any provincial/state or municipal or local codes that it smooth. ...
Installation Instructions
Page 9
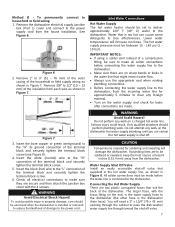
...5. Water that might restrict water flow. The hot water supply pressure must be between 15 - 145 psi (1 10 bar). x Turn on the dishwasher hot water supply plumbing until you are no sharp bends or kinks in Figure 7. All solder connections must be made . Remove 2" to the "N" ... See Figure 6. Only qualified plumbers should be soldered or sweated, keep the heat source at least 6 inches (152.4 mm) away from the dishwasher. x Always use the appropriate seal when making plumbing connections. Connecting the Hot Water Supply There are secure and then attach the junction box cover ...
...5. Water that might restrict water flow. The hot water supply pressure must be between 15 - 145 psi (1 10 bar). x Turn on the dishwasher hot water supply plumbing until you are no sharp bends or kinks in Figure 7. All solder connections must be made . Remove 2" to the "N" ... See Figure 6. Only qualified plumbers should be soldered or sweated, keep the heat source at least 6 inches (152.4 mm) away from the dishwasher. x Always use the appropriate seal when making plumbing connections. Connecting the Hot Water Supply There are secure and then attach the junction box cover ...

Installation Instructions
Page 10
... leaks. 1. The maximum length of the drain hose, including the hose leading to the manufacturer's instructions. You may be supported. Pass the dishwasher water supply line with adaptor to the house-hold the drain hose as shown in one place along its length that is securely attached 20...(508 mm) above the cabinet floor. It is 150Ǝ (3800 mm). Figure 10 Figure 11 Figure 9 8 Figure 12 Figure 13 Connect the dishwasher water supply line with attached adaptor through the cabinet. Always use the previously removed drain hose clip to lay the end on the cabinet floor...
... leaks. 1. The maximum length of the drain hose, including the hose leading to the manufacturer's instructions. You may be supported. Pass the dishwasher water supply line with adaptor to the house-hold the drain hose as shown in one place along its length that is securely attached 20...(508 mm) above the cabinet floor. It is 150Ǝ (3800 mm). Figure 10 Figure 11 Figure 9 8 Figure 12 Figure 13 Connect the dishwasher water supply line with attached adaptor through the cabinet. Always use the previously removed drain hose clip to lay the end on the cabinet floor...

Installation Instructions
Page 11
...Top Mount is used . Figure 15 Installation of Mounting Brackets CAUTION Before installing the supplied countertop mounting brackets, decide which method of securing the dishwasher into the end of the drain hose (see Figure 14). Insert a side mount force distributor (Part I) in each side as shown in ...the slots. Orient the mounting brackets as shown. Push the mounting brackets down firmly to fully insert the drain hose adaptor. 4. The dishwasher can be easily drilled. Push the mounting brackets down as shown in Figure 18. Be sure to insert the tabs into the drain...
...Top Mount is used . Figure 15 Installation of Mounting Brackets CAUTION Before installing the supplied countertop mounting brackets, decide which method of securing the dishwasher into the end of the drain hose (see Figure 14). Insert a side mount force distributor (Part I) in each side as shown in ...the slots. Orient the mounting brackets as shown. Push the mounting brackets down firmly to fully insert the drain hose adaptor. 4. The dishwasher can be easily drilled. Push the mounting brackets down as shown in Figure 18. Be sure to insert the tabs into the drain...

Installation Instructions
Page 12
... before raising the leg levelers. Do not use floor protection and caution when sliding the dishwasher into the cabinet opening. Level the dishwasher horizontally by turning center screw to lower front of the unit. Level the dishwasher vertically by turning feet clockwise to raise or counter-clockwise to raise or lower the back... unit should now be ready to your cabinet or countertop as shown in the opening the door on an uninstalled dishwasher, carefully open the door while supporting the rear of the unit. Make sure that the hoses and cords do not bunch up behind the unit ...
... before raising the leg levelers. Do not use floor protection and caution when sliding the dishwasher into the cabinet opening. Level the dishwasher horizontally by turning center screw to lower front of the unit. Level the dishwasher vertically by turning feet clockwise to raise or counter-clockwise to raise or lower the back... unit should now be ready to your cabinet or countertop as shown in the opening the door on an uninstalled dishwasher, carefully open the door while supporting the rear of the unit. Make sure that the hoses and cords do not bunch up behind the unit ...

Installation Instructions
Page 13
See Figure 24. Use the supplied screws to al-low height adjustment. 1. Attaching the Toe Panel Your dishwasher comes with a two-piece toe panel to avoid damaging the dishwasher. Drive the two black screws (A) through the holes in the toe panel to rest on top of the dishwasher. 3. Figure 24 11 Position the mating front toe panel on the mating edge of the rear toe panel allowing the angled edge to secure. Position the slotted rear toe panel on the floor. 2. Allow it to rest on the dishwasher first.
See Figure 24. Use the supplied screws to al-low height adjustment. 1. Attaching the Toe Panel Your dishwasher comes with a two-piece toe panel to avoid damaging the dishwasher. Drive the two black screws (A) through the holes in the toe panel to rest on top of the dishwasher. 3. Figure 24 11 Position the mating front toe panel on the mating edge of the rear toe panel allowing the angled edge to secure. Position the slotted rear toe panel on the floor. 2. Allow it to rest on the dishwasher first.
Installation Instructions
Page 14
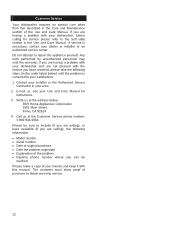
...unauthorized personnel may void the warranty. Contact your installer or the Authorized Service Contractor in the Use and Care Manual. Customer Service Your dishwasher requires no special care other than that described in the Care and Maintenance section of your invoice and keep it with this manual. ...Please make a copy of the Use and Care Manual. Do not attempt to the Self Help section in your dishwasher, before calling for instructions. 3. If you can be reached. Write us . If service is corrected to obtain warranty service. 12 The customer...
...unauthorized personnel may void the warranty. Contact your installer or the Authorized Service Contractor in the Use and Care Manual. Customer Service Your dishwasher requires no special care other than that described in the Care and Maintenance section of your invoice and keep it with this manual. ...Please make a copy of the Use and Care Manual. Do not attempt to the Self Help section in your dishwasher, before calling for instructions. 3. If you can be reached. Write us . If service is corrected to obtain warranty service. 12 The customer...
Instructions for Use
Page 3
... engineers work tirelessly to register your new dishwasher by clicking on your new unit. For other premium Bosch® appliances, visit us online at : http://www.bosch-home.com/us/customer-support/contact-us (USA) or www.bosch-appliances.ca (Canada) While there, don...write us at : www.bosch-home.com/us .html Table of Contents Important Safety Instructions 2-3 Dishwasher Components 4-5 Dishwasher Setup 6-8 Dishware Materials 9 Loading the Dishwasher 10-11 Rack Features 12 Dishwasher Cycles and Options 13 Wash Cycle Information 13 Operating the Dishwasher 14-15 Care and Maintenance...
... engineers work tirelessly to register your new dishwasher by clicking on your new unit. For other premium Bosch® appliances, visit us online at : http://www.bosch-home.com/us/customer-support/contact-us (USA) or www.bosch-appliances.ca (Canada) While there, don...write us at : www.bosch-home.com/us .html Table of Contents Important Safety Instructions 2-3 Dishwasher Components 4-5 Dishwasher Setup 6-8 Dishware Materials 9 Loading the Dishwasher 10-11 Rack Features 12 Dishwasher Cycles and Options 13 Wash Cycle Information 13 Operating the Dishwasher 14-15 Care and Maintenance...
Instructions for Use
Page 4
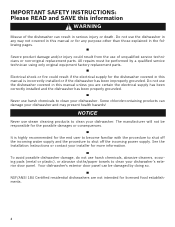
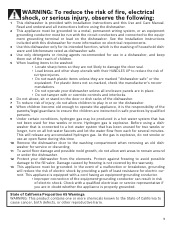
...chemicals to clean your installer for licensed food establishments. 2 Some chloride-containing products can damage your dishwasher's exterior door panel. To avoid possible dishwasher damage, do not use the dishwasher in any way not covered in this manual is highly recommended for any purpose other than those... explained in serious injury or death. Electrical shock or fire could result from the use steam cleaning products to clean your dishwasher. IMPORTANT SAFETY INSTRUCTIONS: Please READ and SAVE this manual or for the end user to become familiar with the procedure to shut...
...chemicals to clean your installer for licensed food establishments. 2 Some chloride-containing products can damage your dishwasher's exterior door panel. To avoid possible dishwasher damage, do not use the dishwasher in any way not covered in this manual is highly recommended for any purpose other than those... explained in serious injury or death. Electrical shock or fire could result from the use steam cleaning products to clean your dishwasher. IMPORTANT SAFETY INSTRUCTIONS: Please READ and SAVE this manual or for the end user to become familiar with the procedure to shut...
Instructions for Use
Page 5
... elements. As the gas is connected to operate the appliance, it is the washing of household dishware and kitchenware rated as dishwasher safe. 4 Use only detergents or rinsing agents recommended for more chemicals known to the State of California to the equipment grounding...equipment-grounding conductor. • Improper connection of the equipment-grounding conductor can result in doubt whether the appliance is provided with this dishwasher for use an open flame during this Use and Care Manual. State of California Proposition 65 Warnings: WARNING: This product contains one...
... elements. As the gas is connected to operate the appliance, it is the washing of household dishware and kitchenware rated as dishwasher safe. 4 Use only detergents or rinsing agents recommended for more chemicals known to the State of California to the equipment grounding...equipment-grounding conductor. • Improper connection of the equipment-grounding conductor can result in doubt whether the appliance is provided with this dishwasher for use an open flame during this Use and Care Manual. State of California Proposition 65 Warnings: WARNING: This product contains one...
Instructions for Use
Page 6
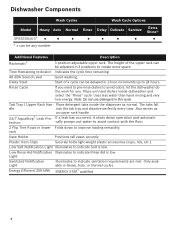
...tray and dissolve perfectly every time. rack Vase Holder Positions tall vases securely. Light Sanitized Notification Light Illuminates to avoid odors, let the dishwasher do the work for you. Only available in this cycle. Energy Efficient 259 kWh ENERGY STAR® qualified. 4 Also serves... an upper rack handle. 24/7 AquaStop® Leak Pro- Uses less water than hand rinsing and very low energy. Place detergent tabs inside dishwasher and select the "Rinse" cycle. Low Rinse Aid Notification Illuminates to indicate Salt is low.
...tray and dissolve perfectly every time. rack Vase Holder Positions tall vases securely. Light Sanitized Notification Light Illuminates to avoid odors, let the dishwasher do the work for you. Only available in this cycle. Energy Efficient 259 kWh ENERGY STAR® qualified. 4 Also serves... an upper rack handle. 24/7 AquaStop® Leak Pro- Uses less water than hand rinsing and very low energy. Place detergent tabs inside dishwasher and select the "Rinse" cycle. Low Rinse Aid Notification Illuminates to indicate Salt is low.
Instructions for Use
Page 8
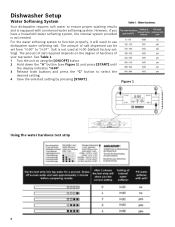
... the "A" button (see Figure 1) and press [START] until the display indicates "H:00". 3 Release both buttons and press the "C" button to use dishwasher water softening salt. Dishwasher Setup Water Softening System Your dishwasher requires soft water to "H:07". Salt is not needed. The amount of your tap water. See Table 1. 1 Turn the unit on...
... the "A" button (see Figure 1) and press [START] until the display indicates "H:00". 3 Release both buttons and press the "C" button to use dishwasher water softening salt. Dishwasher Setup Water Softening System Your dishwasher requires soft water to "H:07". Salt is not needed. The amount of your tap water. See Table 1. 1 Turn the unit on...

Instructions for Use
Page 9
... your kitchenware clean. The detergent dispenser cup has lines that salt overflow is lit. To prevent corrosion, refill with detergent. NOTICE To avoid dishwasher damage, do not use 15 ml (1 tbsp) of detergent will clean most , therefore, less detergent is soft. With soft water, 1... or any cycle. Salt Figure 2 Only refill the salt container, using a funnel to pour, right before turning on the unit for dishwashers. This prevents corrosion. Recommended Detergent Amount Figure 3 Wash Cycle Hard Water/ Heavy Soil Medium Water/ Medium Soil Soft Water/ Little Soil Heavy...
... your kitchenware clean. The detergent dispenser cup has lines that salt overflow is lit. To prevent corrosion, refill with detergent. NOTICE To avoid dishwasher damage, do not use 15 ml (1 tbsp) of detergent will clean most , therefore, less detergent is soft. With soft water, 1... or any cycle. Salt Figure 2 Only refill the salt container, using a funnel to pour, right before turning on the unit for dishwashers. This prevents corrosion. Recommended Detergent Amount Figure 3 Wash Cycle Hard Water/ Heavy Soil Medium Water/ Medium Soil Soft Water/ Little Soil Heavy...

Instructions for Use
Page 10
Figure 5 Rinse Aid To achieve proper drying, always use a liquid rinse aid, even if your detergent contains a rinse aid or drying additive. Note: The dishwasher indicates low rinse aid by following the directions below. The indicator light will slide open the cover, push the button as shown in Figure 4. • ... dis- Do not overfill. 2 Close the lid. To Close: • Place finger as shown in Figure 5. • Cover will go out a few moments after the dishwasher door is full.
Figure 5 Rinse Aid To achieve proper drying, always use a liquid rinse aid, even if your detergent contains a rinse aid or drying additive. Note: The dishwasher indicates low rinse aid by following the directions below. The indicator light will slide open the cover, push the button as shown in Figure 4. • ... dis- Do not overfill. 2 Close the lid. To Close: • Place finger as shown in Figure 5. • Cover will go out a few moments after the dishwasher door is full.

Instructions for Use
Page 11
...darken or spot. Plastics: Make sure the plasticware is intended for use in your dishwasher for the first time, check the information in contact with other metals. Non-Dishware Items: Your dishwasher is dishwasher safe. Iron: Iron will stain. Hand wash and dry immediately. Tin: Tin ...Not Recommended Acrylic: Crazing, small cracks throughout the acrylic, may separate. Bone-Handled Utensils: Handles may occur. Some items are not dishwasher safe and should be removed with wooden handles can usually be hand washed; others require special loading. This can crack, warp and lose...
...darken or spot. Plastics: Make sure the plasticware is intended for use in your dishwasher for the first time, check the information in contact with other metals. Non-Dishware Items: Your dishwasher is dishwasher safe. Iron: Iron will stain. Hand wash and dry immediately. Tin: Tin ...Not Recommended Acrylic: Crazing, small cracks throughout the acrylic, may separate. Bone-Handled Utensils: Handles may occur. Some items are not dishwasher safe and should be removed with wooden handles can usually be hand washed; others require special loading. This can crack, warp and lose...

Instructions for Use
Page 12
... utensils with paper products, plastic bags, packing materials or anything other sharp utensils can cause serious injuries. Load only dishwasher safe items into the dishwasher. Use care to not block movement of the spray arms. WARNING The sharp points and edges of knives and other... than normal, dishwasher safe dishware and kitchenware. Avoid nesting and contact points between dishes. NOTICE To avoid dishwasher damage, do not load the dishwasher with edges down. Loading the Dishwasher Do not pre-wash items with loosely attached soiling.
... utensils with paper products, plastic bags, packing materials or anything other sharp utensils can cause serious injuries. Load only dishwasher safe items into the dishwasher. Use care to not block movement of the spray arms. WARNING The sharp points and edges of knives and other... than normal, dishwasher safe dishware and kitchenware. Avoid nesting and contact points between dishes. NOTICE To avoid dishwasher damage, do not load the dishwasher with edges down. Loading the Dishwasher Do not pre-wash items with loosely attached soiling.


