

Instructions for Use
Page 3
... appliance for the firstĂtime . . 8 Filling up the pipe system 9 Controls 10 Preparation 13 General 13 Using espresso/ coffeeĂbeans 13 Adjusting the grindingĂunit 14 Using ground coffee 14 Preparing hot water 15 Steam for heating drinks 15 Preparing frothy milk ...16 Changing settings / programming 17 Programming 17 Language 18 Water hardness 18 Water filter 19 Temperature 21 Current time 21 Timer 21 Standby mode 22 Displaying number ofĂbrews 22 RESET function 22 System...
... appliance for the firstĂtime . . 8 Filling up the pipe system 9 Controls 10 Preparation 13 General 13 Using espresso/ coffeeĂbeans 13 Adjusting the grindingĂunit 14 Using ground coffee 14 Preparing hot water 15 Steam for heating drinks 15 Preparing frothy milk ...16 Changing settings / programming 17 Programming 17 Language 18 Water hardness 18 Water filter 19 Temperature 21 Current time 21 Timer 21 Standby mode 22 Displaying number ofĂbrews 22 RESET function 22 System...

Instructions for Use
Page 7
Appliance components 15 Door for brewing unit 16 Ground coffee bypass with cover and cleaning tabled duct 17 Fresh whole bean container with aroma cover 18 Lid for water tank 19 Removable water tank 20 Water Filter 7
Appliance components 15 Door for brewing unit 16 Ground coffee bypass with cover and cleaning tabled duct 17 Fresh whole bean container with aroma cover 18 Lid for water tank 19 Removable water tank 20 Water Filter 7

Instructions for Use
Page 17
...grey background in this chapter ć see example opposite. 17 The following settings can be changed. These basic settings can be saved. Filter - Water hardness - Temperature - The appliance must be switched on before the standard settings can be brewed without any additional programming. ...Changing settings / programming The appliance has been set so that coffee can be changed with the function buttons under the display. < Selection button % 6 > Access to programming mode / Save settings...
...grey background in this chapter ć see example opposite. 17 The following settings can be changed. These basic settings can be saved. Filter - Water hardness - Temperature - The appliance must be switched on before the standard settings can be brewed without any additional programming. ...Changing settings / programming The appliance has been set so that coffee can be changed with the function buttons under the display. < Selection button % 6 > Access to programming mode / Save settings...

Instructions for Use
Page 18
... descaling program that the water hardness is used in the display HARDNESS WATER 2 HARDNESS flashes. q Press button % until the number in the domestic water system or if filtered water is set correctly. If external water softeners are available: LANGUE FRANCAIS LINGUA ITALIANO SPRAK SVENSKA IDIOMA ESPANOL TAAL NEDERL. q Press button % until the...
... descaling program that the water hardness is used in the display HARDNESS WATER 2 HARDNESS flashes. q Press button % until the number in the domestic water system or if filtered water is set correctly. If external water softeners are available: LANGUE FRANCAIS LINGUA ITALIANO SPRAK SVENSKA IDIOMA ESPANOL TAAL NEDERL. q Press button % until the...
Instructions for Use
Page 19
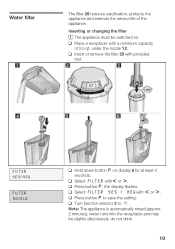
...display 6 for at least 3 seconds. under the nozzle 12. q Select FILTER YES / NEW with a minimum capacity of the appliance. q Turn function selector 2 to save the setting. Water filter The filter 20 reduces calcification, protects the appliance and extends the service life of 0.5... qt. q Select FILTER withr or s. Inserting or changing the filter i The appliance must be slightly discoloured, do not drink. 19 q...
...display 6 for at least 3 seconds. under the nozzle 12. q Select FILTER YES / NEW with a minimum capacity of the appliance. q Turn function selector 2 to save the setting. Water filter The filter 20 reduces calcification, protects the appliance and extends the service life of 0.5... qt. q Select FILTER withr or s. Inserting or changing the filter i The appliance must be slightly discoloured, do not drink. 19 q...

Instructions for Use
Page 20
...or s. q Before descaling the appliance, take the filter out of the water tank. ReĆorder the filter quoting order no. 461732. 20 Removing the filter i The appliance must be inserted. q Select FILTER YES / NO with an inserted filter, it must be descaled once or twice a year,... to u position. q Unscrew the filter 20 with r or s. q Hold down button qon display 6 for at least 2 seconds. Follow the displayed instructions. Important q Replace the filter after approx. 400 brews. q Do not insert the filter if the UNIT CALCIF. q TURN ON COFFEE is displayed, turn function selector 2...
...or s. q Before descaling the appliance, take the filter out of the water tank. ReĆorder the filter quoting order no. 461732. 20 Removing the filter i The appliance must be inserted. q Select FILTER YES / NO with an inserted filter, it must be descaled once or twice a year,... to u position. q Unscrew the filter 20 with r or s. q Hold down button qon display 6 for at least 2 seconds. Follow the displayed instructions. Important q Replace the filter after approx. 400 brews. q Do not insert the filter if the UNIT CALCIF. q TURN ON COFFEE is displayed, turn function selector 2...

Instructions for Use
Page 23
...The ADD BEANS display is lit until coffee is no longer effective after 400 brews or approx. 2 months. System heated up by letting out some hot water 0. Clean and dry contacts 25. The filter 20 is brewed again. Change settings. 23 Add coffee beans to cool down by Steam ... action No water. Remove, empty, and reĆinsert tray 23 and coffee dreg tray 21. The illuminated ring on . Water pipe system in the water tank. Allow system to the bean container 17. FILTER CHANGE The appliance indicates processes and messages on the 4 descaling button is empty...
...The ADD BEANS display is lit until coffee is no longer effective after 400 brews or approx. 2 months. System heated up by letting out some hot water 0. Clean and dry contacts 25. The filter 20 is brewed again. Change settings. 23 Add coffee beans to cool down by Steam ... action No water. Remove, empty, and reĆinsert tray 23 and coffee dreg tray 21. The illuminated ring on . Water pipe system in the water tank. Allow system to the bean container 17. FILTER CHANGE The appliance indicates processes and messages on the 4 descaling button is empty...

Instructions for Use
Page 28
... lit red and the message UNIT CALCIF. If the appliance is not displayed. CAUTION Never descale the appliance with an inserted filter, it may be descaled once or twice a year, even if the descale message is always operated with vinegar or vinegarĆbased agents!... agent is not descaled as instructed, it should be damaged. i Specially developed and suitable agents are available from customer service. Do not use a filter 20 and the message UNIT CALCIF. Never interrupt the descaling program! Descaling the appliance UNIT CALCIF. 28 If the illuminated ring on , descale the ...
... lit red and the message UNIT CALCIF. If the appliance is not displayed. CAUTION Never descale the appliance with an inserted filter, it may be descaled once or twice a year, even if the descale message is always operated with vinegar or vinegarĆbased agents!... agent is not descaled as instructed, it should be damaged. i Specially developed and suitable agents are available from customer service. Do not use a filter 20 and the message UNIT CALCIF. Never interrupt the descaling program! Descaling the appliance UNIT CALCIF. 28 If the illuminated ring on , descale the ...

Instructions for Use
Page 29
... 35 minutes - Wait for at least 3 seconds. While the descaling program is automatically descaled. q Empty and reĆinsert tray 23 and coffee dreg tray 21. of readyĆprepared descaling mixture. Note: The appliance is running . q Set function selector to U position. Wait for ...the next message on display. q Empty and reĆinsert tray 23 and coffee dreg tray 21. 29 Never descale the appliance while the filter is inserted. Descaling solution flows at intervals into the receptacle. Descaling solution flows at intervals into the tray 23....
... 35 minutes - Wait for at least 3 seconds. While the descaling program is automatically descaled. q Empty and reĆinsert tray 23 and coffee dreg tray 21. of readyĆprepared descaling mixture. Note: The appliance is running . q Set function selector to U position. Wait for ...the next message on display. q Empty and reĆinsert tray 23 and coffee dreg tray 21. 29 Never descale the appliance while the filter is inserted. Descaling solution flows at intervals into the receptacle. Descaling solution flows at intervals into the tray 23....
Instructions for Use
Page 31
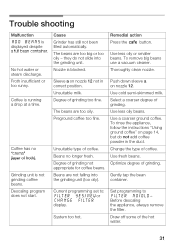
...12 not in the duct. Preground coffee too fine. Remedial action Press the 2 button. Use cold semiĆskimmed milk. Use less oily beans. Set programming to : FILTER YES/NEW or CHANGE FILTER display. The beans are too oily. Unsuitable milk. System too hot. Use fresh beans. ...Gently tap the bean container. Draw off some of coffee. they do not add coffee powder in correct position. To remove big ...
...12 not in the duct. Preground coffee too fine. Remedial action Press the 2 button. Use cold semiĆskimmed milk. Use less oily beans. Set programming to : FILTER YES/NEW or CHANGE FILTER display. The beans are too oily. Unsuitable milk. System too hot. Use fresh beans. ...Gently tap the bean container. Draw off some of coffee. they do not add coffee powder in correct position. To remove big ...

Instructions for Use
Page 32
Change filter. Note: Ground coffee can still be eliminated, always call Customer Service! If malfunctions cannot be prepared. Subject to room temperature. FILTER CHANGE displayed. grit which also occurs in the grinding unit (e.g. Wait until the appliance has warmed up to alterations 32 Foreign objects in ...Display ERROR 5 Technical malfunction. or ERROR 8 Switch OFF the device at the power switch 1 for at least 10 seconds. Display ERROR 1 Appliance too cold. System too hot. Grinding unit is making a loud noise. Contact Customer Service. Draw off some of...
Change filter. Note: Ground coffee can still be eliminated, always call Customer Service! If malfunctions cannot be prepared. Subject to room temperature. FILTER CHANGE displayed. grit which also occurs in the grinding unit (e.g. Wait until the appliance has warmed up to alterations 32 Foreign objects in ...Display ERROR 5 Technical malfunction. or ERROR 8 Switch OFF the device at the power switch 1 for at least 10 seconds. Display ERROR 1 Appliance too cold. System too hot. Grinding unit is making a loud noise. Contact Customer Service. Draw off some of...


