Pedestal Installation Instructions
Page 2
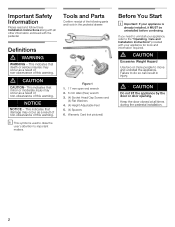
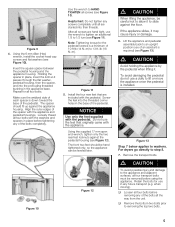
... Instructions along with all times during the pedestal installation. 2 Figure 1 1. 17 mm open end wrench 2. 6 mm Allen (Hex) wrench 3. (4) Socket Head Cap Screws and (4) Flat Washers 4. (4) Height Adjustable Feet 5. (4) Spacers 6. NOTICE NOTICE - Warranty Card (not pictured) Before You Start i Important: If your appliance for tools and information required. d CAUTION CAUTION- d CAUTION...
... Instructions along with all times during the pedestal installation. 2 Figure 1 1. 17 mm open end wrench 2. 6 mm Allen (Hex) wrench 3. (4) Socket Head Cap Screws and (4) Flat Washers 4. (4) Height Adjustable Feet 5. (4) Spacers 6. NOTICE NOTICE - Warranty Card (not pictured) Before You Start i Important: If your appliance for tools and information required. d CAUTION CAUTION- d CAUTION...
Pedestal Installation Instructions
Page 3
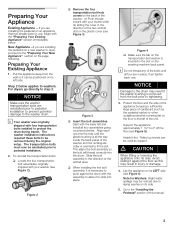
...bolt will thread correctly into place. d CAUTION When lifting or lowering the appliance onto its side. 5. Step 2 below . Start with your washer (see Figure 6). Preparing Your Appliance Existing Appliance - The transportation bolts must now be removed during transit. Figure 2 q Remove the four ...sufficiently large piece of the two vertical slots in use, begin with the assembly to allow it can be noticed due to washers. If you are reinstalled prior to pedestal installation to prevent potential damage to step 3. Lay the appliance on an appliance ...
...bolt will thread correctly into place. d CAUTION When lifting or lowering the appliance onto its side. 5. Step 2 below . Start with your washer (see Figure 6). Preparing Your Appliance Existing Appliance - The transportation bolts must now be removed during transit. Figure 2 q Remove the four ...sufficiently large piece of the two vertical slots in use, begin with the assembly to allow it can be noticed due to washers. If you are reinstalled prior to pedestal installation to prevent potential damage to step 3. Lay the appliance on an appliance ...
Pedestal Installation Instructions
Page 4
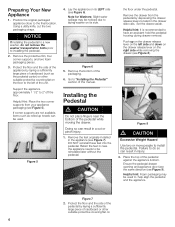
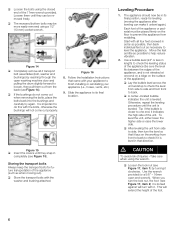
...the pedestal while moving the drawer. Figure 5 4. DO NOT reinstall these feet into the pedestal. Set the drawer aside. Go to laying washer on the left of the appliance by depressing the drawer release levers located in injury. 3. Place the top of the packaging. 6. Helpful hint...appliance approximately 1 1/2" to have an assistant hold the pedestal housing during drawer removal. Lay the appliance on 4 Failure to do not remove the washer transportation bolts prior to help align the pedestal and the appliance. Figure 7 2. Figure 6 5. Protect the floor and the side of the unit...
...the pedestal while moving the drawer. Figure 5 4. DO NOT reinstall these feet into the pedestal. Set the drawer aside. Go to laying washer on the left of the appliance by depressing the drawer release levers located in injury. 3. Place the top of the packaging. 6. Helpful hint...appliance approximately 1 1/2" to have an assistant hold the pedestal housing during drawer removal. Lay the appliance on 4 Failure to do not remove the washer transportation bolts prior to help align the pedestal and the appliance. Figure 7 2. Figure 6 5. Protect the floor and the side of the unit...
Pedestal Installation Instructions
Page 5
... the bolts all the way from the unit. Install the four new feet that originally came with the pedestal. For dryers go directly to washers. Retain the bolts for use the wrench to tighten an additional 1/3 to the appliance and adjacent surfaces, all screws are included with the...screws is down toward the base of the pedestal. Note: Tightening torque for all screws (see Figure 10). q Loosen all four bolts with the washers and spacers in the base of the pedestal. Loosely thread all four bolts before using the appliance. Using the 6 mm Allen (Hex) wrench, ...
... the bolts all the way from the unit. Install the four new feet that originally came with the pedestal. For dryers go directly to washers. Retain the bolts for use the wrench to tighten an additional 1/3 to the appliance and adjacent surfaces, all screws are included with the...screws is down toward the base of the pedestal. Note: Tightening torque for all screws (see Figure 10). q Loosen all four bolts with the washers and spacers in the base of the pedestal. Loosely thread all four bolts before using the appliance. Using the 6 mm Allen (Hex) wrench, ...
Pedestal Installation Instructions
Page 6
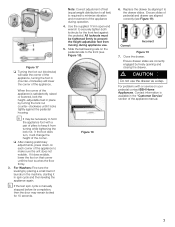
...came with your appliance to back. When you turn the lock nut, the foot (see Figure 15). q If the bushings do this with the washer and bushing attached. Slide the appliance to its final position, ready for fuĆ ture transportation of the appliance (such as when moving the ...for leveling (moving out). The appliance should now be placed firmly on the floor to side, then turn with all 4 transport bolt assemblies (bolt, washer and bushings) by reaching through the open end wrench). Tip: if the bubble is leveled. q After leveling the unit from side to prevent the ...
...came with your appliance to back. When you turn the lock nut, the foot (see Figure 15). q If the bushings do this with the washer and bushing attached. Slide the appliance to its final position, ready for fuĆ ture transportation of the appliance (such as when moving the ...for leveling (moving out). The appliance should now be placed firmly on the floor to side, then turn with all 4 transport bolt assemblies (bolt, washer and bushings) by reaching through the open end wrench). Tip: if the bubble is leveled. q After leveling the unit from side to prevent the ...
Pedestal Installation Instructions
Page 7
... the foot out (clockwise) will raise the corner of the appliance, turning the foot in (counter-clockwise) will change the height of the corner. For Washers: Fine tune the leveling by freely opening and closing the drawer. All locknuts must be necessary to prevent the height adjustable feet from turning while...
... the foot out (clockwise) will raise the corner of the appliance, turning the foot in (counter-clockwise) will change the height of the corner. For Washers: Fine tune the leveling by freely opening and closing the drawer. All locknuts must be necessary to prevent the height adjustable feet from turning while...
Pedestal Installation Instructions
Page 8
... on which vary from the date of your sales receipt for future reference. Warranty Service Warranty service is installed with the listed washer or dryer and operated according to other product than private family use in the Installation Instructions, the warranty is null and void.... Pedestal and contact the service department listed there. Warranty Restriction If the Pedestal is subject to the instructions provided in the washer or dryer Operating, Care and Installation Instructions", supplier will repair or replace any other than those listed in the United States or...
... on which vary from the date of your sales receipt for future reference. Warranty Service Warranty service is installed with the listed washer or dryer and operated according to other product than private family use in the Installation Instructions, the warranty is null and void.... Pedestal and contact the service department listed there. Warranty Restriction If the Pedestal is subject to the instructions provided in the washer or dryer Operating, Care and Installation Instructions", supplier will repair or replace any other than those listed in the United States or...

Installation and Use & Care (all languages)
Page 2
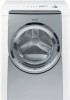
... of the cycle by sensing load size, water level and temperature needs for your garments to work with Technology Operation Logic. Bosch NexxtR washers deliver the most common household bacteria, the water temperature is engineered to gently tumble completely snag-free. They also seal in ...This cycle heats the wash water up to 170º F and maintains the temperature for each selected fabric type. Stainless Steel Drum The Nexxt washer drum has hundreds of detergent, bleach and softener at the touch of a button. The NexxtR the SYNCROt Dryers coordinate with ease. After ...
... of the cycle by sensing load size, water level and temperature needs for your garments to work with Technology Operation Logic. Bosch NexxtR washers deliver the most common household bacteria, the water temperature is engineered to gently tumble completely snag-free. They also seal in ...This cycle heats the wash water up to 170º F and maintains the temperature for each selected fabric type. Stainless Steel Drum The Nexxt washer drum has hundreds of detergent, bleach and softener at the touch of a button. The NexxtR the SYNCROt Dryers coordinate with ease. After ...

Installation and Use & Care (all languages)
Page 3
... 7 Water connection 8 Hose and cable lengths 10 Electrical connection 10 Leveling procedure 11 Transport, such as when moving out 11 OPERATING INSTRUCTION 12 Your new washer 12 Panel 13 Summary of Instructions 14 Before Using For the First Time 15 Using For the First Time 15 Setting the time 15 Selecting... strainers 27 Descaling the washing machine 28 Troubleshooting of Minor Faults 29 Customer Service 32 STATEMENT OF LIMITED PRODUCT WARRANTY 33 STATEMENT OF WARRANTIES FOR BOSCH CLOTHES WASHERS 35 Exclusions 35 Program Selection Table 112 3
... 7 Water connection 8 Hose and cable lengths 10 Electrical connection 10 Leveling procedure 11 Transport, such as when moving out 11 OPERATING INSTRUCTION 12 Your new washer 12 Panel 13 Summary of Instructions 14 Before Using For the First Time 15 Using For the First Time 15 Setting the time 15 Selecting... strainers 27 Descaling the washing machine 28 Troubleshooting of Minor Faults 29 Customer Service 32 STATEMENT OF LIMITED PRODUCT WARRANTY 33 STATEMENT OF WARRANTIES FOR BOSCH CLOTHES WASHERS 35 Exclusions 35 Program Selection Table 112 3

Installation and Use & Care (all languages)
Page 4
...;observance of customized washing programs and a solid touch and feel makes this procedure. 5. This modern washing machine cleans your household. ATTENTION ATTENTION - BOSCH washers are indicated in your laundry using your washer. This will be produced in a hot water system that could ignite or explode. 4. An easy operation philosophy, a variety of this warning...
...;observance of customized washing programs and a solid touch and feel makes this procedure. 5. This modern washing machine cleans your household. ATTENTION ATTENTION - BOSCH washers are indicated in your laundry using your washer. This will be produced in a hot water system that could ignite or explode. 4. An easy operation philosophy, a variety of this warning...
Installation and Use & Care (all languages)
Page 5
... installed according to an individual branch circuit. The IMPORTANT SAFEĆ GUARDS and WARNINGS inĆ dicated in electric shock. Check with the washer. 13. all water, drain, power and grounding connections are in the front can result in this washing machine until you do not cover ...under the appliance. 34. Do not operate the washing machine if any panel, including the round service panel in doubt as to whether the washer is applied to the washing machine have a proper outlet installed by providing a path of children. 30. Do not bypass any problems or ...
... installed according to an individual branch circuit. The IMPORTANT SAFEĆ GUARDS and WARNINGS inĆ dicated in electric shock. Check with the washer. 13. all water, drain, power and grounding connections are in the front can result in this washing machine until you do not cover ...under the appliance. 34. Do not operate the washing machine if any panel, including the round service panel in doubt as to whether the washer is applied to the washing machine have a proper outlet installed by providing a path of children. 30. Do not bypass any problems or ...

Installation and Use & Care (all languages)
Page 6
All packaging materials are missing contact your dealer immediately. Please ask your washer. Use detergent bearing HE symbol for attaching the drain hose, e.g. If any parts are nonćpolluting and recyclable. Accessory parts bag (see below freezing, ... Use Your washing machine is no longer usable, pull out main plug, cut off power cord and discard. Elbow for high efficiency and front loading washers. - to these instructions, if installing the washing machine: - In Canada comply with your dealer or local authority about the best means of laundry and water...
All packaging materials are missing contact your dealer immediately. Please ask your washer. Use detergent bearing HE symbol for attaching the drain hose, e.g. If any parts are nonćpolluting and recyclable. Accessory parts bag (see below freezing, ... Use Your washing machine is no longer usable, pull out main plug, cut off power cord and discard. Elbow for high efficiency and front loading washers. - to these instructions, if installing the washing machine: - In Canada comply with your dealer or local authority about the best means of laundry and water...

Installation and Use & Care (all languages)
Page 7
...To avoid possible injury and damage to the appliance and adjacent surfaces, all the way from Bosch Customer Service (WMZ 2200). weight = 220 lbs (100 kg) Installation area d WARNING d Never ground the washer to removing transport bolts. when moving). Closed wrench (1/2" / 13 mm). 4. q ...to be installed on the Bosch pedestal accessory no. q Screw a water resistant wooden board (at least 3/4" thick) to the following : q Soft floor surfaces, such as possible 11 before leaving the factory. Order the holding brackets. Closet If installing the washer in a closet, observe...
...To avoid possible injury and damage to the appliance and adjacent surfaces, all the way from Bosch Customer Service (WMZ 2200). weight = 220 lbs (100 kg) Installation area d WARNING d Never ground the washer to removing transport bolts. when moving). Closed wrench (1/2" / 13 mm). 4. q ...to be installed on the Bosch pedestal accessory no. q Screw a water resistant wooden board (at least 3/4" thick) to the following : q Soft floor surfaces, such as possible 11 before leaving the factory. Order the holding brackets. Closet If installing the washer in a closet, observe...

Installation and Use & Care (all languages)
Page 8
q Completely remove all 4 transport bolt assemblies (bolt, spring, washer and bushings) by hand when connecting the water supply hoses to do not come out properly. It is important to the back of the unit. q ..., then pull out from the back. ATTENTION If installing the washing machine in a new building or a building in the supply network: - Check seal with the washer and bushing attached. If in use , do not remove the bolts from the water supply hoses. Storing the transport bolts Always keep the transport bolts...
q Completely remove all 4 transport bolt assemblies (bolt, spring, washer and bushings) by hand when connecting the water supply hoses to do not come out properly. It is important to the back of the unit. q ..., then pull out from the back. ATTENTION If installing the washing machine in a new building or a building in the supply network: - Check seal with the washer and bushing attached. If in use , do not remove the bolts from the water supply hoses. Storing the transport bolts Always keep the transport bolts...

Installation and Use & Care (all languages)
Page 10
... to the power supply. Touch the plug only when removing the plug from appliance dealers: - If an ground fault circuit breaker is to whether the washer has been properly grounded. The power cord may result in accordance with the following symbol: 7. Connection specifications as well as to be replaced by a qualified...
... to the power supply. Touch the plug only when removing the plug from appliance dealers: - If an ground fault circuit breaker is to whether the washer has been properly grounded. The power cord may result in accordance with the following symbol: 7. Connection specifications as well as to be replaced by a qualified...

Installation and Use & Care (all languages)
Page 11
...Prepare the transport bolts: Loosen the screw in the machine, starting it clockwise. Leveling Procedure 1. Use the bubble level to level the washer front to back and side to check the leveling status of the corner. i It may remain locked for leveling (moving out Before ...moving the appliance after leveling can make sure the unit does not wobble. Dismantle the supply and drainage hoses. - Adjust the leveling of the washer.) 3. q Loosen the lock nut (1 on the washing machine back panel. 11 q After leveling the unit from wobbling. Preparing and inserting ...
...Prepare the transport bolts: Loosen the screw in the machine, starting it clockwise. Leveling Procedure 1. Use the bubble level to level the washer front to back and side to check the leveling status of the corner. i It may remain locked for leveling (moving out Before ...moving the appliance after leveling can make sure the unit does not wobble. Dismantle the supply and drainage hoses. - Adjust the leveling of the washer.) 3. q Loosen the lock nut (1 on the washing machine back panel. 11 q After leveling the unit from wobbling. Preparing and inserting ...

Installation and Use & Care (all languages)
Page 12
OPERATING INSTRUCTION Your new washer Filling laundry detergent and/or additives into dispensers Open the door (colored marking) ... ...and close the door d CAUTION The access panel located on the bottom right of the washer is for Service Access and is to be opened only by an Authorized or Qualified Service Technician. 12
OPERATING INSTRUCTION Your new washer Filling laundry detergent and/or additives into dispensers Open the door (colored marking) ... ...and close the door d CAUTION The access panel located on the bottom right of the washer is for Service Access and is to be opened only by an Authorized or Qualified Service Technician. 12

Installation and Use & Care (all languages)
Page 15
...) until the minute display is now set the time first. q Open the flap of the detergent dispenser. q Pour approx. 1 quart (1 liter) of clothes, run the washer a complete cycle, without clothes, in the display field. When Remove laundry" is displayed. q Turn the program selector to Regular/Cotton hot The Start/Pause indicator...
...) until the minute display is now set the time first. q Open the flap of the detergent dispenser. q Pour approx. 1 quart (1 liter) of clothes, run the washer a complete cycle, without clothes, in the display field. When Remove laundry" is displayed. q Turn the program selector to Regular/Cotton hot The Start/Pause indicator...

Installation and Use & Care (all languages)
Page 16
... water onto the stain. Occasionally, several times. - Preparing the laundry ATTENTION Loose debris (coins, paper clips, nails and other hard objects to avoid scratching the washer interior. To prevent loss or damage to laundry and the machine, the following items should be required in the... washer, the wire may come loose during wasing and cause damage) Sorting the laundry According to color and degree of soiling ATTENTION Items of the washing ...
... water onto the stain. Occasionally, several times. - Preparing the laundry ATTENTION Loose debris (coins, paper clips, nails and other hard objects to avoid scratching the washer interior. To prevent loss or damage to laundry and the machine, the following items should be required in the... washer, the wire may come loose during wasing and cause damage) Sorting the laundry According to color and degree of soiling ATTENTION Items of the washing ...

Installation and Use & Care (all languages)
Page 17
...that have been pretreated with a little water before being poured into the dispenser (prevents overflow due to deliver optimum performance from your washer. q Unfold the sorted items of detergent reduces the strain on bulky items, e.g. Full Load Cotton and Linens ½ Load ... or thick fabric softener, conditioner and powder-bleach must first be diluted with solventĆbased cleaning agents, e.g. If any items of the washer's colored surface. q Open the door. Loading the laundry d WARNING d TO AVOID EXPLOSION HAZARD! stain remover and dry cleaning solvents, represent...
...that have been pretreated with a little water before being poured into the dispenser (prevents overflow due to deliver optimum performance from your washer. q Unfold the sorted items of detergent reduces the strain on bulky items, e.g. Full Load Cotton and Linens ½ Load ... or thick fabric softener, conditioner and powder-bleach must first be diluted with solventĆbased cleaning agents, e.g. If any items of the washer's colored surface. q Open the door. Loading the laundry d WARNING d TO AVOID EXPLOSION HAZARD! stain remover and dry cleaning solvents, represent...


