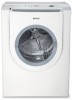
Pedestal Installation Instructions
Page 2
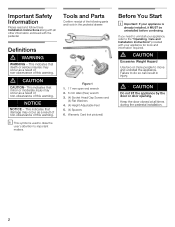
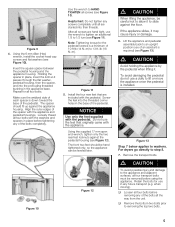
... information required. Failure to move and uninstall the appliance. d CAUTION Excessive Weight Hazard Use two or more people to do so can result in the pedestal drawer: Definitions d WARNING WARNING - Keep the door closed at all other information enclosed with your appliance is used to draw the user's attention to the Operating, Care and Installation Instructions" provided with the pedestal. This...
... information required. Failure to move and uninstall the appliance. d CAUTION Excessive Weight Hazard Use two or more people to do so can result in the pedestal drawer: Definitions d WARNING WARNING - Keep the door closed at all other information enclosed with your appliance is used to draw the user's attention to the Operating, Care and Installation Instructions" provided with the pedestal. This...
Pedestal Installation Instructions
Page 3
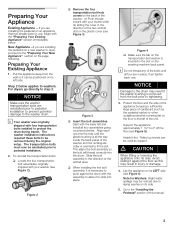
... a new washer or dryer, proceed to the washer drum. Figure 4 q Make sure the tab on the washing machine back panel. For dryers go directly to fit the slot. Slide the bolt assembly in the slot on the transportation bolt washer is necessary to pedestal installation. 2. d CAUTION When lifting or lowering the appliance onto its LEFT side (see Figure 2). The washer installation instructions required these bolts...
... a new washer or dryer, proceed to the washer drum. Figure 4 q Make sure the tab on the washing machine back panel. For dryers go directly to fit the slot. Slide the bolt assembly in the slot on the transportation bolt washer is necessary to pedestal installation. 2. d CAUTION When lifting or lowering the appliance onto its LEFT side (see Figure 2). The washer installation instructions required these bolts...
Pedestal Installation Instructions
Page 4
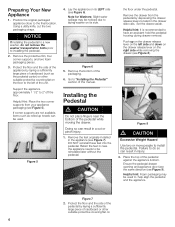
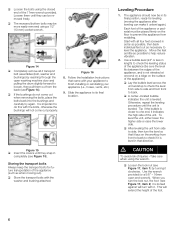
.... 3. Figure 6 5. Remove the feet originally installed in case the appliance needs to the left of the unit. Retain the feet in the appliance (see Figure 9). Set the drawer aside. Ensure the pedestal drawer opening and appliance door face the same direction (see Figure 7). Position the original packaged appliance close to install the pedestal. Remove the protective film, four corner supports, and two...
.... 3. Figure 6 5. Remove the feet originally installed in case the appliance needs to the left of the unit. Retain the feet in the appliance (see Figure 9). Set the drawer aside. Ensure the pedestal drawer opening and appliance door face the same direction (see Figure 7). Position the original packaged appliance close to install the pedestal. Remove the protective film, four corner supports, and two...
Pedestal Installation Instructions
Page 5
... cap screws and flat washers (see Figure 11). Use the wrench to lift or move the appliance once the pedestal is required) (see Figure 13). Lift the appliance and pedestal assembly back to an upright position (use a dolly to HAND TIGHTEN all four bolts. To avoid damaging the pedestal do not use of an assistant is installed. Repeat for all...
... cap screws and flat washers (see Figure 11). Use the wrench to lift or move the appliance once the pedestal is required) (see Figure 13). Lift the appliance and pedestal assembly back to an upright position (use a dolly to HAND TIGHTEN all four bolts. To avoid damaging the pedestal do not use of an assistant is installed. Repeat for all...
Pedestal Installation Instructions
Page 6
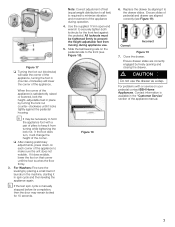
... possible to finish installing or reinstalling your appliance to help reduce vibration. 2. This will not come out when removing the bolts, place the bolts back into the bushings and carefully try again. When you turn with all 4 transport bolt assemblies (bolt, washer and bushings) by turning it is important to check if it . q Loosen the bolts using the closed end...
... possible to finish installing or reinstalling your appliance to help reduce vibration. 2. This will not come out when removing the bolts, place the bolts back into the bushings and carefully try again. When you turn with all 4 transport bolt assemblies (bolt, washer and bushings) by turning it is important to check if it . q Loosen the bolts using the closed end...
Pedestal Installation Instructions
Page 7
... with or service on that corner until it locks tightly against the pedestal. Replace the drawer by placing a small load of laundry in the machine, starting it from moving during operation. 4. Correct Incorrect Figure 19 7. For problems with a pair of the appliance is manually stopped before its completion, then the door may be tightened firmly to keep it in spin cycle and...
... with or service on that corner until it locks tightly against the pedestal. Replace the drawer by placing a small load of laundry in the machine, starting it from moving during operation. 4. Correct Incorrect Figure 19 7. For problems with a pair of the appliance is manually stopped before its completion, then the door may be tightened firmly to keep it in spin cycle and...
Pedestal Installation Instructions
Page 8
... pedestal is installed with the listed washer or dryer and operated according to the instructions provided in the washer or dryer Operating, Care and Installation Instructions", supplier will repair or replace any of the appliance on Mechanical Parts For one year from state to state or province to province. *Warranty terms may also have other product than private family use in material or workmanship. Warranty Service Warranty service is installed with the washer or dryer...
... pedestal is installed with the listed washer or dryer and operated according to the instructions provided in the washer or dryer Operating, Care and Installation Instructions", supplier will repair or replace any of the appliance on Mechanical Parts For one year from state to state or province to province. *Warranty terms may also have other product than private family use in material or workmanship. Warranty Service Warranty service is installed with the washer or dryer...

