
Operating Guide
Page 2
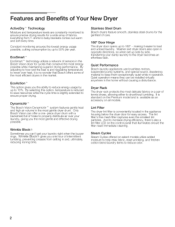
... while in operation. It is standard on the control panel that illuminates should the filter need immediate cleaning. Everything from setting in and, ultimately, reducing ironing time. By selecting this option, temperature is reduced to save resources while the cycle time is no wonder that conserve the most gentle and effective drying possible. Dryer Rack The dryer rack protects the most gentle dryer drum. Steam Cycles Steam Cycles offered on all models. Wrinkle Block®...
... while in operation. It is standard on the control panel that illuminates should the filter need immediate cleaning. Everything from setting in and, ultimately, reducing ironing time. By selecting this option, temperature is reduced to save resources while the cycle time is no wonder that conserve the most gentle and effective drying possible. Dryer Rack The dryer rack protects the most gentle dryer drum. Steam Cycles Steam Cycles offered on all models. Wrinkle Block®...

Operating Guide
Page 3
...Installation Location 8 Dryer Dimensions 8 Door Hinge Reversal 9 Installation Types 11 Electrical connection 14 Exhaust air connection 17 Accessories 19 Preparing to transport the dryer - Table of cycle sequence 23 Cycle Selection Table 24 Automatic cycles 24 Steam cycles 24 Special cycles 24 Time cycles 24 Additional Options on LCD Menu 24 Operation 26 Using the dryer 26 Cleaning the lint filter 27 Using the dryer rack (Option 28 Cleaning and care 29 Cleaning the dryer 29 Cleaning the exhaust duct 29 Cleaning...
...Installation Location 8 Dryer Dimensions 8 Door Hinge Reversal 9 Installation Types 11 Electrical connection 14 Exhaust air connection 17 Accessories 19 Preparing to transport the dryer - Table of cycle sequence 23 Cycle Selection Table 24 Automatic cycles 24 Steam cycles 24 Special cycles 24 Time cycles 24 Additional Options on LCD Menu 24 Operation 26 Using the dryer 26 Cleaning the lint filter 27 Using the dryer rack (Option 28 Cleaning and care 29 Cleaning the dryer 29 Cleaning the exhaust duct 29 Cleaning...

Operating Guide
Page 4
... energy consumption. Bosch dryers offer the following standard features: High efficiency precision drying system Large stainless steel drum with a capacity of up to 17.6 Ibs (8 kg) Large port hole (16"/406 mm), and door interlock with automatic drum stop function Exceptionally quiet operation Sensor-controlled auto cycles Timed cycles 300 and 500 Series Dryer: 20, 40 and 60 minute cycles 800 Series Dryer: 10 to dryers with two different display types...
... energy consumption. Bosch dryers offer the following standard features: High efficiency precision drying system Large stainless steel drum with a capacity of up to 17.6 Ibs (8 kg) Large port hole (16"/406 mm), and door interlock with automatic drum stop function Exceptionally quiet operation Sensor-controlled auto cycles Timed cycles 300 and 500 Series Dryer: 20, 40 and 60 minute cycles 800 Series Dryer: 10 to dryers with two different display types...

Operating Guide
Page 5
... burns, keep all cleaning products out of the reach of electrical power and must not be exposed to cooking oils in your dryer, follow basic precautions, _ncluding the following. 1. BEFORE THE APPLIANCE IS REMOVED FROM SERVICE OR DISCARDED, REMOVE THE DOOR TO THE DRYING COMPARTMENT. Check the lint screen before attempting any service unless specifically recommended in the user-maintenance instructions or in published user repair instructions that might reduce...
... burns, keep all cleaning products out of the reach of electrical power and must not be exposed to cooking oils in your dryer, follow basic precautions, _ncluding the following. 1. BEFORE THE APPLIANCE IS REMOVED FROM SERVICE OR DISCARDED, REMOVE THE DOOR TO THE DRYING COMPARTMENT. Check the lint screen before attempting any service unless specifically recommended in the user-maintenance instructions or in published user repair instructions that might reduce...
Operating Guide
Page 6
... dryer comes without a power supply cord. The power cord must be exercised when installing, maintaining or operating the dryer. Notes: A The IMPORTANT SAFEGUARDS and WARNINGS presented in this manual should be grounded. Common sense, caution and care must meet the following requirements: UL listed in the USA 208 - 240 volt rated (minimum) 30 amps Type SRDT or DRT (UL 2158) Five feet long (minimum) Improper connection of...
... dryer comes without a power supply cord. The power cord must be exercised when installing, maintaining or operating the dryer. Notes: A The IMPORTANT SAFEGUARDS and WARNINGS presented in this manual should be grounded. Common sense, caution and care must meet the following requirements: UL listed in the USA 208 - 240 volt rated (minimum) 30 amps Type SRDT or DRT (UL 2158) Five feet long (minimum) Improper connection of...
Operating Guide
Page 7
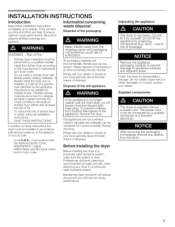
... appliance The dryer is clean. Remove the appliance packaging carefully to prevent damage to ensure optimum dryer performance. Check the dryer for clothes dryers. If in doubt, contact your local authority about the best means of a specific type identified by a qualified installer. Risk of disposal. Do not install a clothes dryer with main plug. These conditions will improve drying performance. SAVE THESE INSTRUCTIONS. due to risk of a local code: In...
... appliance The dryer is clean. Remove the appliance packaging carefully to prevent damage to ensure optimum dryer performance. Check the dryer for clothes dryers. If in doubt, contact your local authority about the best means of a specific type identified by a qualified installer. Risk of disposal. Do not install a clothes dryer with main plug. These conditions will improve drying performance. SAVE THESE INSTRUCTIONS. due to risk of a local code: In...
Operating Guide
Page 8
...-adjustable feet. Have the power supply cord fitted by the appropriate ductwork parts manufacturers (see page 8). 5. Follow the installation instructions supplied by a qualified technician or a licensed electrician (see page 14). , Check for "Y" connection, short hose and water supply hose included with the dryer packaging (see page 13). (Selected models only). , Connect the water supply (selected models only) to the back of the door! DO NOT push...
...-adjustable feet. Have the power supply cord fitted by the appropriate ductwork parts manufacturers (see page 8). 5. Follow the installation instructions supplied by a qualified technician or a licensed electrician (see page 14). , Check for "Y" connection, short hose and water supply hose included with the dryer packaging (see page 13). (Selected models only). , Connect the water supply (selected models only) to the back of the door! DO NOT push...
Operating Guide
Page 11
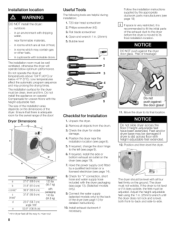
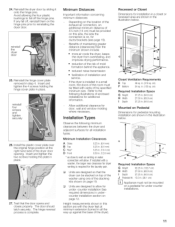
... the dryer door opening. Closet Ventilation Requirements E Top F Bottom 48 sq. If any fall off , reinstall them on Pedestal Dimensions for additional information. Minimum Distances Important information concerning minimum distances: Depending on the location of the exhaust air connection, an additional minimum distance of the stacking kits shown on , for all the way up against the base of the specified minimum size. Installation Types Observe...
... the dryer door opening. Closet Ventilation Requirements E Top F Bottom 48 sq. If any fall off , reinstall them on Pedestal Dimensions for additional information. Minimum Distances Important information concerning minimum distances: Depending on the location of the exhaust air connection, an additional minimum distance of the stacking kits shown on , for all the way up against the base of the specified minimum size. Installation Types Observe...
Operating Guide
Page 12
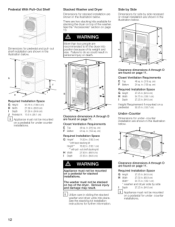
... not be mounted on a pedestal for under counter installations. See the stacking kit installation instructions for under counter installations. 12 More than two people are found on page 19. Clearance dimensions A through D are shown in . (94.6cm) Height Requirement if mounted on top of the washer. iii Dimensions for under counter installation are found on page 11. D Utilize care in the illustration below...
... not be mounted on a pedestal for under counter installations. See the stacking kit installation instructions for under counter installations. 12 More than two people are found on page 19. Clearance dimensions A through D are shown in . (94.6cm) Height Requirement if mounted on top of the washer. iii Dimensions for under counter installation are found on page 11. D Utilize care in the illustration below...
Operating Guide
Page 13
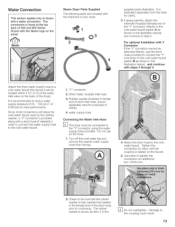
... optional Installation with a water connection. Steam Steam Dryer Parts Supplied The following parts are included with the Steam logo on the panel. %;; "Y" connector 2. Do not use the short hose provided to connect the "Y" connector to a cold water faucet (the faucet must be attached directly, use an old hose. 1. Tighten the connection by the clothes washer, a "Y" connector is shown as shown in order to connect the water supply hose to have a water supply pressure of 500 and 800 Series Dryers...
... optional Installation with a water connection. Steam Steam Dryer Parts Supplied The following parts are included with the Steam logo on the panel. %;; "Y" connector 2. Do not use the short hose provided to connect the "Y" connector to a cold water faucet (the faucet must be attached directly, use an old hose. 1. Tighten the connection by the clothes washer, a "Y" connector is shown as shown in order to connect the water supply hose to have a water supply pressure of 500 and 800 Series Dryers...
Operating Guide
Page 14
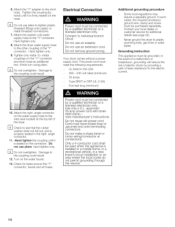
... the right angle connector. 11. Electrical Connection Power cord must be purchased separately. Attach the right angle connector on the water faucet. 13. approved 30 amp power cord with strain relief clamp note manufacturer's instructions. D Do not use pliers, hand tighten only. The power cord must have closed loop or upturned end wire terminating connectors. Do not remove ground prong. Attach the "Y" adapter to the short hose. Turn on the water supply hose to...
... the right angle connector. 11. Electrical Connection Power cord must be purchased separately. Attach the right angle connector on the water faucet. 13. approved 30 amp power cord with strain relief clamp note manufacturer's instructions. D Do not use pliers, hand tighten only. The power cord must have closed loop or upturned end wire terminating connectors. Do not remove ground prong. Attach the "Y" adapter to the short hose. Turn on the water supply hose to...

Operating Guide
Page 15
... it is place. Continued on the terminal block. Connecting the Power Supply (3 wire & 4 wire) Improper connection of the grounding strap. Fix a strain relief clamp (available from located at the top rear of the power cord into a live receptacle before connecting power cord to whether the dryer has been properly grounded, Do not plug the end of the appliance. Have the appliance checked by a qualified technician or licensed electrician...
... it is place. Continued on the terminal block. Connecting the Power Supply (3 wire & 4 wire) Improper connection of the grounding strap. Fix a strain relief clamp (available from located at the top rear of the power cord into a live receptacle before connecting power cord to whether the dryer has been properly grounded, Do not plug the end of the appliance. Have the appliance checked by a qualified technician or licensed electrician...

Operating Guide
Page 17
... appliance(optional) Special exhaust air connections can shorten drying times, save energy and help ensure the safety of the exhaust duct system from incorrect installation are not covered by making sure your dryer to the optional connection location. Metal foil and flexible metal ducting are illustrated below. Joints should change the exhaust air outlet to a previously used for lint. Important Points to an existing venting system or a new venting 17 DO NOT...
... appliance(optional) Special exhaust air connections can shorten drying times, save energy and help ensure the safety of the exhaust duct system from incorrect installation are not covered by making sure your dryer to the optional connection location. Metal foil and flexible metal ducting are illustrated below. Joints should change the exhaust air outlet to a previously used for lint. Important Points to an existing venting system or a new venting 17 DO NOT...

Operating Guide
Page 18
... shorter drying times. _ii/iiidiiii Good Better i\ Do not allow exhaust ductwork to be used . Required Ductwork Parts The parts required for the exhaust air system (elbows, lines, exhaust air outlets) are not recommended. Check to be crushed or otherwise constricted. DO NOT use of straight duct, including distance between last turn inside the dryer. If using the table above ground level or any other obstructing surface. The use an exhaust vent hood...
... shorter drying times. _ii/iiidiiii Good Better i\ Do not allow exhaust ductwork to be used . Required Ductwork Parts The parts required for the exhaust air system (elbows, lines, exhaust air outlets) are not recommended. Check to be crushed or otherwise constricted. DO NOT use of straight duct, including distance between last turn inside the dryer. If using the table above ground level or any other obstructing surface. The use an exhaust vent hood...
Operating Guide
Page 19
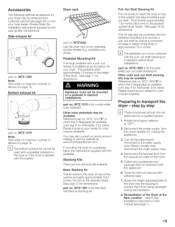
... the X designates an available color (eg: A for Anthracite, S for dimensions. Disconnect the water supply hose. 4. Pull-Out Shelf Stacking Kit This kit serves to the water supply hose (Steam models only). Disconnect the power supply (turn the circuit breaker off the water faucet connected to stack the dryer on the dryer. 5. Close the door and secure with the pedestal. Bottom exhaust kit part no . Dryer rack part no . See page 12 for shipment with a pull-out drawer...
... the X designates an available color (eg: A for Anthracite, S for dimensions. Disconnect the water supply hose. 4. Pull-Out Shelf Stacking Kit This kit serves to the water supply hose (Steam models only). Disconnect the power supply (turn the circuit breaker off the water faucet connected to stack the dryer on the dryer. 5. Close the door and secure with the pedestal. Bottom exhaust kit part no . Dryer rack part no . See page 12 for shipment with a pull-out drawer...
Operating Guide
Page 26
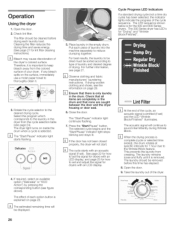
... the Wrinkle Block feature. Open the door. 2. D The "Start/Pause" indicator light starts flashing. 4. The 300 Series dryer has LED's for lint filter cleaning instructions). Open the door. 9. Take the laundry out of laundry into the machine separately to the desired drying cycle. Place laundry in the drum and that all items are completely in the empty drum. Operation Using the dryer 1. The filter should be cleaned before this time has elapsed. 8. Therefore, it . 3. The dryer light turns on...
... the Wrinkle Block feature. Open the door. 2. D The "Start/Pause" indicator light starts flashing. 4. The 300 Series dryer has LED's for lint filter cleaning instructions). Open the door. 9. Take the laundry out of laundry into the machine separately to the desired drying cycle. Place laundry in the drum and that all items are completely in the empty drum. Operation Using the dryer 1. The filter should be cleaned before this time has elapsed. 8. Therefore, it . 3. The dryer light turns on...

Operating Guide
Page 27
... door heats up on the lint filter screen. Avoid touching any heated surface until it no longer holds water. A filter with your fingers lightly for better results. To remove residue, follow these steps: 1. Cleaning the lint filter A dirty filter extends the drying time and increases energy consumption. The filter is harder to cool. 2. Wet both sides of dryer sheets is not recommended. Be careful not to remove lint. Replace the lint filter back into the dryer. Wet lint is clean...
... door heats up on the lint filter screen. Avoid touching any heated surface until it no longer holds water. A filter with your fingers lightly for better results. To remove residue, follow these steps: 1. Cleaning the lint filter A dirty filter extends the drying time and increases energy consumption. The filter is harder to cool. 2. Wet both sides of dryer sheets is not recommended. Be careful not to remove lint. Replace the lint filter back into the dryer. Wet lint is clean...
Operating Guide
Page 29
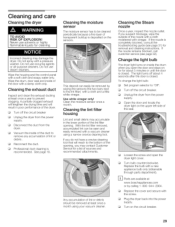
... a month using a narrow crevice cleaning tool. Loosen the screw and open the door and stays on the upper left side of lint or debris should be removed by calling 1 800 944-2904. Replace the cover and secure with a soft cloth and soapy water only. Change the light bulb The dryer light turns on inside the drum when you open the dryer light cover. Unplug the dryer from the power supply. Turn off the circuit breaker. Any...
... a month using a narrow crevice cleaning tool. Loosen the screw and open the door and stays on the upper left side of lint or debris should be removed by calling 1 800 944-2904. Replace the cover and secure with a soft cloth and soapy water only. Change the light bulb The dryer light turns on inside the drum when you open the dryer light cover. Unplug the dryer from the power supply. Turn off the circuit breaker. Any...
Operating Guide
Page 32
... information: Model Number Serial Number Date of Original Purchase Date Problem Originated Explanation of the front panel. An example is located below . The manufacturer reserves the right to disconnection when servicing controls. Label all wires prior to make changes in the product or manual without notification. 32 D If you are having a problem with your installer or service person, the problem still has not been resolved to repair the...
... information: Model Number Serial Number Date of Original Purchase Date Problem Originated Explanation of the front panel. An example is located below . The manufacturer reserves the right to disconnection when servicing controls. Label all wires prior to make changes in the product or manual without notification. 32 D If you are having a problem with your installer or service person, the problem still has not been resolved to repair the...

Operating Guide
Page 34
... structure and setting for your Product, you how to use of the Product in conjunction with air or water going vessels); (2) any party's willful misconduct, negligence, misuse, abuse, accidents, neglect, improper operation, failure to maintain, improper or negligent installation, tampering, failure to follow operating instructions, mishandling, unauthorized service (including self-performed "fixing" or exploration of the appliance's internal workings); (3) adjustment, alteration...
... structure and setting for your Product, you how to use of the Product in conjunction with air or water going vessels); (2) any party's willful misconduct, negligence, misuse, abuse, accidents, neglect, improper operation, failure to maintain, improper or negligent installation, tampering, failure to follow operating instructions, mishandling, unauthorized service (including self-performed "fixing" or exploration of the appliance's internal workings); (3) adjustment, alteration...

