
Operating Instructions
Page 10
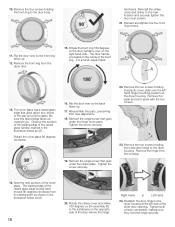
...of the raised glass handle, marked in the illustration below as (A). 10 20. Reassemble the parts, preserving their new alignments. 18. Tighten the screw securely. 22. Remove the two screws holding the plastic cover plate over so the front ring faces up . 17. The leading edge of the dryer door...around the glass. Remove the two screws holding the front ring to Left Hand 24. Tighten both screws completely, making sure they hold the hinge securely. Rotate the front ring 180 degrees so the door handle is a hand-sized indent. 13. Reinsert the single screw that goes about two-...
...of the raised glass handle, marked in the illustration below as (A). 10 20. Reassemble the parts, preserving their new alignments. 18. Tighten the screw securely. 22. Remove the two screws holding the plastic cover plate over so the front ring faces up . 17. The leading edge of the dryer door...around the glass. Remove the two screws holding the front ring to Left Hand 24. Tighten both screws completely, making sure they hold the hinge securely. Rotate the front ring 180 degrees so the door handle is a hand-sized indent. 13. Reinsert the single screw that goes about two-...

Operating Instructions
Page 11
.... Reinstall the hinge cover plate removed in place. Insert and tighten the 4 screws holding the plate in . (310 sq. reinstall four screws and tighten securely 28. Benefits of enclosed installations for under - Refer to allow . Minimum Installation Clearances A Sides B Top C Rear* D Front 0.25 in. (6.4 mm... section are shown in this side, the side the connection is installed in all installation types. The door should latch securely. Allow additional clearance for the laundry pair. Recessed or Closet Dimensions for pedestal mounting installation are with the dryer feet...
.... Reinstall the hinge cover plate removed in place. Insert and tighten the 4 screws holding the plate in . (310 sq. reinstall four screws and tighten securely 28. Benefits of enclosed installations for under - Refer to allow . Minimum Installation Clearances A Sides B Top C Rear* D Front 0.25 in. (6.4 mm... section are shown in this side, the side the connection is installed in all installation types. The door should latch securely. Allow additional clearance for the laundry pair. Recessed or Closet Dimensions for pedestal mounting installation are with the dryer feet...

Operating Instructions
Page 17
..., ceiling or floor. 8. DO NOT use a DEDPV (booster fan) device with magnetic latches. 12. DO NOT use exhaust hoods with this dryer. You can be secured with screws or fasteners that result from your dryer's exhaust duct system is properly installed and maintained. Exhaust air connection The following warnings must be...
..., ceiling or floor. 8. DO NOT use a DEDPV (booster fan) device with magnetic latches. 12. DO NOT use exhaust hoods with this dryer. You can be secured with screws or fasteners that result from your dryer's exhaust duct system is properly installed and maintained. Exhaust air connection The following warnings must be...

Operating Instructions
Page 19
... is for color choices available. This kit may also be combined with the pull-out shelf stacking kit in stacked installations. Close the door and secure with the washer. refer to the Installation Instructions in height of the dryer of the dryer into the housing to stack the dryer on top...
... is for color choices available. This kit may also be combined with the pull-out shelf stacking kit in stacked installations. Close the door and secure with the washer. refer to the Installation Instructions in height of the dryer of the dryer into the housing to stack the dryer on top...
Operating Instructions
Page 29
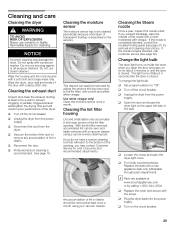
... debris should be cleaned periodically because a fine layer of the nozzle with a cloth moistened with a vaccum cleaner using your vacuum cleaner. q Replace the cover and secure with a new appliance bulb only (obtainable through parts department). If the nozzle remains blocked, call customer service (see page 31) for about 4 seconds after the...
... debris should be cleaned periodically because a fine layer of the nozzle with a cloth moistened with a vaccum cleaner using your vacuum cleaner. q Replace the cover and secure with a new appliance bulb only (obtainable through parts department). If the nozzle remains blocked, call customer service (see page 31) for about 4 seconds after the...