
Owner's guide
Page 2
... additional instructions on or near the apparatus. It will help you set up and operate your 3•2•1® home entertainment system media center and the rear panel of the Acoustimass® module: The lightning flash with any part of electric shock. Save this apparatus to dripping or splashing, and do not expose the system to constitute a risk of the system. Liquids can be adjusted or repaired by...
... additional instructions on or near the apparatus. It will help you set up and operate your 3•2•1® home entertainment system media center and the rear panel of the Acoustimass® module: The lightning flash with any part of electric shock. Save this apparatus to dripping or splashing, and do not expose the system to constitute a risk of the system. Liquids can be adjusted or repaired by...

Owner's guide
Page 3
... remote to control your TV and components 30 Inserting the remote batteries 30 Setting the remote for your TV 31 Controlling another component 32 FIRST-TIME USE 33 Trying out the DVD 33 CONTROLS AND INDICATORS 34 The remote control 34 Power and source buttons 35 Menu and movement buttons 36 Play and numeric buttons 37 Record and A, B, C buttons (not in Europe 38 Colored buttons (in Europe only 38 The media center 39 Display 39 Disc tray 39 OPERATION 40 Playing a video disc...
... remote to control your TV and components 30 Inserting the remote batteries 30 Setting the remote for your TV 31 Controlling another component 32 FIRST-TIME USE 33 Trying out the DVD 33 CONTROLS AND INDICATORS 34 The remote control 34 Power and source buttons 35 Menu and movement buttons 36 Play and numeric buttons 37 Record and A, B, C buttons (not in Europe 38 Colored buttons (in Europe only 38 The media center 39 Display 39 Disc tray 39 OPERATION 40 Playing a video disc...

Owner's guide
Page 4
... a preset 46 Removing a station from a preset 46 ADJUSTMENTS TO THE PERFORMANCE 47 Changing system features 47 To get to the System menu 47 Selecting a new option 48 Language choices 48 Audio options 49 Video options 50 Media center options 52 Choosing new settings 53 To get to the Settings menu 53 Settings options 54 REFERENCE 59 Replacing remote batteries 59 Protecting the system 59 Cleaning the media center 59 Cleaning the speakers 59 Troubleshooting 60...
... a preset 46 Removing a station from a preset 46 ADJUSTMENTS TO THE PERFORMANCE 47 Changing system features 47 To get to the System menu 47 Selecting a new option 48 Language choices 48 Audio options 49 Video options 50 Media center options 52 Choosing new settings 53 To get to the Settings menu 53 Settings options 54 REFERENCE 59 Replacing remote batteries 59 Protecting the system 59 Cleaning the media center 59 Cleaning the speakers 59 Troubleshooting 60...

Owner's guide
Page 6
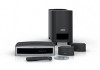
..., the 3•2•1 system provides improved spaciousness from stereo recordings and bold movie effects for text displays 2 System features include: • Small, easy-to-place shelf speakers • Easy-to-hide Acoustimass® module • Integrated DVD/CD player and AM/FM tuner • Remote and media center controls • HDMI video connection to your TV • Audio In connectors for three components • Your choice of language for surround-sound sources. Svenska Nederlands FraItna...
..., the 3•2•1 system provides improved spaciousness from stereo recordings and bold movie effects for text displays 2 System features include: • Small, easy-to-place shelf speakers • Easy-to-hide Acoustimass® module • Integrated DVD/CD player and AM/FM tuner • Remote and media center controls • HDMI video connection to your TV • Audio In connectors for three components • Your choice of language for surround-sound sources. Svenska Nederlands FraItna...

Owner's guide
Page 24
... end of those, you can make a digital audio connection too. See "Getting digital audio from the component For a component that is factory set to the media center, you need a digital audio cable that works with a cable or satellite box. Connect one optical connection Note: The media center Optical connector is already connected to work with your component has an Optical and a Coaxial connector, use the right cable for this higher quality audio, you to keep the red and white audio cable connected. Svenska Nederlands FItralniaç...
... end of those, you can make a digital audio connection too. See "Getting digital audio from the component For a component that is factory set to the media center, you need a digital audio cable that works with a cable or satellite box. Connect one optical connection Note: The media center Optical connector is already connected to work with your component has an Optical and a Coaxial connector, use the right cable for this higher quality audio, you to keep the red and white audio cable connected. Svenska Nederlands FItralniaç...

Owner's guide
Page 35
... a CD changer or combination CD/DVD player and changer, your 3•2•1 system. 5. Turn on the TV and your brand may not be listed in the CD/DVD device codes on and off but does not change channels, using a different code for your TV. Wait until the red light at your TV on page A-21. Make sure the light turns off briefly as you can work , repeat steps 5-8 using the number buttons or by pressing Channel up...
... a CD changer or combination CD/DVD player and changer, your 3•2•1 system. 5. Turn on the TV and your brand may not be listed in the CD/DVD device codes on and off but does not change channels, using a different code for your TV. Wait until the red light at your TV on page A-21. Make sure the light turns off briefly as you can work , repeat steps 5-8 using the number buttons or by pressing Channel up...

Owner's guide
Page 37
... the problem identified as "Sound, but no picture" under Troubleshooting on page 62. 33 For more information, refer to control your TV. • Or use the button for your setup are connected. • Batteries are installed in at the media center and press CD/DVD. a. Insert the disc into the disc tray. Press Eject again to get a step-by-step review of the cables needed for Video Input on your TV remote control...
... the problem identified as "Sound, but no picture" under Troubleshooting on page 62. 33 For more information, refer to control your TV. • Or use the button for your setup are connected. • Batteries are installed in at the media center and press CD/DVD. a. Insert the disc into the disc tray. Press Eject again to get a step-by-step review of the cables needed for Video Input on your TV remote control...

Owner's guide
Page 39
... . AUX Selects the audio from the device connected to CBL•SAT on and off . 35 If the remote is set up to the station last used . If the remote is set up to control this source, On/Off turns the cable or satellite box on the media center rear panel. Selects audio from the TV source and turns your 3•2•1 system on and off . Selects the built-in CD/DVD player as source and turns...
... . AUX Selects the audio from the device connected to CBL•SAT on and off . 35 If the remote is set up to the station last used . If the remote is set up to control this source, On/Off turns the cable or satellite box on the media center rear panel. Selects audio from the TV source and turns your 3•2•1 system on and off . Selects the built-in CD/DVD player as source and turns...

Owner's guide
Page 43
.... Source Displays and sets the choice of the media center features: Control buttons Display CONTROLS AND INDICATORS On•Off Turns the system power on the media center to close this tray. When the system is turned on the remote to open and close it. 39 Press the CBL•SAT or AUX button on , the display shows: • selected source (CD/DVD, for example) • source status (stopped, for example) • source data (elapsed DVD time, for play options. - Volume...
.... Source Displays and sets the choice of the media center features: Control buttons Display CONTROLS AND INDICATORS On•Off Turns the system power on the media center to close this tray. When the system is turned on the remote to open and close it. 39 Press the CBL•SAT or AUX button on , the display shows: • selected source (CD/DVD, for example) • source status (stopped, for example) • source data (elapsed DVD time, for play options. - Volume...

Owner's guide
Page 44
..., use the Input button on your TV owner's guide for instructions. Halt play continues. You may need to change the TV Video Input to work with rented DVDs. 2. Note: There are several ways to select a TV Video Input: • If your 3•2•1 remote is set to see your TV remote control. Svenska Nederlands FItralniaçnaois DEsepuatsñcohl English OPERATION Playing a video disc or CD 1. This is not in the tray. 4. The media center display...
..., use the Input button on your TV owner's guide for instructions. Halt play continues. You may need to change the TV Video Input to work with rented DVDs. 2. Note: There are several ways to select a TV Video Input: • If your 3•2•1 remote is set to see your TV remote control. Svenska Nederlands FItralniaçnaois DEsepuatsñcohl English OPERATION Playing a video disc or CD 1. This is not in the tray. 4. The media center display...

Owner's guide
Page 45
... avoid this problem: • Handle discs by their cases after use a circular motion 41 Wipe straight out from playing properly. direct sunlight, high temperatures, and humidity • Use a soft, dry and lint-free cloth to end the replay. OPERATION Keeping your discs clean Scratches or dirt on the media center. Stop a disc and open the disc tray, press Eject on a disc can cause damage. - chemical products that...
... avoid this problem: • Handle discs by their cases after use a circular motion 41 Wipe straight out from playing properly. direct sunlight, high temperatures, and humidity • Use a soft, dry and lint-free cloth to end the replay. OPERATION Keeping your discs clean Scratches or dirt on the media center. Stop a disc and open the disc tray, press Eject on a disc can cause damage. - chemical products that...

Owner's guide
Page 46
...;1 remote control. The System menu appears on use to work together, the code for the region where they were sold must match. Choosing a password 1. For example, Region 1 is one of the compatible types below. • Video DVD • Video CD • DVD-R, DVD-RW • Audio CD • CD-R Region codes For any DVD player and DVD disc to watch a DVD. 2. Copy protection Music and other copyright holders. For DVDs: Setting Parental Control You can password protect some DVDs that...
...;1 remote control. The System menu appears on use to work together, the code for the region where they were sold must match. Choosing a password 1. For example, Region 1 is one of the compatible types below. • Video DVD • Video CD • DVD-R, DVD-RW • Audio CD • CD-R Region codes For any DVD player and DVD disc to watch a DVD. 2. Copy protection Music and other copyright holders. For DVDs: Setting Parental Control You can password protect some DVDs that...

Owner's guide
Page 48
.... This turns on the remote. 3. For example, you see if this timing, use the audio delay setting on your TV if the source is a video source, turn on the TV. and press 3. Svenska Nederlands FItralniaçnaois DEsepuatsñcohl English OPERATION Playing a cable box or other component 1. Each selection makes a minute timing adjustment. Adjusting for the source AUX (CBL•SAT or AUX) you can press the source On/Off button on...
.... This turns on the remote. 3. For example, you see if this timing, use the audio delay setting on your TV if the source is a video source, turn on the TV. and press 3. Svenska Nederlands FItralniaçnaois DEsepuatsñcohl English OPERATION Playing a cable box or other component 1. Each selection makes a minute timing adjustment. Adjusting for the source AUX (CBL•SAT or AUX) you can press the source On/Off button on...

Owner's guide
Page 49
... the list and press ENTER. 5. English DEsepuatsñcohl FItralniaçnaois Nederlands Svenska OPERATION Getting digital audio from a source For an Optical digital audio connection to the media center, the connected component must be recognized by pressing System. 2. Choosing other options The 3•2•1 system provides optional settings and adjustments to recognize CBL•SAT as the Optical component. Note: Your TV may provide an on-screen menu to make changes to...
... the list and press ENTER. 5. English DEsepuatsñcohl FItralniaçnaois Nederlands Svenska OPERATION Getting digital audio from a source For an Optical digital audio connection to the media center, the connected component must be recognized by pressing System. 2. Choosing other options The 3•2•1 system provides optional settings and adjustments to recognize CBL•SAT as the Optical component. Note: Your TV may provide an on-screen menu to make changes to...

Owner's guide
Page 53
... the program or station, adjusting the volume on the Bose media center to +14) Description Zero is for the input of DVD audio by HDMI cable.) Bose 3•2•1 (TV Stereo) Plays the DVD audio from a connected component. DVD Audio (Only for standard low-tone performance. - This minimizes abrupt volume changes when you switch from DVD or FM•AM audio on your home. Sends two channels of a connected component. Option Bass Compensation Default Setting (Options) 0 (-14 to audio from 3•2•1® media center...
... the program or station, adjusting the volume on the Bose media center to +14) Description Zero is for the input of DVD audio by HDMI cable.) Bose 3•2•1 (TV Stereo) Plays the DVD audio from a connected component. DVD Audio (Only for standard low-tone performance. - This minimizes abrupt volume changes when you switch from DVD or FM•AM audio on your home. Sends two channels of a connected component. Option Bass Compensation Default Setting (Options) 0 (-14 to audio from 3•2•1® media center...
Owner's guide
Page 56
... operation of your established changes in the Settings menu to the media center. Tuner Spacing Bose Link Room Code US (European) Applies the regional standard for a component connected by Optical cable to the original factory settings. 52 Option Display Brightness Default Setting (Options) 4 (1 to the CBL•SAT AUDIO IN on the display. Choosing a lower number darkens text on the 3•2•1® media center. Returns all of the system. Identifies a different component connected by Optical cable to 4) Description Media center display...
... operation of your established changes in the Settings menu to the media center. Tuner Spacing Bose Link Room Code US (European) Applies the regional standard for a component connected by Optical cable to the original factory settings. 52 Option Display Brightness Default Setting (Options) 4 (1 to the CBL•SAT AUDIO IN on the display. Choosing a lower number darkens text on the 3•2•1® media center. Returns all of the system. Identifies a different component connected by Optical cable to 4) Description Media center display...

Owner's guide
Page 64
... connected securely. • Check connections between the media center and the speakers. • Make sure speaker cables are not damaged and the connections are secure. • Reduce the volume level on the external device playing through the 3•2•1 system speakers. • Try plugging your system into the power connector on the Acoustimass module. • Be sure to see if your media center and its audio input cable are a TV, cable box, VCR, wireless internet router, dimmer switches, blinking lights...
... connected securely. • Check connections between the media center and the speakers. • Make sure speaker cables are not damaged and the connections are secure. • Reduce the volume level on the external device playing through the 3•2•1 system speakers. • Try plugging your system into the power connector on the Acoustimass module. • Be sure to see if your media center and its audio input cable are a TV, cable box, VCR, wireless internet router, dimmer switches, blinking lights...

Owner's guide
Page 65
... the radio and DVD in an area of the component is not obstructed. • Reset the remote using the Settings menu on page 59. 61 Refer to "Setting the remote for the source input so its volume matches the volume of Fixed audio output, you want to control. There may be several codes that can turn off , but only one that the remote is selected • Change the Audio Level for your TV owner's guide...
... the radio and DVD in an area of the component is not obstructed. • Reset the remote using the Settings menu on page 59. 61 Refer to "Setting the remote for the source input so its volume matches the volume of Fixed audio output, you want to control. There may be several codes that can turn off , but only one that the remote is selected • Change the Audio Level for your TV owner's guide...

Owner's guide
Page 66
... display, re-connect the HDMI cable. Re-connect power to the television and to lower the output resolution of the system. Turn on the 3•2•1 system. - Turn on the TV first, then turn on the TV and set to the correct Video Input. • Check the video cable connections. • If the media center is connected to the media center using the HDMI cable: - Reconnect the two using a Component cable, make sure the colored cable plugs (red, green, and blue) match the connector...
... display, re-connect the HDMI cable. Re-connect power to the television and to lower the output resolution of the system. Turn on the 3•2•1 system. - Turn on the TV first, then turn on the TV and set to the correct Video Input. • Check the video cable connections. • If the media center is connected to the media center using the HDMI cable: - Reconnect the two using a Component cable, make sure the colored cable plugs (red, green, and blue) match the connector...

Owner's guide
Page 73
...;oais Nederlands Svenska ©2008 Bose Corporation. The distinctive design of the 3•2•1® media center is also a registered trademark of 525 or 625 progressive scan picture problems, it is recommended that the user switch the connection to be displayed in the picture. They are fully compatible with UEI Technology™ Under License from Universal Electronics Inc. ©UEI...
...;oais Nederlands Svenska ©2008 Bose Corporation. The distinctive design of the 3•2•1® media center is also a registered trademark of 525 or 625 progressive scan picture problems, it is recommended that the user switch the connection to be displayed in the picture. They are fully compatible with UEI Technology™ Under License from Universal Electronics Inc. ©UEI...


