
The Bose® Lifestyle® amplifier - Owner's guide
Page 4
... correct the interference by one or more of the receiver or radio remote control could void the user's authority to operate this product, be connected to the grounding system of the building, as close to Article 820-40 of the NEC (of antenna grounding as is provided to call the CATV system installer's attention to the point of the FCC rules. Ground...
... correct the interference by one or more of the receiver or radio remote control could void the user's authority to operate this product, be connected to the grounding system of the building, as close to Article 820-40 of the NEC (of antenna grounding as is provided to call the CATV system installer's attention to the point of the FCC rules. Ground...
The Bose® Lifestyle® amplifier - Owner's guide
Page 6
.... Using the wrong voltage setting may need them later. Make sure the shipping carton for your product. If any way. Setting up your Lifestyle® Stereo Amplifier Before you begin Thank you have a dual voltage Lifestyle® amplifier" on page 15. 4 January 4, 2002 AM262840_00_V.pdf Note: Locate the serial number on the bottom panel of the product. Contact Bose Customer Service for assistance. The Lifestyle...
.... Using the wrong voltage setting may need them later. Make sure the shipping carton for your product. If any way. Setting up your Lifestyle® Stereo Amplifier Before you begin Thank you have a dual voltage Lifestyle® amplifier" on page 15. 4 January 4, 2002 AM262840_00_V.pdf Note: Locate the serial number on the bottom panel of the product. Contact Bose Customer Service for assistance. The Lifestyle...

The Bose® Lifestyle® amplifier - Owner's guide
Page 11
...single-connector end of the audio input cable into the L (left) INPUT jack. Insert the white RCA piggyback connector of the audio input cable into the SPEAKER ZONES 2 output jack on the rear panel of the media center (Figure 8). 2. Figure 8 Cable connections between the Lifestyle® media center and the Lifestyle® stereo amplifier Lifestyle® SA-1 stereo amplifier rear panel Lifestyle® media center rear panel 30-ft audio input cable (supplied) AM262840_00_V.pdf January 4, 2002 9 DO NOT plug the amplifier into the SYSTEM CONTROL jack on the rear panel of...
...single-connector end of the audio input cable into the L (left) INPUT jack. Insert the white RCA piggyback connector of the audio input cable into the SPEAKER ZONES 2 output jack on the rear panel of the media center (Figure 8). 2. Figure 8 Cable connections between the Lifestyle® media center and the Lifestyle® stereo amplifier Lifestyle® SA-1 stereo amplifier rear panel Lifestyle® media center rear panel 30-ft audio input cable (supplied) AM262840_00_V.pdf January 4, 2002 9 DO NOT plug the amplifier into the SYSTEM CONTROL jack on the rear panel of...

The Bose® Lifestyle® amplifier - Owner's guide
Page 12
... / INPUT CD/DVD Changer FM/AM TV VCR AUX MENU / NAVIGATION Settings Tune Disc Seek Enter Channel Chapter Preset Track Volume 1 2 3 4 5 6 7 8 9 0 PLAYBACK Stop Pause Play Shuffle Repeat Settings Settings ( ) System Setup Enter System Setup (3 of 3). this ensures that the house code settings (switches 1, 2, 3, and 4) match those in more ...". Make sure that the Zone 2 Protocol is on, press the Settings button on -screen display. 2. Continue to scroll down to Legacy. 5. Before using the enter button. 3. Setting Up Your Lifestyle® Stereo...
... / INPUT CD/DVD Changer FM/AM TV VCR AUX MENU / NAVIGATION Settings Tune Disc Seek Enter Channel Chapter Preset Track Volume 1 2 3 4 5 6 7 8 9 0 PLAYBACK Stop Pause Play Shuffle Repeat Settings Settings ( ) System Setup Enter System Setup (3 of 3). this ensures that the house code settings (switches 1, 2, 3, and 4) match those in more ...". Make sure that the Zone 2 Protocol is on, press the Settings button on -screen display. 2. Continue to scroll down to Legacy. 5. Before using the enter button. 3. Setting Up Your Lifestyle® Stereo...

The Bose® Lifestyle® amplifier - Owner's guide
Page 13
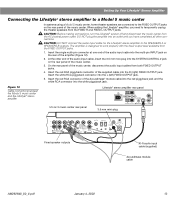
... audio input cable into the SPEAKER ZONES 2 output jack on the rear panel of the amplifier. SPEAKER OUTPUTS INPUT Model 20 music center rear panel 30-ft audio input cable (supplied) AM262840_00_V.pdf January 4, 2002 11 Insert the white RCA piggyback connector of the supplied cable into the R (right) INPUT jack of the amplifier. 3. Lifestyle® stereo amplifier rear panel 4 Ω MINIMUM LL R L SYSTEM RR CONTROL L R +- Setting Up Your Lifestyle® Stereo Amplifier Connecting the Lifestyle® stereo amplifier to a Model 20 music center...
... audio input cable into the SPEAKER ZONES 2 output jack on the rear panel of the amplifier. SPEAKER OUTPUTS INPUT Model 20 music center rear panel 30-ft audio input cable (supplied) AM262840_00_V.pdf January 4, 2002 11 Insert the white RCA piggyback connector of the supplied cable into the R (right) INPUT jack of the amplifier. 3. Lifestyle® stereo amplifier rear panel 4 Ω MINIMUM LL R L SYSTEM RR CONTROL L R +- Setting Up Your Lifestyle® Stereo Amplifier Connecting the Lifestyle® stereo amplifier to a Model 20 music center...
The Bose® Lifestyle® amplifier - Owner's guide
Page 15
... to a Model 5 music center In systems using a Model 5 music center, home theater speakers are connected to the FIXED OUTPUT jacks on the rear panel of the music center. 3. CAUTION: Before making connections, turn the Lifestyle® system off and disconnect the music center from the FIXED OUTPUT jacks. 1. At the other connections. CAUTION: DO NOT connect the audio input cable for the Lifestyle® stereo amplifier to work properly with the fixed output level available from the AC (mains) power outlet. Insert the red RCA connector of the music center...
... to a Model 5 music center In systems using a Model 5 music center, home theater speakers are connected to the FIXED OUTPUT jacks on the rear panel of the music center. 3. CAUTION: Before making connections, turn the Lifestyle® system off and disconnect the music center from the FIXED OUTPUT jacks. 1. At the other connections. CAUTION: DO NOT connect the audio input cable for the Lifestyle® stereo amplifier to work properly with the fixed output level available from the AC (mains) power outlet. Insert the red RCA connector of the music center...
The Bose® Lifestyle® amplifier - Owner's guide
Page 18
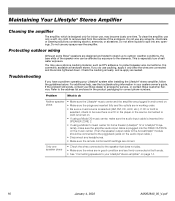
... wiring Although some Bose® speakers are correct. Troubleshooting If you do Neither speaker plays • Make sure the Lifestyle® music center and the amplifier are plugged in and turned on. • Make sure the plugs are inserted fully and the outlets are in the player or the source connected to AUX is turned on. • If using a Model 20 music center, make sure the audio input cable is inserted into SPEAKER ZONE 2. • If using a Model 5 music center for home theater (Lifestyle...
... wiring Although some Bose® speakers are correct. Troubleshooting If you do Neither speaker plays • Make sure the Lifestyle® music center and the amplifier are plugged in and turned on. • Make sure the plugs are inserted fully and the outlets are in the player or the source connected to AUX is turned on. • If using a Model 20 music center, make sure the audio input cable is inserted into SPEAKER ZONE 2. • If using a Model 5 music center for home theater (Lifestyle...

The Bose® Lifestyle® amplifier - Owner's guide
Page 19
... are using an RC-20 or RC-5 remote control, make sure the remote control switch settings are connected + to do One speaker still does not play , the problem is set too high and is covered by the Bose limited one-year transferable warranty. Details of the coverage are touching across terminals. • See "Connecting speakers to that was an intentional action of the cable to your Lifestyle® DVD system's owners guide. Connect...
... are using an RC-20 or RC-5 remote control, make sure the remote control switch settings are connected + to do One speaker still does not play , the problem is set too high and is covered by the Bose limited one-year transferable warranty. Details of the coverage are touching across terminals. • See "Connecting speakers to that was an intentional action of the cable to your Lifestyle® DVD system's owners guide. Connect...
Owner's guide
Page 5
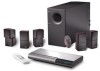
...Lifestyle® music center serial number Acoustimass module serial number Dealer name Dealer phone Purchase date We suggest you begin ...4 Unpack the carton ...5 Select the locations for your Lifestyle® 25 system 6 Connect the speakers and music center 8 Connecting your home theater components to the Lifestyle® system 10 Other connections ...12 Connect the antennas 13 Set up the remote control 14 Set radio channel spacing on dual voltage systems 14 Operating Your Lifestyle® 25 System Turn on your records Serial numbers are located on the bottom of the music center...
...Lifestyle® music center serial number Acoustimass module serial number Dealer name Dealer phone Purchase date We suggest you begin ...4 Unpack the carton ...5 Select the locations for your Lifestyle® 25 system 6 Connect the speakers and music center 8 Connecting your home theater components to the Lifestyle® system 10 Other connections ...12 Connect the antennas 13 Set up the remote control 14 Set radio channel spacing on dual voltage systems 14 Operating Your Lifestyle® 25 System Turn on your records Serial numbers are located on the bottom of the music center...
Owner's guide
Page 6
... Dolby Laboratories Licensing Corporation. 4 December 20, 2001 AM187718_01_V.pdf You will help you for any program material in AM/FM radio and six-disc CD changer • Powered Acoustimass® speakers with surround-encoded material there are times when no sounds are directed to the correct speakers. Please take the time to the surround (rear) speakers. To select surround-encoded material, look for purchasing the Bose® Lifestyle® 25 system. Your system includes: • A Lifestyle® music center...
... Dolby Laboratories Licensing Corporation. 4 December 20, 2001 AM187718_01_V.pdf You will help you for any program material in AM/FM radio and six-disc CD changer • Powered Acoustimass® speakers with surround-encoded material there are times when no sounds are directed to the correct speakers. Please take the time to the surround (rear) speakers. To select surround-encoded material, look for purchasing the Bose® Lifestyle® 25 system. Your system includes: • A Lifestyle® music center...
Owner's guide
Page 12
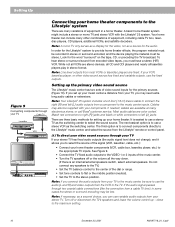
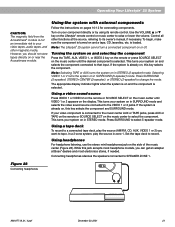
... the Lifestyle® remote or control panel. (1) To direct your video sound sources through your TV If your stereo TV has fixed audio outputs (the audio signal level does not change), and it allows you set up the primary video sound source The Lifestyle® music center has two sets of equipment, including cable TV box, laserdisc players, CDI players, additional VCRs, and satellite decoders. Setting Up Figure 9 Connecting components through your TV Cable TV Laserdisc VCR TV Connecting your home theater components...
... the Lifestyle® remote or control panel. (1) To direct your video sound sources through your TV If your stereo TV has fixed audio outputs (the audio signal level does not change), and it allows you set up the primary video sound source The Lifestyle® music center has two sets of equipment, including cable TV box, laserdisc players, CDI players, additional VCRs, and satellite decoders. Setting Up Figure 9 Connecting components through your TV Cable TV Laserdisc VCR TV Connecting your home theater components...
Owner's guide
Page 13
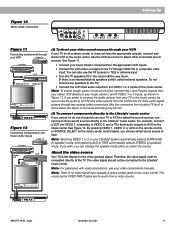
... VIDEO 2, and a TV's fixed audio outputs to AUX on the music center. The music center VIDEO INPUT jacks are for the video (picture) signal. Figure 10 Music center connectors Setting Up Figure 11 Connecting components through your VCR Cable TV Laserdisc VCR Video out to TV Audio out TV (2) To direct your video sound sources through your VCR If your TV is not a stereo model, or does not have the appropriate outputs, connect your video components manuals. By pressing VIDEO 1, VIDEO 2, or AUX on the remote control or SOURCE...
... VIDEO 2, and a TV's fixed audio outputs to AUX on the music center. The music center VIDEO INPUT jacks are for the video (picture) signal. Figure 10 Music center connectors Setting Up Figure 11 Connecting components through your VCR Cable TV Laserdisc VCR Video out to TV Audio out TV (2) To direct your video sound sources through your VCR If your TV is not a stereo model, or does not have the appropriate outputs, connect your video components manuals. By pressing VIDEO 1, VIDEO 2, or AUX on the remote control or SOURCE...
Owner's guide
Page 17
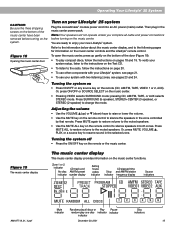
..., 2001 15 Zone 1 or 2 indicator No disc indicator CD track and AM/FM preset number display Setting house codes indicator CD elapsed time Stop and AM/FM station indicator frequency display Source indicators AM187718_01_V.pdf Mute indicator Random play all cable and power connections before turning on the system. pressing CD, AM/FM, TAPE, or AUX selects STEREO mode. Press SURROUND (5-speaker), STEREO+CENTER (3-speaker), or STEREO (2-speaker) to the radio, follow the instructions on pages 18 and 19. Adjusting the volume • Use the VOLUME v (up gently...
..., 2001 15 Zone 1 or 2 indicator No disc indicator CD track and AM/FM preset number display Setting house codes indicator CD elapsed time Stop and AM/FM station indicator frequency display Source indicators AM187718_01_V.pdf Mute indicator Random play all cable and power connections before turning on the system. pressing CD, AM/FM, TAPE, or AUX selects STEREO mode. Press SURROUND (5-speaker), STEREO+CENTER (3-speaker), or STEREO (2-speaker) to the radio, follow the instructions on pages 18 and 19. Adjusting the volume • Use the VOLUME v (up gently...
Owner's guide
Page 18
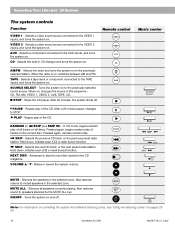
... VIDEO 2 - Selects a component connected to the TAPE TAPE inputs, and turns the system on to speakers silenced by the MUTE ALL key. CD - Remote control VIDEO 1 VIDEO 2 AUX CD AM/FM - FM TAPE - Selects a tape deck or component connected to the AUX inputs, and turns the system on . CD, FM, AM, VIDEO 1, VIDEO 2, AUX, TAPE, CD. . . Selects the next CD track, or the next preset radio station. RANDOM Music center SOURCE SELECT / II / II SKIP SKIP SKIP MUTE - AUX - PAUSE - PLAY - Selects the previous CD track, or the previous preset radio station. VOLUME...
... VIDEO 2 - Selects a component connected to the TAPE TAPE inputs, and turns the system on to speakers silenced by the MUTE ALL key. CD - Remote control VIDEO 1 VIDEO 2 AUX CD AM/FM - FM TAPE - Selects a tape deck or component connected to the AUX inputs, and turns the system on . CD, FM, AM, VIDEO 1, VIDEO 2, AUX, TAPE, CD. . . Selects the next CD track, or the next preset radio station. RANDOM Music center SOURCE SELECT / II / II SKIP SKIP SKIP MUTE - AUX - PAUSE - PLAY - Selects the previous CD track, or the previous preset radio station. VOLUME...

Owner's guide
Page 19
... home construction, your advanced radio-frequency remote control works from anywhere in STEREO mode, pressing SURROUND + selects SURROUND mode. ON O FF / II VOLUME PLAY/PAUSE SKIP STORE SOURCE SELECT NEXT DISC TUNE ERASE The Lifestyle® 25 remote control For most types of the center speaker. • Each time you select SURROUND mode, the surround and center speaker volumes return to reach the music center. Lowers or raises the frequency setting of buildings create "dead spots" where the remote will not operate. SURROUND + / - - AM187718_01_V.pdf...
... home construction, your advanced radio-frequency remote control works from anywhere in STEREO mode, pressing SURROUND + selects SURROUND mode. ON O FF / II VOLUME PLAY/PAUSE SKIP STORE SOURCE SELECT NEXT DISC TUNE ERASE The Lifestyle® 25 remote control For most types of the center speaker. • Each time you select SURROUND mode, the surround and center speaker volumes return to reach the music center. Lowers or raises the frequency setting of buildings create "dead spots" where the remote will not operate. SURROUND + / - - AM187718_01_V.pdf...
Owner's guide
Page 23
... system on in STEREO mode. Using headphones For headphone listening, use the stereo mini headphones jack on the Lifestyle® remote control or music center to the VIDEO 1 or 2 jacks. If the system is selected. Note: Selecting TAPE or AUX turns the system on , this key selects the component. In a 2-zone system, play the source (AM/FM, CD, AUX, VIDEO 1 or 2) you should not store tapes directly on in SURROUND mode and selects the video sound source connected to raise or lower the volume. Control all other magnetic media. Turning...
... system on in STEREO mode. Using headphones For headphone listening, use the stereo mini headphones jack on the Lifestyle® remote control or music center to the VIDEO 1 or 2 jacks. If the system is selected. Note: Selecting TAPE or AUX turns the system on , this key selects the component. In a 2-zone system, play the source (AM/FM, CD, AUX, VIDEO 1 or 2) you should not store tapes directly on in SURROUND mode and selects the video sound source connected to raise or lower the volume. Control all other magnetic media. Turning...
Owner's guide
Page 26
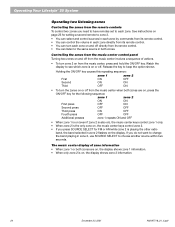
... the music center when both zones. The music center display of actions. • To turn each zone. Watch the display to choose another source within two seconds. Release the key to each zone on , the display shows zone 2 information. 24 December 20, 2001 AM187718_01_V.pdf Operating Your Lifestyle® 25 System Operating two listening zones Controlling the zones from the remote controls To control two zones you need to have remotes set to keep the option shown. See instructions...
... the music center when both zones. The music center display of actions. • To turn each zone. Watch the display to choose another source within two seconds. Release the key to each zone on , the display shows zone 2 information. 24 December 20, 2001 AM187718_01_V.pdf Operating Your Lifestyle® 25 System Operating two listening zones Controlling the zones from the remote controls To control two zones you need to have remotes set to keep the option shown. See instructions...
Owner's guide
Page 28
... Acoustimass module AUDIO INPUT jack. • Check speaker connections. • Turn the music center off for any headphones. • Connect the FM and AM antennas. • Make sure the center cube cable is connected at the same time, to reset the system. • Increase the volume. • Check to see if MUTE is lit on the display. to decrease center speaker volume. • Press and hold the STEREO+CENTER (3-speaker) mode key for 10 seconds to restore the factory preset center volume setting...
... Acoustimass module AUDIO INPUT jack. • Check speaker connections. • Turn the music center off for any headphones. • Connect the FM and AM antennas. • Make sure the center cube cable is connected at the same time, to reset the system. • Increase the volume. • Check to see if MUTE is lit on the display. to decrease center speaker volume. • Press and hold the STEREO+CENTER (3-speaker) mode key for 10 seconds to restore the factory preset center volume setting...
Owner's guide
Page 29
... to the component owner's manual. Display shows a flashing box for listings). • Adjust antenna position to reduce interference. • Make sure speaker cables are not damaged and the connections are connected properly. • Adjust antenna position to do • Check batteries and their polarity (+ and -). Details of "dead spots." Unplug the music center. Warranty period The Bose Lifestyle® 25 system is covered by itself, or behaves erratically Radio does not work Unit turns on...
... to the component owner's manual. Display shows a flashing box for listings). • Adjust antenna position to reduce interference. • Make sure speaker cables are not damaged and the connections are connected properly. • Adjust antenna position to do • Check batteries and their polarity (+ and -). Details of "dead spots." Unplug the music center. Warranty period The Bose Lifestyle® 25 system is covered by itself, or behaves erratically Radio does not work Unit turns on...

Owner's guide
Page 32
..., 23, 24, 27 radio channel spacing 14 radio station presets 17 random 15, 16, 19 RANDOM 15, 16, 19 RCA extension cables 8 red collar 8 remote control 4, 5, 11, 14-17, 21-29 room compensation controls 22 rubber feet 5 S safety information 2 serial numbers 3, 5 SKIP 16, 19, 20 SOURCE SELECT 16, 19-21 speaker cable 5-8, 27 speaker placement 6, 7, 22 station presets 17 STOP 16, 19, 20 STORE 17, 20, 25 SURROUND 4, 11, 15, 17...
..., 23, 24, 27 radio channel spacing 14 radio station presets 17 random 15, 16, 19 RANDOM 15, 16, 19 RCA extension cables 8 red collar 8 remote control 4, 5, 11, 14-17, 21-29 room compensation controls 22 rubber feet 5 S safety information 2 serial numbers 3, 5 SKIP 16, 19, 20 SOURCE SELECT 16, 19-21 speaker cable 5-8, 27 speaker placement 6, 7, 22 station presets 17 STOP 16, 19, 20 STORE 17, 20, 25 SURROUND 4, 11, 15, 17...


