
The Bose® Lifestyle® amplifier - Owner's guide
Page 3
...interfere with them may expose you . 15. for safety related markings. 18. Do not use attachments/accessories specified by Bose® Corporation. Do not use caution when moving the cart/apparatus combination to this product yourself. Do not put it from &#... Use extreme care when installing an outside antenna system to service this product. 14. Heed all components before cleaning. 7. Protect the power cord from being walked on or pinched, particularly at plugs, convenience receptacles, and the point where they may block the ventilation openings. as ...
...interfere with them may expose you . 15. for safety related markings. 18. Do not use attachments/accessories specified by Bose® Corporation. Do not use caution when moving the cart/apparatus combination to this product yourself. Do not put it from &#... Use extreme care when installing an outside antenna system to service this product. 14. Heed all components before cleaning. 7. Protect the power cord from being walked on or pinched, particularly at plugs, convenience receptacles, and the point where they may block the ventilation openings. as ...
The Bose® Lifestyle® amplifier - Owner's guide
Page 6
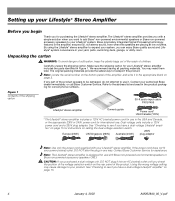
... packaging for international use with Bose non-powered environmental speakers or Bose non-powered accessory speakers ONLY. Figure 1 Contents of the shipping carton 30-ft audio input cable PN197406 Lifestyle® stereo amplifier Owner's guide Power cord* USA/Canada (120V) * The Lifestyle® stereo amplifier includes a 120V AC (mains) power cord for use in the USA...
... packaging for international use with Bose non-powered environmental speakers or Bose non-powered accessory speakers ONLY. Figure 1 Contents of the shipping carton 30-ft audio input cable PN197406 Lifestyle® stereo amplifier Owner's guide Power cord* USA/Canada (120V) * The Lifestyle® stereo amplifier includes a 120V AC (mains) power cord for use in the USA...

The Bose® Lifestyle® amplifier - Owner's guide
Page 17
...are complete. 1. Figure 15 Setting the voltage selection switch to 115V Powering-up your system CAUTION: DO NOT plug the AC power cord into the AC power jack on the amplifier AM262840_00_V.pdf January 4, 2002 15 ume to your Lifestyle® music system to an AC (mains) outlet. 3. Move... this switch to the ON position. 4. Using the power cord included with your Personal® music center or your new remote control and adjust the vol- 115 V Setting Up Your Lifestyle® Stereo Amplifier Checking to see if your unit has this switch. • This...
...are complete. 1. Figure 15 Setting the voltage selection switch to 115V Powering-up your system CAUTION: DO NOT plug the AC power cord into the AC power jack on the amplifier AM262840_00_V.pdf January 4, 2002 15 ume to your Lifestyle® music system to an AC (mains) outlet. 3. Move... this switch to the ON position. 4. Using the power cord included with your Personal® music center or your new remote control and adjust the vol- 115 V Setting Up Your Lifestyle® Stereo Amplifier Checking to see if your unit has this switch. • This...
Owner's guide
Page 3
... or more of the obsolete outlet. 10. Clean only with the apparatus. To ensure reliable operation of the FCC rules. Protect the power cord from overheating, put it from being walked on a different circuit than the other apparatus (including amplifiers) that could void the user's ...to radio or television reception, which can radiate radio frequency energy and, if not installed and used , use attachments/accessories specified by Bose® Corporation. Read these instructions - The wider blade or third prong are encouraged to try to correct the interference by turning the...
... or more of the obsolete outlet. 10. Clean only with the apparatus. To ensure reliable operation of the FCC rules. Protect the power cord from overheating, put it from being walked on a different circuit than the other apparatus (including amplifiers) that could void the user's ...to radio or television reception, which can radiate radio frequency energy and, if not installed and used , use attachments/accessories specified by Bose® Corporation. Read these instructions - The wider blade or third prong are encouraged to try to correct the interference by turning the...
Owner's guide
Page 7
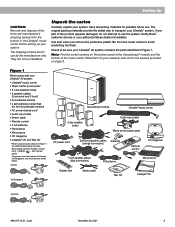
Unpack the carton Carefully unpack your Lifestyle® 25 system contains the parts identified in Figure 1. Check to be sure your system. Write them on your authorized Bose dealer immediately. Dual voltage systems include 1 power cord, 1 adapter , and 2 power packs. The power cords and packs for possible future use by the manufacturer only. The shipping screws are USA/Canada...
Unpack the carton Carefully unpack your Lifestyle® 25 system contains the parts identified in Figure 1. Check to be sure your system. Write them on your authorized Bose dealer immediately. Dual voltage systems include 1 power cord, 1 adapter , and 2 power packs. The power cords and packs for possible future use by the manufacturer only. The shipping screws are USA/Canada...

Owner's guide
Page 10
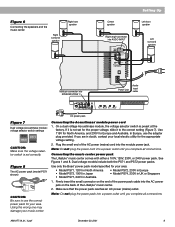
...and black to black (- Connect the wire end of your dealer, electronics store, or call Bose® customer service. Plug the small black multi-pin connector (flat side facing up) into...) and negative (black) terminals on the module. To run the cables in 18-gauge or thicker cord (connecting + to secure the wire. b. Insert the right-angle multi-pin connector on the + ...begin connecting the system. Setting Up CAUTION: Make sure all components are unplugged from the power outlet before you have selected locations for connecting the surround speakers. Figure 5 Speaker cable...
...and black to black (- Connect the wire end of your dealer, electronics store, or call Bose® customer service. Plug the small black multi-pin connector (flat side facing up) into...) and negative (black) terminals on the module. To run the cables in 18-gauge or thicker cord (connecting + to secure the wire. b. Insert the right-angle multi-pin connector on the + ...begin connecting the system. Setting Up CAUTION: Make sure all components are unplugged from the power outlet before you have selected locations for connecting the surround speakers. Figure 5 Speaker cable...
Owner's guide
Page 11
... sure the voltage selector switch is preset at the factory. See Figures 1 and 8. Use only the Bose® power pack model specified for your local electric utility for Europe and Australia. Firmly insert the small connector on the end ...power pack reaches an AC power (mains) outlet. Figure 8 The AC power pack (model PS71 shown) CAUTION: Be sure to the correct setting (Figure 7). Note: Do not plug the power pack into the module power jack. Using the wrong one may damage your area. Connecting the Acoustimass® module power cord 1. Plug the small end of the Lifestyle...
... sure the voltage selector switch is preset at the factory. See Figures 1 and 8. Use only the Bose® power pack model specified for your local electric utility for Europe and Australia. Firmly insert the small connector on the end ...power pack reaches an AC power (mains) outlet. Figure 8 The AC power pack (model PS71 shown) CAUTION: Be sure to the correct setting (Figure 7). Note: Do not plug the power pack into the module power jack. Using the wrong one may damage your area. Connecting the Acoustimass® module power cord 1. Plug the small end of the Lifestyle...
Owner's guide
Page 17
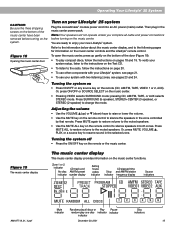
...center. Figure 19 The music center display The music center display This music center display provides information on your Lifestyle® 25 system Plug the Acoustimass® module power cord into an AC power (mains) outlet. Adjusting the volume • Use the VOLUME v (up gently on the bottom of ... random play compact discs, follow the instructions on page 20. • To use other components with your Lifestyle® system, see pages 23 and 24. Operating Your Lifestyle® 25 System CAUTION: Be sure the three shipping screws on the bottom of the door (Figure 18). •...
...center. Figure 19 The music center display The music center display This music center display provides information on your Lifestyle® 25 system Plug the Acoustimass® module power cord into an AC power (mains) outlet. Adjusting the volume • Use the VOLUME v (up gently on the bottom of ... random play compact discs, follow the instructions on page 20. • To use other components with your Lifestyle® system, see pages 23 and 24. Operating Your Lifestyle® 25 System CAUTION: Be sure the three shipping screws on the bottom of the door (Figure 18). •...
Owner's guide
Page 28
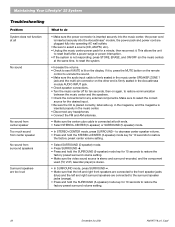
... the music center, the power cord is inserted securely into operating AC wall outlets. • Be sure to see if MUTE is lit on the other end is firmly seated in the music center SPEAKER ZONE 1 jack and the multi-pin connector on the display. Maintaining Your Lifestyle® 25 System Troubleshooting Problem System...
... the music center, the power cord is inserted securely into operating AC wall outlets. • Be sure to see if MUTE is lit on the other end is firmly seated in the music center SPEAKER ZONE 1 jack and the multi-pin connector on the display. Maintaining Your Lifestyle® 25 System Troubleshooting Problem System...

Owner's guide
Page 32
...15, 18 connections 8, 9, 11-13, 26, 27 controls 2, 7, 10, 16, 17, 22, 25, 29 cube speaker array 8, 29 cube speakers 6, 29 customer service 6, 8, 27 D display 10,...25 L laserdisc 10, 11, 26 laserdisc player 12 listening zone 8, 16, 23, 24 M magazine 5, 16, 18, 26, 27 music center 2-5, 7-21, 23-29 MUTE 15, 16, 26 MUTE ALL 15, 16 N NEXT DISC 16 O ON/OFF 24 P PAUSE 19 placement 6, 7, 13, 22 PLAY 12, 15, 16, 19, 27 port 7 power cord 5, 9, 15, 26 power... pack 5, 9, 14, 15, 26, 29 powered speaker 22, 23, 26 preset 15-17, 20 preset radio ...
...15, 18 connections 8, 9, 11-13, 26, 27 controls 2, 7, 10, 16, 17, 22, 25, 29 cube speaker array 8, 29 cube speakers 6, 29 customer service 6, 8, 27 D display 10,...25 L laserdisc 10, 11, 26 laserdisc player 12 listening zone 8, 16, 23, 24 M magazine 5, 16, 18, 26, 27 music center 2-5, 7-21, 23-29 MUTE 15, 16, 26 MUTE ALL 15, 16 N NEXT DISC 16 O ON/OFF 24 P PAUSE 19 placement 6, 7, 13, 22 PLAY 12, 15, 16, 19, 27 port 7 power cord 5, 9, 15, 26 power... pack 5, 9, 14, 15, 26, 29 powered speaker 22, 23, 26 preset 15-17, 20 preset radio ...


