
The Bose® Lifestyle® amplifier - Owner's guide
Page 6
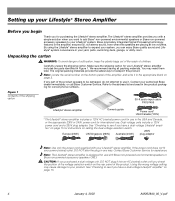
... suffocation, keep the plastic bags out of the reach of the shipping carton 30-ft audio input cable PN197406 Lifestyle® stereo amplifier Owner's guide Power cord* USA/Canada (120V) * The Lifestyle® stereo amplifier includes a 120V AC (mains) power cord ..., ensures full, rich stereo sound, even when the speakers are playing at low volumes. Contact your authorized Bose dealer immediately, or call Bose Customer Service. See "Checking to your Lifestyle® system. Carefully unpack the shipping carton. CAUTION: If you purchased a dual voltage unit, DO NOT...
... suffocation, keep the plastic bags out of the reach of the shipping carton 30-ft audio input cable PN197406 Lifestyle® stereo amplifier Owner's guide Power cord* USA/Canada (120V) * The Lifestyle® stereo amplifier includes a 120V AC (mains) power cord ..., ensures full, rich stereo sound, even when the speakers are playing at low volumes. Contact your authorized Bose dealer immediately, or call Bose Customer Service. See "Checking to your Lifestyle® system. Carefully unpack the shipping carton. CAUTION: If you purchased a dual voltage unit, DO NOT...

The Bose® Lifestyle® amplifier - Owner's guide
Page 7
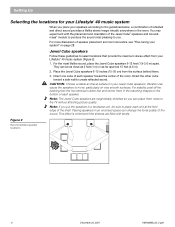
...er must be situated close to either your amplifier: • Locate the amplifier indoors and within the reach of the supplied 30-foot audio input cable. • Place the amplifier in an area where the maximum ambient temperature is located within 8 feet (2.5 ...fier with an open area of 3.0 inches (7.5 cm) minimum immediately above it according to the following guidelines when selecting a location for your Lifestyle® system or the accessory speakers, consider the following guidelines. Figure 4 Wall mounting • To mount the amplifier on page 6 ...
...er must be situated close to either your amplifier: • Locate the amplifier indoors and within the reach of the supplied 30-foot audio input cable. • Place the amplifier in an area where the maximum ambient temperature is located within 8 feet (2.5 ...fier with an open area of 3.0 inches (7.5 cm) minimum immediately above it according to the following guidelines when selecting a location for your Lifestyle® system or the accessory speakers, consider the following guidelines. Figure 4 Wall mounting • To mount the amplifier on page 6 ...

The Bose® Lifestyle® amplifier - Owner's guide
Page 9
...power outlet. Insert the white RCA piggyback connector of the multi-room interface (Figure 6). 2. Figure 6 Cable connections between a multi-room interface and the Lifestyle® stereo amplifier Lifestyle® stereo amplifier rear panel Multi-room interface rear panel 4 Ω MINIMUM LL R L SYSTEM RR CONTROL L R +- Insert the... of the audio input cable, insert the 3.5 mm mini-plug into an outlet until you have completed all other connections. 1. SPSEPAEKAEKREROOUUTPTUPUTSTS INPUT 30-ft audio input cable (supplied) AM262840_00_V.pdf January 4, 2002 7
...power outlet. Insert the white RCA piggyback connector of the multi-room interface (Figure 6). 2. Figure 6 Cable connections between a multi-room interface and the Lifestyle® stereo amplifier Lifestyle® stereo amplifier rear panel Multi-room interface rear panel 4 Ω MINIMUM LL R L SYSTEM RR CONTROL L R +- Insert the... of the audio input cable, insert the 3.5 mm mini-plug into an outlet until you have completed all other connections. 1. SPSEPAEKAEKREROOUUTPTUPUTSTS INPUT 30-ft audio input cable (supplied) AM262840_00_V.pdf January 4, 2002 7

The Bose® Lifestyle® amplifier - Owner's guide
Page 11
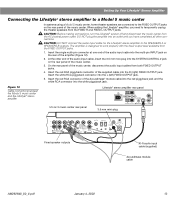
... connector of the amplifier. 3. Setting Up Your Lifestyle® Stereo Amplifier Connecting the Lifestyle® stereo amplifier to a Lifestyle® media center CAUTION: Before making connections, turn the Lifestyle® system off and disconnect the media center from the ... (mains) power outlet. Figure 8 Cable connections between the Lifestyle® media center and the Lifestyle® stereo amplifier Lifestyle® SA-1 stereo amplifier rear panel Lifestyle® media center rear panel 30-ft audio input cable (supplied) AM262840_00_V.pdf January 4, 2002...
... connector of the amplifier. 3. Setting Up Your Lifestyle® Stereo Amplifier Connecting the Lifestyle® stereo amplifier to a Lifestyle® media center CAUTION: Before making connections, turn the Lifestyle® system off and disconnect the media center from the ... (mains) power outlet. Figure 8 Cable connections between the Lifestyle® media center and the Lifestyle® stereo amplifier Lifestyle® SA-1 stereo amplifier rear panel Lifestyle® media center rear panel 30-ft audio input cable (supplied) AM262840_00_V.pdf January 4, 2002...

The Bose® Lifestyle® amplifier - Owner's guide
Page 13
...other end of the audio input cable, insert the 3.5 mm mini-plug into the R (right) INPUT jack of the music center (Figure 10). 2. Lifestyle® stereo amplifier rear panel 4 Ω MINIMUM LL R L SYSTEM RR CONTROL L R +- Insert the white RCA piggyback connector of the... amplifier. 3. SPEAKER OUTPUTS INPUT Model 20 music center rear panel 30-ft audio input cable (supplied) AM262840_00_V.pdf January 4, 2002 11 DO NOT plug the amplifier into the L (left) INPUT jack. ...
...other end of the audio input cable, insert the 3.5 mm mini-plug into the R (right) INPUT jack of the music center (Figure 10). 2. Lifestyle® stereo amplifier rear panel 4 Ω MINIMUM LL R L SYSTEM RR CONTROL L R +- Insert the white RCA piggyback connector of the... amplifier. 3. SPEAKER OUTPUTS INPUT Model 20 music center rear panel 30-ft audio input cable (supplied) AM262840_00_V.pdf January 4, 2002 11 DO NOT plug the amplifier into the L (left) INPUT jack. ...
The Bose® Lifestyle® amplifier - Owner's guide
Page 15
...REC PLAY AUX TAPE INPUT L R VIDEO SOUND AM LOOP 1 SYSTEM CONTROL 2 ~ POWER 12VAC IN 1.0A ANTENNA SEE INSTRUCTION MANUAL Fixed speaker outputs 30-ft audio input cable (supplied) Acoustimass module cable AM262840_00_V.pdf January 4, 2002 13 DO NOT plug the amplifier into the R (right)...left) FIXED OUTPUT jack. 5. Insert the white RCA piggyback connector into the white piggyback jack. CAUTION: Before making connections, turn the Lifestyle® system off and disconnect the music center from the FIXED R and FIXED L OUTPUT jacks. Insert the red RCA connector of the...
...REC PLAY AUX TAPE INPUT L R VIDEO SOUND AM LOOP 1 SYSTEM CONTROL 2 ~ POWER 12VAC IN 1.0A ANTENNA SEE INSTRUCTION MANUAL Fixed speaker outputs 30-ft audio input cable (supplied) Acoustimass module cable AM262840_00_V.pdf January 4, 2002 13 DO NOT plug the amplifier into the R (right)...left) FIXED OUTPUT jack. 5. Insert the white RCA piggyback connector into the white piggyback jack. CAUTION: Before making connections, turn the Lifestyle® system off and disconnect the music center from the FIXED R and FIXED L OUTPUT jacks. Insert the red RCA connector of the...

The Bose® Lifestyle® amplifier - Owner's guide
Page 20
...Wire recommendations Gauge 18 (0.75 mm2) 16 (1.7 mm2) 14 (2.0 mm2) Length (max.) 30 ft (9 m) 45 ft (14 m) 70 ft (21 m) 18 January 4, 2002 AM262840_00_V.pdf Maintaining Your Lifestyle® Stereo Amplifier Technical information Features • Bose® proprietary digital signal processing technology • Built-in digital volume control • Thermal ...DIN System control: 3.5 mm stereo mini-plug connector Input sensitivity 0.5 Vrms @ 1 kHz Output power (continuous average) 35W per channel minimum into 4 Ohms, from 30 to Noise ratio (S/N) 90 dB Dimensions 141/4 in.
...Wire recommendations Gauge 18 (0.75 mm2) 16 (1.7 mm2) 14 (2.0 mm2) Length (max.) 30 ft (9 m) 45 ft (14 m) 70 ft (21 m) 18 January 4, 2002 AM262840_00_V.pdf Maintaining Your Lifestyle® Stereo Amplifier Technical information Features • Bose® proprietary digital signal processing technology • Built-in digital volume control • Thermal ...DIN System control: 3.5 mm stereo mini-plug connector Input sensitivity 0.5 Vrms @ 1 kHz Output power (continuous average) 35W per channel minimum into 4 Ohms, from 30 to Noise ratio (S/N) 90 dB Dimensions 141/4 in.
Owner's guide
Page 8
...; module to produce the sound most lifelike sound, place the Jewel Cube speakers 6-12 feet (1.8-3.6 m) apart. Place the Jewel Cube speakers 6-12 inches (15-30 cm) from the surface behind them close as 3 feet (1 m) or as far apart as close to the TV without af fecting picture quality. Note: The... edge of speaker placement and room acoustics, see "Fine-tuning your system" on very smooth surfaces. CAUTION: Choose a stable and level surface for your Lifestyle® 40 music system When you place your speakers according to select locations that provide the maximum stereo effect from your...
...; module to produce the sound most lifelike sound, place the Jewel Cube speakers 6-12 feet (1.8-3.6 m) apart. Place the Jewel Cube speakers 6-12 inches (15-30 cm) from the surface behind them close as 3 feet (1 m) or as far apart as close to the TV without af fecting picture quality. Note: The... edge of speaker placement and room acoustics, see "Fine-tuning your system" on very smooth surfaces. CAUTION: Choose a stable and level surface for your Lifestyle® 40 music system When you place your speakers according to select locations that provide the maximum stereo effect from your...
Owner's guide
Page 17
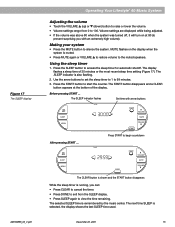
Before pressing START ... English Figure 17 The SLEEP display Operating Your Lifestyle® 40 Music System Adjusting the volume • Touch the VOLUME v (up) or w (down) button to raise or lower the volume. • Volume settings range from the ... again to access the sleep timer for automatic shutoff. The SLEEP indicator is remembered by the music center. MUTE flashes on at the bottom of 30 minutes or the most recent sleep time setting (Figure 17). The selected SLEEP time is also flashing. 2. December 20, 2001 15 Volume settings are displayed...
Before pressing START ... English Figure 17 The SLEEP display Operating Your Lifestyle® 40 Music System Adjusting the volume • Touch the VOLUME v (up) or w (down) button to raise or lower the volume. • Volume settings range from the ... again to access the sleep timer for automatic shutoff. The SLEEP indicator is remembered by the music center. MUTE flashes on at the bottom of 30 minutes or the most recent sleep time setting (Figure 17). The selected SLEEP time is also flashing. 2. December 20, 2001 15 Volume settings are displayed...
Owner's guide
Page 28
... after first selection is entered ON OFF SLEEP CD OPTIONS ÂENU ITEÂ DISC TRACK Press to delete and press CLEAR (Figure 30). Figure 30 CLEAR LIST and CLEAR buttons available on the display after this one are moved down one item number leaving your selected ITEM number available.... 1. If the ITEM field indicates FULL, you can't insert a new item unless you were viewing was moved up one item number. 3. Operating Your Lifestyle® 40 Music System To insert a new track in an existing play list 1. The ITEM number should not be flashing. 3. To delete other items, repeat step...
... after first selection is entered ON OFF SLEEP CD OPTIONS ÂENU ITEÂ DISC TRACK Press to delete and press CLEAR (Figure 30). Figure 30 CLEAR LIST and CLEAR buttons available on the display after this one are moved down one item number leaving your selected ITEM number available.... 1. If the ITEM field indicates FULL, you can't insert a new item unless you were viewing was moved up one item number. 3. Operating Your Lifestyle® 40 Music System To insert a new track in an existing play list 1. The ITEM number should not be flashing. 3. To delete other items, repeat step...
Owner's guide
Page 32
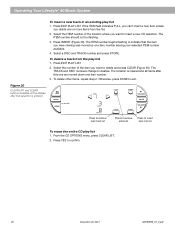
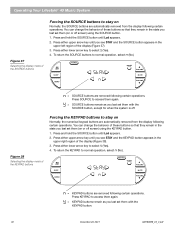
... VOLUÂE = SOURCE buttons are removed following certain operations. Press either upper arrow key until you last set them with the KEYPAD button. 30 December 20, 2001 AM189858_03_V.pdf Press SOURCE to normal operation, select (No). To return the SOURCE buttons to access them again. = SOURCE ... so that they remain in the state you last set them (on or off screen) using the KEYPAD button. 1. Operating Your Lifestyle® 40 Music System Figure 37 Selecting the display mode of the SOURCE buttons Forcing the SOURCE buttons to normal operation, select (No). Press ...
... VOLUÂE = SOURCE buttons are removed following certain operations. Press either upper arrow key until you last set them with the KEYPAD button. 30 December 20, 2001 AM189858_03_V.pdf Press SOURCE to normal operation, select (No). To return the SOURCE buttons to access them again. = SOURCE ... so that they remain in the state you last set them (on or off screen) using the KEYPAD button. 1. Operating Your Lifestyle® 40 Music System Figure 37 Selecting the display mode of the SOURCE buttons Forcing the SOURCE buttons to normal operation, select (No). Press ...


