

The Bose® Lifestyle® amplifier - Owner's guide
Page 5
... remote control 10 Setting Zone 2 Protocol 10 Connecting the Lifestyle® stereo amplifier to a Model 20 music center 11 Connecting the Lifestyle® stereo amplifier to a Model 5 music center 13 Connecting speakers to your Lifestyle® stereo amplifier 14 Checking to see if you keep your Lifestyle® stereo amplifier. Contents Setting up your...
... remote control 10 Setting Zone 2 Protocol 10 Connecting the Lifestyle® stereo amplifier to a Model 20 music center 11 Connecting the Lifestyle® stereo amplifier to a Model 5 music center 13 Connecting speakers to your Lifestyle® stereo amplifier 14 Checking to see if you keep your Lifestyle® stereo amplifier. Contents Setting up your...

The Bose® Lifestyle® amplifier - Owner's guide
Page 9
... 30-ft audio input cable (supplied) AM262840_00_V.pdf January 4, 2002 7 Figure 6 Cable connections between a multi-room interface and the Lifestyle® stereo amplifier Lifestyle® stereo amplifier rear panel Multi-room interface rear panel 4 Ω MINIMUM LL R L SYSTEM RR CONTROL L ...amplifier. Setting Up Your Lifestyle® Stereo Amplifier Connecting the Lifestyle® stereo amplifier to a multi-room interface CAUTION: Before making any connections, turn the Lifestyle® system off and disconnect the music center from the AC (mains) power...
... 30-ft audio input cable (supplied) AM262840_00_V.pdf January 4, 2002 7 Figure 6 Cable connections between a multi-room interface and the Lifestyle® stereo amplifier Lifestyle® stereo amplifier rear panel Multi-room interface rear panel 4 Ω MINIMUM LL R L SYSTEM RR CONTROL L ...amplifier. Setting Up Your Lifestyle® Stereo Amplifier Connecting the Lifestyle® stereo amplifier to a multi-room interface CAUTION: Before making any connections, turn the Lifestyle® system off and disconnect the music center from the AC (mains) power...

The Bose® Lifestyle® amplifier - Owner's guide
Page 10
...room of Bose® powered speakers placed in more than one room. If two or more rooms that have a multi-room interface are referred to as room A, B, C, and D, with the Personal® music center Systems that share a source Press the HOUSE button to your Lifestyle®... system owner's guide for more information on operating your system, the Personal music center displays ROOM and HOUSE buttons, and room indicators (A, B, C, and/...
...room of Bose® powered speakers placed in more than one room. If two or more rooms that have a multi-room interface are referred to as room A, B, C, and D, with the Personal® music center Systems that share a source Press the HOUSE button to your Lifestyle®... system owner's guide for more information on operating your system, the Personal music center displays ROOM and HOUSE buttons, and room indicators (A, B, C, and/...

The Bose® Lifestyle® amplifier - Owner's guide
Page 13
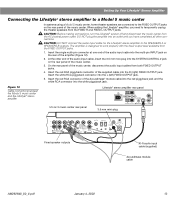
...amplifier to a Model 20 music center ® Figure 10 Cable connections between the Model 20 music center and the Lifestyle® stereo amplifier CAUTION: Before making connections, turn the Lifestyle® system off and disconnect the music center from the AC (mains) ... into the SPEAKER ZONES 2 output jack on the rear panel of the music center (Figure 10). 2. SPEAKER OUTPUTS INPUT Model 20 music center rear panel 30-ft audio input cable (supplied) AM262840_00_V.pdf January 4, 2002 11 Lifestyle® stereo amplifier rear panel 4 Ω MINIMUM LL R...
...amplifier to a Model 20 music center ® Figure 10 Cable connections between the Model 20 music center and the Lifestyle® stereo amplifier CAUTION: Before making connections, turn the Lifestyle® system off and disconnect the music center from the AC (mains) ... into the SPEAKER ZONES 2 output jack on the rear panel of the music center (Figure 10). 2. SPEAKER OUTPUTS INPUT Model 20 music center rear panel 30-ft audio input cable (supplied) AM262840_00_V.pdf January 4, 2002 11 Lifestyle® stereo amplifier rear panel 4 Ω MINIMUM LL R...

The Bose® Lifestyle® amplifier - Owner's guide
Page 14
Setting Up Your Lifestyle® Stereo Amplifier Figure 11 Setting up a Zone 2 remote control Setting up the RC-20 remote ...(Figure 11). 2. Make sure that the house code settings (switches 1, 2, 3, and 4) match those in your system uses a Model 20 music center, you need to set up (on operating your system in more information on ). ON K40 l 2345678 12 January 4, 2002 AM262840_00_V.pdf ... ZONE 2 outputs. 1. Slide switch 5 down (off), and switches 6 and 8 up a second RC-20 remote control to your Lifestyle® system owner's guide for Zone 2 If your first remote. 3.
Setting Up Your Lifestyle® Stereo Amplifier Figure 11 Setting up a Zone 2 remote control Setting up the RC-20 remote ...(Figure 11). 2. Make sure that the house code settings (switches 1, 2, 3, and 4) match those in your system uses a Model 20 music center, you need to set up (on operating your system in more information on ). ON K40 l 2345678 12 January 4, 2002 AM262840_00_V.pdf ... ZONE 2 outputs. 1. Slide switch 5 down (off), and switches 6 and 8 up a second RC-20 remote control to your Lifestyle® system owner's guide for Zone 2 If your first remote. 3.
The Bose® Lifestyle® amplifier - Owner's guide
Page 15
...available from the FIXED R and FIXED L OUTPUT jacks. Figure 12 Cable connections between the Model 5 music center and the Lifestyle® stereo amplifier Model 5 music center rear panel Lifestyle® stereo amplifier rear panel 4 Ω MINIMUM LL LL SYSTEM RR CONTROL R +- ...64257;er (Figure 12). 2. On the rear panel of the music center. Setting Up Your Lifestyle® Stereo Amplifier Connecting the Lifestyle® stereo amplifier to a Model 5 music center In systems using a Model 5 music center, home theater speakers are connected to the SPEAKERS A or...
...available from the FIXED R and FIXED L OUTPUT jacks. Figure 12 Cable connections between the Model 5 music center and the Lifestyle® stereo amplifier Model 5 music center rear panel Lifestyle® stereo amplifier rear panel 4 Ω MINIMUM LL LL SYSTEM RR CONTROL R +- ...64257;er (Figure 12). 2. On the rear panel of the music center. Setting Up Your Lifestyle® Stereo Amplifier Connecting the Lifestyle® stereo amplifier to a Model 5 music center In systems using a Model 5 music center, home theater speakers are connected to the SPEAKERS A or...

The Bose® Lifestyle® amplifier - Owner's guide
Page 16
... 14 January 4, 2002 AM262840_00_V.pdf ON K40 l 2345678 Connecting speakers to your Lifestyle® stereo amplifier CAUTION: DO NOT connect the amplifier to powered speakers of any amplified music sources. Doing so may cause damage to any make or model, nor to... ® Figure 13 RC-5 remote switch settings Setting up the RC-5 remote control If your system uses a Model 5 music center, you face it should always be connected to your Lifestyle® system owner's guide for more than one room. Note: Refer to the positive (+ or red) terminal. Press ...
... 14 January 4, 2002 AM262840_00_V.pdf ON K40 l 2345678 Connecting speakers to your Lifestyle® stereo amplifier CAUTION: DO NOT connect the amplifier to powered speakers of any amplified music sources. Doing so may cause damage to any make or model, nor to... ® Figure 13 RC-5 remote switch settings Setting up the RC-5 remote control If your system uses a Model 5 music center, you face it should always be connected to your Lifestyle® system owner's guide for more than one room. Note: Refer to the positive (+ or red) terminal. Press ...

The Bose® Lifestyle® amplifier - Owner's guide
Page 17
...;er (Figure 16). 2. Using the power cord included with your Personal® music center or your Lifestyle® music system to an AC (mains) outlet. 3. ume to the 115V position. If you have a dual voltage Lifestyle® amplifier • Dual voltage units have a voltage selection switch ...on the rear panel of the amplifier. Select a music source with your liking. Check to see if you own a 230V version, ...
...;er (Figure 16). 2. Using the power cord included with your Personal® music center or your Lifestyle® music system to an AC (mains) outlet. 3. ume to the 115V position. If you have a dual voltage Lifestyle® amplifier • Dual voltage units have a voltage selection switch ...on the rear panel of the amplifier. Select a music source with your liking. Check to see if you own a 230V version, ...
The Bose® Lifestyle® amplifier - Owner's guide
Page 18
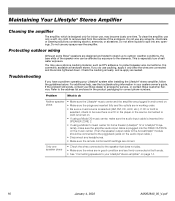
...-apply as RTV adhesive, to protect speaker wire connections. Troubleshooting If you do Neither speaker plays • Make sure the Lifestyle® music center and the amplifier are connected and the knobs tightened down. Do not allow liquids to arrange for correct phone... the amplifier, use any solvents, chemicals, or cleaning solutions containing alcohol, ammonia, or abrasives. Protecting outdoor wiring Although some Bose® speakers are firmly connected at hardware stores. If the problem still exists, contact your system owner's guide. For additional ...
...-apply as RTV adhesive, to protect speaker wire connections. Troubleshooting If you do Neither speaker plays • Make sure the Lifestyle® music center and the amplifier are connected and the knobs tightened down. Do not allow liquids to arrange for correct phone... the amplifier, use any solvents, chemicals, or cleaning solutions containing alcohol, ammonia, or abrasives. Protecting outdoor wiring Although some Bose® speakers are firmly connected at hardware stores. If the problem still exists, contact your system owner's guide. For additional ...
Owner's guide
Page 2
... not expose the system to follow this owner's guide. Do not incinerate. Additional safety information See the additional instructions on the bottoms of your Lifestyle® Personal™ music center, Acoustimass® module, multi-room interface, and CD changer: The lightning flash with this owner's guide carefully. These CAUTION marks are located...
... not expose the system to follow this owner's guide. Do not incinerate. Additional safety information See the additional instructions on the bottoms of your Lifestyle® Personal™ music center, Acoustimass® module, multi-room interface, and CD changer: The lightning flash with this owner's guide carefully. These CAUTION marks are located...
Owner's guide
Page 5
... Dealer phone Purchase date We suggest you begin ...4 Unpacking the carton ...5 Selecting the locations for your Lifestyle® 40 music system 6 Connecting your system 8 Connecting external components 11 Connecting the antennas 12 Completing connections and turning ...music center 35 Maintaining Your Lifestyle® 40 Music System 36 Finding a misplaced Personal music center 36 Replacing batteries ...36 Cleaning the system ...37 Troubleshooting ...38 Warranty period ...39 Customer service ...39 Product Information ...40 Technical information ...40 Accessories ...40 Index ...41 Bose...
... Dealer phone Purchase date We suggest you begin ...4 Unpacking the carton ...5 Selecting the locations for your Lifestyle® 40 music system 6 Connecting your system 8 Connecting external components 11 Connecting the antennas 12 Completing connections and turning ...music center 35 Maintaining Your Lifestyle® 40 Music System 36 Finding a misplaced Personal music center 36 Replacing batteries ...36 Cleaning the system ...37 Troubleshooting ...38 Warranty period ...39 Customer service ...39 Product Information ...40 Technical information ...40 Accessories ...40 Index ...41 Bose...
Owner's guide
Page 6
... this owner's guide carefully. The other innovations, bring you for purchasing the Bose® Lifestyle® 40 music system. The Bose Jewel Cube® speakers are designed to be hidden from Bose. Communicating through its advanced features. Please take the time to enjoy Bose sound throughout your home. Technological innovations that these tiny speakers not only fill...
... this owner's guide carefully. The other innovations, bring you for purchasing the Bose® Lifestyle® 40 music system. The Bose Jewel Cube® speakers are designed to be hidden from Bose. Communicating through its advanced features. Please take the time to enjoy Bose sound throughout your home. Technological innovations that these tiny speakers not only fill...
Owner's guide
Page 7
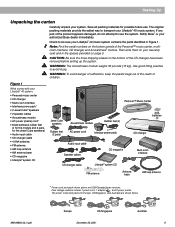
Notify Bose® or your Lifestyle® 40 music system contains the parts identified in the spaces provided on your Lifestyle® 40 system: • Personal music center • CD changer • Multi-room interface • Interface power pack* • 2 Jewel Cube® speakers • 2 speaker ...versions. AM189858_03_V.pdf Europe UK/Singapore December 20, 2001 Australia 5 Setting Up Unpacking the carton Carefully unpack your Lifestyle® 40 music system. Dual voltage systems include 1 power cord, 1 adapter , and 2 power packs. Then write them on page 3.
Notify Bose® or your Lifestyle® 40 music system contains the parts identified in the spaces provided on your Lifestyle® 40 system: • Personal music center • CD changer • Multi-room interface • Interface power pack* • 2 Jewel Cube® speakers • 2 speaker ...versions. AM189858_03_V.pdf Europe UK/Singapore December 20, 2001 Australia 5 Setting Up Unpacking the carton Carefully unpack your Lifestyle® 40 music system. Dual voltage systems include 1 power cord, 1 adapter , and 2 power packs. Then write them on page 3.
Owner's guide
Page 8
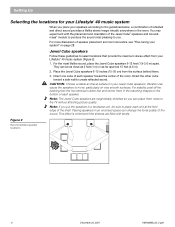
CAUTION: Choose a stable and level surface for your Lifestyle® 40 music system When you . For the most pleasing to you place your speakers according to place each one cube of reflected and direct sound provides a lifelike .... Vibration can change the tonal quality of the room. Direct one at the front edge of speaker placement and room acoustics, see "Fine-tuning your Lifestyle® 40 music system (Figure 2). 1. Placing speakers in a bookcase unit, be as 15 feet (4.6 m). 2. Place the Jewel Cube speakers 6-12 inches (15-30 cm) from the surface...
CAUTION: Choose a stable and level surface for your Lifestyle® 40 music system When you . For the most pleasing to you place your speakers according to place each one cube of reflected and direct sound provides a lifelike .... Vibration can change the tonal quality of the room. Direct one at the front edge of speaker placement and room acoustics, see "Fine-tuning your Lifestyle® 40 music system (Figure 2). 1. Placing speakers in a bookcase unit, be as 15 feet (4.6 m). 2. Place the Jewel Cube speakers 6-12 inches (15-30 cm) from the surface...
Owner's guide
Page 13
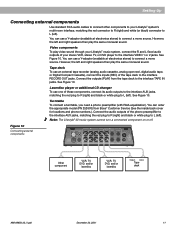
Setting Up Connecting external components Use standard RCA audio cables to connect other components to your Lifestyle® music system, connect the R and L fixed audio outputs of the tape deck to the interface RECORD OUT jacks. Tape deck To use a Y-adapter...Bose® Customer Service (See the inside back cover for locations and phone numbers.). See Figure 10. Connect the audio outputs of these components, connect its audio outputs to the interface AUX jacks, matching the red plug to R (right) and black or white plug to connect a mono source. Note: The Lifestyle® 40 music...
Setting Up Connecting external components Use standard RCA audio cables to connect other components to your Lifestyle® music system, connect the R and L fixed audio outputs of the tape deck to the interface RECORD OUT jacks. Tape deck To use a Y-adapter...Bose® Customer Service (See the inside back cover for locations and phone numbers.). See Figure 10. Connect the audio outputs of these components, connect its audio outputs to the interface AUX jacks, matching the red plug to R (right) and black or white plug to connect a mono source. Note: The Lifestyle® 40 music...
Owner's guide
Page 15
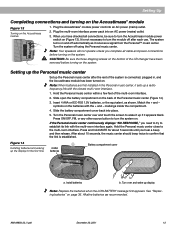
...Battery compartment cover a. Figure 14 Installing batteries and waking up if it receives a signal from the Personal™ music center. Install batteries b. Turn the Personal music center over and wake up a radiofrequency link with the closest multi-r oom interface. 1. Press ON/OFF, FM,...Alkaline batteries are first installed in , and the Acoustimass module has been turned on . markings inside the compartment. 4. If the Personal music center continuously displays "NO RESPONSE," you hear a beep and then release. AM189858_03_V.pdf December 20, 2001 13 CAUTION: Be sure ...
...Battery compartment cover a. Figure 14 Installing batteries and waking up if it receives a signal from the Personal™ music center. Install batteries b. Turn the Personal music center over and wake up a radiofrequency link with the closest multi-r oom interface. 1. Press ON/OFF, FM,...Alkaline batteries are first installed in , and the Acoustimass module has been turned on . markings inside the compartment. 4. If the Personal music center continuously displays "NO RESPONSE," you hear a beep and then release. AM189858_03_V.pdf December 20, 2001 13 CAUTION: Be sure ...
Owner's guide
Page 16
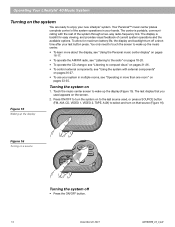
... places complete control of the system through a two-way radio-frequency link. Figure 15 Waking up the display (Figure 15). Operating Your Lifestyle® 40 Music System Turning on 1. The center is backlit for maximum battery life, the display and backlight turn off • Press the ON/OFF button... screen to turn on a source Turning the system off a short time after your new Lifestyle® system. You only need to touch the screen to wake up the music center. • To learn more than one room" on the screen. 2. The last display that you used , or press a SOURCE ...
... places complete control of the system through a two-way radio-frequency link. Figure 15 Waking up the display (Figure 15). Operating Your Lifestyle® 40 Music System Turning on 1. The center is backlit for maximum battery life, the display and backlight turn off • Press the ON/OFF button... screen to turn on a source Turning the system off a short time after your new Lifestyle® system. You only need to touch the screen to wake up the music center. • To learn more than one room" on the screen. 2. The last display that you used , or press a SOURCE ...
Owner's guide
Page 17
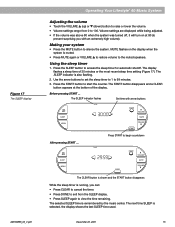
...; If the volume was above 80 when the system was turned off, it will turn on the display when the system is remembered by the music center. Press the SLEEP button to 99 minutes. 3. The START button disappears and a CLEAR button appears at 80 (to prevent surprising you can: &#... flashes on at the bottom of 30 minutes or the most recent sleep time setting (Figure 17). English Figure 17 The SLEEP display Operating Your Lifestyle® 40 Music System Adjusting the volume • Touch the VOLUME v (up) or w (down) button to raise or lower the volume. • Volume settings range ...
...; If the volume was above 80 when the system was turned off, it will turn on the display when the system is remembered by the music center. Press the SLEEP button to 99 minutes. 3. The START button disappears and a CLEAR button appears at 80 (to prevent surprising you can: &#... flashes on at the bottom of 30 minutes or the most recent sleep time setting (Figure 17). English Figure 17 The SLEEP display Operating Your Lifestyle® 40 Music System Adjusting the volume • Touch the VOLUME v (up) or w (down) button to raise or lower the volume. • Volume settings range ...
Owner's guide
Page 18
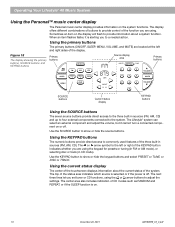
The Lifestyle® system can select an external component and adjust the volume, but it is off . Use the KEYPAD button to commonly used features of the ... or right of the KEYPAD button indicates whether you are using. Use the SOURCE button to a needed action. Operating Your Lifestyle® 40 Music System Using the Personal™ music center display The Personal music center display provides information on the display will flash to provide control of the function you are using the keypad...
The Lifestyle® system can select an external component and adjust the volume, but it is off . Use the KEYPAD button to commonly used features of the ... or right of the KEYPAD button indicates whether you are using. Use the SOURCE button to a needed action. Operating Your Lifestyle® 40 Music System Using the Personal™ music center display The Personal music center display provides information on the display will flash to provide control of the function you are using the keypad...
Owner's guide
Page 19
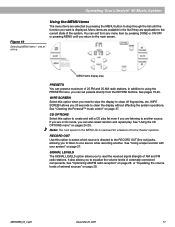
... by pressing DONE or ON/OFF or pressing MENU until the function you want is displayed. See pages 19-20. See "Cleaning the Personal™ music center" on pages 24-26. See "Using the CD OPTIONS menu" on page 37. See "Optimizing AM/FM radio reception" on page 28, or "Equalizing... listening to equalize the volume levels of external sources" on page 27. See "Using a tape recorder with your system" on page 29. English Operating Your Lifestyle® 40 Music System Figure 19 Selecting MENU items -
... by pressing DONE or ON/OFF or pressing MENU until the function you want is displayed. See pages 19-20. See "Cleaning the Personal™ music center" on pages 24-26. See "Using the CD OPTIONS menu" on page 37. See "Optimizing AM/FM radio reception" on page 28, or "Equalizing... listening to equalize the volume levels of external sources" on page 27. See "Using a tape recorder with your system" on page 29. English Operating Your Lifestyle® 40 Music System Figure 19 Selecting MENU items -


