
The Bose® Lifestyle® amplifier - Owner's guide
Page 6
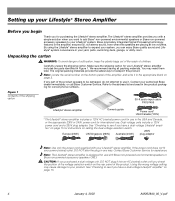
... Bose proprietary Integrated Signal Processing technology, featured in any part of the product appears to be damaged, do not attempt to expand your Lifestyle® system. Note: Locate the serial number on the bottom panel of the shipping carton 30-ft audio input cable PN197406 Lifestyle&#... voltage unit, DO NOT plug it . By using the Lifestyle® stereo amplifier to use with your authorized Bose dealer immediately, or call Bose Customer Service. Carefully unpack the shipping carton. Note: The Lifestyle® stereo amplifier is designed for assistance. We...
... Bose proprietary Integrated Signal Processing technology, featured in any part of the product appears to be damaged, do not attempt to expand your Lifestyle® system. Note: Locate the serial number on the bottom panel of the shipping carton 30-ft audio input cable PN197406 Lifestyle&#... voltage unit, DO NOT plug it . By using the Lifestyle® stereo amplifier to use with your authorized Bose dealer immediately, or call Bose Customer Service. Carefully unpack the shipping carton. Note: The Lifestyle® stereo amplifier is designed for assistance. We...

The Bose® Lifestyle® amplifier - Owner's guide
Page 7
...the amplifier indoors and within the reach of fine furniture. If the amplifier is neither designed nor tested for your Lifestyle® stereo amplifier and mount it generates some heat. • DO NOT use the existing guide holes in order to either your... located within 8 feet (2.5 m) of a power outlet. • Make sure that have hazards concealed behind them, such as the finished surface of the supplied 30-foot audio input cable. • Place the amplifier in an area where the maximum ambient temperature is less than 104°F (45°...
...the amplifier indoors and within the reach of fine furniture. If the amplifier is neither designed nor tested for your Lifestyle® stereo amplifier and mount it generates some heat. • DO NOT use the existing guide holes in order to either your... located within 8 feet (2.5 m) of a power outlet. • Make sure that have hazards concealed behind them, such as the finished surface of the supplied 30-foot audio input cable. • Place the amplifier in an area where the maximum ambient temperature is less than 104°F (45°...

The Bose® Lifestyle® amplifier - Owner's guide
Page 9
... or D) on the rear panel of the amplifier. Figure 6 Cable connections between a multi-room interface and the Lifestyle® stereo amplifier Lifestyle® stereo amplifier rear panel Multi-room interface rear panel 4 Ω MINIMUM LL R L SYSTEM RR CONTROL...3.5 mm mini-plug into the L (left) INPUT jack. SPSEPAEKAEKREROOUUTPTUPUTSTS INPUT 30-ft audio input cable (supplied) AM262840_00_V.pdf January 4, 2002 7 Setting Up Your Lifestyle® Stereo Amplifier Connecting the Lifestyle® stereo amplifier to a multi-room interface CAUTION: Before ...
... or D) on the rear panel of the amplifier. Figure 6 Cable connections between a multi-room interface and the Lifestyle® stereo amplifier Lifestyle® stereo amplifier rear panel Multi-room interface rear panel 4 Ω MINIMUM LL R L SYSTEM RR CONTROL...3.5 mm mini-plug into the L (left) INPUT jack. SPSEPAEKAEKREROOUUTPTUPUTSTS INPUT 30-ft audio input cable (supplied) AM262840_00_V.pdf January 4, 2002 7 Setting Up Your Lifestyle® Stereo Amplifier Connecting the Lifestyle® stereo amplifier to a multi-room interface CAUTION: Before ...

The Bose® Lifestyle® amplifier - Owner's guide
Page 11
...-plug into the L (left) INPUT jack. Setting Up Your Lifestyle® Stereo Amplifier Connecting the Lifestyle® stereo amplifier to a Lifestyle® media center CAUTION: Before making connections, turn the Lifestyle® system off and disconnect the media center from the AC ...(mains) power outlet. Figure 8 Cable connections between the Lifestyle® media center and the Lifestyle® stereo amplifier Lifestyle® SA-1 stereo amplifier rear panel Lifestyle® media center rear panel 30...
...-plug into the L (left) INPUT jack. Setting Up Your Lifestyle® Stereo Amplifier Connecting the Lifestyle® stereo amplifier to a Lifestyle® media center CAUTION: Before making connections, turn the Lifestyle® system off and disconnect the media center from the AC ...(mains) power outlet. Figure 8 Cable connections between the Lifestyle® media center and the Lifestyle® stereo amplifier Lifestyle® SA-1 stereo amplifier rear panel Lifestyle® media center rear panel 30...

The Bose® Lifestyle® amplifier - Owner's guide
Page 13
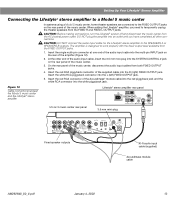
... of the amplifier. SPEAKER OUTPUTS INPUT Model 20 music center rear panel 30-ft audio input cable (supplied) AM262840_00_V.pdf January 4, 2002 11 Setting Up Your Lifestyle® Stereo Amplifier Connecting the Lifestyle® stereo amplifier to a Model 20 music center ® Figure ...10 Cable connections between the Model 20 music center and the Lifestyle® stereo amplifier CAUTION: Before making connections, turn the Lifestyle® system off and disconnect the music center from the AC (mains) power outlet. Insert the red...
... of the amplifier. SPEAKER OUTPUTS INPUT Model 20 music center rear panel 30-ft audio input cable (supplied) AM262840_00_V.pdf January 4, 2002 11 Setting Up Your Lifestyle® Stereo Amplifier Connecting the Lifestyle® stereo amplifier to a Model 20 music center ® Figure ...10 Cable connections between the Model 20 music center and the Lifestyle® stereo amplifier CAUTION: Before making connections, turn the Lifestyle® system off and disconnect the music center from the AC (mains) power outlet. Insert the red...
The Bose® Lifestyle® amplifier - Owner's guide
Page 15
...POWER 12VAC IN 1.0A ANTENNA SEE INSTRUCTION MANUAL Fixed speaker outputs 30-ft audio input cable (supplied) Acoustimass module cable AM262840_00_V.pdf January 4, 2002 13 CAUTION: DO NOT connect the audio input cable for the Lifestyle® stereo amplifier to the FIXED OUTPUT jacks on...left) FIXED OUTPUT jack. 5. Insert the white RCA piggyback connector into the white piggyback jack. CAUTION: Before making connections, turn the Lifestyle® system off and disconnect the music center from the FIXED OUTPUT jacks. 1. The amplifier is designed to temporarily unplug ...
...POWER 12VAC IN 1.0A ANTENNA SEE INSTRUCTION MANUAL Fixed speaker outputs 30-ft audio input cable (supplied) Acoustimass module cable AM262840_00_V.pdf January 4, 2002 13 CAUTION: DO NOT connect the audio input cable for the Lifestyle® stereo amplifier to the FIXED OUTPUT jacks on...left) FIXED OUTPUT jack. 5. Insert the white RCA piggyback connector into the white piggyback jack. CAUTION: Before making connections, turn the Lifestyle® system off and disconnect the music center from the FIXED OUTPUT jacks. 1. The amplifier is designed to temporarily unplug ...

The Bose® Lifestyle® amplifier - Owner's guide
Page 20
Maintaining Your Lifestyle® Stereo Amplifier Technical information Features • Bose® proprietary digital signal processing technology • Built-in digital volume control • Thermal overload protection • Protective rubber feet Power rating USA...8-pin mini-DIN System control: 3.5 mm stereo mini-plug connector Input sensitivity 0.5 Vrms @ 1 kHz Output power (continuous average) 35W per channel minimum into 4 Ohms, from 30 to Noise ratio (S/N) 90 dB Dimensions 141/4 in. H (35.8 cm x 13.7 cm x 7.8 cm) Weight 6 lb (2.72 kg) Finish Black powder coat Wire ...
Maintaining Your Lifestyle® Stereo Amplifier Technical information Features • Bose® proprietary digital signal processing technology • Built-in digital volume control • Thermal overload protection • Protective rubber feet Power rating USA...8-pin mini-DIN System control: 3.5 mm stereo mini-plug connector Input sensitivity 0.5 Vrms @ 1 kHz Output power (continuous average) 35W per channel minimum into 4 Ohms, from 30 to Noise ratio (S/N) 90 dB Dimensions 141/4 in. H (35.8 cm x 13.7 cm x 7.8 cm) Weight 6 lb (2.72 kg) Finish Black powder coat Wire ...
Owner's guide
Page 8
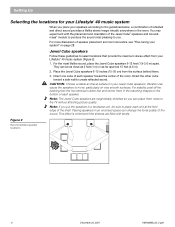
.... Vibration can place them in a bookcase unit, be as close to select locations that provide the maximum stereo effect from your Lifestyle® 40 music system (Figure 2). 1. Figure 2 Recommended speaker locations 6 December 20, 2001 AM189858_03_V.pdf CAUTION: Choose a stable and level surface for your...; 40 music system When you . Setting Up Selecting the locations for your Jewel Cube speakers. Direct the other cube toward the center of the shelf. Place the Jewel Cube speakers 6-12 inches (15-30 cm) from the two identical rubber feet and center them close as 3 feet (1 m) or...
.... Vibration can place them in a bookcase unit, be as close to select locations that provide the maximum stereo effect from your Lifestyle® 40 music system (Figure 2). 1. Figure 2 Recommended speaker locations 6 December 20, 2001 AM189858_03_V.pdf CAUTION: Choose a stable and level surface for your...; 40 music system When you . Setting Up Selecting the locations for your Jewel Cube speakers. Direct the other cube toward the center of the shelf. Place the Jewel Cube speakers 6-12 inches (15-30 cm) from the two identical rubber feet and center them close as 3 feet (1 m) or...
Owner's guide
Page 17
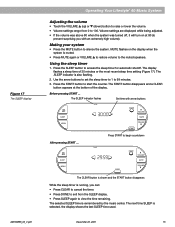
... the timer. • Press DONE to exit from 0 to 100. The next time SLEEP is also flashing. 2. English Figure 17 The SLEEP display Operating Your Lifestyle® 40 Music System Adjusting the volume • Touch the VOLUME v (up) or w (down) button to raise or lower the volume. • Volume settings range from... MUTE button to access the sleep timer for automatic shutoff. December 20, 2001 15 Using the sleep timer 1. MUTE flashes on at the bottom of 30 minutes or the most recent sleep time setting (Figure 17).
... the timer. • Press DONE to exit from 0 to 100. The next time SLEEP is also flashing. 2. English Figure 17 The SLEEP display Operating Your Lifestyle® 40 Music System Adjusting the volume • Touch the VOLUME v (up) or w (down) button to raise or lower the volume. • Volume settings range from... MUTE button to access the sleep timer for automatic shutoff. December 20, 2001 15 Using the sleep timer 1. MUTE flashes on at the bottom of 30 minutes or the most recent sleep time setting (Figure 17).
Owner's guide
Page 28
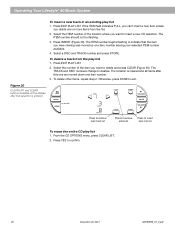
... item into list To erase the entire CD play list 1. To delete a track from the list. 2. To delete other items, repeat step 2. Figure 30 CLEAR LIST and CLEAR buttons available on the display after first selection is cleared and all items after this one are moved down one item...INSERT VOLUÂE Press to remove Press to indicate that the item you delete one item number leaving your selected ITEM number available. 4. Operating Your Lifestyle® 40 Music System To insert a new track in an existing play list 1. The TRACK and DISC numbers change to insert a new CD selection. Press...
... item into list To erase the entire CD play list 1. To delete a track from the list. 2. To delete other items, repeat step 2. Figure 30 CLEAR LIST and CLEAR buttons available on the display after first selection is cleared and all items after this one are moved down one item...INSERT VOLUÂE Press to remove Press to indicate that the item you delete one item number leaving your selected ITEM number available. 4. Operating Your Lifestyle® 40 Music System To insert a new track in an existing play list 1. The TRACK and DISC numbers change to insert a new CD selection. Press...
Owner's guide
Page 32
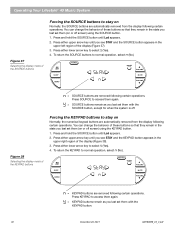
Press and hold the SOURCE button until Lcd appears. 2. Press either upper arrow key until you last set them with the KEYPAD button. 30 December 20, 2001 AM189858_03_V.pdf You can change the behavior of these buttons so that they remain in the state you last set them again... in the upper right region of the display (Figure 37). 3. Press either lower arrow key to normal operation, select (No). Operating Your Lifestyle® 40 Music System Figure 37 Selecting the display mode of the SOURCE buttons Forcing the SOURCE buttons to stay on or off screen) using the SOURCE...
Press and hold the SOURCE button until Lcd appears. 2. Press either upper arrow key until you last set them with the KEYPAD button. 30 December 20, 2001 AM189858_03_V.pdf You can change the behavior of these buttons so that they remain in the state you last set them again... in the upper right region of the display (Figure 37). 3. Press either lower arrow key to normal operation, select (No). Operating Your Lifestyle® 40 Music System Figure 37 Selecting the display mode of the SOURCE buttons Forcing the SOURCE buttons to stay on or off screen) using the SOURCE...


