User Manual
Page 2
CONTENTS Installation & Removal 3 DIN Mount 3 Installing the unit 3 Removing the unit 4 Wiring Connections 5 Operation 6 Location of Keys 6 Powering On/Off 7 Audio Adjustment 7 Time 7 Display 7 Aux-In 7 Reset 7 Radio Operation 7 Switching to Radio Mode 7 Selecting AM/FM 7 Selecting Station 7 Auto Memory Storing & Scanning 7 Reset Stations 8 Station Storing 8 USB/SD Playback 8 Selecting Tracks 8 Play/Pause 8 Direct Track Access 8 BT Playback 9 Remote Control 10 Specifications 11 Troubleshooting 12 2
CONTENTS Installation & Removal 3 DIN Mount 3 Installing the unit 3 Removing the unit 4 Wiring Connections 5 Operation 6 Location of Keys 6 Powering On/Off 7 Audio Adjustment 7 Time 7 Display 7 Aux-In 7 Reset 7 Radio Operation 7 Switching to Radio Mode 7 Selecting AM/FM 7 Selecting Station 7 Auto Memory Storing & Scanning 7 Reset Stations 8 Station Storing 8 USB/SD Playback 8 Selecting Tracks 8 Play/Pause 8 Direct Track Access 8 BT Playback 9 Remote Control 10 Specifications 11 Troubleshooting 12 2
User Manual
Page 3
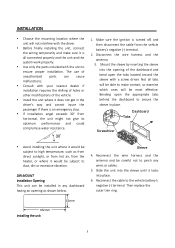
... proper installation. The use of unauthorized parts can be installed in place. Bending open the tabs located around the sleeve with a screw driver. Reconnect the wire harness and the antenna and be careful not to pinch any dashboard having an opening of the vehicle. Install the unit where it would be subject to secure the sleeve in any wires or cables. 5. DIN MOUNT Installation...
... proper installation. The use of unauthorized parts can be installed in place. Bending open the tabs located around the sleeve with a screw driver. Reconnect the wire harness and the antenna and be careful not to pinch any dashboard having an opening of the vehicle. Install the unit where it would be subject to secure the sleeve in any wires or cables. 5. DIN MOUNT Installation...
User Manual
Page 4
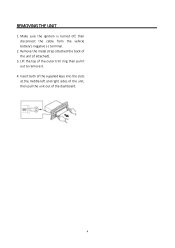
Insert both of the supplied keys into the slots at the middle left and right sides of the unit, then pull the unit out of the unit (if attached). 3. REMOVING THE UNIT 1. Remove the metal strap attached the back of the dashboard. 4 Lift the top of the outer trim ring then pull it out to remove it. 4. Make sure the ignition is turned off, then disconnect the cable from the vehicle battery's negative (-) terminal. 2.
Insert both of the supplied keys into the slots at the middle left and right sides of the unit, then pull the unit out of the unit (if attached). 3. REMOVING THE UNIT 1. Remove the metal strap attached the back of the dashboard. 4 Lift the top of the outer trim ring then pull it out to remove it. 4. Make sure the ignition is turned off, then disconnect the cable from the vehicle battery's negative (-) terminal. 2.
User Manual
Page 5
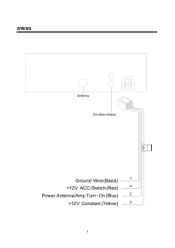
WIRING 5
WIRING 5
User Manual
Page 6
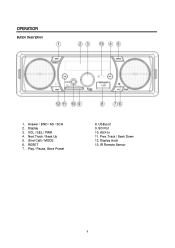
Answer / BND / AS / SCH 2. SD Port 10. Track / Seek Down 12. Next Track / Seek Up 5. (End Call) / MODE 6. Play / Pause, Store Preset 8. USB port 9. Prev. AUX-In 11. IR Remote Sensor 6 Display clock 13. RESET 7. OPERATION Button Description DISP 1. Display 3. VOL / SEL / PWR 4.
Answer / BND / AS / SCH 2. SD Port 10. Track / Seek Down 12. Next Track / Seek Up 5. (End Call) / MODE 6. Play / Pause, Store Preset 8. USB port 9. Prev. AUX-In 11. IR Remote Sensor 6 Display clock 13. RESET 7. OPERATION Button Description DISP 1. Display 3. VOL / SEL / PWR 4.
User Manual
Page 7
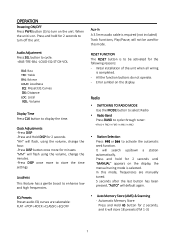
...: - Error symbol on the unit. It will default again. Auto Memory Store (AMS) & Scanning - Audio Adjustment Press SEL button to cycle. →BAS-TRE-BAL -LOUD-EQ-ST-DX-VOL BAS: Bass TRE: Treble BAL: Balance LOUD: Loudness EQ: Preset EQ Curves DX: Distance LOC: Local VOL: Volume Display Time Press CLK button to activate the automatic seek function. RESET FUNCTION The RESET button is on the display, the manual tuning mode is selected. Initial installation...
...: - Error symbol on the unit. It will default again. Auto Memory Store (AMS) & Scanning - Audio Adjustment Press SEL button to cycle. →BAS-TRE-BAL -LOUD-EQ-ST-DX-VOL BAS: Bass TRE: Treble BAL: Balance LOUD: Loudness EQ: Preset EQ Curves DX: Distance LOC: Local VOL: Volume Display Time Press CLK button to activate the automatic seek function. RESET FUNCTION The RESET button is on the display, the manual tuning mode is selected. Initial installation...
User Manual
Page 8
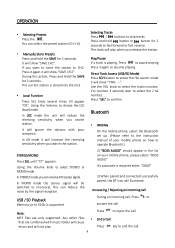
... phone, select the Bluetooth set up to select the 2'nd number... Using the Volume, to operate Bluetooth.) STEREO/MONO Press SEL until "ST" appears. In LOC mode the unit will illuminate. Direct Track Access (USB/SD Mode) Press SCH button to end the call . End a Call Press key to active the file search mode. OPERATION Selecting Presets Press the . Use the VOL knob to select the tracks number, 1'st number. 3 seconds later to 32Gb is supported 2) "BOSS AUDIO...
... phone, select the Bluetooth set up to select the 2'nd number... Using the Volume, to operate Bluetooth.) STEREO/MONO Press SEL until "ST" appears. In LOC mode the unit will illuminate. Direct Track Access (USB/SD Mode) Press SCH button to end the call . End a Call Press key to active the file search mode. OPERATION Selecting Presets Press the . Use the VOL knob to select the tracks number, 1'st number. 3 seconds later to 32Gb is supported 2) "BOSS AUDIO...
User Manual
Page 9
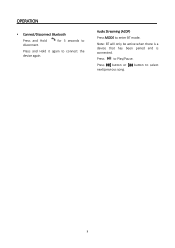
Press to select 9 button to Play/Pause. OPERATION Connect/Disconnect Bluetooth Press and Hold disconnect. Audio Streaming (A2DP) Press MODE to connect the device again. Note: BT will only be active when there is a device that has been paired and is connected. Press button or next/previous song. for 3 seconds to Press and Hold it again to enter BT mode.
Press to select 9 button to Play/Pause. OPERATION Connect/Disconnect Bluetooth Press and Hold disconnect. Audio Streaming (A2DP) Press MODE to connect the device again. Note: BT will only be active when there is a device that has been paired and is connected. Press button or next/previous song. for 3 seconds to Press and Hold it again to enter BT mode.
User Manual
Page 10
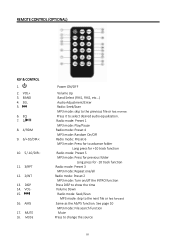
... INTRO function Press DISP to show the time Volume Down Radio mode: Seek/Scan MP3 mode: skip to select desired audio equalization. MUTE 18. SEL 5. 6. See page 10 MP3 mode: File search function Mute Press to the previous file or fast reverse. VOL+ 3. BAND 4. MODE Power ON/OFF Volume Up Band Select (FM1, FM2, etc...) Audio Adjustment/Enter Radio: Seek/Scan MP3 mode: skip to change the source 10 DISP 14. REMOTE CONTROL (OPTIONAL) KEY & CONTROL 1. 2.
... INTRO function Press DISP to show the time Volume Down Radio mode: Seek/Scan MP3 mode: skip to select desired audio equalization. MUTE 18. SEL 5. 6. See page 10 MP3 mode: File search function Mute Press to the previous file or fast reverse. VOL+ 3. BAND 4. MODE Power ON/OFF Volume Up Band Select (FM1, FM2, etc...) Audio Adjustment/Enter Radio: Seek/Scan MP3 mode: skip to change the source 10 DISP 14. REMOTE CONTROL (OPTIONAL) KEY & CONTROL 1. 2.

User Manual
Page 12
... The fuse is not on Cause The car ignition switch is blown. Solution Turn the key to select radio Press the reset button. Change the source Remove any of the problems persist after checklist has been made, call our Tech Dept. (M-F, 8:30a-5p PST) 805-751-4853 Symptom Does not power on . No sound Volume is at minimum Unit is not connected. Adjust volume to a desired level. Select a station manually. 12 TROUBLESHOOTING Before going...
... The fuse is not on Cause The car ignition switch is blown. Solution Turn the key to select radio Press the reset button. Change the source Remove any of the problems persist after checklist has been made, call our Tech Dept. (M-F, 8:30a-5p PST) 805-751-4853 Symptom Does not power on . No sound Volume is at minimum Unit is not connected. Adjust volume to a desired level. Select a station manually. 12 TROUBLESHOOTING Before going...


