User Manual
Page 3
...3 Remote Control Operation 4 Panel Introduction 6 Main Menu Operation Instruction 7 Access Setup Interface 9 General Setup 9 Disc Setup 10 Audio Setup 11 Navigation Setup 11 Other Setup 12 SWC-Steering Wheel Control Setting.... 12 Radio Operation 13 Disc Playback-Video 15 Disc Playback-Audio 16 Music Playing Menu 17 Bluetooth Operation 17 Bluetooth Operation Menu 17 Bluetooth Dialing 18 Bluetooth Call 19 Bluetooth Phone Book 19 Bluetooth Phone Call History 20 Bluetooth Music Streaming-A2DP 21 Viewing Photos 21 Camera/Aux/AN Menu 23 Troubleshooting...
...3 Remote Control Operation 4 Panel Introduction 6 Main Menu Operation Instruction 7 Access Setup Interface 9 General Setup 9 Disc Setup 10 Audio Setup 11 Navigation Setup 11 Other Setup 12 SWC-Steering Wheel Control Setting.... 12 Radio Operation 13 Disc Playback-Video 15 Disc Playback-Audio 16 Music Playing Menu 17 Bluetooth Operation 17 Bluetooth Operation Menu 17 Bluetooth Dialing 18 Bluetooth Call 19 Bluetooth Phone Book 19 Bluetooth Phone Call History 20 Bluetooth Music Streaming-A2DP 21 Viewing Photos 21 Camera/Aux/AN Menu 23 Troubleshooting...
User Manual
Page 4
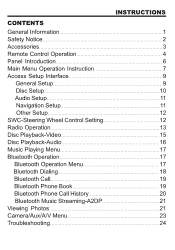
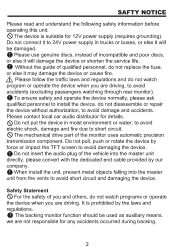
.../JPEG Built-in GPS Front USB & SD reader support Built-in Bluetooth AUX Input AV Input AV output Rear view camera 4.2 channel output 80*4W AMP power output maximum Steering wheel control TFT screen 800*480pixel SD 64G Working power 12 V Max Output 4*80W Working Temperature -20°C-70°C Size 96.5*170.5*144mm Weight About 1.92kg Compatible Media Picture JPG/JPEG/BMP/GIF/PNG Disc CD/CD-R/CD-RW/DVD/DVD-R/DVD+R/ DVD-RW/DVD+RW Audio file APE-Monkey...
.../JPEG Built-in GPS Front USB & SD reader support Built-in Bluetooth AUX Input AV Input AV output Rear view camera 4.2 channel output 80*4W AMP power output maximum Steering wheel control TFT screen 800*480pixel SD 64G Working power 12 V Max Output 4*80W Working Temperature -20°C-70°C Size 96.5*170.5*144mm Weight About 1.92kg Compatible Media Picture JPG/JPEG/BMP/GIF/PNG Disc CD/CD-R/CD-RW/DVD/DVD-R/DVD+R/ DVD-RW/DVD+RW Audio file APE-Monkey...
User Manual
Page 5
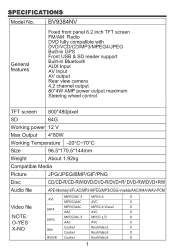
... install the unit, prevent metal objects falling into the master unit directly. It is suitable for 12V power supply (requires grounding). we are driving. O Do not insert the audio plug of qualified personnel, do not replace the fuse, or else it may damage the device or cause fire. /i\ Please follow the traffic laws and regulations and do not watch programs or operate the device when...
... install the unit, prevent metal objects falling into the master unit directly. It is suitable for 12V power supply (requires grounding). we are driving. O Do not insert the audio plug of qualified personnel, do not replace the fuse, or else it may damage the device or cause fire. /i\ Please follow the traffic laws and regulations and do not watch programs or operate the device when...
User Manual
Page 8
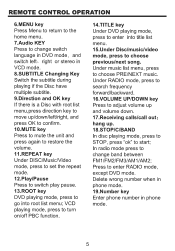
... radio mode press to go into title list menu. 15.Under Disc/music/video mode, press to choose PRE/NEXT music. Delete wrong number when in phone mode. 19.Number key Enter phone number in DVD mode, and switch left /right, and press OK to confirm. 10.MUTE key Press to mute the unit and press again to restore the volume. 11.REPEAT key Under DISC/MusicNideo mode, press to set the repeat mode. 12.Play...
... radio mode press to go into title list menu. 15.Under Disc/music/video mode, press to choose PRE/NEXT music. Delete wrong number when in phone mode. 19.Number key Enter phone number in DVD mode, and switch left /right, and press OK to confirm. 10.MUTE key Press to mute the unit and press again to restore the volume. 11.REPEAT key Under DISC/MusicNideo mode, press to set the repeat mode. 12.Play...
User Manual
Page 9
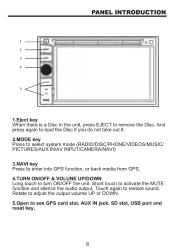
... adjust the output volume UP or DOWN. 5.Open to restore sound. And press again to load the Disc if you do not take out it. 2.MODE key Press to select system mode (RADIO/DISC/PHONE/VIDEOS/MUSIC/ PICTURES/AUX IN/AV INPUT/CAMERA/NAVI) 3.NAVI key Press to enter into GPS function, or back media from GPS. 4.TURN ON/OFF & VOLUNE UP/DOWN Long touch to activate the MUTE function and silence the audio output. Short touch to turn...
... adjust the output volume UP or DOWN. 5.Open to restore sound. And press again to load the Disc if you do not take out it. 2.MODE key Press to select system mode (RADIO/DISC/PHONE/VIDEOS/MUSIC/ PICTURES/AUX IN/AV INPUT/CAMERA/NAVI) 3.NAVI key Press to enter into GPS function, or back media from GPS. 4.TURN ON/OFF & VOLUNE UP/DOWN Long touch to activate the MUTE function and silence the audio output. Short touch to turn...
User Manual
Page 10
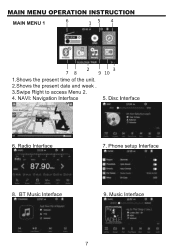
... !lint Ltu 6. Phone setup Interface ar PHONE l2 0fb ■Keypad • Ph.C•BCIOk N,eents Pair Device MI ReAp likerdatli Puto Answer Rotto akkliNft 'Device Narre Sr Code 411 • ROSt AUDIO WOO 8. k DP 9. BT Music Interface sTREAnt* •*." 12:07 PM % Jug. Music Interface * MUSK 1.2.:137 aal nt In Shuffle a 11. )0 1111.. NAVI: Navigation Interface 5. MAIN MENU OPERATION INSTRUCTION MAIN MENU 1 6 5 4 1I I •...
... !lint Ltu 6. Phone setup Interface ar PHONE l2 0fb ■Keypad • Ph.C•BCIOk N,eents Pair Device MI ReAp likerdatli Puto Answer Rotto akkliNft 'Device Narre Sr Code 411 • ROSt AUDIO WOO 8. k DP 9. BT Music Interface sTREAnt* •*." 12:07 PM % Jug. Music Interface * MUSK 1.2.:137 aal nt In Shuffle a 11. )0 1111.. NAVI: Navigation Interface 5. MAIN MENU OPERATION INSTRUCTION MAIN MENU 1 6 5 4 1I I •...
User Manual
Page 11
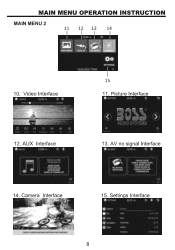
Picture Interface 1201 HPAI 10' 3 12. Settings Interface • S 8 MAIN MENU OPERATION INSTRUCTION MAIN MENU 2 11 12 I UPP 13 14 I I ir- se: CU • 1/2015 THUR 15 10. AV no signal Interface 17.77" • PROM AM II MAKE SLEW VOLIR ORME HEADPFIONE 4 E.IB TURNED UP r4i Apr cHECKYGUR CABLE CONNECTICIID AND MARE SURE YOUR DEVICE IS CONNECTED POWERED 14. AUX Interface 'It MAIN t " •...
Picture Interface 1201 HPAI 10' 3 12. Settings Interface • S 8 MAIN MENU OPERATION INSTRUCTION MAIN MENU 2 11 12 I UPP 13 14 I I ir- se: CU • 1/2015 THUR 15 10. AV no signal Interface 17.77" • PROM AM II MAKE SLEW VOLIR ORME HEADPFIONE 4 E.IB TURNED UP r4i Apr cHECKYGUR CABLE CONNECTICIID AND MARE SURE YOUR DEVICE IS CONNECTED POWERED 14. AUX Interface 'It MAIN t " •...
User Manual
Page 12
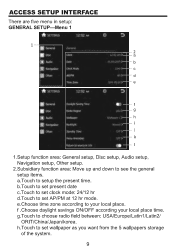
.... 9 f .Choose daylight savings ON/OFF according your local place. h.Touch to your local place time. e.Choose time zone according to set clock mode: 24/12 hr d.Touch to choose radio field between: USA/Europe/Latin1/Latin2/ ORIT/China/Japan/korea. Radio Region Wallpaper Backlight Standby Time Menu Anil-natal Return to source in setup: GENERAL SETUP-Menu 1 * SETTINGS 12:02 Am 1 General Disc Audio Navigation Other * SETTINGS General MI Disc Audio 9 Navigation • Other...
.... 9 f .Choose daylight savings ON/OFF according your local place. h.Touch to your local place time. e.Choose time zone according to set clock mode: 24/12 hr d.Touch to choose radio field between: USA/Europe/Latin1/Latin2/ ORIT/China/Japan/korea. Radio Region Wallpaper Backlight Standby Time Menu Anil-natal Return to source in setup: GENERAL SETUP-Menu 1 * SETTINGS 12:02 Am 1 General Disc Audio Navigation Other * SETTINGS General MI Disc Audio 9 Navigation • Other...
User Manual
Page 13
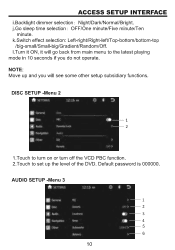
... turn off the VCD PBC function. 2.Touch to the latest playing mode in 10 seconds if you will see some other setup subsidiary functions. j.Go sleep time selection: OFF/One minute/Five minute/Ten minute. NOTE: Move up the level of the DVD. AUDIO SETUP -Menu 3 smiNGs 12:15 AM ~' mineral EQ 1 111 ❑isc Revert) 2 Audio Loudness 3 i NaVigarlOn Beep 4 Other Subwoofer 5 Balance 6 10 k.Switch...
... turn off the VCD PBC function. 2.Touch to the latest playing mode in 10 seconds if you will see some other setup subsidiary functions. j.Go sleep time selection: OFF/One minute/Five minute/Ten minute. NOTE: Move up the level of the DVD. AUDIO SETUP -Menu 3 smiNGs 12:15 AM ~' mineral EQ 1 111 ❑isc Revert) 2 Audio Loudness 3 i NaVigarlOn Beep 4 Other Subwoofer 5 Balance 6 10 k.Switch...
User Manual
Page 14
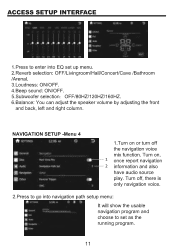
... IP 110 1 ' 4 IIIE It will show the usable navigation program and choose to enter into EQ set as the running program. 11 so 1.Turn on , once report navigation 2 information and also have audio source play. Turn off the navigation voice mix function. ACCESS SETUP INTERFACE ..-manc 54, 1208.4., , 4 4- iii'7.:_:-,A„N0,.)•A4tn-..-i.-m-.--.a7...•...i,r _- 4.-.-1-.r- I SvilC . NAVIGATION SETUP -Menu 4 *sEnkijiis..e 12:06 M4 ■ General ■...
... IP 110 1 ' 4 IIIE It will show the usable navigation program and choose to enter into EQ set as the running program. 11 so 1.Turn on , once report navigation 2 information and also have audio source play. Turn off the navigation voice mix function. ACCESS SETUP INTERFACE ..-manc 54, 1208.4., , 4 4- iii'7.:_:-,A„N0,.)•A4tn-..-i.-m-.--.a7...•...i,r _- 4.-.-1-.r- I SvilC . NAVIGATION SETUP -Menu 4 *sEnkijiis..e 12:06 M4 ■ General ■...
User Manual
Page 15
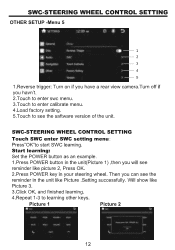
...-STEERING WHEEL CONTROL SETTING OTHER SETUP -Menu 5 * smINGs Aam, • • itiltt a General OthE•r MMI IMMIel..-- • Disc Reycrse Trigger 1 --' M! SWC-STEERING WHEEL CONTROL SETTING Touch SWC enter SWC setting menu: Press"OK"to see the reminder in your steering wheel. Will show like Picture .Setting successfully. Audio SWC 2 a Navigation Touch Calibrate ll 3 • Other Factory Sealog 4 version 5 1.Reverse trigger: Turn on if you have a rear view camera.Turn off if...
...-STEERING WHEEL CONTROL SETTING OTHER SETUP -Menu 5 * smINGs Aam, • • itiltt a General OthE•r MMI IMMIel..-- • Disc Reycrse Trigger 1 --' M! SWC-STEERING WHEEL CONTROL SETTING Touch SWC enter SWC setting menu: Press"OK"to see the reminder in your steering wheel. Will show like Picture .Setting successfully. Audio SWC 2 a Navigation Touch Calibrate ll 3 • Other Factory Sealog 4 version 5 1.Reverse trigger: Turn on if you have a rear view camera.Turn off if...
User Manual
Page 16
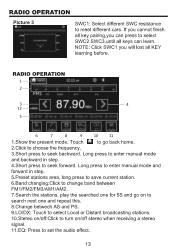
... SWC resistance to set the audio effect. 13 all key pairing,you cannot finish E. If you can learn. RADIO OPERATION 1 - 12:15 Am 0 2 - FM 1 P5: 3- 87.90. 4 12 - Long press to enter manual mode and backward in step. 5.Preset stations area, long press to save current station. 6.Band changing:Click to change band between FM1/FM2/FM3/AM1/AM2. 7.Search the stations, play the searched...
... SWC resistance to set the audio effect. 13 all key pairing,you cannot finish E. If you can learn. RADIO OPERATION 1 - 12:15 Am 0 2 - FM 1 P5: 3- 87.90. 4 12 - Long press to enter manual mode and backward in step. 5.Preset stations area, long press to save current station. 6.Band changing:Click to change band between FM1/FM2/FM3/AM1/AM2. 7.Search the stations, play the searched...
User Manual
Page 17
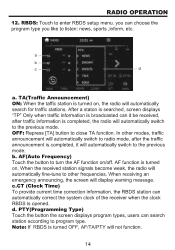
... mode. In other frequencies. When receiving an emergency announcing, the screen will automatically switch to radio mode, after the traffic announcement is completed, it be received, after traffic information is turned on , the radio will automatically search for traffic stations. Note: If RBDS is opened. AF function is completed, the radio will not function. 14 RBDS: Touch to close TA function. d. PTY(Programming Type) Touch the button the screen displays program types, users...
... mode. In other frequencies. When receiving an emergency announcing, the screen will automatically switch to radio mode, after the traffic announcement is completed, it be received, after traffic information is turned on , the radio will automatically search for traffic stations. Note: If RBDS is opened. AF function is completed, the radio will not function. 14 RBDS: Touch to close TA function. d. PTY(Programming Type) Touch the button the screen displays program types, users...

User Manual
Page 18
... TO WATCH VIDEO 15 If you will disappear in a while, and click this area to show the process and time of present video. 4.Function bar same as audio playing menu. Press the function key HE and you attempt to choose the chapter 8 9 0 ■ NOTE: When properly installed, DVD video cannot be displayed unless the parking brake is moving, the screen displays the following warning. DISC PLAYBACK-VIDEO It VIDEOS 12...
... TO WATCH VIDEO 15 If you will disappear in a while, and click this area to show the process and time of present video. 4.Function bar same as audio playing menu. Press the function key HE and you attempt to choose the chapter 8 9 0 ■ NOTE: When properly installed, DVD video cannot be displayed unless the parking brake is moving, the screen displays the following warning. DISC PLAYBACK-VIDEO It VIDEOS 12...
User Manual
Page 20
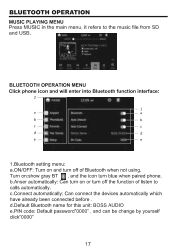
... this unit: BOSS AUDIO e.PIN code: Default password"0000" , and can be change by yourself click"0000" 17 Turn on and turn blue when paired phone. c.Connect automatically: Can connect the devices automatically which have already been connected before . b - Keypad FtioneBook Recent Pair Device Setup Bluetaoth Auto Answer Auto Connect Dev,;ce Narric Pin Code 1 a b C BOSS .AUDIO d e 1.Bluetooth setting menu: a.ON/OFF: Turn on :show gray BT and the icon turn off the function of Bluetooth when not using. a - BLUETOOTH OPERATION MUSIC PLAYING MENU Press MUSIC in the main menu, it...
... this unit: BOSS AUDIO e.PIN code: Default password"0000" , and can be change by yourself click"0000" 17 Turn on and turn blue when paired phone. c.Connect automatically: Can connect the devices automatically which have already been connected before . b - Keypad FtioneBook Recent Pair Device Setup Bluetaoth Auto Answer Auto Connect Dev,;ce Narric Pin Code 1 a b C BOSS .AUDIO d e 1.Bluetooth setting menu: a.ON/OFF: Turn on :show gray BT and the icon turn off the function of Bluetooth when not using. a - BLUETOOTH OPERATION MUSIC PLAYING MENU Press MUSIC in the main menu, it...
User Manual
Page 21
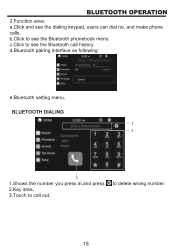
... keypad, users can dial no. BLUETOOTH OPERATION 2.Function area: a.Click and see the Bluetooth phonebook menu. to see the Bluetooth call out. c.Click to delete wrong number. 18 Pair Device 445! 8 9x z # 3 1.Shows the number you press in =±7:1 - BLUETOOTH DIALING tt..11c3ir 12:113 401 0 ■ Enter a Phone Number a 1 2 • Keypad cA A ■ PhoneBoak • Recenb ut . r-Ir:•-•!FAa e.Bluetooth setting menu. and make phone calls.
... keypad, users can dial no. BLUETOOTH OPERATION 2.Function area: a.Click and see the Bluetooth phonebook menu. to see the Bluetooth call out. c.Click to delete wrong number. 18 Pair Device 445! 8 9x z # 3 1.Shows the number you press in =±7:1 - BLUETOOTH DIALING tt..11c3ir 12:113 401 0 ■ Enter a Phone Number a 1 2 • Keypad cA A ■ PhoneBoak • Recenb ut . r-Ir:•-•!FAa e.Bluetooth setting menu. and make phone calls.

User Manual
Page 25
... this background will be played for 5s automatically and goes to the next if you can set the picture as ou want. b.Scan the picture file of the unit. During picture playing mode, one picture will remain the same till you reset it . 4.Zoom in the present picture. 5.Zoom out the present picture. 6.Turn left 90 degrees. 7.Turn right 90 degrees. 8.Press to change between picture mode and picture list mode...
... this background will be played for 5s automatically and goes to the next if you can set the picture as ou want. b.Scan the picture file of the unit. During picture playing mode, one picture will remain the same till you reset it . 4.Zoom in the present picture. 5.Zoom out the present picture. 6.Turn left 90 degrees. 7.Turn right 90 degrees. 8.Press to change between picture mode and picture list mode...
User Manual
Page 26
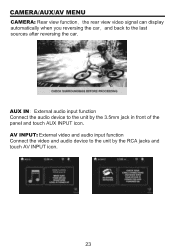
CAMERA/AUX/AV MENU CAMERA: Rear view function, the rear view video signal can display automatically when you reversing the car, and back to the last sources after reversing the car. 7 AM, CHECK SURROUNDINGS BEFORE PROCEEDING AUX IN: External audio input function Connect the audio device to the unit by the 3.5mm jack in front of the panel and touch AUX INPUT icon. Lena. Rtile4 UP 23 AV INPUT: External video and audio input function Connect the video and audio device to the unit by the RCA jacks and touch AV INPUT icon.
CAMERA/AUX/AV MENU CAMERA: Rear view function, the rear view video signal can display automatically when you reversing the car, and back to the last sources after reversing the car. 7 AM, CHECK SURROUNDINGS BEFORE PROCEEDING AUX IN: External audio input function Connect the audio device to the unit by the 3.5mm jack in front of the panel and touch AUX INPUT icon. Lena. Rtile4 UP 23 AV INPUT: External video and audio input function Connect the video and audio device to the unit by the RCA jacks and touch AV INPUT icon.
User Manual
Page 27
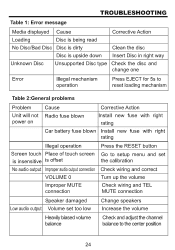
... change one Error Illegal mechanism operation Press EJECT for 5s to reset loading mechanism Table 2:General problems Problem Unit will not power on Cause Corrective Action Radio fuse blown Install new fuse with right rating Car battery fuse blown Install new fuse with right rating Illegal operation Screen touch Place of touch screen is insensitive is offset No audio output Improper audio output connection VOLUME 0 Improper MUTE connection Press the RESET button Go to setup menu and set the calibration Check wiring and correct Turn up the volume Check wiring...
... change one Error Illegal mechanism operation Press EJECT for 5s to reset loading mechanism Table 2:General problems Problem Unit will not power on Cause Corrective Action Radio fuse blown Install new fuse with right rating Car battery fuse blown Install new fuse with right rating Illegal operation Screen touch Place of touch screen is insensitive is offset No audio output Improper audio output connection VOLUME 0 Improper MUTE connection Press the RESET button Go to setup menu and set the calibration Check wiring and correct Turn up the volume Check wiring...

User Manual
Page 28
... vehicle in safe place and set parking brake ON Flashing image DVD is not compatible with Change setup to or interference current TV system settings accommodate Disc appears on screen Improper image, improper height/width ratio display Improper video signal connections Check wiring and correct Improper aspect ratio setup Use correct aspect ratio setting Table 4: Tuner Problem Cause Corrective Action Weak station Auto antenna is not fully searching extended Connect the auto antenna properly LOCAL function is activated Turn LOCAL function OFF 25
... vehicle in safe place and set parking brake ON Flashing image DVD is not compatible with Change setup to or interference current TV system settings accommodate Disc appears on screen Improper image, improper height/width ratio display Improper video signal connections Check wiring and correct Improper aspect ratio setup Use correct aspect ratio setting Table 4: Tuner Problem Cause Corrective Action Weak station Auto antenna is not fully searching extended Connect the auto antenna properly LOCAL function is activated Turn LOCAL function OFF 25


