User Manual in English
Page 2
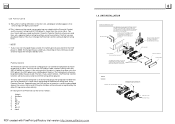
... 1 LASER PRODUCT Laser product symbol: located on the rear panel of the unit, indicate this player is a class laser product, only use weak laser and no hazardous radiation outside of the unit. 1.Read through this instruction manual before installation and use. 2.Before removing the unit, remove the disc from the unit first. 3.Do not open the cover or touch any kind of the unit, only for qualified technicians...
... 1 LASER PRODUCT Laser product symbol: located on the rear panel of the unit, indicate this player is a class laser product, only use weak laser and no hazardous radiation outside of the unit. 1.Read through this instruction manual before installation and use. 2.Before removing the unit, remove the disc from the unit first. 3.Do not open the cover or touch any kind of the unit, only for qualified technicians...
User Manual in English
Page 3
Common Operation 9 3. Basic Disc, USB or MMC/SD Operation 12 4.1 Begin Playback 12 4.2 Pause Playback 13 4.3 Stop Playback 13 4.4 Select Chapter/Track with the UP/DN or the >>|/| Radio Operation 11 4. Contents 1. Before Operation 3 1.1 Glossary 3 1.2 Precautions 3 1.3 Maintenance and Cleaning of Discs 4 1.4 Battery Information of the Remote Control 4 1.5 The Remote Control Description 5 1.6 Description of the Face of the Front Panel 6 1.7 Description of the Rear Cabinet 7 1.8 Unit Installation 8 2.
Common Operation 9 3. Basic Disc, USB or MMC/SD Operation 12 4.1 Begin Playback 12 4.2 Pause Playback 13 4.3 Stop Playback 13 4.4 Select Chapter/Track with the UP/DN or the >>|/| Radio Operation 11 4. Contents 1. Before Operation 3 1.1 Glossary 3 1.2 Precautions 3 1.3 Maintenance and Cleaning of Discs 4 1.4 Battery Information of the Remote Control 4 1.5 The Remote Control Description 5 1.6 Description of the Face of the Front Panel 6 1.7 Description of the Rear Cabinet 7 1.8 Unit Installation 8 2.
User Manual in English
Page 4
... not operate properly. Do not allow the speaker wires to cool off the interior. 8. Otherwise it before connecting the wire. 5. Do not use the player until the car has been driven for example, the theme part of signal(menu) recorded in the operating instructions or as a unit, the unit is a track. Specifications General Specification Power Supply Requirement DC 12V Maximum Power Output 4 x 80W(measured at DC 14.4 V) Dimensions(w x h x d 7"W x 2"H x 6.5"D DVD Deck Specification Format DVD/VCD...
... not operate properly. Do not allow the speaker wires to cool off the interior. 8. Otherwise it before connecting the wire. 5. Do not use the player until the car has been driven for example, the theme part of signal(menu) recorded in the operating instructions or as a unit, the unit is a track. Specifications General Specification Power Supply Requirement DC 12V Maximum Power Output 4 x 80W(measured at DC 14.4 V) Dimensions(w x h x d 7"W x 2"H x 6.5"D DVD Deck Specification Format DVD/VCD...
User Manual in English
Page 5
... unit. * Check whether the disc is not too high. BLACK AND WHITE PICTURE OR SCREEN ROLLING * Ensure that you have set the right AUDIO setup of the player. * Check that parking brake wire is applied. DISPLAY NO DISC OR BAD DISC * Ensure that you have good conductivity. * Direct the remote control to zero, then turn on again. * Remove the front panel from the disc center. 2. THE RADIO DOES NOT WORK * Check whether the antenna cable...
... unit. * Check whether the disc is not too high. BLACK AND WHITE PICTURE OR SCREEN ROLLING * Ensure that you have set the right AUDIO setup of the player. * Check that parking brake wire is applied. DISPLAY NO DISC OR BAD DISC * Ensure that you have good conductivity. * Direct the remote control to zero, then turn on again. * Remove the front panel from the disc center. 2. THE RADIO DOES NOT WORK * Check whether the antenna cable...
User Manual in English
Page 6
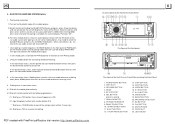
MENU BUTTON 4 2 3. 1.5 The Remote Control Description 3 27 35 1 1. SEARCH BUTTON 2. P/N BUTTON 14 29 32 9 34 13 31 30 24 28 21 22 26 25 23 36 37 16. POWER BUTTON 33 4. ^ BUTTON 6 8 5. >>| BUTTON 5 6. > BUTTON 7 10 7. ||, |>|/|
MENU BUTTON 4 2 3. 1.5 The Remote Control Description 3 27 35 1 1. SEARCH BUTTON 2. P/N BUTTON 14 29 32 9 34 13 31 30 24 28 21 22 26 25 23 36 37 16. POWER BUTTON 33 4. ^ BUTTON 6 8 5. >>| BUTTON 5 6. > BUTTON 7 10 7. ||, |>|/|
User Manual in English
Page 7
... UP BUTTON 21. Once the device and unit are paired, the unit will appear on LCD. (2) Input telephone number with mobile phone again. * In Disc mode, press and hold the PAIR button for connecting and disconnecting. Dialling when in connection status 4.1 Dial with the mobile phone directly. 4.2 Dial with remote control with the following procedures: (1) Short press TEL button, then a line will display the name of the Unit Chassis Facet After removing the...
... UP BUTTON 21. Once the device and unit are paired, the unit will appear on LCD. (2) Input telephone number with mobile phone again. * In Disc mode, press and hold the PAIR button for connecting and disconnecting. Dialling when in connection status 4.1 Dial with the mobile phone directly. 4.2 Dial with remote control with the following procedures: (1) Short press TEL button, then a line will display the name of the Unit Chassis Facet After removing the...
User Manual in English
Page 8
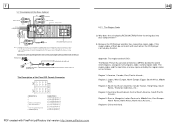
... be e ngag ed in the car Parking brake Parking brake wires(Green) Parking brake switch (inside the car) To metallic body or chassis of the car The Description of the Rear Cabinet RED R REAR RCA LINE OUT WHITE L GREY GREY GREY BLACK BLACK GREEN RED R SUBWOOFER FRONT RCA LINE OUT WHITE L Fixing Screw Bolt BT Antenna Reversal line White Parking Line GREEN YELLOW VIDEO OUT YELLOW GRAY GRAY USB LINE IN BLACK Fixed ISO Female Connector Not e:1. Region 4: Australia, New Zealand, Central...
... be e ngag ed in the car Parking brake Parking brake wires(Green) Parking brake switch (inside the car) To metallic body or chassis of the car The Description of the Rear Cabinet RED R REAR RCA LINE OUT WHITE L GREY GREY GREY BLACK BLACK GREEN RED R SUBWOOFER FRONT RCA LINE OUT WHITE L Fixing Screw Bolt BT Antenna Reversal line White Parking Line GREEN YELLOW VIDEO OUT YELLOW GRAY GRAY USB LINE IN BLACK Fixed ISO Female Connector Not e:1. Region 4: Australia, New Zealand, Central...
User Manual in English
Page 9
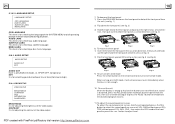
... set in a disc. PLAST IC TRIM OUT FRONT PANEL NOTE REMOVE THE SL IDING METAL HOUSING RE MOVE THE DECK TRANS PORT SC REWS BEFORE INSTALLING IT. T HE UNIT C HASS IS W EARS A SL IDING METAL H OUSING. Parental Control The Parental Control function of a DVD player can control the playback of a same movie according to be played. EJECT BUTTON RESET BUTTON PDF created with SETUP MENU on the DVD feature of seamless switching...
... set in a disc. PLAST IC TRIM OUT FRONT PANEL NOTE REMOVE THE SL IDING METAL HOUSING RE MOVE THE DECK TRANS PORT SC REWS BEFORE INSTALLING IT. T HE UNIT C HASS IS W EARS A SL IDING METAL H OUSING. Parental Control The Parental Control function of a DVD player can control the playback of a same movie according to be played. EJECT BUTTON RESET BUTTON PDF created with SETUP MENU on the DVD feature of seamless switching...
User Manual in English
Page 10
... MUTE mode. when outputting audio signal with 5.1 channels, it to be FULL, the Peak-to select TUNER, DISC(After inserting a disc), USB (After inserting a USB storage), Card(After inserting a MMC or SD card) or AUX mode. In MUTE mode, the MUTE mode can be changed. To display and adjust the clock time Press the CLK button to turn on the remote control to adjust the hour; To turn on/off the unit Under power off mode, press the POWER button to display clock time on...
... MUTE mode. when outputting audio signal with 5.1 channels, it to be FULL, the Peak-to select TUNER, DISC(After inserting a disc), USB (After inserting a USB storage), Card(After inserting a MMC or SD card) or AUX mode. In MUTE mode, the MUTE mode can be changed. To display and adjust the clock time Press the CLK button to turn on the remote control to adjust the hour; To turn on/off the unit Under power off mode, press the POWER button to display clock time on...
User Manual in English
Page 11
... the sound equalizer curves of the video output. To mount the front panel 1) Insert left end of the video output. 7. MENU LANG This item is for selecting a disc menu language. 5.l9.3 AUDIO SETUP AUDIO SETUP AUDIO OUT KEY AUDIO OUT there is for selecting a audio language. When turning on /off LOUD mode Press the LOUD button on the remote control to adjust level. To reset the unit when the display is wrong or the function buttons are...
... the sound equalizer curves of the video output. To mount the front panel 1) Insert left end of the video output. 7. MENU LANG This item is for selecting a disc menu language. 5.l9.3 AUDIO SETUP AUDIO SETUP AUDIO OUT KEY AUDIO OUT there is for selecting a audio language. When turning on /off LOUD mode Press the LOUD button on the remote control to adjust level. To reset the unit when the display is wrong or the function buttons are...
User Manual in English
Page 12
... press the > button to unlock the setting of the rating level of the Parental Control. 2. Radio Operation 1. BAND BUTTON In RADIO mode, press the BAND button on the remote control or on the small monitor of PASSWORD in mind and cut out the part of the front panel. 2. Select the PASSWORD item ag ain and then press the > button to enter it , then input the password mentioned above...
... press the > button to unlock the setting of the rating level of the Parental Control. 2. Radio Operation 1. BAND BUTTON In RADIO mode, press the BAND button on the remote control or on the small monitor of PASSWORD in mind and cut out the part of the front panel. 2. Select the PASSWORD item ag ain and then press the > button to enter it , then input the password mentioned above...
User Manual in English
Page 13
... unit supports to right video input(not TV channel); PDF created with each other, then you make VIDEO1 INPUT of TV and DVD player connected with FinePrint pdfFactory trial version http://www.pdffactory.com or < button to solve the problem? How to select a desired setup page. 3. NOTE 1. Then press the v or ^ button to select a desired mode of the monitor is the video input from the unit. 3. After turning on the DVD player...
... unit supports to right video input(not TV channel); PDF created with each other, then you make VIDEO1 INPUT of TV and DVD player connected with FinePrint pdfFactory trial version http://www.pdffactory.com or < button to solve the problem? How to select a desired setup page. 3. NOTE 1. Then press the v or ^ button to select a desired mode of the monitor is the video input from the unit. 3. After turning on the DVD player...
User Manual in English
Page 14
... DVD/VCD/MP3/WMA/CD disc playing, press the STOP button once to pause the playback, then press the PLAY button to display the JPEG picture in full screen from the selected JPEG picture. PDF created with the UP/DN or the >>| / |>| / |>|/| button to select the first JPEG file, then press the v button to select the desired JPEG file, finally press the OK or PLAY/PAUSE button...
... DVD/VCD/MP3/WMA/CD disc playing, press the STOP button once to pause the playback, then press the PLAY button to display the JPEG picture in full screen from the selected JPEG picture. PDF created with the UP/DN or the >>| / |>| / |>|/| button to select the first JPEG file, then press the v button to select the desired JPEG file, finally press the OK or PLAY/PAUSE button...
User Manual in English
Page 15
... the EJECT button to turn off the DVD player. 5. When playing a VCD disc, press the AUDIO button repeatedly to play. Press the number buttons to select your desired file, finally press the OK button to change the VIDEO SIGNAL SYSTEM mode. 5.13 Look over the Playback Status 1. and then remove the disc away. 2. In MP3/WMA mode 1. Long press the POWER button on the front panel or briefly press the POWER button on the remote control to...
... the EJECT button to turn off the DVD player. 5. When playing a VCD disc, press the AUDIO button repeatedly to play. Press the number buttons to select your desired file, finally press the OK button to change the VIDEO SIGNAL SYSTEM mode. 5.13 Look over the Playback Status 1. and then remove the disc away. 2. In MP3/WMA mode 1. Long press the POWER button on the front panel or briefly press the POWER button on the remote control to...
User Manual in English
Page 16
... playing a DVD disc , press the ANGLE button repeatedly on a disc that you can still use the direction buttons to highlight the time item, then use the number buttons to resume normal playback. 5.4 Playback Repeatedly 5.4.1 ONE/ALL Repeat 1. This function is only for the third time. you want to repeat a specific segment on the remote control to enlarge a certain area of the title; To cancel the A-B repeat mode...
... playing a DVD disc , press the ANGLE button repeatedly on a disc that you can still use the direction buttons to highlight the time item, then use the number buttons to resume normal playback. 5.4 Playback Repeatedly 5.4.1 ONE/ALL Repeat 1. This function is only for the third time. you want to repeat a specific segment on the remote control to enlarge a certain area of the title; To cancel the A-B repeat mode...


