User Manual in English
Page 5
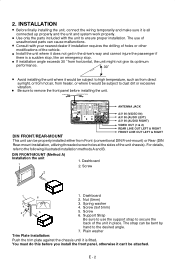
Consult with the unit to use of the vehicle. Dashboard 2. INSTALLATION Before finally installing the unit, connect the wiring temporarily and make sure it is fitted. SUB-W OUT BACKSIGHT RCA ANTENNA JACK A/V IN (VIDEO IN) A/V IN (AUDO LEFT) A/V IN (AUDIO RIGHT) DIN FRONT/REAR-MOUNT VIDEO OUT (1 & 2) REAR LINE OUT LEFT & RIGHT FRONT LINE OUT LEFT & RIGHT This unit can cause malfunctions. Spring washer 4 4. Support Strap Be sure to...
Consult with the unit to use of the vehicle. Dashboard 2. INSTALLATION Before finally installing the unit, connect the wiring temporarily and make sure it is fitted. SUB-W OUT BACKSIGHT RCA ANTENNA JACK A/V IN (VIDEO IN) A/V IN (AUDO LEFT) A/V IN (AUDIO RIGHT) DIN FRONT/REAR-MOUNT VIDEO OUT (1 & 2) REAR LINE OUT LEFT & RIGHT FRONT LINE OUT LEFT & RIGHT This unit can cause malfunctions. Spring washer 4 4. Support Strap Be sure to...

User Manual in English
Page 6
... main unit touching point A on the D.C.P. (As shown on the back of the D.C.P. DO NOT insert a CD into the unit before installing the unit into the vehicle. Fastening the unit to damage it by shocks. Screw Hook Hook Note: The mounting box, metal half sleeve, hook & screws are used for this installation. Turn the power off the dirt with soft, dry cloth only. CAUTION...
... main unit touching point A on the D.C.P. (As shown on the back of the D.C.P. DO NOT insert a CD into the unit before installing the unit into the vehicle. Fastening the unit to damage it by shocks. Screw Hook Hook Note: The mounting box, metal half sleeve, hook & screws are used for this installation. Turn the power off the dirt with soft, dry cloth only. CAUTION...

User Manual in English
Page 7
... from the fuse box. d. Notes: INCORRECT WIRING OR OPERATION WILL VOID THE WARRANTY OF THIS UNIT. (CAR UNIT BACK SIDE) Fuse Replacement: To replace the fuse, pull out the blown fuse from the socket. E - 4 3. b. It is located on the diagram). f. Connect the black ground wire to a metal part of the control panel. ELECTRICAL CONNECTION a. Make sure your car does not have ISO connector, you press the RESET button, and the unit still cannot function normally, please use a cotton...
... from the fuse box. d. Notes: INCORRECT WIRING OR OPERATION WILL VOID THE WARRANTY OF THIS UNIT. (CAR UNIT BACK SIDE) Fuse Replacement: To replace the fuse, pull out the blown fuse from the socket. E - 4 3. b. It is located on the diagram). f. Connect the black ground wire to a metal part of the control panel. ELECTRICAL CONNECTION a. Make sure your car does not have ISO connector, you press the RESET button, and the unit still cannot function normally, please use a cotton...
User Manual in English
Page 10
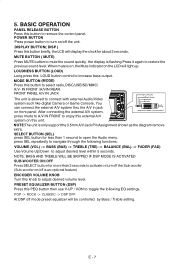
... VOLUME KNOB Turn this button briefly, the LCD will be controlled by Bass / Treble setting. POP -> ROCK -> CLASSIC -> DSP OFF At DSP off the unit. the display is allowed to navigate through the following EQ settings. press SEL repeatedly to connect with external Audio/Video system such like digital Camera or Game Console, You 1 Left Audio 2 Right Audio 3 Ground 4 Video can connect the external A/V system thru the A/V in jack on the LCD will light...
... VOLUME KNOB Turn this button briefly, the LCD will be controlled by Bass / Treble setting. POP -> ROCK -> CLASSIC -> DSP OFF At DSP off the unit. the display is allowed to navigate through the following EQ settings. press SEL repeatedly to connect with external Audio/Video system such like digital Camera or Game Console, You 1 Left Audio 2 Right Audio 3 Ground 4 Video can connect the external A/V system thru the A/V in jack on the LCD will light...
User Manual in English
Page 11
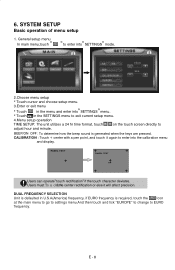
... the SETTINGS menu to exit current setup menu. 4.Menu setup operation TIME SETUP: The unit utilizes a 24 hr time format, touch on the touch screen directly to adjust hour and minute. General setup menuç In main menu,touch éçççéto enter intoéSETTINGSémode. 2.Choose menu setup * Touch cursor and choose setup menu. 3.Enter or exit menu * Touch * Touch in įthòe center rectification or else it again to EURO frequency. Users must...
... the SETTINGS menu to exit current setup menu. 4.Menu setup operation TIME SETUP: The unit utilizes a 24 hr time format, touch on the touch screen directly to adjust hour and minute. General setup menuç In main menu,touch éçççéto enter intoéSETTINGSémode. 2.Choose menu setup * Touch cursor and choose setup menu. 3.Enter or exit menu * Touch * Touch in įthòe center rectification or else it again to EURO frequency. Users must...

User Manual in English
Page 12
... Serial number 1 2 3 4 5 6 7 8 9 10 11 12 13 14 15 16 17 Name Information CLOCK Radio MUTE SEL BND TFT OFF / LOUD EQ MONO LOC SCAN P1/2- P2/2 Function description CURRENT BAND AND FREQUENCY CURRENT TIME TOUCH TO SELECT RADIO AND PRESS LONGER TO STORE CURRENT FREQUENCY CLOSE\OPEN AUDIO OUTPUT VOL-BASS-TRE-BAL-FAD BAND SWITCH(FM1\FM2\FM3\AM1 AM2 ) TFT DISPLAY ON...
... Serial number 1 2 3 4 5 6 7 8 9 10 11 12 13 14 15 16 17 Name Information CLOCK Radio MUTE SEL BND TFT OFF / LOUD EQ MONO LOC SCAN P1/2- P2/2 Function description CURRENT BAND AND FREQUENCY CURRENT TIME TOUCH TO SELECT RADIO AND PRESS LONGER TO STORE CURRENT FREQUENCY CLOSE\OPEN AUDIO OUTPUT VOL-BASS-TRE-BAL-FAD BAND SWITCH(FM1\FM2\FM3\AM1 AM2 ) TFT DISPLAY ON...
User Manual in English
Page 13
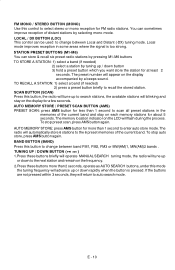
... frequency. 2.Press these buttons more than 1 second to scan all preset stations in some areas where the signal is pressed. FM MONO / STEREO BUTTON (MONO) Use this mode the tuning frequency will return to auto search mode. You can store & recall six preset radio stations by a beeps sound. The radio will appear on each memory stations for less than 1 second to enter auto store mode. To stop preset scan, press AMS...
... frequency. 2.Press these buttons more than 1 second to scan all preset stations in some areas where the signal is pressed. FM MONO / STEREO BUTTON (MONO) Use this mode the tuning frequency will return to auto search mode. You can store & recall six preset radio stations by a beeps sound. The radio will appear on each memory stations for less than 1 second to enter auto store mode. To stop preset scan, press AMS...
User Manual in English
Page 15
... CD slot. When BACK is pressed, the disc will now repeat continuously. 3. REPEAT A-B BUTTON (A-B) 1. Selecting a Track to stop mode, if PLAY is pressed, the unit will continue. Briefly press the STOP button to Play 1. there are 4 speed levels for track number or File number direct access and Use when function need numeric Selection or Input, like in FWD/REV: X2, X4, X8,X16, X20...
... CD slot. When BACK is pressed, the disc will now repeat continuously. 3. REPEAT A-B BUTTON (A-B) 1. Selecting a Track to stop mode, if PLAY is pressed, the unit will continue. Briefly press the STOP button to Play 1. there are 4 speed levels for track number or File number direct access and Use when function need numeric Selection or Input, like in FWD/REV: X2, X4, X8,X16, X20...

User Manual in English
Page 16
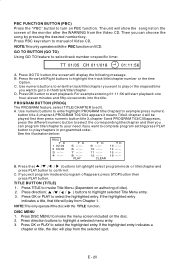
... TO BUTTON (GO TO) Using GO TO feature to highlight the track number or the time option. D. PROGRAM BUTTON (PROG) Press PROG button the screen will display the following message. C. E - 13 A. Press GO TO button,the screen will display the following message: TRK 001/021 A 00:01ā 56 B. PLAY 9 ---- 10 ---11 ---12 ---- ID3 INFORMATION DISPLAY If any Music file contains any ID3-TAG information, user can view these ID3...
... TO BUTTON (GO TO) Using GO TO feature to highlight the track number or the time option. D. PROGRAM BUTTON (PROG) Press PROG button the screen will display the following message. C. E - 13 A. Press GO TO button,the screen will display the following message: TRK 001/021 A 00:01ā 56 B. PLAY 9 ---- 10 ---11 ---12 ---- ID3 INFORMATION DISPLAY If any Music file contains any ID3-TAG information, user can view these ID3...

User Manual in English
Page 17
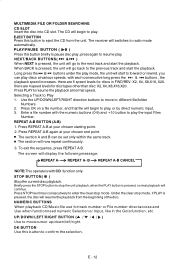
... directories saved files. You can press the Numeric buttons to select the file you want to the disc containing both Music and Photo files; PLAY MULTIMEDIA FILES OPERATION Place a disc into the player, and the player will automatically go to the first directory saved files (to play the first song in File Switch Region. The playing file is highlighted).The screen displays as the picture above; Also you can activate Directory Region, File Region and File Switch...
... directories saved files. You can press the Numeric buttons to select the file you want to the disc containing both Music and Photo files; PLAY MULTIMEDIA FILES OPERATION Place a disc into the player, and the player will automatically go to the first directory saved files (to play the first song in File Switch Region. The playing file is highlighted).The screen displays as the picture above; Also you can activate Directory Region, File Region and File Switch...

User Manual in English
Page 18
... disc playback. COMPATIBILITY Due to the fast changing technology world, this unit. User must use the mode button to radio mode. USB SOCKET P.1 P.2 TO STOP USB PLAYBACK 1.If the USB drive / device is unplugged, the unit will automatically switch to choose USB mode (only if USB drive / device is being plugged in correctly & the download has begun. 3.Does not matter what mode the unit is in, once a USB drive / device is inserted in the unit ) or any mode. USB SPECIFICATION * SUPPORT...
... disc playback. COMPATIBILITY Due to the fast changing technology world, this unit. User must use the mode button to radio mode. USB SOCKET P.1 P.2 TO STOP USB PLAYBACK 1.If the USB drive / device is unplugged, the unit will automatically switch to choose USB mode (only if USB drive / device is being plugged in correctly & the download has begun. 3.Does not matter what mode the unit is in, once a USB drive / device is inserted in the unit ) or any mode. USB SPECIFICATION * SUPPORT...

User Manual in English
Page 19
.... 5. All the SD / MMC files playback function is same as P.7 indicated in the correct direction until a "CLICK" sound is inserted, the file will automatically loaded & playback will show "CARD" to the unit & the SD or MMC card. SD/MMC SPECIFICATION * SUPPORT MAX 4G SD/MMC CARD * SUPPORT MAX 999 SONGS CAUTION 2.Please make sure to eject the SD or MMC card...
.... 5. All the SD / MMC files playback function is same as P.7 indicated in the correct direction until a "CLICK" sound is inserted, the file will automatically loaded & playback will show "CARD" to the unit & the SD or MMC card. SD/MMC SPECIFICATION * SUPPORT MAX 4G SD/MMC CARD * SUPPORT MAX 999 SONGS CAUTION 2.Please make sure to eject the SD or MMC card...
User Manual in English
Page 20
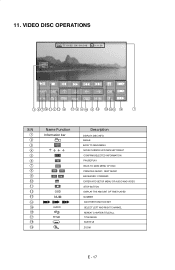
... 19 14 1 S.N Name Function Information bar OSD NUM 14 15 AUDIO 16 17 TITLE 18 19 + Description DISPLAY DISC INFO. 11. ANGLE BACK TO MAIN MENU MOVE CURSOR UP/DOWN/LEFT/RIGHT CONFIRM SELECTED INFORMATION PAUSE/PLAY BACK TO MAIN MENU OF DISC PREVIOUS MUSIC/ NEXT MUSIC BACKWARD/ FORWARD ENTER INTO SETUP MENU OF AUDIO AND VIDEO STOP BUTTON DISPLAY THE AMOUNT OF TIME PLAYED NUMBER ANOTHER FANCTION KEY...
... 19 14 1 S.N Name Function Information bar OSD NUM 14 15 AUDIO 16 17 TITLE 18 19 + Description DISPLAY DISC INFO. 11. ANGLE BACK TO MAIN MENU MOVE CURSOR UP/DOWN/LEFT/RIGHT CONFIRM SELECTED INFORMATION PAUSE/PLAY BACK TO MAIN MENU OF DISC PREVIOUS MUSIC/ NEXT MUSIC BACKWARD/ FORWARD ENTER INTO SETUP MENU OF AUDIO AND VIDEO STOP BUTTON DISPLAY THE AMOUNT OF TIME PLAYED NUMBER ANOTHER FANCTION KEY...
User Manual in English
Page 22
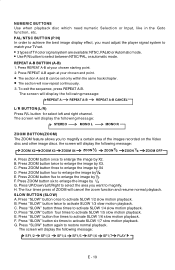
.... F. The four times press of TV color signal system are available: NTSC, PAL60 or Automatic mode. Press "SLOW" button four times to enlarge the image by ½. E. The screen will display the following message: SF1/2 SF1/3 SF1/4 SF1/5 SF1/6 SF1/7 PLAY E - 19 NUMERIC BUTTONS Use when playback disc which need numeric Selection or Input, like in the Goto function, etc. Press ZOOM button twice to activate SLOW 1/2 slow motion...
.... F. The four times press of TV color signal system are available: NTSC, PAL60 or Automatic mode. Press "SLOW" button four times to enlarge the image by ½. E. The screen will display the following message: SF1/2 SF1/3 SF1/4 SF1/5 SF1/6 SF1/7 PLAY E - 19 NUMERIC BUTTONS Use when playback disc which need numeric Selection or Input, like in the Goto function, etc. Press ZOOM button twice to activate SLOW 1/2 slow motion...
User Manual in English
Page 23
... --:-16 --:-- Press OK or PLAY to edit. DISC MENU 1. Press PBC key return to invoke Title Menu (Dependent on the screen of the monitor after the WARNING from the selected spot. NOTE:This only operate if the disc with the PBC function on PBC function. Press OK button to in programmed order. Press direction buttons to select track number or specific time: TT 01/05 CH...
... --:-16 --:-- Press OK or PLAY to edit. DISC MENU 1. Press PBC key return to invoke Title Menu (Dependent on the screen of the monitor after the WARNING from the selected spot. NOTE:This only operate if the disc with the PBC function on PBC function. Press OK button to in programmed order. Press direction buttons to select track number or specific time: TT 01/05 CH...
User Manual in English
Page 25
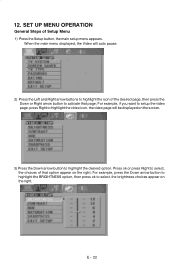
... SET UP MENU OPERATION General Steps of that page; When the main menu displayed, the Video will be displayed on the right; For example, if you want to setup the video page, press Right to highlight the desired option. Press ok or press Right to select, the choices of Setup Menu 1) Press the Setup button, the main setup menu appears. For example, press the Down arrow button...
... SET UP MENU OPERATION General Steps of that page; When the main menu displayed, the Video will be displayed on the right; For example, if you want to setup the video page, press Right to highlight the desired option. Press ok or press Right to select, the choices of Setup Menu 1) Press the Setup button, the main setup menu appears. For example, press the Down arrow button...
User Manual in English
Page 26
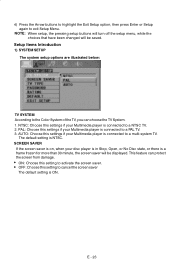
... Multimedia player is connected to a PAL TV. 3. NOTE: When setup, the pressing setup buttons will turn off the setup menu, while the choices that have been changed will be saved. The default setting is ON. E - 23 NTSC: Choose this settings if your Multimedia player is connected to a NTSC TV. 2. Setup Items Introduction 1) SYSTEM SETUP The system setup options are illustrated below: TV SYSTEM According to activate the screen saver. SCREEN...
... Multimedia player is connected to a PAL TV. 3. NOTE: When setup, the pressing setup buttons will turn off the setup menu, while the choices that have been changed will be saved. The default setting is ON. E - 23 NTSC: Choose this settings if your Multimedia player is connected to a NTSC TV. 2. Setup Items Introduction 1) SYSTEM SETUP The system setup options are illustrated below: TV SYSTEM According to activate the screen saver. SCREEN...
User Manual in English
Page 27
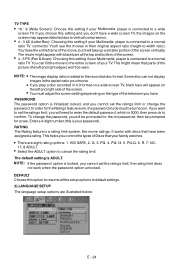
... change the password. It works with black bars at the top and bottom of the screen. 4 : 3 PS (Pan & Scan): Choosing this setting if your family watches. There are illustrated below: SPAINISH FRENGH PORTUGUCSE ITALIAN RUSSIAN DUTCH E - 24 RATING The Rating feature is locked, you will take up a smaller portion of the picture (the left and right side of Discs that parts...
... change the password. It works with black bars at the top and bottom of the screen. 4 : 3 PS (Pan & Scan): Choosing this setting if your family watches. There are illustrated below: SPAINISH FRENGH PORTUGUCSE ITALIAN RUSSIAN DUTCH E - 24 RATING The Rating feature is locked, you will take up a smaller portion of the picture (the left and right side of Discs that parts...
User Manual in English
Page 28
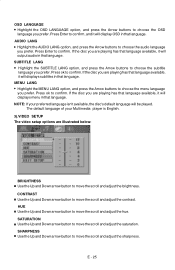
.... Press Enter to confirm. If the disc you are playing has that language available, it will be played. NOTE: If your Multimedia player is English. 3).VIDEO SETUP The video setup options are playing has that language available, it will displays menu in that language. CONTRAST Use the Up and Down arrow button to move the scroll and adjust the sharpness. Press Enter to confirm...
.... Press Enter to confirm. If the disc you are playing has that language available, it will be played. NOTE: If your Multimedia player is English. 3).VIDEO SETUP The video setup options are playing has that language available, it will displays menu in that language. CONTRAST Use the Up and Down arrow button to move the scroll and adjust the sharpness. Press Enter to confirm...
User Manual in English
Page 29
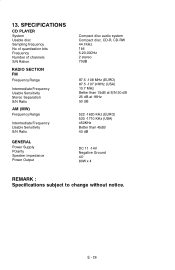
E - 26 SPECIFICATIONS CD PLAYER System Usable disc Sampling frequency No of quantization bits Frequency Number of channels S/N Ration RADIO SECTION FM Frequency Range Intermediate Frequency Usable Sensitivity Stereo Separation S/N Ratio AM (MW) Frequency Range Intermediate Frequency Usable Sensitivity S/N Ratio GENERAL Power Supply Polarity Speaker impedance Power Output Compact disc audio system Compact disc, CD-R, CD-RW 44.1KHz 1bit 5-20,000Hz 2 stereo 70dB 87.5 -108...
E - 26 SPECIFICATIONS CD PLAYER System Usable disc Sampling frequency No of quantization bits Frequency Number of channels S/N Ration RADIO SECTION FM Frequency Range Intermediate Frequency Usable Sensitivity Stereo Separation S/N Ratio AM (MW) Frequency Range Intermediate Frequency Usable Sensitivity S/N Ratio GENERAL Power Supply Polarity Speaker impedance Power Output Compact disc audio system Compact disc, CD-R, CD-RW 44.1KHz 1bit 5-20,000Hz 2 stereo 70dB 87.5 -108...


