User Manual in English
Page 3
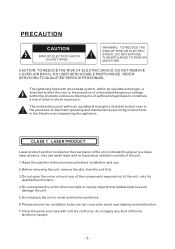
... USER SERVICEABLE PARTS INSIDE. SHOCK, DO NOT EXPOSE THIS APPLIANCE TO RAIN OR DO NOT OPEN MOISTURE. CLASS 1 LASER PRODUCT Laser product symbol: located on the rear panel of the unit, indicate this player is a class laser product, only use weak laser and no hazardous radiation outside of the unit. 1.Read through this instruction manual before installation and use. 2.Before removing the unit, remove the disc from the unit...
... USER SERVICEABLE PARTS INSIDE. SHOCK, DO NOT EXPOSE THIS APPLIANCE TO RAIN OR DO NOT OPEN MOISTURE. CLASS 1 LASER PRODUCT Laser product symbol: located on the rear panel of the unit, indicate this player is a class laser product, only use weak laser and no hazardous radiation outside of the unit. 1.Read through this instruction manual before installation and use. 2.Before removing the unit, remove the disc from the unit...
User Manual in English
Page 4
Pause Playback 16 3. Stop Playback 16 4. Select Chapter/Track with >>|/| Contents Precaution...1 Contents...2 Wires Connection Description 3 Unit Installation 4 General Knowledge About Remote Control 5 Remote Control Description 6 Locations and Names of Controls on or in the Unit 7 Common Operation 8 Radio Operation 11 Disc, USB and Card Operation 14 1. Load/unload Disc, USB or Card 14 2.
Pause Playback 16 3. Stop Playback 16 4. Select Chapter/Track with >>|/| Contents Precaution...1 Contents...2 Wires Connection Description 3 Unit Installation 4 General Knowledge About Remote Control 5 Remote Control Description 6 Locations and Names of Controls on or in the Unit 7 Common Operation 8 Radio Operation 11 Disc, USB and Card Operation 14 1. Load/unload Disc, USB or Card 14 2.

User Manual in English
Page 5
...Wiring Diagram for Socket 2 RED R WHITE L YELLOW VIDEO YELLOW YELLOW YELLOW BROWN AV IN GREY VIDEO RCA OUT BLACK REAR VIEW CAMERA WIRING CONNECTING SOCKET 2 WIRING CONNECTING PLUG 2 GREY REAR AUDIO RCA OUT BLUE BACKGROUND AUDIO RCA OUT RED R WHITE L RED R WHITE L Description of Connecting the Parking Brake Line to the Parking Brake System Built in order for the monitor to connect the negative pole of the car NOTE: after braking the car. -3- Ensure that the blue auto antenna cable does not make contact with 4 ohms impedance may be engaged in a Car Parking brake Parking...
...Wiring Diagram for Socket 2 RED R WHITE L YELLOW VIDEO YELLOW YELLOW YELLOW BROWN AV IN GREY VIDEO RCA OUT BLACK REAR VIEW CAMERA WIRING CONNECTING SOCKET 2 WIRING CONNECTING PLUG 2 GREY REAR AUDIO RCA OUT BLUE BACKGROUND AUDIO RCA OUT RED R WHITE L RED R WHITE L Description of Connecting the Parking Brake Line to the Parking Brake System Built in order for the monitor to connect the negative pole of the car NOTE: after braking the car. -3- Ensure that the blue auto antenna cable does not make contact with 4 ohms impedance may be engaged in a Car Parking brake Parking...
User Manual in English
Page 9
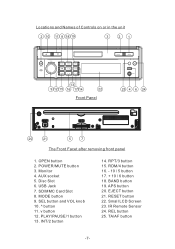
OPEN button 2. AUX socket 5. USB Jack 7. SEL button and VOL knob 10. ^ button 11. RESET button 22. POWER/MUTE button 3. Disc Slot 6. MODE button 9. INT/2 button 14. VOL + SEL MODE BAND APS 1 2 INT 3 RPT 4 RDM 5 -10 6 +10 13 9 12 15 16 17 14 22 Front Panel TA / AF OPEN REL IR AUX 23 4 6 24 SD/MMC 20 21 5 7 The Front Facet after removing front panel 1. Monitor 4. PLAY/PAUSE/1 button 13. RPT/3 button 15. EJECT button 21...
OPEN button 2. AUX socket 5. USB Jack 7. SEL button and VOL knob 10. ^ button 11. RESET button 22. POWER/MUTE button 3. Disc Slot 6. MODE button 9. INT/2 button 14. VOL + SEL MODE BAND APS 1 2 INT 3 RPT 4 RDM 5 -10 6 +10 13 9 12 15 16 17 14 22 Front Panel TA / AF OPEN REL IR AUX 23 4 6 24 SD/MMC 20 21 5 7 The Front Facet after removing front panel 1. Monitor 4. PLAY/PAUSE/1 button 13. RPT/3 button 15. EJECT button 21...
User Manual in English
Page 10
... card), AUX , or iPod mode. To adjust the angle of the monitor. 4. after popping up Keyboard interface for disc/USB/card) can turn on the monitor to turn on or off the touch screen. 7. To display clock time Press the CLK button to switch between VOLUME, BASS, TREBLE, BALANCE and FADER. To select a desired EQ mode Press the EQ button on the unit. Common Operation 1. To turn on the remote control to set it will enhance bass level...
... card), AUX , or iPod mode. To adjust the angle of the monitor. 4. after popping up Keyboard interface for disc/USB/card) can turn on the monitor to turn on or off the touch screen. 7. To display clock time Press the CLK button to switch between VOLUME, BASS, TREBLE, BALANCE and FADER. To select a desired EQ mode Press the EQ button on the unit. Common Operation 1. To turn on the remote control to set it will enhance bass level...

User Manual in English
Page 11
... General Setting the VOLUME, BASS, TREBLE, BALANCE and FADER. 11.To remove the front panel press the REL button to flip down the front panel from the main unit, then hold the right end of the front panel to push leftward and pull away. 12.To reset the player When the monitor , the small LCD display or some buttons are not working or sound...
... General Setting the VOLUME, BASS, TREBLE, BALANCE and FADER. 11.To remove the front panel press the REL button to flip down the front panel from the main unit, then hold the right end of the front panel to push leftward and pull away. 12.To reset the player When the monitor , the small LCD display or some buttons are not working or sound...
User Manual in English
Page 12
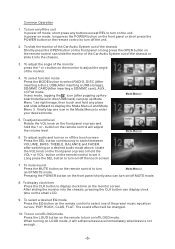
... available station. In the interface, tapping the AV, DVD, USB, SD or iPod icon can pop up the foreground radio interface as the underlined step above. In the interface, tapping the icon can set the backlight. BTAns. : To receive a coming telephone. 18. Radio Rear Setup In the Mode Menu 3 screen, tapping the Radio Rear Setup icon can enter the background audio output mode of all steer buttons , tap the icon to save...
... available station. In the interface, tapping the AV, DVD, USB, SD or iPod icon can pop up the foreground radio interface as the underlined step above. In the interface, tapping the icon can set the backlight. BTAns. : To receive a coming telephone. 18. Radio Rear Setup In the Mode Menu 3 screen, tapping the Radio Rear Setup icon can enter the background audio output mode of all steer buttons , tap the icon to save...
User Manual in English
Page 13
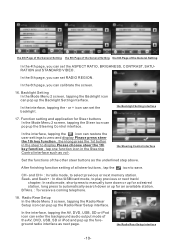
... BUTTON In RADIO mode, press the BAND button on the remote controller or on the front panel to enter RADIO mode, it will be displayed on the small monitor on the front panel. 3. or + icon can change to CUSTO, tapping the - The icons in the main unit. 2. In the interface, tapping the or icon can adjust the volume level. * The functions of the LCD In the Mode Menu 3 screen...
... BUTTON In RADIO mode, press the BAND button on the remote controller or on the front panel to enter RADIO mode, it will be displayed on the small monitor on the front panel. 3. or + icon can change to CUSTO, tapping the - The icons in the main unit. 2. In the interface, tapping the or icon can adjust the volume level. * The functions of the LCD In the Mode Menu 3 screen...
User Manual in English
Page 14
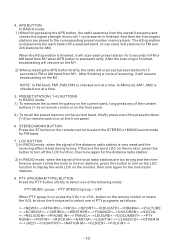
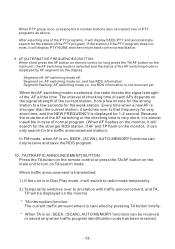
... the preset buttons [1-6] on remote control or on the monitor, then tune again for FM band. 7. button on the remote control or rotate the VOL knob on the remote control to select one of the following mode: PTY MUSIC group- - And then the 6 strongest stations are too strong and the interference doesn t allow the tuner to lock on stations, press this button to turn on the LOC function to display...
... the preset buttons [1-6] on remote control or on the monitor, then tune again for FM band. 7. button on the remote control or rotate the VOL knob on the remote control to select one of the following mode: PTY MUSIC group- - And then the 6 strongest stations are too strong and the interference doesn t allow the tuner to lock on stations, press this button to turn on the LOC function to display...
User Manual in English
Page 15
... mute time of the AF switching or the checking time is very short, it is almost inaudible in Disc Play mode, it will switch to radio mode temporarily. 2).Temporarily switches over to a few seconds for 1-2 second. TA [TRAFFIC ANNOUNCEMENT] BUTTON Press the TA button on the remote control or press the TA/AF button on the main unit to the normal station. 9. Segment on: AF switching mode on , SEEK, (SCAN), AUTO MEMORY functions...
... mute time of the AF switching or the checking time is very short, it is almost inaudible in Disc Play mode, it will switch to radio mode temporarily. 2).Temporarily switches over to a few seconds for 1-2 second. TA [TRAFFIC ANNOUNCEMENT] BUTTON Press the TA button on the remote control or press the TA/AF button on the main unit to the normal station. 9. Segment on: AF switching mode on , SEEK, (SCAN), AUTO MEMORY functions...
User Manual in English
Page 16
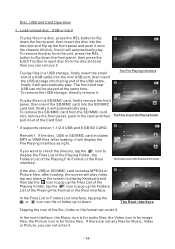
.../unload disc , USB or Card To play files in the card and then pull it out of the Playing File Format If the disc, USB or SD/MMC card includes MPEG4 or Picture files, after loading, it . The Folders List of the Card Slot. To remove the disc from the unit, press the REL button to flip down the front panel, then press the EJECT button to eject disc...
.../unload disc , USB or Card To play files in the card and then pull it out of the Playing File Format If the disc, USB or SD/MMC card includes MPEG4 or Picture files, after loading, it . The Folders List of the Card Slot. To remove the disc from the unit, press the REL button to flip down the front panel, then press the EJECT button to eject disc...
User Manual in English
Page 21
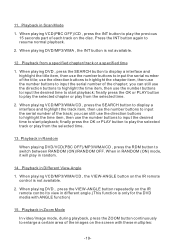
... Zoom Mode In video/image mode, during playback, press the ZOOM button continuously to input the serial number of each track on the IR remote control is not available. 12. When playing VCD/MP3/WMA/CD , the VIEW-ANGLE button on the disc. Playback from the selected time. 13. you can still use the direction buttons to highlight the time item, then use the number buttons to input the desired time to play...
... Zoom Mode In video/image mode, during playback, press the ZOOM button continuously to input the serial number of each track on the IR remote control is not available. 12. When playing VCD/MP3/WMA/CD , the VIEW-ANGLE button on the disc. Playback from the selected time. 13. you can still use the direction buttons to highlight the time item, then use the number buttons to input the desired time to play...
User Manual in English
Page 22
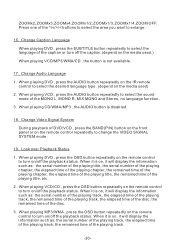
... remote control to turn on/off the caption.(depend on the remote control repeatedly to select the language of the playing title, etc. 2. Change Video Signal System During playback of the MONO L, MONO R, MIX MONO and Stereo, no language function. 3. Change Audio Language 1. Change Caption Language When playing DVD , press the SUBTITLE button repeatedly to change the VIDEO SIGNAL SYSTEM mode . 19. When playing VCD , press the AUDIO button repeatedly to select the sound mode of DVD...
... remote control to turn on/off the caption.(depend on the remote control repeatedly to select the language of the playing title, etc. 2. Change Video Signal System During playback of the MONO L, MONO R, MIX MONO and Stereo, no language function. 3. Change Audio Language 1. Change Caption Language When playing DVD , press the SUBTITLE button repeatedly to change the VIDEO SIGNAL SYSTEM mode . 19. When playing VCD , press the AUDIO button repeatedly to select the sound mode of DVD...
User Manual in English
Page 23
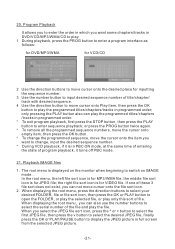
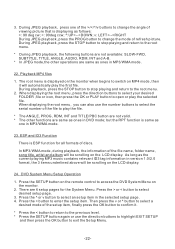
... in DVD/VCD/MP3/WMA/CD to play. 1 During playback, press the PROG button to enter a program interface as follows: for DVD/MP3/WMA for VCD/CD 2 Use the direction buttons to display the JPEG picture in programmed order; the right file sort icon is displayed on IMAGE mode. . If one of title/chapter/ track with desired sequence. 4 Use the direction button to switch on the monitor when...
... in DVD/VCD/MP3/WMA/CD to play. 1 During playback, press the PROG button to enter a program interface as follows: for DVD/MP3/WMA for VCD/CD 2 Use the direction buttons to display the JPEG picture in programmed order; the right file sort icon is displayed on IMAGE mode. . If one of title/chapter/ track with desired sequence. 4 Use the direction button to switch on the monitor when...
User Manual in English
Page 24
3. Press the > button to select desired setup page. 3. or < button to enter the setup item. Press the ^ or v button to select a desired mode of the >/: 90 deg cw; During JPEG playback, press one of the setup item, finally press the OK button to confirm it. * Press the < button to return to the previous level. * Press the SETUP button again or use the direction buttons to highlight EXIT SETUP and then press the OK button to exit the Setup Menu. -22- Then press the v or ^ button to select an setup item in the selected setup page. 4.
3. Press the > button to select desired setup page. 3. or < button to enter the setup item. Press the ^ or v button to select a desired mode of the >/: 90 deg cw; During JPEG playback, press one of the setup item, finally press the OK button to confirm it. * Press the < button to return to the previous level. * Press the SETUP button again or use the direction buttons to highlight EXIT SETUP and then press the OK button to exit the Setup Menu. -22- Then press the v or ^ button to select an setup item in the selected setup page. 4.
User Manual in English
Page 25
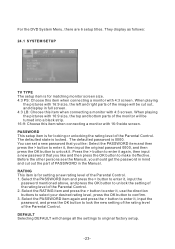
... turned into a black strip. 16:9: Choose this item when connecting a monitor with 4:3 screen. When playing the pictures with 4:3 screen. They display as follows: 24.1 SYSTEM SETUP TV TYPE The setup item is for matching monitor screen size. 4:3 PS: Choose this item when connecting a monitor with 16:9 size, the left and right parts of the Parental Control. PASSWORD This setup item is for locking or unlocking the rating level of the image...
... turned into a black strip. 16:9: Choose this item when connecting a monitor with 4:3 screen. When playing the pictures with 4:3 screen. They display as follows: 24.1 SYSTEM SETUP TV TYPE The setup item is for matching monitor screen size. 4:3 PS: Choose this item when connecting a monitor with 16:9 size, the left and right parts of the Parental Control. PASSWORD This setup item is for locking or unlocking the rating level of the image...

User Manual in English
Page 27
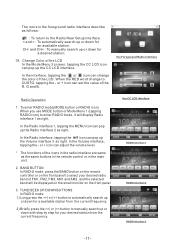
... of signal ; There are 4 modes in all as follows: STEREO, MONO L, MONO R, MIX MONO. -25- STEREO: If you can output audio signal with 5.1 channels, it to -Peak value of the audio signal is the minimum; HUE It is for adjusting the saturation of the video output. SATURATION It is not central speaker and sub-woofer. SHARPNESS It is for adjusting the sharpness of the video output. 24.5 SPEAKER SETUP...
... of signal ; There are 4 modes in all as follows: STEREO, MONO L, MONO R, MIX MONO. -25- STEREO: If you can output audio signal with 5.1 channels, it to -Peak value of the audio signal is the minimum; HUE It is for adjusting the saturation of the video output. SATURATION It is not central speaker and sub-woofer. SHARPNESS It is for adjusting the sharpness of the video output. 24.5 SPEAKER SETUP...
User Manual in English
Page 28
... AUX IN mode, you can use the car AV system as monitor and amplifier. 1. AUX IN operation An external AV system can use SEL, VOL, MUTE, EQ and LOUD buttons to adjust audio . -26- Use an AV cable to make the car AV system and the external AV system connected through the monitor of the external AV system. 2. Play the external AV system, then use MODE button or the Mode Menu to the car AV system. 3. By now, the program played...
... AUX IN mode, you can use the car AV system as monitor and amplifier. 1. AUX IN operation An external AV system can use SEL, VOL, MUTE, EQ and LOUD buttons to adjust audio . -26- Use an AV cable to make the car AV system and the external AV system connected through the monitor of the external AV system. 2. Play the external AV system, then use MODE button or the Mode Menu to the car AV system. 3. By now, the program played...
User Manual in English
Page 29
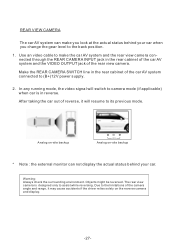
... display. -27- The rear view camera is in the rear cabinet of the car AV system and the VIDEO OUTPUT jack of reverse, it may cause accidents if the driver relies solely on -site backup * Note : the external monitor can make the car AV system and the rear view camera connected through the REAR CAMERA INPUT jack in reverse. In any running mode, the video signal will resume to the back position. 1. Objects might be reversed. Use an video cable...
... display. -27- The rear view camera is in the rear cabinet of the car AV system and the VIDEO OUTPUT jack of reverse, it may cause accidents if the driver relies solely on -site backup * Note : the external monitor can make the car AV system and the rear view camera connected through the REAR CAMERA INPUT jack in reverse. In any running mode, the video signal will resume to the back position. 1. Objects might be reversed. Use an video cable...
User Manual in English
Page 31
... disc format is compatible to the player. * Ensure that they are some obstacles between the remote control and IR sensor. DISPLAY NO DISC OR BAD DISC * Ensure that you have set the right VIDEO settings of the player. THE RADIO DOES NOT WORK * Check whether the antenna cable is condensation inside the car is connected to insert it again and then turn on again. * Remove the front panel from the unit, then install...
... disc format is compatible to the player. * Ensure that they are some obstacles between the remote control and IR sensor. DISPLAY NO DISC OR BAD DISC * Ensure that you have set the right VIDEO settings of the player. THE RADIO DOES NOT WORK * Check whether the antenna cable is condensation inside the car is connected to insert it again and then turn on again. * Remove the front panel from the unit, then install...


