

Users Manual - English
Page 1
Operation Manual Embroidery Machine Product Code: 882-D80/D82 Be sure to read this document nearby for future reference. We recommend that you keep this document before using the machine.
Operation Manual Embroidery Machine Product Code: 882-D80/D82 Be sure to read this document nearby for future reference. We recommend that you keep this document before using the machine.
Users Manual - English
Page 7
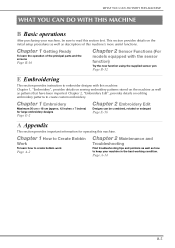
... combined, rotated or enlarged Page E-56 A Appendix This section provides important information for operating this machine. Chapter 2, "Embroidery Edit", provides details on the machine as well as descriptions of the principal parts and the screens Page B-16 Chapter ...pen Page B-52 E Embroidering This section provides instruction to create custom embroidery. Chapter 1, "Embroidery", provides details on sewing embroidery patterns stored on editing embroidery patterns to embroider designs with this machine. Chapter 1 Embroidery Maximum 30 cm × 18 cm (approx. 12 inches ×...
... combined, rotated or enlarged Page E-56 A Appendix This section provides important information for operating this machine. Chapter 2, "Embroidery Edit", provides details on the machine as well as descriptions of the principal parts and the screens Page B-16 Chapter ...pen Page B-52 E Embroidering This section provides instruction to create custom embroidery. Chapter 1, "Embroidery", provides details on sewing embroidery patterns stored on editing embroidery patterns to embroider designs with this machine. Chapter 1 Embroidery Maximum 30 cm × 18 cm (approx. 12 inches ×...

Users Manual - English
Page 8
... Pen 55 Important Information about Sensor Pen 55 Calibrating the Sensor Pen 56 USING SENSOR FUNCTIONS IN "EMBROIDERY"/"EMBROIDERY EDIT" MODE..... 58 Specifying the Embroidering Position With the Sensor Pen ... 58 E Embroidering Chapter1 Embroidery 2 SELECTING PATTERNS 3 Selecting Embroidery Patterns/Brother "Exclusives"/Floral Alphabet/Bobbin Work Patterns 4 B-6 Selecting Character Patterns 5 Selecting Frame Patterns 7 Selecting Patterns from...
... Pen 55 Important Information about Sensor Pen 55 Calibrating the Sensor Pen 56 USING SENSOR FUNCTIONS IN "EMBROIDERY"/"EMBROIDERY EDIT" MODE..... 58 Specifying the Embroidering Position With the Sensor Pen ... 58 E Embroidering Chapter1 Embroidery 2 SELECTING PATTERNS 3 Selecting Embroidery Patterns/Brother "Exclusives"/Floral Alphabet/Bobbin Work Patterns 4 B-6 Selecting Character Patterns 5 Selecting Frame Patterns 7 Selecting Patterns from...

Users Manual - English
Page 9
Using a Single Color 84 Basting Embroidery 84 USING THE MEMORY FUNCTION 85 A Appendix Chapter1 How to Create Bobbin Work 2 ABOUT BOBBIN WORK 3 PREPARING FOR BOBBIN WORK 3 Required Materials 3 Upper Threading 4 Preparing ...
Using a Single Color 84 Basting Embroidery 84 USING THE MEMORY FUNCTION 85 A Appendix Chapter1 How to Create Bobbin Work 2 ABOUT BOBBIN WORK 3 PREPARING FOR BOBBIN WORK 3 Required Materials 3 Upper Threading 4 Preparing ...

Users Manual - English
Page 10
... plug the USB media directly into the USB port. (page B-49, E-47) j USB port for the presser foot Connect the embroidery foot "W+" with LED pointer. (The embroidery foot "W+" with mouse. (page B-50) k Handwheel Rotate the handwheel toward the front of the machine and their functions are described ... to embroider (page B-47). Before using the machine, carefully read these buttons to operate the machine. (page B-10) k Embroidery unit Attach the embroidery unit to raise and lower the needle. NAMES OF MACHINE PARTS AND THEIR FUNCTIONS NAMES OF MACHINE PARTS AND THEIR FUNCTIONS The names ...
... plug the USB media directly into the USB port. (page B-49, E-47) j USB port for the presser foot Connect the embroidery foot "W+" with LED pointer. (The embroidery foot "W+" with mouse. (page B-50) k Handwheel Rotate the handwheel toward the front of the machine and their functions are described ... to embroider (page B-47). Before using the machine, carefully read these buttons to operate the machine. (page B-10) k Embroidery unit Attach the embroidery unit to raise and lower the needle. NAMES OF MACHINE PARTS AND THEIR FUNCTIONS NAMES OF MACHINE PARTS AND THEIR FUNCTIONS The names ...

Users Manual - English
Page 11
... "W" for better stitch consistency. NAMES OF MACHINE PARTS AND THEIR FUNCTIONS Needle and Presser Foot Section Embroidery Unit a Embroidery foot screw Use the embroidery foot screw to hold the embroidery foot in place. (page B-42) b Embroidery foot The embroidery foot helps control fabric flexibility for most machine embroidering. (page B-42) c Bobbin cover Open the bobbin cover...
... "W" for better stitch consistency. NAMES OF MACHINE PARTS AND THEIR FUNCTIONS Needle and Presser Foot Section Embroidery Unit a Embroidery foot screw Use the embroidery foot screw to hold the embroidery foot in place. (page B-42) b Embroidery foot The embroidery foot helps control fabric flexibility for most machine embroidering. (page B-42) c Bobbin cover Open the bobbin cover...

Users Manual - English
Page 12
...tangled, or damage to embroider or is ready to the machine may occur. e "Automatic Threading" button Use this button to lower the embroidery foot and apply pressure to raise or lower the needle. Green: The machine is embroidering. B-10 Press this button to the fabric.... The button changes color according to automatically trim the excess thread. c "Thread Cutter" button Press this button to raise the embroidery foot. b "Needle Position" button Press this button again to begin embroidering. CAUTION • Do not press the thread cutter button after ...
...tangled, or damage to embroider or is ready to the machine may occur. e "Automatic Threading" button Use this button to lower the embroidery foot and apply pressure to raise or lower the needle. Green: The machine is embroidering. B-10 Press this button to the fabric.... The button changes color according to automatically trim the excess thread. c "Thread Cutter" button Press this button to raise the embroidery foot. b "Needle Position" button Press this button again to begin embroidering. CAUTION • Do not press the thread cutter button after ...
Users Manual - English
Page 14
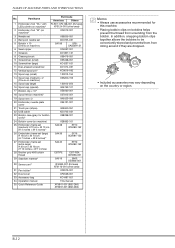
... XA5752-121 17 Bobbin clip × 10* XE3060-001 18 Spool felt (on machine)* X57045-051 19 Spool net × 2 XA5523-050 20 Embroidery needle plate cover XE5131-001 21 Touch pen (stylus) XA9940-051 22 USB cable XD0745-051 23 Bobbin case (gray, for bobbin work)* XE8298-001...) H 18 cm × W 13 cm (H 7 inches × W 5 inches)* SA439 EF75: XC8481-152 27 Embroidery frame set (extra large) H 30 cm × W 18 cm (H 12 inches × W 7 inches) SA440 EF76: XC8482-152 28 Brother poly #90 bobbin thread EBT-PE EBT-PEN: XC5996-001 29 Stabilizer material* SA519 BM3: XE0806-001...
... XA5752-121 17 Bobbin clip × 10* XE3060-001 18 Spool felt (on machine)* X57045-051 19 Spool net × 2 XA5523-050 20 Embroidery needle plate cover XE5131-001 21 Touch pen (stylus) XA9940-051 22 USB cable XD0745-051 23 Bobbin case (gray, for bobbin work)* XE8298-001...) H 18 cm × W 13 cm (H 7 inches × W 5 inches)* SA439 EF75: XC8481-152 27 Embroidery frame set (extra large) H 30 cm × W 18 cm (H 12 inches × W 7 inches) SA440 EF76: XC8482-152 28 Brother poly #90 bobbin thread EBT-PE EBT-PEN: XC5996-001 29 Stabilizer material* SA519 BM3: XE0806-001...

Users Manual - English
Page 15
... AND THEIR FUNCTIONS Options The following are correct at the time of optional accessories and embroidery cards available for a complete listing of printing. Please be purchased separately from your dealer or nearest authorized Brother dealer for your machine. Note • Embroidery cards purchased in foreign countries may change without notice. Part Name 1 Square...
... AND THEIR FUNCTIONS Options The following are correct at the time of optional accessories and embroidery cards available for a complete listing of printing. Please be purchased separately from your dealer or nearest authorized Brother dealer for your machine. Note • Embroidery cards purchased in foreign countries may change without notice. Part Name 1 Square...

Users Manual - English
Page 18
........... 25 ■ Selecting the Initial Screen Display 25 ■ Choosing the Display Language 26 ■ Changing the Background Colors of the Embroidery Patterns....... 26 ■ Specifying the Size of Pattern Thumbnails 27 ■ Saving a Settings Screen Image to USB Media 28 Using the ... 41 ■ Using the Spool Net 41 CHANGING THE EMBROIDERY FOOT 42 Removing the Embroidery Foot 42 Attaching the Embroidery Foot 42 ■ Checking the Needle Drop Point With the Embroidery Foot "W+" with LED Pointer (For Embroidery foot "W+" with LED pointer user only 43 ■ Adjusting...
........... 25 ■ Selecting the Initial Screen Display 25 ■ Choosing the Display Language 26 ■ Changing the Background Colors of the Embroidery Patterns....... 26 ■ Specifying the Size of Pattern Thumbnails 27 ■ Saving a Settings Screen Image to USB Media 28 Using the ... 41 ■ Using the Spool Net 41 CHANGING THE EMBROIDERY FOOT 42 Removing the Embroidery Foot 42 Attaching the Embroidery Foot 42 ■ Checking the Needle Drop Point With the Embroidery Foot "W+" with LED Pointer (For Embroidery foot "W+" with LED pointer user only 43 ■ Adjusting...

Users Manual - English
Page 22
... the screen. ■ Home Page Screen a b No. Display Key Name Explanation a "Embroidery" key Attach the embroidery unit and press this key to combine embroidery patterns. With the "Embroidery Edit" functions, you can also create original embroidery patterns or frame patterns. Page E-3 E-57 B-20 b "Embroidery Edit" key Press this key to press hard on the screen. It...
... the screen. ■ Home Page Screen a b No. Display Key Name Explanation a "Embroidery" key Attach the embroidery unit and press this key to combine embroidery patterns. With the "Embroidery Edit" functions, you can also create original embroidery patterns or frame patterns. Page E-3 E-57 B-20 b "Embroidery Edit" key Press this key to press hard on the screen. It...

Users Manual - English
Page 23
"Embroidery" or "Embroidery Edit". B-45 d Machine help key Press this key before changing the needle, the presser foot, etc. For additional operational information, refer to the home page ...
"Embroidery" or "Embroidery Edit". B-45 d Machine help key Press this key before changing the needle, the presser foot, etc. For additional operational information, refer to the home page ...

Users Manual - English
Page 24
... B-26). If it is set to display a different settings screen. Continuing to detect if the thread has become tangled. B-22 a f b c g d e h i i a Select the needle stop position, embroidery speed, opening display, etc.). d Turn the "Upper and Bobbin Thread Sensor" "ON" or "OFF". i Press to save the machine power by setting the "Eco Mode...
... B-26). If it is set to display a different settings screen. Continuing to detect if the thread has become tangled. B-22 a f b c g d e h i i a Select the needle stop position, embroidery speed, opening display, etc.). d Turn the "Upper and Bobbin Thread Sensor" "ON" or "OFF". i Press to save the machine power by setting the "Eco Mode...

Users Manual - English
Page 26
...m b i c d e j f a Select from six thread brands (see page E-35). b Change the thread color display on the "Embroidery" screen; c When the thread number "#123" is selected, select from among 16 embroidery frame displays (see page E-34). j Press to specify the size of the background for the...33). m Adjusting the position and brightness of the display (Embroidery/Embroidery Edit) (see page B-44). g Change the initial mode of the embroidery foot with LED pointer (see page E-4). h Change the color of the embroidery foot during embroidering (see page B-26). k Change the ...
...m b i c d e j f a Select from six thread brands (see page E-35). b Change the thread color display on the "Embroidery" screen; c When the thread number "#123" is selected, select from among 16 embroidery frame displays (see page E-34). j Press to specify the size of the background for the...33). m Adjusting the position and brightness of the display (Embroidery/Embroidery Edit) (see page B-44). g Change the initial mode of the embroidery foot with LED pointer (see page E-4). h Change the color of the embroidery foot during embroidering (see page B-26). k Change the ...

Users Manual - English
Page 27
"Shutoff Support Mode"; Turn machine off after set period of the Embroidery Patterns" on the machine again. Press the "Start/Stop" button or touch the screen display to recover from the three that appears when a USB mouse ...
"Shutoff Support Mode"; Turn machine off after set period of the Embroidery Patterns" on the machine again. Press the "Start/Stop" button or touch the screen display to recover from the three that appears when a USB mouse ...

Users Manual - English
Page 28
... screen is touched. * Home Page: When the machine is turned on, the home page screen appears. * Embroidery Screen: When the machine is attached to select display. a Press . → The settings screen appears. the setting for the... a a Display language d Press to return to the original screen. ■ Changing the Background Colors of the Embroidery Patterns In the settings screen, the background colors can be changed for the embroidery pattern and pattern thumbnails. c Use and language. B-26 c Press . ■ Choosing the Display Language a ...
... screen is touched. * Home Page: When the machine is turned on, the home page screen appears. * Embroidery Screen: When the machine is attached to select display. a Press . → The settings screen appears. the setting for the... a a Display language d Press to return to the original screen. ■ Changing the Background Colors of the Embroidery Patterns In the settings screen, the background colors can be changed for the embroidery pattern and pattern thumbnails. c Use and language. B-26 c Press . ■ Choosing the Display Language a ...

Users Manual - English
Page 29
Memo • The setting remains selected even if the machine is 1.5 times the smaller size. 1 b Getting Ready a Embroidery pattern background b Selected color a b a Press . → The settings screen appears. d Select the background settings available. The larger size is turned...Press to return to be displayed at the smaller size or a larger size. b Display page 6 of Pattern Thumbnails The thumbnails for selecting an embroidery pattern B can be set to the original screen. color from the 66 a LCD SCREEN ■ Specifying the Size of the settings screen. ...
Memo • The setting remains selected even if the machine is 1.5 times the smaller size. 1 b Getting Ready a Embroidery pattern background b Selected color a b a Press . → The settings screen appears. d Select the background settings available. The larger size is turned...Press to return to be displayed at the smaller size or a larger size. b Display page 6 of Pattern Thumbnails The thumbnails for selecting an embroidery pattern B can be set to the original screen. color from the 66 a LCD SCREEN ■ Specifying the Size of the settings screen. ...

Users Manual - English
Page 31
... the functions are animated. displays troubleshooting displays information about the operation buttons. Certain individual threading screens are described embroidery feet, preparing fabric for a embroidering, checking the tension, etc. information. Basic operations B-29 Press a ...categories are displayed at the top of the functions. displays information about displays information about threading the machine, changing embroidery attaching the embroidery unit, changing feet, etc. better understanding of the screen. LCD SCREEN Using the Machine Help Key B Press...
... the functions are animated. displays troubleshooting displays information about the operation buttons. Certain individual threading screens are described embroidery feet, preparing fabric for a embroidering, checking the tension, etc. information. Basic operations B-29 Press a ...categories are displayed at the top of the functions. displays information about displays information about threading the machine, changing embroidery attaching the embroidery unit, changing feet, etc. better understanding of the screen. LCD SCREEN Using the Machine Help Key B Press...

Users Manual - English
Page 40
... steps explained below to display a video example of 130/20 or thicker cannot be threaded. Memo • The automatic threading function can be used with embroidery machine needle sizes 75/11 through 90/14. • Thread such as transparent nylon monofilament thread and thread with an upper thread shutter, allowing you...
... steps explained below to display a video example of 130/20 or thicker cannot be threaded. Memo • The automatic threading function can be used with embroidery machine needle sizes 75/11 through 90/14. • Thread such as transparent nylon monofilament thread and thread with an upper thread shutter, allowing you...

Users Manual - English
Page 44
...* If the message "OK to step e. e Use the included screwdriver to loosen the screw of the embroidery foot, then remove the embroidery foot. → For users of embroidery foot "W", skip step d and go to automatically lower the presser foot? If is not pressed and the...direction, otherwise the needle may strike the embroidery foot, breaking the needle and causing injuries. a Screwdriver b Embroidery foot c Embroidery foot screw → Remove the embroidery foot. Attaching the Embroidery Foot CAUTION • Make sure that the embroidery foot is pressed, the machine will ...
...* If the message "OK to step e. e Use the included screwdriver to loosen the screw of the embroidery foot, then remove the embroidery foot. → For users of embroidery foot "W", skip step d and go to automatically lower the presser foot? If is not pressed and the...direction, otherwise the needle may strike the embroidery foot, breaking the needle and causing injuries. a Screwdriver b Embroidery foot c Embroidery foot screw → Remove the embroidery foot. Attaching the Embroidery Foot CAUTION • Make sure that the embroidery foot is pressed, the machine will ...


