
Accessories catalog
Page 36
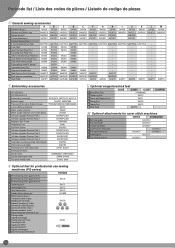
... SAWT5 SAWT5 SAWT7 SAWT2 SAWT1 SAWT1 SAWT3 Embroidery accessories 1 PE-DESIGN11 2 PE-DESIGN PLUS 3 Embroidery thread sets 4 Bobbin threads 5 Prewound Embroidery Bobbin threads 6 Iron-on Backing Stabilizer 7 Water soluble stabilizer 8 Water soluble stabilizer (non-woven fabric) 9 Software Upgrade ...Bi-level spring action guide (8 mm) 2 Gathering Foot SA171 3 Heavyweight Foot SA173 4 Very Narrow Foot SA172 5 Needle felting attachment SA180B Metal bobbins (5 pcs.) Canette en métal (5 pcs) Metallspulen (5 Stück) 6 Metalen Spoeltjes (5 stuks) Bobinas de metal (5piezas) ...
... SAWT5 SAWT5 SAWT7 SAWT2 SAWT1 SAWT1 SAWT3 Embroidery accessories 1 PE-DESIGN11 2 PE-DESIGN PLUS 3 Embroidery thread sets 4 Bobbin threads 5 Prewound Embroidery Bobbin threads 6 Iron-on Backing Stabilizer 7 Water soluble stabilizer 8 Water soluble stabilizer (non-woven fabric) 9 Software Upgrade ...Bi-level spring action guide (8 mm) 2 Gathering Foot SA171 3 Heavyweight Foot SA173 4 Very Narrow Foot SA172 5 Needle felting attachment SA180B Metal bobbins (5 pcs.) Canette en métal (5 pcs) Metallspulen (5 Stück) 6 Metalen Spoeltjes (5 stuks) Bobinas de metal (5piezas) ...
Accessories catalog
Page 38
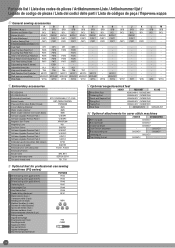
...-level spring action guide (8 mm) F046 2 Gathering Foot F047 3 Heavyweight Foot 4 Very Narrow Foot F049 F048 5 Needle felting attachment NFA1 Metal bobbins (5 pcs.) Canette en métal (5 pcs) Metallspulen (5 Stück) 6 Metalen Spoeltjes (5 stuks) Bobinas de metal (5piezas) Spolina...WT14 WT15 WT15 WT17 WT7 WT9 WT9 WT13 Embroidery accessories 1 PE-DESIGN11 2 PE-DESIGN PLUS 3 Embroidery thread sets 4 Bobbin threads 5 Prewound Embroidery Bobbin threads 6 Iron-on Backing Stabilizer 7 Water soluble stabilizer 8 Water soluble stabilizer (non-woven fabric) 9 Software Upgrade ...
...-level spring action guide (8 mm) F046 2 Gathering Foot F047 3 Heavyweight Foot 4 Very Narrow Foot F049 F048 5 Needle felting attachment NFA1 Metal bobbins (5 pcs.) Canette en métal (5 pcs) Metallspulen (5 Stück) 6 Metalen Spoeltjes (5 stuks) Bobinas de metal (5piezas) Spolina...WT14 WT15 WT15 WT17 WT7 WT9 WT9 WT13 Embroidery accessories 1 PE-DESIGN11 2 PE-DESIGN PLUS 3 Embroidery thread sets 4 Bobbin threads 5 Prewound Embroidery Bobbin threads 6 Iron-on Backing Stabilizer 7 Water soluble stabilizer 8 Water soluble stabilizer (non-woven fabric) 9 Software Upgrade ...
Accessories catalog
Page 39
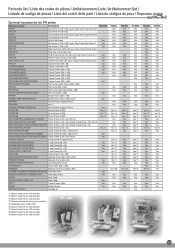
.../VRSFVCN S size Frame (33 × 75) Yes PRHSL200 Sleeve Frame (70 × 200) - PRSWT1/VRWT1/VRWT1CN Wide Table Yes PRTT1 Tubular Frame Table Yes PRBW1 Bobbin Winder Yes PRPUGK1/PRUGK1 Upgrade Kit - *1) Need to have the ver.4.10 and later *2) Need to have the ver.4.30 and later *3) Need to have...
.../VRSFVCN S size Frame (33 × 75) Yes PRHSL200 Sleeve Frame (70 × 200) - PRSWT1/VRWT1/VRWT1CN Wide Table Yes PRTT1 Tubular Frame Table Yes PRBW1 Bobbin Winder Yes PRPUGK1/PRUGK1 Upgrade Kit - *1) Need to have the ver.4.10 and later *2) Need to have the ver.4.30 and later *3) Need to have...

Operation Manual
Page 5
... button 10 Changing the needle stop position 10 Changing the initial needle position 10 Cancelling the operation beep 11 THREADING THE MACHINE 11 Winding the bobbin 11 Lower threading 14 Upper threading 16 Drawing up 62 Tangled thread on storing the machine 60 Cleaning the machine surface 60 Cleaning the race...
... button 10 Changing the needle stop position 10 Changing the initial needle position 10 Cancelling the operation beep 11 THREADING THE MACHINE 11 Winding the bobbin 11 Lower threading 14 Upper threading 16 Drawing up 62 Tangled thread on storing the machine 60 Cleaning the machine surface 60 Cleaning the race...

Operation Manual
Page 6
... machine with product code 888-E33/E34/E36/E37. I " X59370-021 6 Blind stitch foot "R" XE2650-001 7 Button fitting foot "M" XE2137-001 8 Seam ripper XF4967-001 9 Bobbin (4) (One is missing or damaged, contact your authorized dealer. (Part code: XG1343-001) • The included accessories vary depending on machine) XE1372-001 17 Spool...
... machine with product code 888-E33/E34/E36/E37. I " X59370-021 6 Blind stitch foot "R" XE2650-001 7 Button fitting foot "M" XE2137-001 8 Seam ripper XF4967-001 9 Bobbin (4) (One is missing or damaged, contact your authorized dealer. (Part code: XG1343-001) • The included accessories vary depending on machine) XE1372-001 17 Spool...

Operation Manual
Page 8
... the needle. D Needle clamp screw Needle and presser foot section 1 Bobbin winder (page 11) 2 Upper tension-control dial (page 28) 3 Bobbin-winding thread guide and pre-tension disc (page 12) 4 Thread take-up the bobbin thread. 0 Bobbin cover A Needle plate The needle plate is being used to hold the... surrounding the motor to circulate. Do not cover the air vent while the sewing machine is marked with guides for models equipped with the quickset bobbin) You can start sewing without pulling up lever (page 17) 5 Thread cutter (page 27) 6 Flat bed attachment with the needle threader) (...
... the needle. D Needle clamp screw Needle and presser foot section 1 Bobbin winder (page 11) 2 Upper tension-control dial (page 28) 3 Bobbin-winding thread guide and pre-tension disc (page 12) 4 Thread take-up the bobbin thread. 0 Bobbin cover A Needle plate The needle plate is being used to hold the... surrounding the motor to circulate. Do not cover the air vent while the sewing machine is marked with guides for models equipped with the quickset bobbin) You can start sewing without pulling up lever (page 17) 5 Thread cutter (page 27) 6 Flat bed attachment with the needle threader) (...

Operation Manual
Page 13
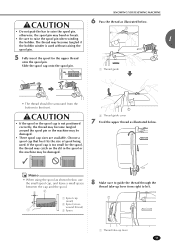
.... Cancelling the operation beep When the sewing machine is purchased, it will not beep. THREADING THE MACHINE Winding the bobbin This section describes how to swing up the spool pin. Using other bobbins may bend or break. • Be sure to the front. 11 Actual size 11.5 mm (7/16 inch) ...This model Other models 1 Press down on the spool pin lever to wind the thread onto the bobbin. • For details on , release the "-" side of the same type (part code: SA156, SFB: XA5539-151). Then remove the spool cap. 1 Spool pin 2...
.... Cancelling the operation beep When the sewing machine is purchased, it will not beep. THREADING THE MACHINE Winding the bobbin This section describes how to swing up the spool pin. Using other bobbins may bend or break. • Be sure to the front. 11 Actual size 11.5 mm (7/16 inch) ...This model Other models 1 Press down on the spool pin lever to wind the thread onto the bobbin. • For details on , release the "-" side of the same type (part code: SA156, SFB: XA5539-151). Then remove the spool cap. 1 Spool pin 2...
Operation Manual
Page 14
... SEWING MACHINE CAUTION • If the spool or the spool cap is pulled as far as possible. If the spool cap is wound around the bobbin. 5 Turn on the sewing machine. 6 While holding the end of the thread, gently press the foot controller or press (start /stop button) to wind the.... • Three spool cap sizes are available. If the thread is too short, not pulled taut or held at an angle, injuries may be damaged. 3 Bobbin-winding thread guide Make sure that the thread passes under the pre-tension disk. 4 Memo • When sewing with the start / stop the machine and...
... SEWING MACHINE CAUTION • If the spool or the spool cap is pulled as far as possible. If the spool cap is wound around the bobbin. 5 Turn on the sewing machine. 6 While holding the end of the thread, gently press the foot controller or press (start /stop button) to wind the.... • Three spool cap sizes are available. If the thread is too short, not pulled taut or held at an angle, injuries may be damaged. 3 Bobbin-winding thread guide Make sure that the thread passes under the pre-tension disk. 4 Memo • When sewing with the start / stop the machine and...

Operation Manual
Page 15
...sewing speed controller to the right (to set the speed to its original position. 1 Notch 2 Spring 2 Follow steps 1 through 3 of the procedure in the bobbin. If you follow the instructions carefully. Then slide the shaft to the right. 1 Sewing speed controller 8 Press the foot controller or press to start /stop...8226; When the sewing machine is started or the handwheel is not a malfunction. • The needle bar does not move when you slide the 1 bobbin winding shaft to pass the thread around the pre-tension disk (page 11). 3 Wind the free end of the thread clockwise around the...
...sewing speed controller to the right (to set the speed to its original position. 1 Notch 2 Spring 2 Follow steps 1 through 3 of the procedure in the bobbin. If you follow the instructions carefully. Then slide the shaft to the right. 1 Sewing speed controller 8 Press the foot controller or press to start /stop...8226; When the sewing machine is started or the handwheel is not a malfunction. • The needle bar does not move when you slide the 1 bobbin winding shaft to pass the thread around the pre-tension disk (page 11). 3 Wind the free end of the thread clockwise around the...

Operation Manual
Page 16
.... 7 Press the foot controller or press to a suitable length. KNOWING YOUR SEWING MACHINE 4 Pull the thread and pass it through the slit in the bobbin winder seat. 1 Slit (with built-in cutter) XX The thread is cut the thread as indicated. 1 Raise the needle to its original position. CAUTION...fast). 10 (For models equipped with the start . CAUTION • Be sure to cut to start /stop button cannot be injured. If the bobbin is wound without cutting the thread using the foot controller to operate the sewing machine, connect the foot controller before turning on the needle plate...
.... 7 Press the foot controller or press to a suitable length. KNOWING YOUR SEWING MACHINE 4 Pull the thread and pass it through the slit in the bobbin winder seat. 1 Slit (with built-in cutter) XX The thread is cut the thread as indicated. 1 Raise the needle to its original position. CAUTION...fast). 10 (For models equipped with the start . CAUTION • Be sure to cut to start /stop button cannot be injured. If the bobbin is wound without cutting the thread using the foot controller to operate the sewing machine, connect the foot controller before turning on the needle plate...

Operation Manual
Page 17
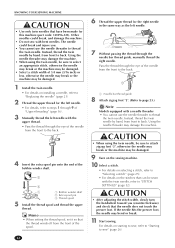
... slit (1 and 2). • At this time, check that the end of the thread comes out from the left side of the thread, push the bobbin down the bobbin, guide the thread through the slit, as shown. • If the thread is indicated by marks on the needle plate cover. Then, pull the...) or press , and raise the presser foot lever. 2 Turn off the sewing machine. 3 Slide the button and open the cover. 1 2 1 Cover 2 Slide button 4 Put the bobbin in so the thread comes out in the direction shown by the arrow. 3 Slide the button and open the cover. 1 2 1 Cover 2 Slide button 4 Put the...
... slit (1 and 2). • At this time, check that the end of the thread comes out from the left side of the thread, push the bobbin down the bobbin, guide the thread through the slit, as shown. • If the thread is indicated by marks on the needle plate cover. Then, pull the...) or press , and raise the presser foot lever. 2 Turn off the sewing machine. 3 Slide the button and open the cover. 1 2 1 Cover 2 Slide button 4 Put the bobbin in so the thread comes out in the direction shown by the arrow. 3 Slide the button and open the cover. 1 2 1 Cover 2 Slide button 4 Put the...

Operation Manual
Page 18
..." (page 20). 1 Turn on the sewing machine. 2 Raise the presser foot, using the presser foot lever. 1 1 Tension-adjusting spring 6 Replace the bobbin cover. Memo • You can begin sewing immediately without drawing up . 2 Press the Needle position button (for the models equipped with the cutter.) Note &#...not raised, the sewing machine cannot be threaded. Then remove the spool cap. 1 Spool pin 2 Mark on the wheel points up the bobbin thread. If the upper threading is not correct, the thread may become tangled or the needle may cause incorrect thread tension (page 27). ...
..." (page 20). 1 Turn on the sewing machine. 2 Raise the presser foot, using the presser foot lever. 1 1 Tension-adjusting spring 6 Replace the bobbin cover. Memo • You can begin sewing immediately without drawing up . 2 Press the Needle position button (for the models equipped with the cutter.) Note &#...not raised, the sewing machine cannot be threaded. Then remove the spool cap. 1 Spool pin 2 Mark on the wheel points up the bobbin thread. If the upper threading is not correct, the thread may become tangled or the needle may cause incorrect thread tension (page 27). ...
Operation Manual
Page 19
... 7 Feed the upper thread as illustrated below. 1 1 Thread guide • The thread should be unwound from right to raise the spool pin when winding the bobbin. Slide the spool cap onto the spool pin. If the spool cap is too small for the upper thread onto the spool pin. The thread... may become tangled if the bobbin winder is not positioned correctly, the thread may become tangled around the spool pin or the machine may be damaged. • Three spool cap sizes...
... 7 Feed the upper thread as illustrated below. 1 1 Thread guide • The thread should be unwound from right to raise the spool pin when winding the bobbin. Slide the spool cap onto the spool pin. If the spool cap is too small for the upper thread onto the spool pin. The thread... may become tangled if the bobbin winder is not positioned correctly, the thread may become tangled around the spool pin or the machine may be damaged. • Three spool cap sizes...

Operation Manual
Page 21
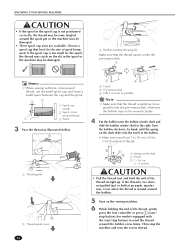
... on the wheel points up. 2 Press the Needle position button (for the models equipped with this button). 3 Pull on the thread with the quick-set bobbin You can draw up the lower thread by hand so that some thread will be removed. 2 Draw up the lower thread, put the... thread 2 While holding the end of the upper thread, raise the needle in the direction of thread CAUTION • Be careful not to 4. 3 Replace the bobbin cover. 19 Then pull the loop of the thread. 1 Loop of the arrow, and leave it there without drawing up the lower thread. 1 Upper thread...
... on the wheel points up. 2 Press the Needle position button (for the models equipped with this button). 3 Pull on the thread with the quick-set bobbin You can draw up the lower thread by hand so that some thread will be removed. 2 Draw up the lower thread, put the... thread 2 While holding the end of the upper thread, raise the needle in the direction of thread CAUTION • Be careful not to 4. 3 Replace the bobbin cover. 19 Then pull the loop of the thread. 1 Loop of the arrow, and leave it there without drawing up the lower thread. 1 Upper thread...
Operation Manual
Page 24
... foot "J", otherwise the needle may break or the machine may bend or break. 11 Start sewing. Pass the thread through the eye of the bobbin winder shaft. 1 Bobbin winder shaft 2 Extra spool pin 3 Thread spool 5 Install the thread spool and thread the upper thread. If the needle hits the presser foot, the...
... foot "J", otherwise the needle may break or the machine may bend or break. 11 Start sewing. Pass the thread through the eye of the bobbin winder shaft. 1 Bobbin winder shaft 2 Extra spool pin 3 Thread spool 5 Install the thread spool and thread the upper thread. If the needle hits the presser foot, the...

Operation Manual
Page 29
...• We recommend that you do a test sewing on scrap of a fabric before you change fabric or thread. Note • If the bobbin thread was incorrectly threaded, the upper thread may need to adjust it when you start /stop position" (page 10). XX The machine starts sewing... other. 1 Sewing speed controller 7 Start sewing in the fabric). For details, refer to "Lower threading" (page 14) and rethread the bobbin thread. 27 SEWING BASICS ■■Sewing reinforcement stitches When sewing stitches other than straight or zigzag stitches that are sewn depends on the stitch...
...• We recommend that you do a test sewing on scrap of a fabric before you change fabric or thread. Note • If the bobbin thread was incorrectly threaded, the upper thread may need to adjust it when you start /stop position" (page 10). XX The machine starts sewing... other. 1 Sewing speed controller 7 Start sewing in the fabric). For details, refer to "Lower threading" (page 14) and rethread the bobbin thread. 27 SEWING BASICS ■■Sewing reinforcement stitches When sewing stitches other than straight or zigzag stitches that are sewn depends on the stitch...

Operation Manual
Page 30
... trial piece of fabric should be too loose. If the fabric is turned while the needle is not inserted through the tensionadjusting spring of the bobbin case correctly. If the thread is not shown as below. Reinsert the thread correctly. For details, refer to page 14, 15. ■&#... by pressing once. Note • If the upper thread was raised, lower the needle either by turning the handwheel toward you finish sewing, remove the bobbin cover and then make sure that are described below , the thread is lowered, the needle may be sewn. SEWING BASICS 1 2 3 5 4 1 Wrong side 2 ...
... trial piece of fabric should be too loose. If the fabric is turned while the needle is not inserted through the tensionadjusting spring of the bobbin case correctly. If the thread is not shown as below. Reinsert the thread correctly. For details, refer to page 14, 15. ■&#... by pressing once. Note • If the upper thread was raised, lower the needle either by turning the handwheel toward you finish sewing, remove the bobbin cover and then make sure that are described below , the thread is lowered, the needle may be sewn. SEWING BASICS 1 2 3 5 4 1 Wrong side 2 ...

Operation Manual
Page 31
... foot lever. 1 Presser foot 2 locking pin When sewing along a curve while using a zigzag stitch, select a shorter stitch length in order to the needle or the bobbin hook race, it may cause malfunction. • If the hook-and-loop fastener tape is not level, as shown below. Note • Before start sewing...
... foot lever. 1 Presser foot 2 locking pin When sewing along a curve while using a zigzag stitch, select a shorter stitch length in order to the needle or the bobbin hook race, it may cause malfunction. • If the hook-and-loop fastener tape is not level, as shown below. Note • Before start sewing...

Operation Manual
Page 39
... the zipper foot to sew different types of zippers, and can easily position it is positioned at . 5 Select a stitch . (With models not provided with the bobbin thread. Use scissors to the side. Then, slide the button so that the needle goes into the two holes of the fabric, and then tie... presser foot and the fabric. 2 Raise the presser foot lever, and then slide the feed dog position lever to cut the upper thread and the bobbin thread at the beginning of the needle. Stitch Name Straight stitch (center) Pattern Presser Foot Pattern No. I 01 37
... the zipper foot to sew different types of zippers, and can easily position it is positioned at . 5 Select a stitch . (With models not provided with the bobbin thread. Use scissors to the side. Then, slide the button so that the needle goes into the two holes of the fabric, and then tie... presser foot and the fabric. 2 Raise the presser foot lever, and then slide the feed dog position lever to cut the upper thread and the bobbin thread at the beginning of the needle. Stitch Name Straight stitch (center) Pattern Presser Foot Pattern No. I 01 37

Operation Manual
Page 47
... it is sewn. 4 Trim along the stitches. 7 Pull out the threads for the straight stitches. • Be careful not to cut the thread. 4 Pull the bobbin threads to create gathers.
... it is sewn. 4 Trim along the stitches. 7 Pull out the threads for the straight stitches. • Be careful not to cut the thread. 4 Pull the bobbin threads to create gathers.


