
Accessories catalog
Page 35
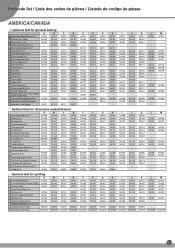
...Stitch Guide Foot SA160 SA160 17 Stitch in the Ditch Foot SA191 SA191 18 Straight Stitch Foot 19 Straight Stitch Foot Stitch Needle Plate and Straight 20 Vertical Stitch Alignment Foot SA167 - SA131 E SA161 SA103 SA104 SA111 SA133 SA102 SA184 SA126 SA208 SA114...Adjustable Zipper/Piping Foot SA161 SA161 2 Bi-level Foot - SA189 SA176 - SA142 SA158 SA199V SA142 11 Gathering Foot SA120 SA120 SA120 SA120 12 Needle Felting Felting Needle Attachment 6 set - L SA109 SA141 SA145 SA148 SA142 SA120 SA186/ SA147 - Partcode list / Liste des codes de pièces / Listado...
...Stitch Guide Foot SA160 SA160 17 Stitch in the Ditch Foot SA191 SA191 18 Straight Stitch Foot 19 Straight Stitch Foot Stitch Needle Plate and Straight 20 Vertical Stitch Alignment Foot SA167 - SA131 E SA161 SA103 SA104 SA111 SA133 SA102 SA184 SA126 SA208 SA114...Adjustable Zipper/Piping Foot SA161 SA161 2 Bi-level Foot - SA189 SA176 - SA142 SA158 SA199V SA142 11 Gathering Foot SA120 SA120 SA120 SA120 12 Needle Felting Felting Needle Attachment 6 set - L SA109 SA141 SA145 SA148 SA142 SA120 SA186/ SA147 - Partcode list / Liste des codes de pièces / Listado...
Accessories catalog
Page 36
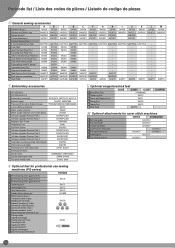
... mm) SA170 Bi-level spring action guide (8 mm) 2 Gathering Foot SA171 3 Heavyweight Foot SA173 4 Very Narrow Foot SA172 5 Needle felting attachment SA180B Metal bobbins (5 pcs.) Canette en métal (5 pcs) Metallspulen (5 Stück) 6 Metalen Spoeltjes (5 stuks...) Bobinas de metal (5piezas) Spolina de metallo (5 pz.) Bobinas metálicas (5 un.) 5 шт.) SA159 Felting needle Aiguille de feutrage Ersatznadel zum Filzen 7 Verviltings naald Aguja para fieltrar Ago per feltratura Agulha de feltragem SA181 32 SAWT6 - 5234PRW - SAMDRIVER1 -...
... mm) SA170 Bi-level spring action guide (8 mm) 2 Gathering Foot SA171 3 Heavyweight Foot SA173 4 Very Narrow Foot SA172 5 Needle felting attachment SA180B Metal bobbins (5 pcs.) Canette en métal (5 pcs) Metallspulen (5 Stück) 6 Metalen Spoeltjes (5 stuks...) Bobinas de metal (5piezas) Spolina de metallo (5 pz.) Bobinas metálicas (5 un.) 5 шт.) SA159 Felting needle Aiguille de feutrage Ersatznadel zum Filzen 7 Verviltings naald Aguja para fieltrar Ago per feltratura Agulha de feltragem SA181 32 SAWT6 - 5234PRW - SAMDRIVER1 -...
Accessories catalog
Page 37
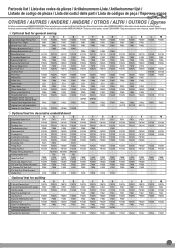
... 16 Stitch Guide Foot F035N F035N 17 Stitch in the Ditch Foot F065 F065 18 Straight Stitch Foot 19 Straight Straight Stitch Stitch Foot and Needle Plate 20 Vertical Stitch Alignment Foot F042N - G F036N F081 F082 F084 F017N F080 F056 F002N F079 F007N F039N F067 F066 SG1 F054 F035N... SG1 F054 F035N F065 F042N - F063 SA176 - F063 - F073 10 Fringe Foot F025N F025N F025N F025N 11 Gathering Foot F012N F012N F012N F012N 12 Needle Felting Felting Needle Attachment 6 set 13 Open Toe Foot 14 Pearls and Sequins Foot 15 Pin Tuck Foot (Seven Grooves) 16 5 Grooves Pin Tuck Foot - L...
... 16 Stitch Guide Foot F035N F035N 17 Stitch in the Ditch Foot F065 F065 18 Straight Stitch Foot 19 Straight Straight Stitch Stitch Foot and Needle Plate 20 Vertical Stitch Alignment Foot F042N - G F036N F081 F082 F084 F017N F080 F056 F002N F079 F007N F039N F067 F066 SG1 F054 F035N... SG1 F054 F035N F065 F042N - F063 SA176 - F063 - F073 10 Fringe Foot F025N F025N F025N F025N 11 Gathering Foot F012N F012N F012N F012N 12 Needle Felting Felting Needle Attachment 6 set 13 Open Toe Foot 14 Pearls and Sequins Foot 15 Pin Tuck Foot (Seven Grooves) 16 5 Grooves Pin Tuck Foot - L...
Accessories catalog
Page 38
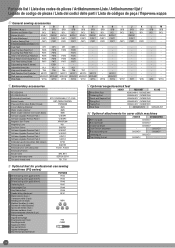
...guide (5 mm) F045 Bi-level spring action guide (8 mm) F046 2 Gathering Foot F047 3 Heavyweight Foot 4 Very Narrow Foot F049 F048 5 Needle felting attachment NFA1 Metal bobbins (5 pcs.) Canette en métal (5 pcs) Metallspulen (5 Stück) 6 Metalen Spoeltjes (5 stuks) Bobinas... de metal (5piezas) Spolina de metallo (5 pz.) Bobinas metálicas (5 un.) 5 шт.) MBN Felting needle Aiguille de feutrage Ersatznadel zum Filzen 7 Verviltings naald Aguja para fieltrar Ago per feltratura Agulha de feltragem FN1 FN001 34 SA231CV 5 Bias tape...
...guide (5 mm) F045 Bi-level spring action guide (8 mm) F046 2 Gathering Foot F047 3 Heavyweight Foot 4 Very Narrow Foot F049 F048 5 Needle felting attachment NFA1 Metal bobbins (5 pcs.) Canette en métal (5 pcs) Metallspulen (5 Stück) 6 Metalen Spoeltjes (5 stuks) Bobinas... de metal (5piezas) Spolina de metallo (5 pz.) Bobinas metálicas (5 un.) 5 шт.) MBN Felting needle Aiguille de feutrage Ersatznadel zum Filzen 7 Verviltings naald Aguja para fieltrar Ago per feltratura Agulha de feltragem FN1 FN001 34 SA231CV 5 Bias tape...

Operation Manual
Page 3
...machine may damage the machine or result in the machine falling, which could cause injuries. • When lifting the machine, be connected to the needle. Do not connect it has been dropped or damaged, or water is being sewn may injure your back or knees. 5 Always keep your machine...the machine directly into the electrical outlet. • Never drop or insert any object into the electrical outlet. Special care is required around the machine needle. • Switch the machine to the symbol "O" position to turn it off when making any air openings blocked. To reduce the risk of lint...
...machine may damage the machine or result in the machine falling, which could cause injuries. • When lifting the machine, be connected to the needle. Do not connect it has been dropped or damaged, or water is being sewn may injure your back or knees. 5 Always keep your machine...the machine directly into the electrical outlet. • Never drop or insert any object into the electrical outlet. Special care is required around the machine needle. • Switch the machine to the symbol "O" position to turn it off when making any air openings blocked. To reduce the risk of lint...

Operation Manual
Page 4
...adjustment is intended for its intended use as described in a safe way and understand the hazards involved. Children should contact your local authorized Brother dealer. Use this machine only for household use of . Benzene, thinner, and scouring powders can be supervised to clean the case....this equipment, you should be used . • Always consult the operation manual when replacing or installing any assemblies, the presser feet, needle, or other hot objects. • Use only neutral soaps or detergents to ensure that this machine was supplied in this product are ...
...adjustment is intended for its intended use as described in a safe way and understand the hazards involved. Children should contact your local authorized Brother dealer. Use this machine only for household use of . Benzene, thinner, and scouring powders can be supervised to clean the case....this equipment, you should be used . • Always consult the operation manual when replacing or installing any assemblies, the presser feet, needle, or other hot objects. • Use only neutral soaps or detergents to ensure that this machine was supplied in this product are ...

Operation Manual
Page 5
... 5 Accessory compartment 5 Flip chart (For models equipped with a flip chart).... 5 NAMES OF MACHINE PARTS AND THEIR FUNCTIONS 6 The main parts 6 Needle and presser foot section 6 Operation buttons 7 Operation panel 7 Spool pin 8 USING YOUR SEWING MACHINE 9 Power supply precautions 9 Power supply 9 Foot ... topics 61 Upper thread tightened up the lower thread 19 REPLACING THE NEEDLE 20 Needle precautions 20 Needle types and their uses 20 Checking the needle 20 Replacing the needle 21 Sewing with character stitches 50 4. APPENDIX 52 STITCH SETTINGS 52 Utility...
... 5 Accessory compartment 5 Flip chart (For models equipped with a flip chart).... 5 NAMES OF MACHINE PARTS AND THEIR FUNCTIONS 6 The main parts 6 Needle and presser foot section 6 Operation buttons 7 Operation panel 7 Spool pin 8 USING YOUR SEWING MACHINE 9 Power supply precautions 9 Power supply 9 Foot ... topics 61 Upper thread tightened up the lower thread 19 REPLACING THE NEEDLE 20 Needle precautions 20 Needle types and their uses 20 Checking the needle 20 Replacing the needle 21 Sewing with character stitches 50 4. APPENDIX 52 STITCH SETTINGS 52 Utility...

Operation Manual
Page 6
... for example, at the beginning of the presser foot holder is on machine.) SA156 SFB: XA5539-151 10 Needle set XC8834-021 11 Twin needle 131096-121 12 Ball point needle (gold colored) XD0360-021 13 Cleaning brush X59476-051 14 Disc-shaped screwdriver XC1074-051 15 Spool cap ... on the machine rating plate. • The screw of sewing thick fabrics. (Page 29) 1 Black button 10. 11. 75/11 1 needle 90/14 1 needle 100/16 1 needle 12. 13. 14. 90/14 1 needle 15. 16. 17. 18. 19. 4 I " X59370-021 6 Blind stitch foot "R" XE2650-001 7 Button fitting foot "M" XE2137-001...
... for example, at the beginning of the presser foot holder is on machine.) SA156 SFB: XA5539-151 10 Needle set XC8834-021 11 Twin needle 131096-121 12 Ball point needle (gold colored) XD0360-021 13 Cleaning brush X59476-051 14 Disc-shaped screwdriver XC1074-051 15 Spool cap ... on the machine rating plate. • The screw of sewing thick fabrics. (Page 29) 1 Black button 10. 11. 75/11 1 needle 90/14 1 needle 100/16 1 needle 12. 13. 14. 90/14 1 needle 15. 16. 17. 18. 19. 4 I " X59370-021 6 Blind stitch foot "R" XE2650-001 7 Button fitting foot "M" XE2137-001...

Operation Manual
Page 8
...pressure consistently on the fabric as the sewing takes place. B Main power and sewing light switch (page 9) C Jack/socket connector (page 9) 6 1 Needle threader (for models equipped with the quickset bobbin) You can start sewing without pulling up lever (page 17) 5 Thread cutter (page 27) 6 Flat ...bed attachment with the needle threader) (page 18) 2 Buttonhole lever (page 35 and 43) 3 Presser foot holder The presser foot is used . The main parts D Foot controller ...
...pressure consistently on the fabric as the sewing takes place. B Main power and sewing light switch (page 9) C Jack/socket connector (page 9) 6 1 Needle threader (for models equipped with the quickset bobbin) You can start sewing without pulling up lever (page 17) 5 Thread cutter (page 27) 6 Flat ...bed attachment with the needle threader) (page 18) 2 Buttonhole lever (page 35 and 43) 3 Presser foot holder The presser foot is used . The main parts D Foot controller ...

Operation Manual
Page 9
...side to increase the stitch length. 4 Stitch width adjustment key Press the "-" side to adjust the sewing speed. When sewing is stopped, the needle is lowered in the opposite direction. The display location of the selected stitch (1), the presser foot type to sew in the fabric. Reverse stitches ... the "-" side to reduce the stitch length; For details, refer to "Starting to sew" (page 26). 3 Needle position button Press this button to raise or lower the needle. 4 Sewing speed controller Slide this key to sew reverse stitches. This manual uses the illustrations of sewing while the ...
...side to increase the stitch length. 4 Stitch width adjustment key Press the "-" side to adjust the sewing speed. When sewing is stopped, the needle is lowered in the opposite direction. The display location of the selected stitch (1), the presser foot type to sew in the fabric. Reverse stitches ... the "-" side to reduce the stitch length; For details, refer to "Starting to sew" (page 26). 3 Needle position button Press this button to raise or lower the needle. 4 Sewing speed controller Slide this key to sew reverse stitches. This manual uses the illustrations of sewing while the ...

Operation Manual
Page 11
... . WARNING • Use only regular household electricity for a long period of electric shock, this is intended to heat. Do not place heavy objects on , the needle and the feed dogs will make sound when they move; These things may damage the cord, or lead to fire or electric shock. • Do...
... . WARNING • Use only regular household electricity for a long period of electric shock, this is intended to heat. Do not place heavy objects on , the needle and the feed dogs will make sound when they move; These things may damage the cord, or lead to fire or electric shock. • Do...

Operation Manual
Page 12
... in, the start/ stop button cannot be used to select the desired sewing speed. Instead, the machine can be changed to the center needle position. CAUTION • Do not allow pieces of (1). Sewing speed controller (for models equipped with the start/stop button) 1 Slide the... sewing speed controller to start sewing (only for models equipped with the start/ stop button). XX The needle stop position to the raised position. Memo • The specified initial needle position is maintained after the machine is stopped. 1 Turn off the sewing machine. 2 Holding the "-" side ...
... in, the start/ stop button cannot be used to select the desired sewing speed. Instead, the machine can be changed to the center needle position. CAUTION • Do not allow pieces of (1). Sewing speed controller (for models equipped with the start/stop button) 1 Slide the... sewing speed controller to start sewing (only for models equipped with the start/ stop button). XX The needle stop position to the raised position. Memo • The specified initial needle position is maintained after the machine is stopped. 1 Turn off the sewing machine. 2 Holding the "-" side ...

Operation Manual
Page 15
...times. 13 CAUTION • Not winding the bobbin properly may cause the thread tension to loosen, and may tangle around the bobbin and cause the needle to break. 7 (For models equipped with the fast bobbin winding system 1 Place the bobbin on the bobbin winder shaft so that the spring on... foot controller is plugged in, the start/stop button). If you do not cut the thread completely, and the bobbin is not a malfunction. • The needle bar does not move when you slide the 1 bobbin winding shaft to the right. 1 1 1 cm (3/8 inch) CAUTION • Make sure you follow the ...
...times. 13 CAUTION • Not winding the bobbin properly may cause the thread tension to loosen, and may tangle around the bobbin and cause the needle to break. 7 (For models equipped with the fast bobbin winding system 1 Place the bobbin on the bobbin winder shaft so that the spring on... foot controller is plugged in, the start/stop button). If you do not cut the thread completely, and the bobbin is not a malfunction. • The needle bar does not move when you slide the 1 bobbin winding shaft to the right. 1 1 1 cm (3/8 inch) CAUTION • Make sure you follow the ...

Operation Manual
Page 16
...shaft to sew, you accidentally step on the sewing machine. 7 Press the foot controller or press to fast). 10 (For models equipped with the needle position button), and raise the presser foot lever. 2 Turn off while threading the machine. Be sure to thread the machine as described. KNOWING YOUR... the slit in the bobbin winder seat. 1 Slit (with built-in cutter) XX The thread is cut the thread as indicated. 1 Raise the needle to start sewing (only for models equipped with the sewing speed controller) Slide the sewing speed controller back to a suitable length. Memo • When...
...shaft to sew, you accidentally step on the sewing machine. 7 Press the foot controller or press to fast). 10 (For models equipped with the needle position button), and raise the presser foot lever. 2 Turn off while threading the machine. Be sure to thread the machine as described. KNOWING YOUR... the slit in the bobbin winder seat. 1 Slit (with built-in cutter) XX The thread is cut the thread as indicated. 1 Raise the needle to start sewing (only for models equipped with the sewing speed controller) Slide the sewing speed controller back to a suitable length. Memo • When...

Operation Manual
Page 17
... unrolls in the right direction. If the thread unrolls in the wrong direction, it may cause the thread tension to be incorrect or break the needle. 5 While lightly holding down with your finger, and then pass the thread through the slit (1 and 2). • At this time, check that the end of... set bobbin Memo • The direction for feeding the bobbin thread is not correctly inserted, it may cause incorrect thread tension (page 27). 1 Raise the needle to cut it may cause the thread tension to thread the machine as shown by the line in the wrong direction, it with the cutter...
... unrolls in the right direction. If the thread unrolls in the wrong direction, it may cause the thread tension to be incorrect or break the needle. 5 While lightly holding down with your finger, and then pass the thread through the slit (1 and 2). • At this time, check that the end of... set bobbin Memo • The direction for feeding the bobbin thread is not correctly inserted, it may cause incorrect thread tension (page 27). 1 Raise the needle to cut it may cause the thread tension to thread the machine as shown by the line in the wrong direction, it with the cutter...

Operation Manual
Page 18
... tension (page 27). For details on the spool pin lever to sew, follow the instructions. Upper threading Set the upper thread and thread the needle. • For details on the wheel points up the spool pin. Memo • You can begin sewing immediately without drawing up the lower ...thread" (page 19). or 1 Turn the handwheel so that the mark on the needle threader, see page 18. 1 Presser foot lever CAUTION • If the presser foot is not correctly raised, the sewing machine cannot be threaded correctly....
... tension (page 27). For details on the spool pin lever to sew, follow the instructions. Upper threading Set the upper thread and thread the needle. • For details on the wheel points up the spool pin. Memo • You can begin sewing immediately without drawing up the lower ...thread" (page 19). or 1 Turn the handwheel so that the mark on the needle threader, see page 18. 1 Presser foot lever CAUTION • If the presser foot is not correctly raised, the sewing machine cannot be threaded correctly....

Operation Manual
Page 20
... Hook 2 Thread 18 If you accidentally step on the foot controller and the machine starts to sew, you could be injured. 11 Thread the needle from front to back and pull out about 5 cm (2 inches) of the procedure in "Upper threading". 2 Lower the presser foot lever. 3 While... lowering the needle threader lever, hook the thread onto the guide. 1 Needle holder 2 Needle threader lever 3 Guide 4 Fully lower the needle threader lever. 1 5 cm (2 inches) Note • If the thread take-up lever is not raised, ...
... Hook 2 Thread 18 If you accidentally step on the foot controller and the machine starts to sew, you could be injured. 11 Thread the needle from front to back and pull out about 5 cm (2 inches) of the procedure in "Upper threading". 2 Lower the presser foot lever. 3 While... lowering the needle threader lever, hook the thread onto the guide. 1 Needle holder 2 Needle threader lever 3 Guide 4 Fully lower the needle threader lever. 1 5 cm (2 inches) Note • If the thread take-up lever is not raised, ...

Operation Manual
Page 21
... end of the upper thread. 1 Upper thread 2 Lower thread ■■For models equipped with the quick-set bobbin You can draw up . 2 Press the Needle position button (for the models equipped with this button). 3 Pull on the thread with force or it . 1 Upper thread 2 While holding the end of the... upper thread, raise the needle in steps 1 to draw up the lower thread. 1 Upper thread 2 Lower thread 4 Pull out about 10 cm (4 inches) of both threads and pull them ...
... end of the upper thread. 1 Upper thread 2 Lower thread ■■For models equipped with the quick-set bobbin You can draw up . 2 Press the Needle position button (for the models equipped with this button). 3 Pull on the thread with force or it . 1 Upper thread 2 While holding the end of the... upper thread, raise the needle in steps 1 to draw up the lower thread. 1 Upper thread 2 Lower thread 4 Pull out about 10 cm (4 inches) of both threads and pull them ...

Operation Manual
Page 22
...3 5 Not even 20 Failure to 75/11), the needle may bend the needle or damage the machine. • Never use home sewing machine needles. If the combination of the needle. KNOWING YOUR SEWING MACHINE REPLACING THE NEEDLE This section provides information on stretch fabrics or fabrics where ... • Only use bent needles. and the higher the needle number, the thicker the needle. ■■Ball point needle Use the ball point needle when sewing on sewing machine needles. Fabric Type/ Application Thread Type Size Size of Needle Medium weight fabrics Broadcloth Taffeta ...
...3 5 Not even 20 Failure to 75/11), the needle may bend the needle or damage the machine. • Never use home sewing machine needles. If the combination of the needle. KNOWING YOUR SEWING MACHINE REPLACING THE NEEDLE This section provides information on stretch fabrics or fabrics where ... • Only use bent needles. and the higher the needle number, the thicker the needle. ■■Ball point needle Use the ball point needle when sewing on sewing machine needles. Fabric Type/ Application Thread Type Size Size of Needle Medium weight fabrics Broadcloth Taffeta ...

Operation Manual
Page 23
... too much . or KNOWING YOUR SEWING MACHINE • Do not apply strong force when loosening or tightening the needle clamp screw, otherwise certain parts of the machine, insert the needle until it touches the needle stopper. 1 Needle stopper 6 Tighten the needle clamp screw by turning it clockwise. 1 Presser foot lever CAUTION • Before replacing the...
... too much . or KNOWING YOUR SEWING MACHINE • Do not apply strong force when loosening or tightening the needle clamp screw, otherwise certain parts of the machine, insert the needle until it touches the needle stopper. 1 Needle stopper 6 Tighten the needle clamp screw by turning it clockwise. 1 Presser foot lever CAUTION • Before replacing the...


