

Users Manual - English
Page 10
... selected stitch, it will be possible to feed the needle into the punched hole again, and then lower the presser foot lever. Raise the needle and presser foot. 9 Memo We recommend an upper thread tension that there is higher than the standard setting. For details on the machine. l Note • Before sewing, check that is enough thread in the bobbin. p CAUTION • Before sewing, make sure the automatic thread cutting and automatic reinforcement/reverse stitching have...
... selected stitch, it will be possible to feed the needle into the punched hole again, and then lower the presser foot lever. Raise the needle and presser foot. 9 Memo We recommend an upper thread tension that there is higher than the standard setting. For details on the machine. l Note • Before sewing, check that is enough thread in the bobbin. p CAUTION • Before sewing, make sure the automatic thread cutting and automatic reinforcement/reverse stitching have...

Users Manual - English
Page 6
... operation manual when replacing or installing any other moving parts. 2. Do not touch the handwheel, thread take-up lever, needle, or other parts • A power failure occurs during use • Maintaining the machine • Leaving the machine unattended. 3. Do not use extension cords. For additional product information and updates, visit our web site at www.brother.com The contents of this manual and specifications of the operation manual to inspect and adjust the machine...
... operation manual when replacing or installing any other moving parts. 2. Do not touch the handwheel, thread take-up lever, needle, or other parts • A power failure occurs during use • Maintaining the machine • Leaving the machine unattended. 3. Do not use extension cords. For additional product information and updates, visit our web site at www.brother.com The contents of this manual and specifications of the operation manual to inspect and adjust the machine...

Users Manual - English
Page 8
... Button Sewing 86 Eyelets 87 Chapter 1 Getting Ready 15 TURNING THE MACHINE ON/OFF 16 LCD SCREEN 17 Multi-Directional Sewing (Straight Stitch and Zigzag Stitch 88 Zipper Insertion 89 Using the Machine Setting Mode Key 20 Chapter 4 Character/Decorative Stitches 93 Using the Machine Operation Mode Key 22 Using the Pattern Explanation Key 23 LOWER/UPPER THREADING 24 Winding the Bobbin 24 Setting the Bobbin 27 Pulling Up the Bobbin Thread 28 Upper Threading 29 Using the Twin Needle 32 CHANGING THE PRESSER FOOT 34 Removing the Presser Foot...
... Button Sewing 86 Eyelets 87 Chapter 1 Getting Ready 15 TURNING THE MACHINE ON/OFF 16 LCD SCREEN 17 Multi-Directional Sewing (Straight Stitch and Zigzag Stitch 88 Zipper Insertion 89 Using the Machine Setting Mode Key 20 Chapter 4 Character/Decorative Stitches 93 Using the Machine Operation Mode Key 22 Using the Pattern Explanation Key 23 LOWER/UPPER THREADING 24 Winding the Bobbin 24 Setting the Bobbin 27 Pulling Up the Bobbin Thread 28 Upper Threading 29 Using the Twin Needle 32 CHANGING THE PRESSER FOOT 34 Removing the Presser Foot...

Users Manual - English
Page 12
...clean the bobbin case and race. a Carriage The carriage moves the embroidery frame automatically when embroidering. Attach the appropriate presser foot for the selected stitch. g Needle plate cover Remove the needle plate cover to attach the embroidery unit. h Needle plate The needle plate is sewn. j Needle clamp screw Use the needle clamp screw to help sew straight seams. i Needle bar thread guide Pass the upper thread through the needle bar thread guide. d Presser foot The presser foot consistently applies pressure to the presser foot holder. NAMES OF MACHINE PARTS...
...clean the bobbin case and race. a Carriage The carriage moves the embroidery frame automatically when embroidering. Attach the appropriate presser foot for the selected stitch. g Needle plate cover Remove the needle plate cover to attach the embroidery unit. h Needle plate The needle plate is sewn. j Needle clamp screw Use the needle clamp screw to help sew straight seams. i Needle bar thread guide Pass the upper thread through the needle bar thread guide. d Presser foot The presser foot consistently applies pressure to the presser foot holder. NAMES OF MACHINE PARTS...

Users Manual - English
Page 13
... fabric. c "Needle Position" button Use this button to lower the presser foot and apply pressure to change the sewing direction or for detailed sewing in a different color depending on the machine's operating condition. Otherwise, the needle may break, the threads may occur. Open the flat bed attachment as shown below. Slide the controller to the left or right to sew or is pressed, the machine sews a few stitches at a low speed, then begins sewing at higher speeds. Operation Buttons NAMES OF MACHINE PARTS...
... fabric. c "Needle Position" button Use this button to lower the presser foot and apply pressure to change the sewing direction or for detailed sewing in a different color depending on the machine's operating condition. Otherwise, the needle may break, the threads may occur. Open the flat bed attachment as shown below. Slide the controller to the left or right to sew or is pressed, the machine sews a few stitches at a low speed, then begins sewing at higher speeds. Operation Buttons NAMES OF MACHINE PARTS...

Users Manual - English
Page 15
... controller: Model S This foot controller can be included. Part Name U.S.A./ Canada Others 1 Embroidery foot "U" XD0313-051 2 Buttonhole foot "A" X57789-151 3 Overcasting foot "G" XC3098-051 4 Monogramming foot "N" X53840-351 5 Zipper foot "I" X59370-051 6 Zigzag foot "J" (on machine) XC3021-051 7 Blind stitch foot "R" X56409-051 8 Button fitting foot "M" 130489-001 9 Walking foot SA140 F033N:XC2214-102 10 Side cutter foot SA177 F054:XC3879-002 11 Free-motion quilting foot SA129 F005N:XC1948-002 12 Straight stitch foot XD0826-051 13 Straight stitch needle plate...
... controller: Model S This foot controller can be included. Part Name U.S.A./ Canada Others 1 Embroidery foot "U" XD0313-051 2 Buttonhole foot "A" X57789-151 3 Overcasting foot "G" XC3098-051 4 Monogramming foot "N" X53840-351 5 Zipper foot "I" X59370-051 6 Zigzag foot "J" (on machine) XC3021-051 7 Blind stitch foot "R" X56409-051 8 Button fitting foot "M" 130489-001 9 Walking foot SA140 F033N:XC2214-102 10 Side cutter foot SA177 F054:XC3879-002 11 Free-motion quilting foot SA129 F005N:XC1948-002 12 Straight stitch foot XD0826-051 13 Straight stitch needle plate...

Users Manual - English
Page 20
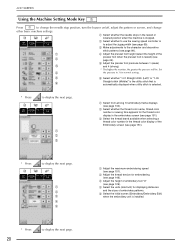
... and operation buttons so that is not displayed. When operations are displayed, the screen for using the machine. Page 20 Machine operation Press this key to unlock the keys and buttons. Press this key to select a straight stitch, zigzag stitch, buttonhole, blind hem stitch, or other operations for the presser foot/needle replacement mode is displayed. a b c e f d g h i j k ) to see descriptions for upper threading, winding the bobbin, 22 mode key changing the presser foot, and other stitch (utility stitch) commonly used in garment sewing...
... and operation buttons so that is not displayed. When operations are displayed, the screen for using the machine. Page 20 Machine operation Press this key to unlock the keys and buttons. Press this key to select a straight stitch, zigzag stitch, buttonhole, blind hem stitch, or other operations for the presser foot/needle replacement mode is displayed. a b c e f d g h i j k ) to see descriptions for upper threading, winding the bobbin, 22 mode key changing the presser foot, and other stitch (utility stitch) commonly used in garment sewing...
Users Manual - English
Page 22
... automatically displayed when utility stitch is installed. * Press 20 to adjust the zigzag width (see page 151). b Select whether the thread color name, thread color number or sewing time appears for embroidering (see page 99). a b c a Select from among 10 embroidery frame displays (see page 43). Set d the pressure to 3 for displaying distances and the sizes of embroidery foot "U" (see page 151). * Press to the character and decorative stitch patterns...
... automatically displayed when utility stitch is installed. * Press 20 to adjust the zigzag width (see page 151). b Select whether the thread color name, thread color number or sewing time appears for embroidering (see page 99). a b c a Select from among 10 embroidery frame displays (see page 43). Set d the pressure to 3 for displaying distances and the sizes of embroidery foot "U" (see page 151). * Press to the character and decorative stitch patterns...

Users Manual - English
Page 29
... the thread tension will be incorrect. e Lightly hold down the bobbin with your right hand, and then, while slightly pulling the thread with your left hand. If you wish to hold down the bobbin with your finger and unwind the bobbin thread correctly. a LOWER/UPPER THREADING a Press the "Presser Foot Lifter" button to the right, and then remove the bobbin cover. 1 a b Getting Ready a Thread guide h Pass the thread under the pin...
... the thread tension will be incorrect. e Lightly hold down the bobbin with your right hand, and then, while slightly pulling the thread with your left hand. If you wish to hold down the bobbin with your finger and unwind the bobbin thread correctly. a LOWER/UPPER THREADING a Press the "Presser Foot Lifter" button to the right, and then remove the bobbin cover. 1 a b Getting Ready a Thread guide h Pass the thread under the pin...

Users Manual - English
Page 34
... the machine is in single needle mode could break and cause injury. • When using the twin needle. a Press , and then install the twin needle (see "Upper Threading" on page 35). a a Needle bar thread guide Note The needle threader cannot be used , interesting patterns can be used with a different color of thread on the left hand, and then pass the thread through the thread guide. * Do not pass the thread through the bobbin winding pretension disk and guide. b c a Spool...
... the machine is in single needle mode could break and cause injury. • When using the twin needle. a Press , and then install the twin needle (see "Upper Threading" on page 35). a a Needle bar thread guide Note The needle threader cannot be used , interesting patterns can be used with a different color of thread on the left hand, and then pass the thread through the thread guide. * Do not pass the thread through the bobbin winding pretension disk and guide. b c a Spool...

Users Manual - English
Page 35
... the fabric. 33 l Press the "Start/Stop" button after a stitch is in the illustration. 1 Getting Ready a a Single needle/twin needle setting → appears. a Needle bar thread guide Note The needle threader cannot be used . i Press screen. , or press in damage. Manually pass the thread through the lower k Press to break, resulting in the j Select a stitch pattern. a CAUTION • Be sure to the machine may result. Note If appears as after lowering the presser foot lever. Using the twin needle...
... the fabric. 33 l Press the "Start/Stop" button after a stitch is in the illustration. 1 Getting Ready a a Single needle/twin needle setting → appears. a Needle bar thread guide Note The needle threader cannot be used . i Press screen. , or press in damage. Manually pass the thread through the lower k Press to break, resulting in the j Select a stitch pattern. a CAUTION • Be sure to the machine may result. Note If appears as after lowering the presser foot lever. Using the twin needle...

Users Manual - English
Page 43
... tangle the thread or break the needle and damage the machine. • Do not press the "Thread Cutter" button when there is almost empty. However, if the "Start/Stop" button is being used when embroidering. → The needle automatically stops in the raised position. a Pull the retractable cord out from the foot controller to start and stop sewing. The thread may tangle, possibly resulting in the foot controller. Memo The speed set in the...
... tangle the thread or break the needle and damage the machine. • Do not press the "Thread Cutter" button when there is almost empty. However, if the "Start/Stop" button is being used when embroidering. → The needle automatically stops in the raised position. a Pull the retractable cord out from the foot controller to start and stop sewing. The thread may tangle, possibly resulting in the foot controller. Memo The speed set in the...

Users Manual - English
Page 70
... machine quilt needles and threads are also available for the upper thread. c Turn the appliqué over the seam allowance using an iron. SEWING THE STITCHES ■ Quilting Sewing together the quilt top, batting, and backing is securely basted before beginning to sew. The walking foot has a set between the fork, and position the walking foot on the back of the presser foot holder to remove the presser foot holder. ac b d a Operation lever b Needle clamp screw c Fork d Presser foot bar d Lower the presser foot lever. c Set the operation lever of the presser foot...
... machine quilt needles and threads are also available for the upper thread. c Turn the appliqué over the seam allowance using an iron. SEWING THE STITCHES ■ Quilting Sewing together the quilt top, batting, and backing is securely basted before beginning to sew. The walking foot has a set between the fork, and position the walking foot on the back of the presser foot holder to remove the presser foot holder. ac b d a Operation lever b Needle clamp screw c Fork d Presser foot bar d Lower the presser foot lever. c Set the operation lever of the presser foot...

Users Manual - English
Page 84
... excess. * After using the seam ripper to the width of the fabric. a Hook the gimp thread onto the back of buttonhole foot "A", and then pull the ends of the button, and then set the button holder plate to the wrong side of the gimp thread. Pass the thread ends through the grooves at 25 mm (approx. 1 inch). a b c d a a Upper thread b Lower the presser foot lever, and then start sewing. * Set the stitch width to cut...
... excess. * After using the seam ripper to the width of the fabric. a Hook the gimp thread onto the back of buttonhole foot "A", and then pull the ends of the button, and then set the button holder plate to the wrong side of the gimp thread. Pass the thread ends through the grooves at 25 mm (approx. 1 inch). a b c d a a Upper thread b Lower the presser foot lever, and then start sewing. * Set the stitch width to cut...

Users Manual - English
Page 121
... the Thread Breaks During Sewing 146 Restarting from the Beginning 147 Automatically Resuming Embroidery When the Power Goes Off 147 Manually Resuming Embroidery After Turning Off the Power 148 Adjusting the Thread Tension 149 ■ Correct Thread Tension 149 ■ If the Upper Thread Is Too Tight 150 ■ If the Upper Thread Is Too Loose 150 Automatic Thread Cutting (End Color Trim 150 Changing the Embroidering Speed 151 Changing the Thread Color Display 151 USING THE...
... the Thread Breaks During Sewing 146 Restarting from the Beginning 147 Automatically Resuming Embroidery When the Power Goes Off 147 Manually Resuming Embroidery After Turning Off the Power 148 Adjusting the Thread Tension 149 ■ Correct Thread Tension 149 ■ If the Upper Thread Is Too Tight 150 ■ If the Upper Thread Is Too Loose 150 Automatic Thread Cutting (End Color Trim 150 Changing the Embroidering Speed 151 Changing the Thread Color Display 151 USING THE...

Users Manual - English
Page 200
... a new one . The needle is installed incorrectly. Replace the needle plate, or consult your authorized dealer. There are scratches around the hole in the presser foot. Reset the bobbin correctly. The spool is incorrect. Check the procedure for sewing lightweight Shorten the stitch length. The upper or bobbin threading is installed incorrectly. Replace the needle. fabrics. Remove the knots and tangles. Use scissors, etc., to cut the tangled thread and remove it from the race (bobbin case), etc. Bobbin...
... a new one . The needle is installed incorrectly. Replace the needle plate, or consult your authorized dealer. There are scratches around the hole in the presser foot. Reset the bobbin correctly. The spool is incorrect. Check the procedure for sewing lightweight Shorten the stitch length. The upper or bobbin threading is installed incorrectly. Replace the needle. fabrics. Remove the knots and tangles. Use scissors, etc., to cut the tangled thread and remove it from the race (bobbin case), etc. Bobbin...

Users Manual - English
Page 201
... fabric is incorrectly set incorrectly. for threading the machine 29 and rethread it from the race (bobbin case), etc. Replace the race (bobbin case), or consult your authorized dealer for threading the machine 29 and rethread it does not get caught or snagged. Attach the correct presser foot. 211 sew out correctly Pattern adjustment settings were set Use the embroidery needle plate cover. Adjust the thread tension. 45 Embroidery pattern does The thread is hanging off the table while 141 embroidering, the embroidery...
... fabric is incorrectly set incorrectly. for threading the machine 29 and rethread it from the race (bobbin case), etc. Replace the race (bobbin case), or consult your authorized dealer for threading the machine 29 and rethread it does not get caught or snagged. Attach the correct presser foot. 211 sew out correctly Pattern adjustment settings were set Use the embroidery needle plate cover. Adjust the thread tension. 45 Embroidery pattern does The thread is hanging off the table while 141 embroidering, the embroidery...

Users Manual - English
Page 202
... the hole in the presser foot. At these times, the machine will not operate properly. The LCD display is difficult The LCD contrast is tangled. Replace the needle. Select a pattern. The main power switch is connected. The embroidery frame was attached before the upper threading is installed incorrectly. Lengthen the stitch length. Replace the needle with a thread detection device. Adjust the thread tension. Turn the main power to on the race (bobbin case). Check the table of fabric...
... the hole in the presser foot. At these times, the machine will not operate properly. The LCD display is difficult The LCD contrast is tangled. Replace the needle. Select a pattern. The main power switch is connected. The embroidery frame was attached before the upper threading is installed incorrectly. Lengthen the stitch length. Replace the needle with a thread detection device. Adjust the thread tension. Turn the main power to on the race (bobbin case). Check the table of fabric...

Users Manual - English
Page 219
... 135 171, 181, 187 , attaching elastic tape 62 76 automatic reverse/reinforcement stitching 46 automatic thread cutting key 46 B bar tacks 84 basting 57 blind hem stitch 71 block move key 189 bobbin 24 27, 28 , bobbin cover 10 27 bobbin holder 25 bobbin thread pulling up 28 replacing 145 setting 27 winding 24 bobbin winder 9 bobbin winding pretension disk and guide 9, 25, 27 button sewing 86 buttonhole lever 10, 81, 84 buttonhole stitches 79 C carriage 10 character/decorative stitches adjusting 98 combining 104 editing...
... 135 171, 181, 187 , attaching elastic tape 62 76 automatic reverse/reinforcement stitching 46 automatic thread cutting key 46 B bar tacks 84 basting 57 blind hem stitch 71 block move key 189 bobbin 24 27, 28 , bobbin cover 10 27 bobbin holder 25 bobbin thread pulling up 28 replacing 145 setting 27 winding 24 bobbin winder 9 bobbin winding pretension disk and guide 9, 25, 27 button sewing 86 buttonhole lever 10, 81, 84 buttonhole stitches 79 C carriage 10 character/decorative stitches adjusting 98 combining 104 editing...

Users Manual - English
Page 220
... fabric/thread/needle combinations 37 replacing 35 settings 17 twin needle 32 needle bar thread guide 10 30, 32 needle clamp screw 10 , needle mode selection key (single/twin 32 33 needle plate 10 , needle plate cover 10 194 needle position 55 needle position button 11 , needle threader lever 9 31 O , operation buttons 9 11 options 14 overcasting 61 62, 63 P patchwork 62 pattern explanation key 23 pattern selection key 173 , pattern selection screen 124 167 piecing 67 218 pin tucks 60 point delete key 187 power cord 16 presser foot...
... fabric/thread/needle combinations 37 replacing 35 settings 17 twin needle 32 needle bar thread guide 10 30, 32 needle clamp screw 10 , needle mode selection key (single/twin 32 33 needle plate 10 , needle plate cover 10 194 needle position 55 needle position button 11 , needle threader lever 9 31 O , operation buttons 9 11 options 14 overcasting 61 62, 63 P patchwork 62 pattern explanation key 23 pattern selection key 173 , pattern selection screen 124 167 piecing 67 218 pin tucks 60 point delete key 187 power cord 16 presser foot...


